机器学习笔记7:TensorFlow进阶之利用CNN训练MNIST
机器学习笔记7:TensorFlow进阶之利用CNN训练MNIST
本文的理论基础部分以及参考代码源于TensorFlow中文社区以及aliceyangxi1987的博客。
代码分析及调试
在aliceyangxi1987的博客中,基本的代码思路与中文社区中的思路基本一致,不同的地方在于,博客中的代码将准确率计算的步骤进行封装成一个函数也就是compute_accuracy()函数。整体代码如下:
# coding=utf-8

import tensorflow as tf
from tensorflow.examples.tutorials.mnist import input_data
# number 1 to 10 data
mnist = input_data.read_data_sets('MNIST_data', one_hot=True)

def compute_accuracy(v_xs, v_ys):
    global prediction
    y_pre = sess.run(prediction, feed_dict={xs: v_xs, keep_prob: 1})
    correct_prediction = tf.equal(tf.argmax(y_pre,1), tf.argmax(v_ys,1))
    accuracy = tf.reduce_mean(tf.cast(correct_prediction, tf.float32))
    result = sess.run(accuracy, feed_dict={xs: v_xs, ys: v_ys, keep_prob: 1})
    return result

# 产生随机变量,符合 normal 分布
# 传递 shape 就可以返回weight和bias的变量
def weight_variable(shape):
    initial = tf.truncated_normal(shape, stddev=0.1)
    return tf.Variable(initial)

def bias_variable(shape):
    initial = tf.constant(0.1, shape=shape)
    return tf.Variable(initial)

# 定义2维的 convolutional 图层
def conv2d(x, W):
    # stride [1, x_movement, y_movement, 1]
    # Must have strides[0] = strides[3] = 1
    # strides 就是跨多大步抽取信息
    return tf.nn.conv2d(x, W, strides=[1, 1, 1, 1], padding='SAME')

# 定义 pooling 图层
def max_pool_2x2(x):
    # stride [1, x_movement, y_movement, 1]
    # 用pooling对付跨步大丢失信息问题
    return tf.nn.max_pool(x, ksize=[1,2,2,1], strides=[1,2,2,1], padding='SAME')

# define placeholder for inputs to network
xs = tf.placeholder(tf.float32, [None, 784])        # 784=28x28
ys = tf.placeholder(tf.float32, [None, 10])
keep_prob = tf.placeholder(tf.float32)
x_image = tf.reshape(xs, [-1, 28, 28, 1])           # 最后一个1表示数据是黑白的
# print(x_image.shape)  # [n_samples, 28,28,1]

## 1. conv1 layer ##
#  把x_image的厚度1加厚变成了32
W_conv1 = weight_variable([5, 5, 1, 32])                # patch 5x5, in size 1, out size 32
b_conv1 = bias_variable([32])
# 构建第一个convolutional层,外面再加一个非线性化的处理relu
h_conv1 = tf.nn.relu(conv2d(x_image, W_conv1) + b_conv1)            # output size 28x28x32
# 经过pooling后,长宽缩小为14x14
h_pool1 = max_pool_2x2(h_conv1)                                     # output size 14x14x32

## 2. conv2 layer ##
# 把厚度32加厚变成了64
W_conv2 = weight_variable([5,5, 32, 64])                # patch 5x5, in size 32, out size 64
b_conv2 = bias_variable([64])
# 构建第二个convolutional层
h_conv2 = tf.nn.relu(conv2d(h_pool1, W_conv2) + b_conv2)            # output size 14x14x64
# 经过pooling后,长宽缩小为7x7
h_pool2 = max_pool_2x2(h_conv2)                                     # output size 7x7x64

## 3. func1 layer ##
# 飞的更高变成1024
W_fc1 = weight_variable([7*7*64, 1024])
b_fc1 = bias_variable([1024])
# [n_samples, 7, 7, 64] ->> [n_samples, 7*7*64]
# 把pooling后的结果变平
h_pool2_flat = tf.reshape(h_pool2, [-1, 7*7*64])
h_fc1 = tf.nn.relu(tf.matmul(h_pool2_flat, W_fc1) + b_fc1)
h_fc1_drop = tf.nn.dropout(h_fc1, keep_prob)

## 4. func2 layer ##
# 最后一层,输入1024,输出size 10,用 softmax 计算概率进行分类的处理
W_fc2 = weight_variable([1024, 10])
b_fc2 = bias_variable([10])
prediction = tf.nn.softmax(tf.matmul(h_fc1_drop, W_fc2) + b_fc2)


# the error between prediction and real data
cross_entropy = tf.reduce_mean(-tf.reduce_sum(ys * tf.log(prediction),
                                              reduction_indices=[1]))       # loss
train_step = tf.train.AdamOptimizer(1e-4).minimize(cross_entropy)

sess = tf.Session()
# important step
sess.run(tf.initialize_all_variables())

for i in range(1000):
    batch_xs, batch_ys = mnist.train.next_batch(100)
    sess.run(train_step, feed_dict={xs: batch_xs, ys: batch_ys, keep_prob: 0.5})
    if i % 50 == 0:
        print(compute_accuracy(
            mnist.test.images, mnist.test.labels))
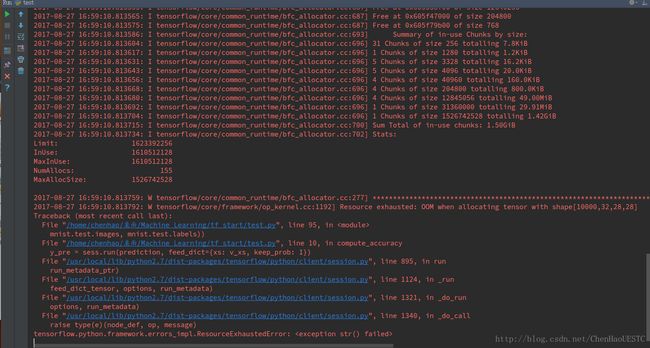
运行结果如下,会产生报错信息:
tensorflow.python.framework.errors_impl.ResourceExhaustedError: < exception str() failed>

在查找过后,发现是因为数据集太大的原因,导致在运行的过程中,内存不足的原因。因此要在完成训练过后,对于数据集的应用时,可以将数据集进行分块,分别预测。其他人可能会在显卡强劲的情况下直接运行出结果。
根据TensorFlow中文社区中贴出的代码,我对其进行改写,没有使用封装好的函数,并在使用模型对结果进行测试的时候,将测试集进行分块测试,则可以完成测试。
# coding=utf-8

'''
Author: chenhao
Description: MINIST & CNN
Date: August 24 , 2017
经过修改后可以完整运行的
'''

import tensorflow as tf
from tensorflow.examples.tutorials.mnist import input_data
# number 1 to 10 data
mnist = input_data.read_data_sets('MNIST_data', one_hot=True)

def compute_accuracy(v_xs, v_ys):
    global prediction
    y_pre = sess.run(prediction, feed_dict={xs: v_xs, keep_prob: 1})
    correct_prediction = tf.equal(tf.argmax(y_pre,1), tf.argmax(v_ys,1))
    accuracy = tf.reduce_mean(tf.cast(correct_prediction, tf.float32))
    result = sess.run(accuracy, feed_dict={xs: v_xs, ys: v_ys, keep_prob: 1})
    return result

# 产生随机变量,符合 normal 分布
# 传递 shape 就可以返回weight和bias的变量
def weight_variable(shape):
    initial = tf.truncated_normal(shape, stddev=0.1)
    return tf.Variable(initial)

def bias_variable(shape):
    initial = tf.constant(0.1, shape=shape)
    return tf.Variable(initial)

# 定义2维的 convolutional 图层
def conv2d(x, W):
    # stride [1, x_movement, y_movement, 1]
    # Must have strides[0] = strides[3] = 1
    # strides 就是跨多大步抽取信息
    return tf.nn.conv2d(x, W, strides=[1, 1, 1, 1], padding='SAME')

# 定义 pooling 图层
def max_pool_2x2(x):
    # stride [1, x_movement, y_movement, 1]
    # 用pooling对付跨步大丢失信息问题
    return tf.nn.max_pool(x, ksize=[1,2,2,1], strides=[1,2,2,1], padding='SAME')

# define placeholder for inputs to network
xs = tf.placeholder(tf.float32, [None, 784])        # 784=28x28
ys = tf.placeholder(tf.float32, [None, 10])
keep_prob = tf.placeholder("float")
x_image = tf.reshape(xs, [-1, 28, 28, 1])           # 最后一个1表示数据是黑白的
# print(x_image.shape)  # [n_samples, 28,28,1]

## 1. conv1 layer ##
#  把x_image的厚度1加厚变成了32
W_conv1 = weight_variable([5, 5, 1, 32])                # patch 5x5, in size 1, out size 32
b_conv1 = bias_variable([32])
# 构建第一个convolutional层,外面再加一个非线性化的处理relu
h_conv1 = tf.nn.relu(conv2d(x_image, W_conv1) + b_conv1)            # output size 28x28x32
# 经过pooling后,长宽缩小为14x14
h_pool1 = max_pool_2x2(h_conv1)                                     # output size 14x14x32

## 2. conv2 layer ##
# 把厚度32加厚变成了64
W_conv2 = weight_variable([5,5, 32, 64])                # patch 5x5, in size 32, out size 64
b_conv2 = bias_variable([64])
# 构建第二个convolutional层
h_conv2 = tf.nn.relu(conv2d(h_pool1, W_conv2) + b_conv2)            # output size 14x14x64
# 经过pooling后,长宽缩小为7x7
h_pool2 = max_pool_2x2(h_conv2)                                     # output size 7x7x64

## 3. func1 layer ##
# 飞的更高变成1024
W_fc1 = weight_variable([7*7*64, 1024])
b_fc1 = bias_variable([1024])
# [n_samples, 7, 7, 64] ->> [n_samples, 7*7*64]
# 把pooling后的结果变平
h_pool2_flat = tf.reshape(h_pool2, [-1, 7*7*64])
h_fc1 = tf.nn.relu(tf.matmul(h_pool2_flat, W_fc1) + b_fc1)
h_fc1_drop = tf.nn.dropout(h_fc1, keep_prob)

## 4. func2 layer ##
# 最后一层,输入1024,输出size 10,用 softmax 计算概率进行分类的处理
W_fc2 = weight_variable([1024, 10])
b_fc2 = bias_variable([10])
prediction = tf.nn.softmax(tf.matmul(h_fc1_drop, W_fc2) + b_fc2)


# the error between prediction and real data
cross_entropy = -tf.reduce_sum(ys * tf.log(prediction))
train_step = tf.train.AdamOptimizer(learning_rate=1e-4).minimize(cross_entropy)
correct_prediction = tf.equal(tf.argmax(prediction,1),tf.argmax(ys,1))
accuracy = tf.reduce_mean(tf.cast(correct_prediction, "float"))

#sess = tf.Session()
# important step
with tf.Session() as sess:
    sess.run(tf.global_variables_initializer())
    for i in range(1000):
        batch = mnist.train.next_batch(100)

        if i % 100 == 0:
            train_accuracy = accuracy.eval(feed_dict={xs: batch[0], ys: batch[1], keep_prob: 1.0})
            print (i,train_accuracy)
        train_step.run(feed_dict={xs: batch[0], ys: batch[1], keep_prob: 0.5})
    for j in xrange(10):
        testSet = mnist.test.next_batch(50)
        print("test accuracy %g" % accuracy.eval(feed_dict={xs: testSet[0], ys: testSet[1], keep_prob: 1.0}))
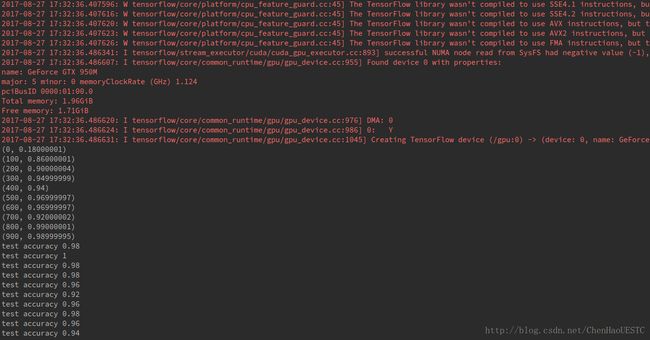
代码运行结果如下:

通过运行结果可以观察到,相对于之前的MNIST训练结果,本次的准确率有了较大的提升。