前言
第三方登入太常见了,微信,微博,QQ...总有一个你用过。当然看这篇文章的你,应该还用过github登入。这篇分享是在上一篇基于node的登入例子(node-koa-mongoose)的基础增加了github账号第三方授权登入功能,如果有些代码,这篇中美介绍,你可以先去看下上一篇的分享。
本项目源码地址:https://github.com/linwalker/...
第三方登入
第三方登入主要基于OAuth 2.0。OAuth协议为用户资源的授权提供了一个安全的、开放而又简易的标准。与以往的授权方式不同之处是OAUTH的授权不会使第三方触及到用户的帐号信息(如用户名与密码),即第三方无需使用用户的用户名与密码就可以申请获得该用户资源的授权,因此OAUTH是安全的 ---- 百度百科
更详细的介绍可以看这篇文章理解OAuth 2.0
github 授权登入
原理过程
先来大致了解下第三方通过GitHub账号授权登入的过程,具体实现结合后面代码讲解
-
1.获取code
第三方客户端向`https://github.com/login/oauth/authorize`发送get请求,带上`?client_id=XXXXXX`参数,这时会跳转到GitHub登入页面,授权后GitHub会向客户端返回`https://redirect_url?code=XXXXXX`。其中`client_id`和`redirect_url`是第三方事先在GitHub平台上配置好的。 -
2.通过code获取access_token
客户端处理`https://redirect_url?code=XXXXXX`请求,获取code值,向`https://github.com/login/oauth/access_token`发起post请求,请求参数为`client_di`,`client_secret`和`code`。 3.通过access_token获取用户GitHub账号信息
第二步的请求会返回这样access_token=d0686dc49a22d64e77402db072b719f510f22421&scope=user&token_type=bearer的内容,拿到access_token只需要向https://api.github.com/user?access_token=xxx发送GET请求,即可获取到登录用户的基本信息,
具体实现
GitHub注册应用
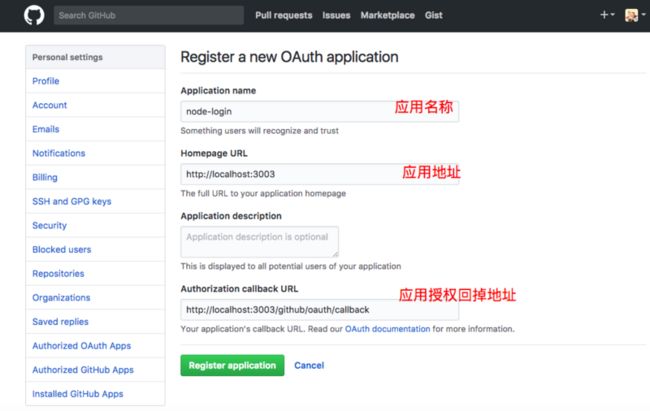
首先你要有一个GitHub账号,然后进入settings -> OAuth application -> Register a new application。进来后你会看到下面这个页面:
依次填好应用名称,应用地址和授权回掉地址后点击Register application按钮,会生成一个client Id和client Secret,用于后面向GitHub发送请求传参。
Github授权请求(获取code)
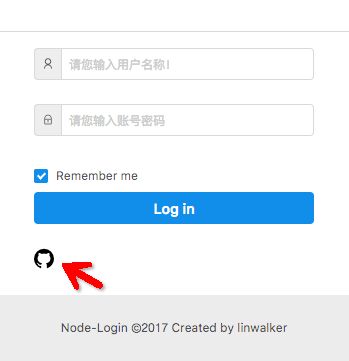
在页面中添加GitHub登入跳转按钮,并在路由中对跳转请求进行转发处理:
//在node-login/components/LoginTab.js
添加跳转按钮后,增加相应路由处理,路由入口中添加/github路径处理
//在node-login/routes/index.js

const github = require('./github');
router.use('/github', github.routes(), github.allowedMethods());
最后是具体的路由处理
//在node-login/routes/github.js
const config = require('../config');
const router = require('koa-router')();
const fetch = require('node-fetch');
const routers = router
    .get('/login', async (ctx) => {
        var dataStr = (new Date()).valueOf();
        //重定向到认证接口,并配置参数
        var path = "https://github.com/login/oauth/authorize";
        path += '?client_id=' + config.client_id;
        path += '&scope=' + config.scope;
        path += '&state=' + dataStr;
        //转发到授权服务器
        ctx.redirect(path);
    })
module.exports = routers;在config中事先添加配置请求所需参数client_id,client_secret和scope。
module.exports = {
    'database': 'mongodb://localhost:27017/node-login',
    'client_id': '83b21756e93d6ce27075',
    'client_secret': 'd87c4163ece5695a9ded1e8bf2701c5ee2651f28',
    'scope': ['user'],
};
其中scope参数可选。就是你期待你的应用需要调用Github哪些信息,可以填写多个,以逗号分割,比如:scope=user,public_repo。state参数非必需,用于防治跨域伪造请求攻击。
现在可以运行一下项目,点击小黑猫,跳转到授权登入页面(没登入过,要输入账号密码),授权成功返回回掉地址。
回掉地址中code就是返回的授权码,通过授权码再去获取令牌access_token。
授权回掉处理(获取access_token)
在第一步授权请求https://github.com/login/oauth/authorize成功后GitHub会给应用返回一个回掉http://localhost:3003/github/oauth/callback?code=14de2c737aa02037132d&state=1496989988474。这个回掉地址就是之前在GitHub注册应用时填入的回掉地址,另外还带了需要的code参数,state就是上一步请求中带的state参数,原样返回。
现在我们要对这个回掉请求进行处理:
//node-login/routes/github.js
const config = require('../config');
const router = require('koa-router')();
const fetch = require('node-fetch');
const routers = router
    .get('/login', async (ctx) => {
        ...
    })
    .get('/oauth/callback', async (ctx) => {
        const code = ctx.query.code;
        let path = 'https://github.com/login/oauth/access_token';
        const params = {
            client_id: config.client_id,
            client_secret: config.client_secret,
            code: code
        }
        console.log(code);
        await fetch(path, {
            method: 'POST',
            headers: {
                'Content-Type': 'application/json'
            },
            body: JSON.stringify(params)
        })
        .then(res => {
            return res.text();
        })
        .then(body => {
            ctx.body = body;
        })
       .catch(e => {
            console.log(e);
        })
    })
module.exports = routers;GitHub返回回掉地址时,先拿到请求中的code参数,然后向https://github.com/login/oauth/access_token发送post请求并带上client_id,client_secret,code参数,请求成功后会返回带有access_token的信息。
获取GitHub账号信息
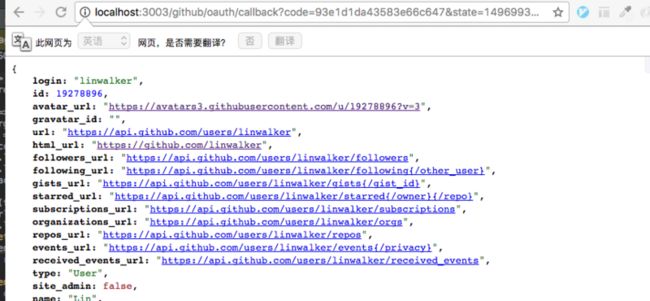
最后带上获取的access_token请求https://api.github.com/user?access_token=xxx,返回的就是之前scope中对应的账号信息。
.get('/oauth/callback', async (ctx) => {
        const code = ctx.query.code;
        let path = 'https://github.com/login/oauth/access_token';
        const params = {
            client_id: config.client_id,
            client_secret: config.client_secret,
            code: code
        }
        console.log(code);
        await fetch(path, {
            method: 'POST',
            headers: {
                'Content-Type': 'application/json'
            },
            body: JSON.stringify(params)
        })
        .then(res => {
            return res.text();
        })
        .then(body => {
            const args = body.split('&');
            let arg = args[0].split('=');
            const access_token = arg[1];
            console.log(body);
            console.log(access_token);
            return access_token;
        })
        .then(async(token) => {
            const url = ' https://api.github.com/user?access_token=' + token;
            console.log(url);
            await fetch(url)
                .then(res => {
                    return res.json();
                })
                .then(res => {
                    console.log(res);
                    ctx.body = res;
                })
        })
        .catch(e => {
            console.log(e);
        })
    })
返回的用户信息如下:
总结
用一张图来总结


