iOS键盘、选取器上的工具栏
前言
我们在使用键盘的时候,在打字完毕后想要收起键盘继续操作,要么是习惯性点击界面空白处收起键盘,要么是在键盘上方点击一个“完成”之类的按钮来收起键盘。在Android上键盘的完成按钮是自带的,但是iOS没有,所以需要开发者自行添加上去一个,这里就要用到工具栏UIToolbar。
同样,在使用选取器的时候,最常见的就是选择省市区时,选择完毕后我们想要收起选取器,一种做法时点击空白界面来唤起一个响应,另一种更常见的做法还是自行添加一个工具栏上去,因为这时往往需要两个按钮,一个“取消”,一个“完成”,只有点击完成时才真正产生修改。很遗憾,选取器也没有自带这两个按钮,还是需要使用工具栏UIToolbar来做这两个按钮。
本文就根据实例来讲解怎么在键盘和选取器上添加工具栏按钮。
在键盘上添加收起按钮
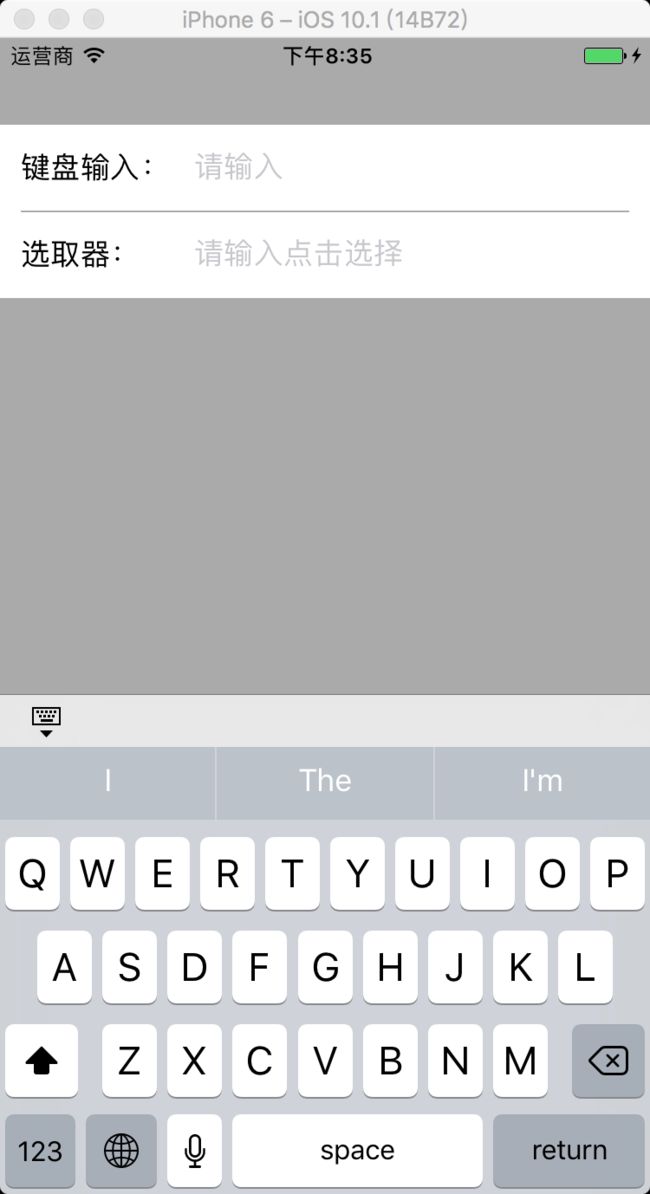
先看看效果:
可以看到,在键盘上面有一条工具栏,最左边有一个小图标,是键盘形状的,点击那个图标后,就会收起键盘,这个按钮并不是自带的,是我添加上去的。
我们先添加键盘输入的文字及输入框:
    // 键盘输入文字
    UILabel *keyboardLabel = [[UILabel alloc] initWithFrame:CGRectMake(12, 16, 90, 17)];
    keyboardLabel.text = @"键盘输入:";
    keyboardLabel.textAlignment = NSTextAlignmentLeft;
    keyboardLabel.font = [UIFont systemFontOfSize:17];
    [bgView addSubview:keyboardLabel];

    // 键盘输入框
    self.keyboardText = [[UITextField alloc] initWithFrame:CGRectMake(keyboardLabel.frame.origin.x + keyboardLabel.frame.size.width + 10, 16, SCREENWIDTH - 122 - 12, 17)];
    self.keyboardText.borderStyle = UITextBorderStyleNone;
    self.keyboardText.placeholder = @"请输入";
    self.keyboardText.clearButtonMode = UITextFieldViewModeWhileEditing;// 清除全部按钮
    self.keyboardText.font = [UIFont systemFontOfSize:17];
    self.keyboardText.delegate = self;
    [bgView addSubview:self.keyboardText];
这个很常规,没啥说的,注意到我们给输入框添加了一个delegate是self,因为我们要在delegate中给他添加工具栏:
#pragma mark - TextField Delegate
- (void)textFieldDidBeginEditing:(UITextField *)textField {
    if (![textField isEqual:self.pickerText]) {// 避免与选取器的工具栏起冲突,只在键盘输入框时添加
        //在键盘上添加toolbar工具条  点击工具条中的按钮回收键盘
        UIToolbar *topView = [[UIToolbar alloc]initWithFrame:CGRectMake(0, 0, [UIScreen mainScreen].bounds.size.width, 30)];
        [topView setBarStyle:UIBarStyleDefault];
        UIButton *doneButton = [[UIButton alloc] initWithFrame:CGRectMake(0, 4, 22, 22)];
        [doneButton setBackgroundImage:[UIImage imageNamed:@"keyboard"] forState:UIControlStateNormal];
        [doneButton setBackgroundImage:[UIImage imageNamed:@"keyboard"] forState:UIControlStateHighlighted];
        [doneButton addTarget:self action:@selector(dismissKeyBoard) forControlEvents:UIControlEventTouchUpInside];
        UIBarButtonItem *doneButtonItem = [[UIBarButtonItem alloc]initWithCustomView:doneButton];
        NSArray *buttonsArray = [NSArray arrayWithObjects:doneButtonItem,nil];
        //关键的代码,不写的话不会在键盘上面显示工具条
        [textField setInputAccessoryView:topView];
        [topView setItems:buttonsArray];
    }
}
这里我们就给键盘上添加了一个工具栏,工具栏上有一个done按钮,按钮的背景图片就是那个小键盘图标,然后把按钮转换成一个UIBarButtonItem,这种类型的对象才可以放在工具栏上。我们用了一个UIBarButtonItem组成的数组,因为可以放多个按钮,只要在数组中继续添加就可以了,最后将数组作为工具栏的Items添加进去就可以了。
这里有一行要注意:
//关键的代码,不写的话不会在键盘上面显示工具条
[textField setInputAccessoryView:topView];
这一行的意思是把工具栏作为输入框的InputAccessoryView,也就是附加视图,设置后会自动将工具栏添加到适当的位置,也就是键盘的上方。
这里按钮的响应是一个dismissKeyBoard方法,这个方法中包含了让输入框失去第一响应的方法:
//隐藏键盘
-(void)dismissKeyBoard{
    [self.keyboardText resignFirstResponder];
    [self.pickerText resignFirstResponder];
}
至此在键盘上添加收起键盘的工具栏按钮就完成啦,还是很简单的。
在选取器上添加取消、完成按钮
还是先来看看效果再说:
这里下面是一个选择省市区的三级选取器,选取器上方有两个按钮,一个是取消,一个是完成。点击取消只会收起选取器,点击完成才会将选择的位置添加到输入框。
其实实现思路跟上面的大体相同,还是添加一个工具栏上去,因为这也是一个textfield,我们还是要将工具栏作为它的inputAccessoryView。不过这次我们换一种实现方式。
首先还是设计输入框的样式:
    // 选取器文字
    UILabel *pickerLabel = [[UILabel alloc] initWithFrame:CGRectMake(12, 66, 90, 17)];
    pickerLabel.text = @"选取器:";
    pickerLabel.textAlignment = NSTextAlignmentLeft;
    pickerLabel.font = [UIFont systemFontOfSize:17];
    [bgView addSubview:pickerLabel];

    // 选取器输入框
    self.pickerText = [[UITextField alloc] initWithFrame:CGRectMake(pickerLabel.frame.origin.x + pickerLabel.frame.size.width + 10, 66, SCREENWIDTH - 122 - 12, 17)];
    self.pickerText.borderStyle = UITextBorderStyleNone;
    self.pickerText.placeholder = @"请输入点击选择";
    self.pickerText.inputAccessoryView = self.toolBar;
    self.pickerText.inputView = self.addressPickerView;
    self.pickerText.clearButtonMode = UITextFieldViewModeWhileEditing;// 清除全部按钮
    self.pickerText.font = [UIFont systemFontOfSize:17];
    self.pickerText.delegate = self;
    [bgView addSubview:self.pickerText];
这其中有两行新的东西:
    self.pickerText.inputAccessoryView = self.toolBar;
    self.pickerText.inputView = self.addressPickerView;
一个是将工具栏作为inputAccessoryView,跟上面一样,不过这里不再delegate里面设置,而是在这里直接设置,这也是一种方式。另一行是将省市区选取器作为inputView,这样点击输入就会直线显示选取器,而不是键盘了。至于选取器怎么做,不是本文的重点,在文末之间下载示例工程看吧。
上面我们是将一个tooBar作为inputAccessoryView,这就是另一种实现方式,不使用delegate,单独创建一个UIToolBar,直接设置上去,这个toolbar的样式与功能和键盘的工具栏是不一样的,还记得上面的delegate中设置了一下只有当不是选取器的textfield时才显示键盘的工具栏吗,如果不判断一下,两个工具栏会冲突,结果就是什么都不显示,创建工具栏的代码如下:
// 工具栏按钮
- (UIToolbar *)toolBar {
    if (_toolBar == nil) {
        _toolBar = [[UIToolbar alloc] initWithFrame:CGRectMake(0, 0, SCREENWIDTH, 44)];

        NSMutableArray *barItems = [[NSMutableArray alloc] init];

        UIBarButtonItem *cancelBtn = [[UIBarButtonItem alloc] initWithTitle:@"取消" style:UIBarButtonItemStyleBordered target:self action:@selector(toolBarCanelClick)];
        [barItems addObject:cancelBtn];

        UIBarButtonItem *flexSpace = [[UIBarButtonItem alloc] initWithBarButtonSystemItem:UIBarButtonSystemItemFlexibleSpace target:self action:nil];
        [barItems addObject:flexSpace];

        UIBarButtonItem *doneBtn = [[UIBarButtonItem alloc] initWithTitle:@"完成" style:UIBarButtonItemStyleDone target:self action:@selector(toolBarDoneClick)];
        [barItems addObject:doneBtn];

        [_toolBar setItems:barItems animated:YES];
    }
    return _toolBar;
}

-(void)toolBarCanelClick{
    [self dismissKeyBoard];
}

-(void)toolBarDoneClick{
    [self dismissKeyBoard];

    NSLog(@"%@", self.addressPickerView.selectedAddress);
    self.pickerText.text = [NSString stringWithFormat:@"%@%@%@", self.addressPickerView.selectedAddress[@"Province"], self.addressPickerView.selectedAddress[@"CityKey"], self.addressPickerView.selectedAddress[@"AreaKey"]];
}在创建toolbar时,同样是用了一个UIBarButtonItem的数组,来存储三个UIBarButtonItem对象,注意,为什么是三个呢,界面上不是只有取消和完成两个按钮吗?那是因为中间还有一个占位按钮。其余两个按钮的代码不多说了,挺简单的,这个占位按钮很有意思:
UIBarButtonItem *flexSpace = [[UIBarButtonItem alloc] initWithBarButtonSystemItem:UIBarButtonSystemItemFlexibleSpace target:self action:nil];
[barItems addObject:flexSpace];
如果没有中间这个占位按钮,完成按钮会直接出现在取消按钮的左边,结果就是两个按钮都挤在左上角,这跟用户习惯是不同的,而要让完成按钮出现在右上角,就需要这个占位按钮来占据中间的位置,把完成按钮挤到右边去,这是一个专用的类型:UIBarButtonSystemItemFlexibleSpace。
下面两个方法分别是取消和完成两个按钮的响应方法,一个是直接收起选取器,一个是收起选取器之外还要设置输入框的内容为所选择的内容。
这样选取器的工具栏按钮就完成了。
示例工程:https://github.com/Cloudox/UIToolbarDemo
版权所有:http://blog.csdn.net/cloudox_

