springboot+mybatis+thymeleaf+ajax+JQuery 技术整合搭建项目开发环境__02_技术落地(技术选型)
目前各类公司开始采用前后端分离模式开发
这种开发模式的好处:分工明确,职责分明,可以提供更好的系统使用体验。
后端追求的是:三高(高并发,高可用,高性能),安全,存储,业务等等。
前端追求的是:页面表现,速度流畅,兼容性,用户体验等等。
通过将整个开发团队分成前后端,让两边的工程师更加专注各自的领域,独立治理,然后构建出一个全栈式的精益求精的开发队伍
上面的介绍只是说明下本整合框架支持前后端分离。
这里我主要记录下后端的架构搭建————》
这里的整合开发框架 是基于SpringBoot整合其它模块而成的,那么每个模块选择的技术如下:
- SpringBoot版本选择目前较新的2.0.5.RELEASE版本
- 持久化框架选择 Mybatis
- 页面模板引擎选择 thymeleaf
- 前台框架选择 Bootstrap/Vue
- 后台框架选择 AdminLTE
- 数据库选择 Mysql
- 数据库版本管理选择 Flyway
- 前后端接口调用方式 RESTful
- 数据格式 JSON
- 前端事件请求 AJAX
- 页面的事件控制与样式处理 JQuery
代码分包(工程目录基础结构)
首先确定本整合框架名为springboot-backendframe
基础包名为:com.company.frame
主要分成3个模块,即用户管理及权限相关模块、具体业务相关模块和公共模块。为此这3个模块分别所属的包为auth、biz和common,即:
com.company.frame.auth
com.company.frame.biz
com.company.frame.common
然后每个模块下都是有本模块的controller、service、dao和domain,所以本工程包的结构如下:

根据前面所确定的技术,我们首先从整合springboot ,mybatis开始:
那么工程的pom文件内容如下
    4.0.0

    com.cheri
    spring-boot-ajax
    1.0-SNAPSHOT


        org.springframework.boot
        spring-boot-starter-parent
        2.0.5.RELEASE


        UTF-8
        UTF-8
        1.8


            org.springframework.boot
            spring-boot-starter-web


            org.springframework.boot
            spring-boot-starter-thymeleaf


            org.springframework.boot
            spring-boot-devtools
            true


            org.projectlombok
            lombok
            1.16.10


            net.sf.json-lib
            json-lib
            2.2.3
            jdk15


            org.mybatis.spring.boot
            mybatis-spring-boot-starter
            1.3.2


            org.springframework.boot
            spring-boot-starter-jdbc


            mysql
            mysql-connector-java
            runtime


            com.github.pagehelper
            pagehelper-spring-boot-starter
            1.2.5


            org.springframework.boot
            spring-boot-starter-data-redis


            org.springframework.boot
            spring-boot-starter-cache


            org.springframework.boot
            spring-boot-starter-data-jpa


            org.springframework.boot
            spring-boot-starter-activemq


            org.apache.activemq
            activemq-pool


            org.springframework.boot
            spring-boot-test
            test


            junit
            junit
            test


            org.springframework
            spring-test
            test


            io.springfox
            springfox-swagger2
            2.8.0


            io.springfox
            springfox-swagger-ui
            2.8.0


                org.springframework.boot
                spring-boot-maven-plugin

                    true


                org.apache.maven.plugins
                maven-war-plugin

                    src/main/resources/**
                    spring-boot-ajax
配置 application.properties:
#热部署生效
spring.devtools.restart.enabled=true

# thymeleaf
spring.thymeleaf.cache=false
spring.thymeleaf.prefix=classpath:/templates/
spring.thymeleaf.suffix=.html
spring.thymeleaf.encoding=utf-8
spring.thymeleaf.mode=html5
spring.thymeleaf.servlet.content-type=text/html

# 数据源
server.port=8080
spring.datasource.username=root
spring.datasource.password=1234
spring.datasource.url=jdbc:mysql://localhost:3306/springboot?useUnicode=true&characterEncoding=utf-8&useSSL=true&serverTimezone=UTC
spring.datasource.driver-class-name=com.mysql.jdbc.Driver
mybatis.mapper-locations=classpath:mapper/*Mapper.xml
mybatis.type-aliases-package=com.company.frame.auth.domain

# showSql
logging.level.com.company.frame.auth.dao=debug
UserMapper.xml:
INSERT INTO user (name , password) VALUES (#{name}, #{password})
update user
name = #{user.name},
password = #{user.password},
age = #{user.age}
where id = #{user.id}
delete from user where id = #{id}
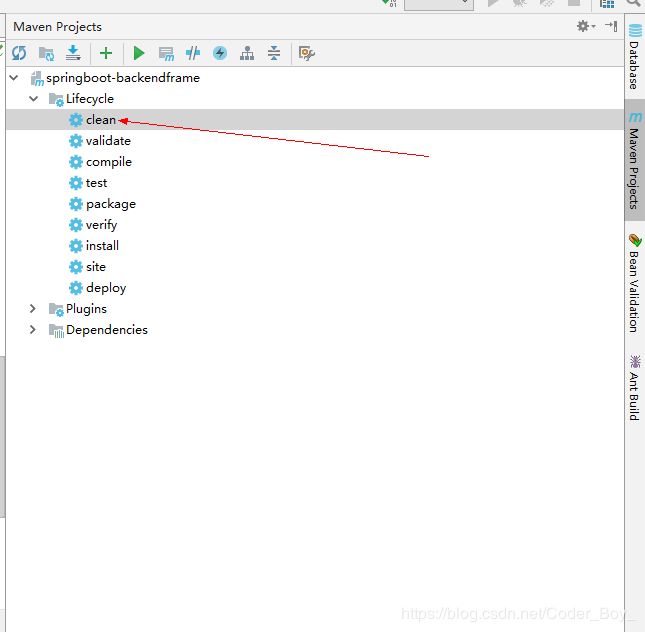
执行clean 后 compile 没报错,项目构建成功》

简单的做下测测,看看整合成功了吗?
package com.company.frame;

import com.company.frame.auth.dao.UserMapper;
import com.company.frame.auth.domain.User;
import org.junit.Test;
import org.junit.runner.RunWith;
import org.springframework.beans.factory.annotation.Autowired;
import org.springframework.boot.test.context.SpringBootTest;
import org.springframework.test.context.junit4.SpringRunner;

@RunWith(SpringRunner.class)
@SpringBootTest
public class SpringbootBackendframeApplicationTests {

    @Autowired
    UserMapper userMapper;

    @Test
    public void contextLoads() {
    }

    @Test
    public void mapperTest01() {
       User user =  userMapper.findUserById(44);
        System.out.println(user);

    }

}
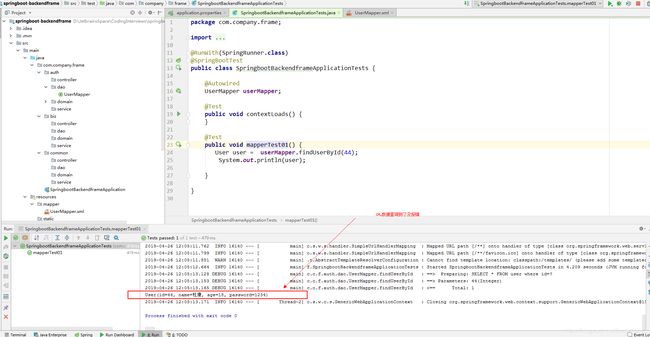
Sringboot与mybatis整合成功了——》