开始学习一门全新的语言确实很慢,需要了解很多控件,个人的做法是大家都记不住这么多,所以就要做一个件事,那就是写博客,把你看到的情况都列出来,这样你遇到需求的时候就去翻翻控件那一篇,copycopy就记住了,也没有那么不想学了,可以去试试~这篇是我总结的各种前期遇到比较多的控件样式设置写法,以后会更新下去,这样每次记不住回来看一眼,跟API一样~
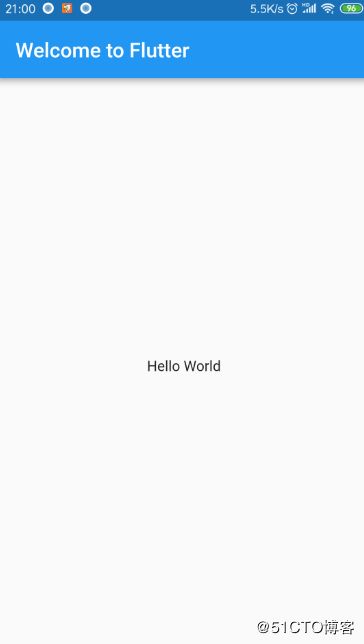
1.Widget:多写几次你会发现越写越顺,其实不是很绕,一看上去有点小乱,后面由于google智能的换行,所以很好找~试试吧~
import 'package:flutter/material.dart';

void main() => runApp(new MyApp());

//Stateless widgets 是不可变的, 这意味着它们的属性不能改变 - 所有的值都是最终的.
//Stateful widgets 持有的状态可能在widget生命周期中发生变化. 实现一个 stateful widget 至少需要两个类:

class MyApp extends StatelessWidget {
  @override
  Widget build(BuildContext context) {
//    final wordPair = new WordPair.random();
    return new MaterialApp(
      title: 'Welcome to Flutter',
      debugShowCheckedModeBanner: false,
      home: new Scaffold(
        appBar: new AppBar(
          title: new Text('Welcome to Flutter'),
        ),
        body: new Center(
          child: new Text('Hello World'),
        ),
      ),
    );
  }
}
2.文本及样式:我总结了一些常用的后续会继续更新,直接拿去用,目前看应该够用~
import 'package:flutter/material.dart';
import 'package:flutter/rendering.dart';

void main() => runApp(new MyApp());

//void main() {
//  runApp(new MaterialApp(
//    home: new MyApp(),
//  ));
//}

class MyApp extends StatelessWidget {
  @override
  Widget build(BuildContext context) {
    // TODO: implement build
    return new MaterialApp(
      title: 'Flutter Demo1',
      debugShowCheckedModeBanner: false,
      theme: new ThemeData(
        primarySwatch: Colors.blue,
//        fontFamily: 'fontdemo1'
      ),
      home: new MyHomePage(title: '文本及样式'),
    );
  }
}

class MyHomePage extends StatefulWidget {
  MyHomePage({Key key, this.title}) : super(key: key);
  final String title;

  @override
  State createState() {
    // TODO: implement createState
    return new _MyHomePageState();
  }
}

class _MyHomePageState extends State {
  final textStyleAssetFont1 = const TextStyle(
    fontFamily: 'fontdemo1',
  );
  final textStyleAssetFont2 = const TextStyle(
    fontFamily: 'fontdemo2',
  );
  final textStyleAssetFont3 = const TextStyle(
    letterSpacing: 2.0,
  );
  final textStyleAssetFont4 = const TextStyle(
    height: 2.0,
  );

  @override
  Widget build(BuildContext context) {
    // TODO: implement build
    return new Scaffold(
      appBar: new AppBar(
        title: new Text(
          widget.title,
          style: textStyleAssetFont2,
        ),
      ),
      body: new Center(
        child: new Column(
//          mainAxisAlignment: MainAxisAlignment.start,
          crossAxisAlignment: CrossAxisAlignment.start,
          children: [
            new Text(
              "1.hi yun~",
              textAlign: TextAlign.start,
              style: textStyleAssetFont3,
            ),
            new Text(
              "2.hi yun~" * 16,
              maxLines: 1,
              overflow: TextOverflow.ellipsis,
              style: textStyleAssetFont4,
//              style: Theme.of(context).textTheme.display1,
            ),
            new Text(
              "3.hi yun~",
              textScaleFactor: 1.5,
              style: textStyleAssetFont4,
            ),
            new Text(
              "4.hi yun~" * 16,
              textAlign: TextAlign.start,
              style: textStyleAssetFont4,
            ),
            new Text(
              "5.hi yun~",
              style: TextStyle(
                  color: Colors.blue,
                  fontSize: 18.0,
                  height: 2.0,
                  fontFamily: "Courier",
                  background: new Paint()..color = Colors.yellow,
                  decoration: TextDecoration.underline,
                  decorationStyle: TextDecorationStyle.dashed),
            ),
            new Text(
              "红色+黑色删除线+25号",
              style: new TextStyle(
                color: const Color(0xffff0000),
                decoration: TextDecoration.lineThrough,
                decorationColor: const Color(0xff000000),
                fontSize: 25.0,
              ),
            ),
            new Text.rich(TextSpan(children: [
              TextSpan(text: "6.Yun:"),
              TextSpan(
                text: "https://flutterchina.club",
                style: TextStyle(
                  color: Colors.blue,
                  height: 2.0,
                ),
//                  recognizer: _tapRecognizer
              ),
            ])),
            DefaultTextStyle(
              style: TextStyle(
                color: Colors.red,
                fontSize: 20.0,
                height: 2.0,
              ),
              textAlign: TextAlign.start,
              child: Column(
                crossAxisAlignment: CrossAxisAlignment.start,
                children: [
                  Text("7.hi yun1~"),
                  Text("7.hi yun2~"),
                  Text(
                    "7.hi yun3~",
                    style: TextStyle(
                      inherit: false,
                      color: Colors.grey,
                      height: 2.0,
                    ),
                  ),
                  Text(
                    "8.hi yun~",
                    style: textStyleAssetFont2,
                  ),
                ],
              ),
            ),
          ],
        ),
      ),
    );
  }
}
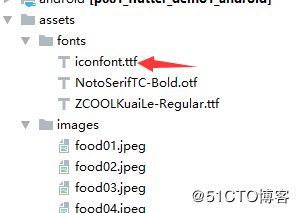
需要注意的是路径要对:
name: p001_flutter_demo1
description: A new Flutter application.

# The following defines the version and build number for your application.
# A version number is three numbers separated by dots, like 1.2.43
# followed by an optional build number separated by a +.
# Both the version and the builder number may be overridden in flutter
# build by specifying --build-name and --build-number, respectively.
# Read more about versioning at semver.org.
version: 1.0.0+1

environment:
  sdk: ">=2.0.0-dev.68.0 <3.0.0"

dependencies:
  flutter:
    sdk: flutter

  # The following adds the Cupertino Icons font to your application.
  # Use with the CupertinoIcons class for iOS style icons.
  cupertino_icons: ^0.1.2
  english_words: ^3.1.5

dev_dependencies:
  flutter_test:
    sdk: flutter


# For information on the generic Dart part of this file, see the
# following page: https://www.dartlang.org/tools/pub/pubspec

# The following section is specific to Flutter.
flutter:

  # The following line ensures that the Material Icons font is
  # included with your application, so that you can use the icons in
  # the material Icons class.
  uses-material-design: true

  assets:
    - assets/demo.txt
    - assets/images/
  # To add assets to your application, add an assets section, like this:
  # assets:
  #  - images/a_dot_burr.jpeg
  #  - images/a_dot_ham.jpeg

  # An image asset can refer to one or more resolution-specific "variants", see
  # https://flutter.io/assets-and-images/#resolution-aware.

  # For details regarding adding assets from package dependencies, see
  # https://flutter.io/assets-and-images/#from-packages

  # To add custom fonts to your application, add a fonts section here,
  # in this "flutter" section. Each entry in this list should have a
  # "family" key with the font family name, and a "fonts" key with a
  # list giving the asset and other descriptors for the font. For
  # example:
  # fonts:
  #   - family: Schyler
  #     fonts:
  #       - asset: fonts/Schyler-Regular.ttf
  #       - asset: fonts/Schyler-Italic.ttf
  #         style: italic
  #   - family: Trajan Pro
  #     fonts:
  #       - asset: fonts/TrajanPro.ttf
  #       - asset: fonts/TrajanPro_Bold.ttf
  #         weight: 700
  #
  fonts:
    - family: fontdemo1
      fonts:
        - asset: assets/fonts/NotoSerifTC-Bold.otf
          style: italic
    - family: fontdemo2
      fonts:
        - asset: assets/fonts/ZCOOLKuaiLe-Regular.ttf
          weight: 500
    - family: iconfont
      fonts:
        - asset: assets/fonts/iconfont.ttf
          weight: 700
  # For details regarding fonts from package dependencies,
  # see https://flutter.io/custom-fonts/#from-packages
3.图片及icon:这里多了一个iconfont.cn的操作,大家可以了解一下
import 'package:flutter/material.dart';

void main() => runApp(new MyApp());

//Stateless widgets 是不可变的, 这意味着它们的属性不能改变 - 所有的值都是最终的.
//Stateful widgets 持有的状态可能在widget生命周期中发生变化. 实现一个 stateful widget 至少需要两个类:

class MyApp extends StatelessWidget {
  final textStyleAssetFont1 = const TextStyle(
    height: 0.5,
  );

  @override
  Widget build(BuildContext context) {
//    final wordPair = new WordPair.random();
    return new MaterialApp(
      title: 'Welcome to Flutter',
      debugShowCheckedModeBanner: false,
      theme: new ThemeData(
        primarySwatch: Colors.blue,
//        fontFamily: 'fontdemo1'
      ),
      home: new Scaffold(
        appBar: new AppBar(
          title: new Text('图片加载'),
        ),
        body: new Center(
          child: new Column(
            crossAxisAlignment: CrossAxisAlignment.center,
//            mainAxisAlignment: MainAxisAlignment.start,
            children: [
//              CustomScrollView(
//                slivers: [
//
//                ],
//              ),
              new Text(
                "",
                style: textStyleAssetFont1,
              ),
              new Image(
                image: AssetImage("assets/images/food01.jpeg"),
                fit: BoxFit.fill,
                width: 120.0,
              ),
              new Text(
                "",
                style: textStyleAssetFont1,
              ),
              new Image.asset(
                "assets/images/food02.jpeg",
                width: 120.0,
                fit: BoxFit.cover,
              ),
              new Text(
                "",
                style: textStyleAssetFont1,
              ),
              new Image(
                image: NetworkImage(
                    "https://s1.51cto.com/images/20190423/1556012017949570.png"),
                width: 120.0,
                fit: BoxFit.contain,
              ),
              new Text(
                "",
                style: textStyleAssetFont1,
              ),
              new Image.network(
                "https://s1.51cto.com/images/20190423/1556012017949570.png",
                width: 120.0,
                fit: BoxFit.fill,
              ),
              new Text(
                "",
                style: textStyleAssetFont1,
              ),
              Row(
                mainAxisAlignment: MainAxisAlignment.center,
                children: [
                  Icon(
                    Icons.accessible,
                    color: Colors.green,
                  ),
                  Icon(
                    Icons.error,
                    color: Colors.green,
                  ),
                  Icon(
                    Icons.fingerprint,
                    color: Colors.green,
                  ),
                ],
              ),
              Row(
                mainAxisAlignment: MainAxisAlignment.center,
                children: [
                  Icon(
                    MyIcons.qq,
                    color: Colors.red,
                  ),
                  Icon(
                    MyIcons.wechat,
                    color: Colors.green,
                  ),
                ],
              )
            ],
          ),
        ),
      ),
    );
  }
}

class MyIcons {
  // book 图标
  static const IconData qq =
      const IconData(0xe606, fontFamily: 'iconfont', matchTextDirection: true);

  // 微信图标
  static const IconData wechat =
      const IconData(0xe607, fontFamily: 'iconfont', matchTextDirection: true);
}
4.单选开关和复选框:
import 'package:flutter/material.dart';

void main() => runApp(new MyApp());

//Stateless widgets 是不可变的, 这意味着它们的属性不能改变 - 所有的值都是最终的.
//Stateful widgets 持有的状态可能在widget生命周期中发生变化. 实现一个 stateful widget 至少需要两个类:

class MyApp extends StatelessWidget {
  @override
  Widget build(BuildContext context) {
    // TODO: implement build
    return new MaterialApp(
      title: "单选框和复选框",
      home: new Scaffold(
        appBar: new AppBar(
          title: new Text("单选框和复选框"),
        ),
        body: new Center(
          child: new SwitchAndCheckBoxTestRoute(),
        ),
      ),
    );
  }
}

class SwitchAndCheckBoxTestRoute extends StatefulWidget {
  @override
  State createState() {
    // TODO: implement createState
    return new _SwitchAndCheckBoxTestRoute();
  }
}

class _SwitchAndCheckBoxTestRoute extends State {
  bool _switchSelected = true;
  bool _checkboxSelected = true;

  @override
  Widget build(BuildContext context) {
    // TODO: implement build
    return new Column(
      children: [
        Switch(
          value: _switchSelected,
          activeColor: Colors.blue,
          inactiveThumbColor: Colors.lightBlueAccent,
          onChanged: (value) {
            setState(() {
              _switchSelected = value;
            });
          },
        ),
        Checkbox(
          value: _checkboxSelected,
          activeColor: Colors.red,
          onChanged: (value) {
            setState(() {
              _checkboxSelected = value;
            });
          },
        ),
      ],
    );
  }
}
5.输入框和表单:这块比较复杂,我在学习过程中遇到很多问题,找到了一些方案,最常见的就是布局问题,键盘遮挡,目前找到的这个方案比较合适,希望能帮到你~
解决遮挡的基类:
/**
 * 作者:Created by H on 2019/1/23 11:08.
 * 介绍: 解决输入框被遮挡问题
 */
import 'package:flutter/material.dart';
import 'package:flutter/rendering.dart';

///
/// Helper class that ensures a Widget is visible when it has the focus
/// For example, for a TextFormField when the keyboard is displayed
///
/// How to use it:
///
/// In the class that implements the Form,
///   Instantiate a FocusNode
///   FocusNode _focusNode = new FocusNode();
///
/// In the build(BuildContext context), wrap the TextFormField as follows:
///
///   new EnsureVisibleWhenFocused(
///     focusNode: _focusNode,
///     child: new TextFormField(
///       ...
///       focusNode: _focusNode,
///     ),
///   ),
///
/// Initial source code written by Collin Jackson.
/// Extended (see highlighting) to cover the case when the keyboard is dismissed and the
/// user clicks the TextFormField/TextField which still has the focus.
///
class EnsureVisibleWhenFocused extends StatefulWidget {
  const EnsureVisibleWhenFocused({
    Key key,
    @required this.child,
    @required this.focusNode,
    this.curve: Curves.ease,
    this.duration: const Duration(milliseconds: 100),
  }) : super(key: key);

  /// The node we will monitor to determine if the child is focused
  final FocusNode focusNode;

  /// The child widget that we are wrapping
  final Widget child;

  /// The curve we will use to scroll ourselves into view.
  ///
  /// Defaults to Curves.ease.
  final Curve curve;

  /// The duration we will use to scroll ourselves into view
  ///
  /// Defaults to 100 milliseconds.
  final Duration duration;

  @override
  _EnsureVisibleWhenFocusedState createState() => new _EnsureVisibleWhenFocusedState();
}

///
/// We implement the WidgetsBindingObserver to be notified of any change to the window metrics
///
class _EnsureVisibleWhenFocusedState extends State with WidgetsBindingObserver  {

  @override
  void initState(){
    super.initState();
    widget.focusNode.addListener(_ensureVisible);
    WidgetsBinding.instance.addObserver(this);
  }

  @override
  void dispose(){
    WidgetsBinding.instance.removeObserver(this);
    widget.focusNode.removeListener(_ensureVisible);
    super.dispose();
  }

  ///
  /// This routine is invoked when the window metrics have changed.
  /// This happens when the keyboard is open or dismissed, among others.
  /// It is the opportunity to check if the field has the focus
  /// and to ensure it is fully visible in the viewport when
  /// the keyboard is displayed
  ///
  @override
  void didChangeMetrics(){
    if (widget.focusNode.hasFocus){
      _ensureVisible();
    }
  }

  ///
  /// This routine waits for the keyboard to come into view.
  /// In order to prevent some issues if the Widget is dismissed in the
  /// middle of the loop, we need to check the "mounted" property
  ///
  /// This method was suggested by Peter Yuen (see discussion).
  ///
  Future _keyboardToggled() async {
    if (mounted){
      EdgeInsets edgeInsets = MediaQuery.of(context).viewInsets;
      while (mounted && MediaQuery.of(context).viewInsets == edgeInsets) {
        await new Future.delayed(const Duration(milliseconds: 10));
      }
    }

    return;
  }

  Future _ensureVisible() async {
    // Wait for the keyboard to come into view
    await Future.any([new Future.delayed(const Duration(milliseconds: 300)), _keyboardToggled()]);

    // No need to go any further if the node has not the focus
    if (!widget.focusNode.hasFocus){
      return;
    }

    // Find the object which has the focus
    final RenderObject object = context.findRenderObject();
    final RenderAbstractViewport viewport = RenderAbstractViewport.of(object);
    assert(viewport != null);

    // Get the Scrollable state (in order to retrieve its offset)
    ScrollableState scrollableState = Scrollable.of(context);
    assert(scrollableState != null);

    // Get its offset
    ScrollPosition position = scrollableState.position;
    double alignment;

    if (position.pixels > viewport.getOffsetToReveal(object, 0.0).offset) {
      // Move down to the top of the viewport
      alignment = 0.0;
    } else if (position.pixels < viewport.getOffsetToReveal(object, 1.0).offset){
      // Move up to the bottom of the viewport
      alignment = 1.0;
    } else {
      // No scrolling is necessary to reveal the child
      return;
    }

    position.ensureVisible(
      object,
      alignment: alignment,
      duration: widget.duration,
      curve: widget.curve,
    );
  }

  @override
  Widget build(BuildContext context) {
    return widget.child;
  }
}
如何使用:
import 'package:flutter/material.dart';

import 'main15.dart';

void main() => runApp(new MyApp());

//Stateless widgets 是不可变的, 这意味着它们的属性不能改变 - 所有的值都是最终的.
//Stateful widgets 持有的状态可能在widget生命周期中发生变化. 实现一个 stateful widget 至少需要两个类:

class MyApp extends StatelessWidget {
  @override
  Widget build(BuildContext context) {
    // TODO: implement build
    return new MaterialApp(
      title: "输入框及表单",
      home: new Scaffold(
        appBar: new AppBar(
          title: new Text("输入框及表单"),
        ),
        body: new Center(
//          child: new FormTestRoute(),
          child: new TestPage(),
        ),
      ),
    );
  }
}

class TestPage extends StatefulWidget {
  @override
  _TestPageState createState() => new _TestPageState();
}

class _TestPageState extends State {
  final GlobalKey _formKey = new GlobalKey();
  FocusNode _focusNodeFirstName = new FocusNode();
  FocusNode _focusNodeLastName = new FocusNode();
  FocusNode _focusNodeDescription = new FocusNode();
  static final TextEditingController _firstNameController =
      new TextEditingController();
  static final TextEditingController _lastNameController =
      new TextEditingController();
  static final TextEditingController _pwdController =
      new TextEditingController();
  static final TextEditingController _descriptionController =
      new TextEditingController();

  @override
  Widget build(BuildContext context) {
    return new Scaffold(
//      appBar: new AppBar(
//        title: new Text('My Test Page'),
//      ),
      body: new SafeArea(
        top: false,
        bottom: false,
        child: new Form(
          key: _formKey, //设置globalKey,用于后面获取FormState
          autovalidate: true, //开启自动校验
          child: new SingleChildScrollView(
            padding: const EdgeInsets.symmetric(horizontal: 16.0),
            child: new Column(
              crossAxisAlignment: CrossAxisAlignment.stretch,
              children: [
                /* -- Something large -- */
                Container(
                  width: double.infinity,
                  height: 150.0,
                  color: Colors.red,
                ),

                /* -- First Name -- */
                new EnsureVisibleWhenFocused(
                  focusNode: _focusNodeFirstName,
                  child: new TextFormField(
                    decoration: const InputDecoration(
                      border: const UnderlineInputBorder(),
                      filled: true,
                      icon: const Icon(Icons.person),
                      labelText: "用户名",
                      hintText: "用户名或邮箱",
                    ),
                    // 校验用户名
                    validator: (v) {
                      return v.trim().length > 0 ? null : "用户名不能为空";
                    },
                    onSaved: (String value) {
                      //TODO
                    },
                    controller: _firstNameController,
                    focusNode: _focusNodeFirstName,
                  ),
                ),
                const SizedBox(height: 24.0),

                /* -- Last Name -- */
                new EnsureVisibleWhenFocused(
                  focusNode: _focusNodeLastName,
                  child: new TextFormField(
                    decoration: const InputDecoration(
                      border: const UnderlineInputBorder(),
                      filled: true,
                      icon: const Icon(Icons.lock),
                      labelText: "密码",
                      hintText: "您的登录密码",
                    ),
                    obscureText: true,
                    //校验密码
                    validator: (v) {
                      return v.trim().length > 5 ? null : "密码不能少于6位";
                    },
                    onSaved: (String value) {
                      //TODO
                    },
//                    controller: _lastNameController,
                    controller: _pwdController,
                    focusNode: _focusNodeLastName,
                  ),
                ),
                const SizedBox(height: 24.0),

                /* -- Some other fields -- */
                new Container(
                  width: double.infinity,
                  height: 250.0,
                  color: Colors.blue,
                ),

                /* -- Description -- */
                new EnsureVisibleWhenFocused(
                  focusNode: _focusNodeDescription,
                  child: new TextFormField(
                    decoration: const InputDecoration(
                      border: const OutlineInputBorder(),
                      hintText: '请介绍一下自己',
                      labelText: '简介',
                    ),
                    onSaved: (String value) {
                      //TODO
                    },
                    maxLines: 5,
                    controller: _descriptionController,
                    focusNode: _focusNodeDescription,
                  ),
                ),
                const SizedBox(height: 24.0),

                /* -- Save Button -- */
                new Center(
                  child: new RaisedButton(
                    child: const Text('确定'),
                    onPressed: () {
                      //TODO
                      if ((_formKey.currentState as FormState).validate()) {
                        //验证通过提交数据
                      }
                    },
                  ),
                ),
                const SizedBox(height: 24.0),
              ],
            ),
          ),
        ),
      ),
    );
  }
}

//class FormTestRoute extends StatefulWidget {
//  @override
//  _FormTestRouteState createState() => new _FormTestRouteState();
//}
//
//class _FormTestRouteState extends State {
//  TextEditingController _unameController = new TextEditingController();
//  TextEditingController _pwdController = new TextEditingController();
//  GlobalKey _formKey = new GlobalKey();
//  FocusNode _focusNode = new FocusNode();
//
//  @override
//  Widget build(BuildContext context) {
//    return Scaffold(
////      title: "Form Test",
//
//      body: Padding(
//        padding: const EdgeInsets.symmetric(vertical: 16.0, horizontal: 24.0),
//        child: Form(
//          key: _formKey, //设置globalKey,用于后面获取FormState
//          autovalidate: true, //开启自动校验
//          child: Column(
//            children: [
//              new EnsureVisibleWhenFocused(
//                focusNode: _focusNode,
//                child: new TextFormField(
//                  autofocus: true,
//                  controller: _unameController,
//                  decoration: InputDecoration(
//                      labelText: "用户名",
//                      hintText: "用户名或邮箱",
//                      icon: Icon(Icons.person)),
//                  // 校验用户名
//                  validator: (v) {
//                    return v.trim().length > 0 ? null : "用户名不能为空";
//                  },
//                  focusNode: _focusNode,
//                ),
//              ),
//              new EnsureVisibleWhenFocused(
//                focusNode: _focusNode,
//                child: new TextFormField(
//                  controller: _pwdController,
//                  decoration: InputDecoration(
//                      labelText: "密码",
//                      hintText: "您的登录密码",
//                      icon: Icon(Icons.lock)),
//                  obscureText: true,
//                  //校验密码
//                  validator: (v) {
//                    return v.trim().length > 5 ? null : "密码不能少于6位";
//                  },
//                  focusNode: _focusNode,
//                ),
//              ),
////              TextFormField(
////                autofocus: true,
////                controller: _unameController,
////                decoration: InputDecoration(
////                    labelText: "用户名",
////                    hintText: "用户名或邮箱",
////                    icon: Icon(Icons.person)),
////                // 校验用户名
////                validator: (v) {
////                  return v.trim().length > 0 ? null : "用户名不能为空";
////                },
////              ),
////              TextFormField(
////                controller: _pwdController,
////                decoration: InputDecoration(
////                    labelText: "密码",
////                    hintText: "您的登录密码",
////                    icon: Icon(Icons.lock)),
////                obscureText: true,
////                //校验密码
////                validator: (v) {
////                  return v.trim().length > 5 ? null : "密码不能少于6位";
////                },
////              ),
//              // 登录按钮
//              Padding(
//                padding: const EdgeInsets.only(top: 28.0),
//                child: Row(
//                  children: [
//                    Expanded(
//                      child: RaisedButton(
//                        padding: EdgeInsets.all(15.0),
//                        child: Text("登录"),
//                        color: Theme.of(context).primaryColor,
//                        textColor: Colors.white,
//                        onPressed: () {
//                          //在这里不能通过此方式获取FormState,context不对
//                          //print(Form.of(context));
//
//                          // 通过_formKey.currentState 获取FormState后,
//                          // 调用validate()方法校验用户名密码是否合法,校验
//                          // 通过后再提交数据。
//                          if ((_formKey.currentState as FormState).validate()) {
//                            //验证通过提交数据
//                          }
//                        },
//                      ),
//                    ),
//                  ],
//                ),
//              )
//            ],
//          ),
//        ),
//      ),
//    );
//  }
//}
需要注意的是自定义布局的时候要保证开启全局校验,还有就是官方的PageScaffold目前没找到,可能是官方废弃了吧,后续再看,可以用Scaffold替换,另外还有自定义样式的写法BoxDecoration是关键,可以查查资料结合下面的代码修改,基本可以搞定一般的不带动画的需求~
import 'package:flutter/material.dart';

void main() => runApp(new MyApp());

//Stateless widgets 是不可变的, 这意味着它们的属性不能改变 - 所有的值都是最终的.
//Stateful widgets 持有的状态可能在widget生命周期中发生变化. 实现一个 stateful widget 至少需要两个类:

class MyApp extends StatelessWidget {
  @override
  Widget build(BuildContext context) {
    // TODO: implement build
    return new MaterialApp(
      title: "输入框及表单",
      home: new Scaffold(
        appBar: new AppBar(
          title: new Text("输入框及表单"),
        ),
        body: new Center(
          child: new FormTestRoute(),
        ),
      ),
    );
  }
}

class FormTestRoute extends StatefulWidget {
  @override
  _FormTestRouteState createState() => new _FormTestRouteState();
}

class _FormTestRouteState extends State {
  TextEditingController _unameController = new TextEditingController();
  TextEditingController _pwdController = new TextEditingController();
  GlobalKey _formKey = new GlobalKey();
  FocusNode _focusNode = new FocusNode();

  @override
  Widget build(BuildContext context) {
    return Scaffold(
//      title: "Form Test",

      body: Container(
        padding: const EdgeInsets.symmetric(vertical: 16.0, horizontal: 24.0),
        decoration: BoxDecoration(
            // 下滑线浅灰色,宽度1像素
            border: Border(
                bottom: BorderSide(color: Colors.grey[200], width: 1.0))),
        child: Form(
          key: _formKey, //设置globalKey,用于后面获取FormState
          autovalidate: true, //开启自动校验
          child: Column(
            children: [
              TextFormField(
                autofocus: true,
                controller: _unameController,
                decoration: InputDecoration(
                  labelText: "用户名",
                  hintText: "用户名或邮箱",
                  icon: Icon(Icons.person),
                  border: InputBorder.none, //隐藏下划线
                ),
                // 校验用户名
                validator: (v) {
                  return v.trim().length > 0 ? null : "用户名不能为空";
                },
              ),
              TextFormField(
                controller: _pwdController,
                decoration: InputDecoration(
                    labelText: "密码",
                    hintText: "您的登录密码",
                    icon: Icon(Icons.lock)),
                obscureText: true,
                //校验密码
                validator: (v) {
                  return v.trim().length > 5 ? null : "密码不能少于6位";
                },
              ),
              // 登录按钮
              Padding(
                padding: const EdgeInsets.only(top: 28.0),
                child: Row(
                  children: [
                    Expanded(
                      child: RaisedButton(
                        padding: EdgeInsets.all(15.0),
                        child: Text("登录"),
                        color: Theme.of(context).primaryColor,
                        textColor: Colors.white,
                        onPressed: () {
                          //在这里不能通过此方式获取FormState,context不对
                          //print(Form.of(context));

                          // 通过_formKey.currentState 获取FormState后,
                          // 调用validate()方法校验用户名密码是否合法,校验
                          // 通过后再提交数据。
                          if ((_formKey.currentState as FormState).validate()) {
                            //验证通过提交数据
                          }
                        },
                      ),
                    ),
                  ],
                ),
              )
            ],
          ),
        ),
      ),
    );
  }
}
总结:因为周末了,所以今天讲的有点多,可以慢慢敲一遍,你会发现dart是真心强,用的舒服~撸起袖子,继续更新ing~


