LED灯点亮的案例
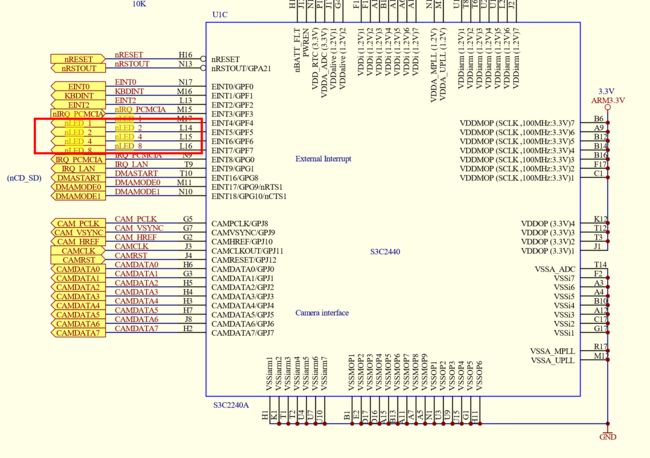
有上图可以看出到,开发板上有三盏LED,分别通过LED1、'LED2'和'LED4'四条线连接,从图上可以看出如果对于三盏LED来说,右侧如果为低电平,那么LED将可以被点亮
在开发板的原理图上可以搜索到,
LED1、'LED2'和'LED4'三根线引入到了2440芯片,引脚分别为
EINT4/GPF4、
EINT4/GPF5、
EINT4/GPF6。
那以上的原理图可以看出,如果将以上的三个引脚设置为输出引脚,并且输出低电平,那么对应的LED将会被点亮。
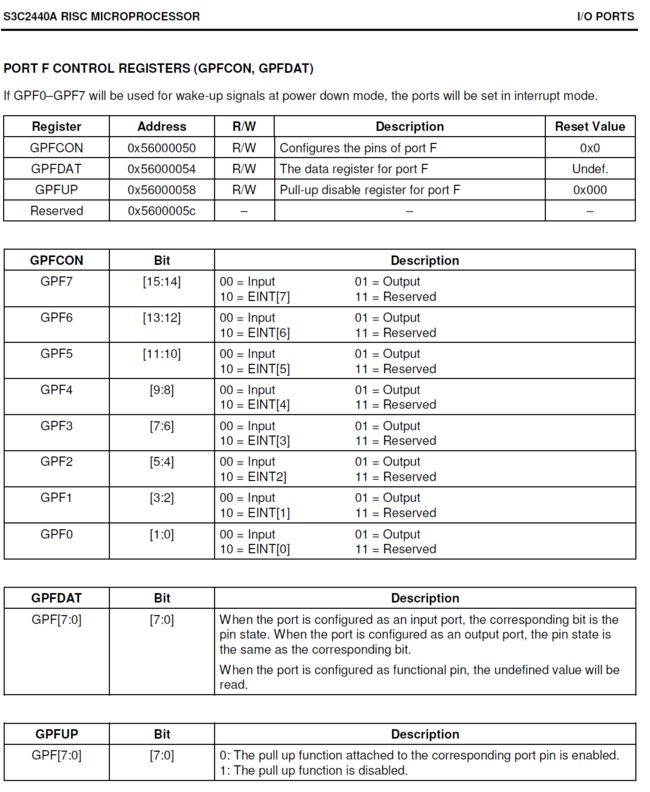
如果需要将引脚设置为输出引脚并输出低电平,那么需要配置对应的寄存器,那么此时需要阅读2440芯片手册。
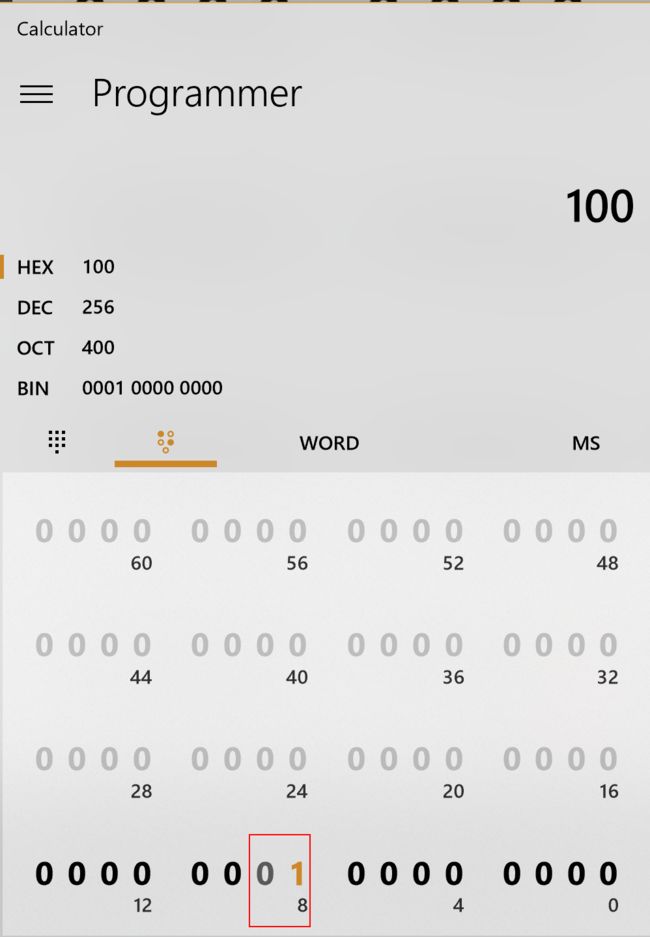
其中这三个引脚的输入输出属性,需要配置的是GPFCON寄存器,他的地址为0x5600 0050, 如果需要配置EINT4/GPF4引脚为输出引脚,需要设置GPFCON寄存器的9位和8位为0和1。如果我们不管其他位,先设置其他位为0,那么9,8两位为10的情况下,对应的十六进制数为:0x0000 0100。
![寄存器(16bit)设置内容计算]
已经完成了配置为输出引脚,那么接下来需要配置输出的内容,可以通过GPFDAT寄存器,他的地址为0x 5600 0054,其中GPF7到GPF0八个引脚,分别对应该寄存器的7到0位。那么以上就是关于如何点亮开发板上的LED灯的原理。
为了完成以上操作,可以先使用汇编语言,来讲寄存器进行设置。
.text
.global _start
_start:
        LDR    R0,=0x56000050    @R0设置为GPFCON寄存器。此寄存器用于选择端口B各引脚的功能:是输出、输入或者其他
        MOV    R1,#0x00000100    @设置R1=0x00000100
        STR    R1,[R0]           @R0中放入R1. 设置GPF4为输出引脚,为[9:8]=0b01
                                 @以上完成了GPFCON寄存器的设置,此时GPF4为输出引脚

        LDR    R0,=0x56000054    @R0设为GPBDAT寄存器,此寄存器用于读取/写入端口B各引脚的数据
        MOV    R1,#0x00000000    @R1改为0x00000000
        STR    R1,[R0]           @R0中,放入R1。GPF4输出0,LED1点亮
                                 @此时设置GPFDAT0x00000000,然后为0x00000100
MAIN_LOOP:
        B      MAIN_LOOP
Makefile文件
led_on.bin : led_on.s
        arm-linux-gcc -g -c led_on.S -o led_on.o                        #编译不链接
        arm-linux-ld -Ttext 0x00000000 -g led_on.o -o led_on_elf        #链接
        arm-linux-objcopy -O binary -S led_on_elf led_on.bin            #转换为二进制文件,也会将生成的二进制文件烧写到开发板
clean:
        rm -f led_on.bin led_on_elf *.o
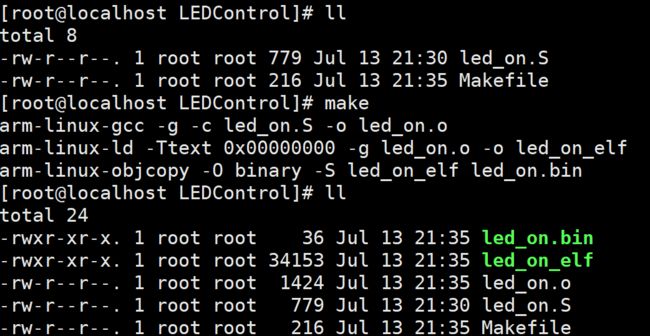
执行make命令后,生成的文件结果
再来看看Makefile
arm-linux-gcc -g -c led_on.S -o led_on.o:汇编不链接
-
-g:表示调试信息,不需要调试的情况下可以不加 -
-c:表示编译不链接(编译过程:预处理、编译、汇编、链接,我们直接使用的是汇编语言,所以直接进行汇编链接就可以生成了可执行程序了) -
-o:表示生成的文件
arm-linux-ld -Ttext 0x00000000 -g led_on.o -o led_on_elf
-
-Ttext 0x00000000:表示代码段的地址是0x00000000
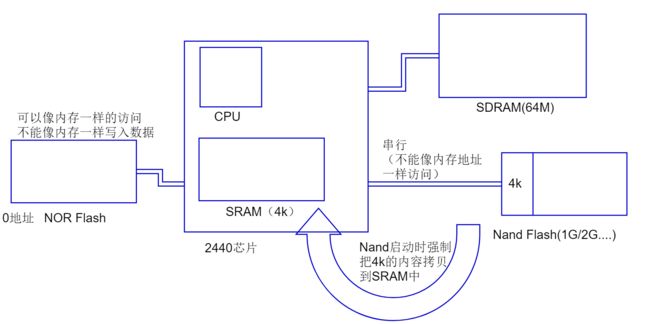
2440有两种启动方式,一种是Nand启动,一种是NOR启动
-
Nand启动
- Nand启动的时候,会自动将Nand Flash的前4k的拷贝到2440中的SRAM中去。
- CPU从SRAM的0地址执行,因此会有
Ttext 0x00000000的选项。
以上两步有硬件执行,无论Nand Flash中是否有内容。
-
NOR启动
- 0地址指向Nor flash
- cpu 从0地址取值执行
也正是由于这两种启动方式不同,那么如果把程序烧写到Nand中可以正常点亮LED,如果烧写到NOR中,则无法点亮LED了。
arm-linux-objcopy -O binary -S led_on_elf led_on.bin:生成可执行文件
-
-O binary:声称二进制文件。
那么我们不可能每次都是用的是汇编语言进行开发,主要的开发还是要用C语言,那么我们就来看看如何用C语言点亮LED
我们在开发C语言程序的时候,一般都是使用main函数作为入口,而main函数仅仅只是一个函数而已,那么他一定需要被别人来调用,同时将返回值返回给调用者。那么在我们在开发的时候LED点亮的时候,没有人来调用我们的函数,所以我么需要自己来做这些工作。
-
硬件方面的初始化
- 关闭看门狗(看门狗:定时器,默认启动,倒计时,3秒内没关闭会重新启动)
- 初始化时钟:2440最高为400MHz,而启动时候时钟只有12MHz,所以需要初始化
- 初始化SDRAM
-
软件方面的初始化
- 设置栈 :把栈指针sp指向某块内存
如果是片内的SRAM,不需要初始化就可以使用
如果不是片内的SRAM,而是SDRAM,就需要初始化
- 设置main函数的返回地址
- 调用main
- 清理工作
- 设置栈 :把栈指针sp指向某块内存
那么硬件和软件的初始化被称之为启动文件,而该启动文件是一个汇编代码,由于我们的程序比较简单,就不用初始化时钟了,并且我们芯片中有SRAM所以也无需初始化SDRAM。硬件初始化部分只需要关闭看门狗即可。
.text
.global _start
_start:
        ldr    r0,=0x53000000    @WATCHDOG寄存器的地址
        mov    r1,#0x0           @r1是这为0
        str    r1,[r0]           @写入0,禁止WATCHDOG,否则CPU会不断重启

        ldr    sp,=1024*4        @设置堆栈,注意:不能大于4k,因为现在可用的内存只有4k
                                 @Nand Flash中的代码在复位后,会被移到内部的ram中,此ram只有4k
        bl    main               @调用c程序中的main函数 ,bl指令会跳转到main函数,并把返回值放在lr里面
halt_loop:                       @死循环作为清理工作
        b    halt_loop
C语言程序
#define GPFCON (*(volatile unsigned long*)0x56000050)
#define GPFDAT (*(volatile unsigned long*)0x56000054)
//volatile是让编译器不要做优化
//此处宏定义相当于(long *)0x56000050把这个数值强转为指针。第一个*是起到解引用的作用,为了给地址内的内容赋值

int main()
{
  GPFCON = 0x00000100;  //设置GPF4为输出口,为[9:8] = 0b01
  GPFDAT = 0x00000000;  //GPF4输出0,LED1点亮。
  return 0;
}
Makefile
led_on_c.bin : crt0.S  led_on_c.c
    arm-linux-gcc -g -c -o crt0.o crt0.S
    arm-linux-gcc -g -c -o led_on_c.o led_on_c.c
    arm-linux-ld -Ttext 0x0000000 -g  crt0.o led_on_c.o -o led_on_c_elf
    arm-linux-objcopy -O binary -S led_on_c_elf led_on_c.bin
    arm-linux-objdump -D -m arm  led_on_c_elf > led_on_c.dis
clean:
    rm -f led_on_c.dis led_on_c.bin led_on_c_elf *.o
arm-linux-objdump -D -m arm led_on_c_elf > led_on_c.dis:声称反汇编代码
那么我们来看看反汇编后的代码
led_on_elf:     file format elf32-littlearm

Disassembly of section .text:

00000000 :
   0:   e3a00453    mov r0, #1392508928 ; 0x53000000
   4:   e3a01000    mov r1, #0  ; 0x0                                    @关闭看门狗
   8:   e5801000    str r1, [r0]
   c:   e3a0da01    mov sp, #4096   ; 0x1000    @设置栈
  10:   eb000000    bl  18                       @调用main函数

00000014 :
  14:   eafffffe    b   14

00000018 :
  18:   e1a0c00d    mov ip, sp
  1c:   e92dd800    stmdb   sp!, {fp, ip, lr, pc}        @把四个寄存器保存在了栈里面,并设置会报错
  20:   e24cb004    sub fp, ip, #4  ; 0x4
  24:   e3a03456    mov r3, #1442840576 ; 0x56000000
  28:   e2833050    add r3, r3, #80 ; 0x50
  2c:   e3a02c01    mov r2, #256    ; 0x100
  30:   e5832000    str r2, [r3]
  34:   e3a03456    mov r3, #1442840576 ; 0x56000000
  38:   e2833054    add r3, r3, #84 ; 0x54
  3c:   e3a02000    mov r2, #0  ; 0x0
  40:   e5832000    str r2, [r3]
  44:   e3a03000    mov r3, #0  ; 0x0
  48:   e1a00003    mov r0, r3
  4c:   e89da800    ldmia   sp, {fp, sp, pc}      @main执行完,从栈里面恢复寄存器
Disassembly of section .comment:

00000000 <.comment>:
   0:   43434700    cmpmi   r3, #0  ; 0x0
   4:   4728203a    undefined
   8:   2029554e    eorcs   r5, r9, lr, asr #10
   c:   2e342e33    mrccs   14, 1, r2, cr4, cr3, {1}
  10:   Address 0x10 is out of bounds.

Disassembly of section .debug_aranges:

00000000 <.debug_aranges>:
   0:   0000001c    andeq   r0, r0, ip, lsl r0
   4:   00000002    andeq   r0, r0, r2
   8:   00040000    andeq   r0, r4, r0
    ...
  14:   00000018    andeq   r0, r0, r8, lsl r0
    ...
  20:   0000001c    andeq   r0, r0, ip, lsl r0
  24:   004d0002    subeq   r0, sp, r2
  28:   00040000    andeq   r0, r4, r0
  2c:   00000000    andeq   r0, r0, r0
  30:   00000018    andeq   r0, r0, r8, lsl r0
  34:   00000038    andeq   r0, r0, r8, lsr r0
    ...
Disassembly of section .debug_pubnames:

00000000 <.debug_pubnames>:
   0:   00000017    andeq   r0, r0, r7, lsl r0
   4:   004d0002    subeq   r0, sp, r2
   8:   006d0000    rsbeq   r0, sp, r0
   c:   004e0000    subeq   r0, lr, r0
  10:   616d0000    cmnvs   sp, r0
  14:   00006e69    andeq   r6, r0, r9, ror #28
  18:   Address 0x18 is out of bounds.

Disassembly of section .debug_info:

00000000 <.debug_info>:
   0:   00000049    andeq   r0, r0, r9, asr #32
   4:   00000002    andeq   r0, r0, r2
   8:   01040000    tsteq   r4, r0
    ...
  14:   00000018    andeq   r0, r0, r8, lsl r0
  18:   30747263    rsbccs  r7, r4, r3, ror #4
  1c:   2f00532e    swics   0x0000532e
  20:   65646f63    strvsb  r6, [r4, #-3939]!
  24:   6e694c2f    cdpvs   12, 6, cr4, cr9, cr15, {1}
  28:   65447875    strvsb  r7, [r4, #-2165]
  2c:   614c2f76    cmpvs   ip, r6, ror pc
  30:   454c2f62    strmib  r2, [ip, #-3938]
  34:   6e6f4344    cdpvs   3, 6, cr4, cr15, cr4, {2}
  38:   6c6f7274    sfmvs   f7, 2, [pc], #-464
  3c:   4700432f    strmi   r4, [r0, -pc, lsr #6]
  40:   4120554e    teqmi   r0, lr, asr #10
  44:   2e322053    mrccs   0, 1, r2, cr2, cr3, {2}
  48:   01003531    tsteq   r0, r1, lsr r5
  4c:   00006980    andeq   r6, r0, r0, lsl #19
  50:   14000200    strne   r0, [r0], #-512
  54:   04000000    streq   r0, [r0]
  58:   00003601    andeq   r3, r0, r1, lsl #12
  5c:   00005000    andeq   r5, r0, r0
  60:   00001800    andeq   r1, r0, r0, lsl #16
  64:   554e4700    strplb  r4, [lr, #-1792]
  68:   33204320    teqcc   r0, #-2147483648    ; 0x80000000
  6c:   352e342e    strcc   r3, [lr, #-1070]!
  70:   656c0100    strvsb  r0, [ip, #-256]!
  74:   6e6f5f64    cdpvs   15, 6, cr5, cr15, cr4, {3}
  78:   2f00632e    swics   0x0000632e
  7c:   65646f63    strvsb  r6, [r4, #-3939]!
  80:   6e694c2f    cdpvs   12, 6, cr4, cr9, cr15, {1}
  84:   65447875    strvsb  r7, [r4, #-2165]
  88:   614c2f76    cmpvs   ip, r6, ror pc
  8c:   454c2f62    strmib  r2, [ip, #-3938]
  90:   6e6f4344    cdpvs   3, 6, cr4, cr15, cr4, {2}
  94:   6c6f7274    sfmvs   f7, 2, [pc], #-464
  98:   0200432f    andeq   r4, r0, #-1140850688    ; 0xbc000000
  9c:   69616d01    stmvsdb r1!, {r0, r8, sl, fp, sp, lr}^
  a0:   0501006e    streq   r0, [r1, #-110]
  a4:   00000065    andeq   r0, r0, r5, rrx
  a8:   00000018    andeq   r0, r0, r8, lsl r0
  ac:   00000050    andeq   r0, r0, r0, asr r0
  b0:   69035b01    stmvsdb r3, {r0, r8, r9, fp, ip, lr}
  b4:   0400746e    streq   r7, [r0], #-1134
  b8:   Address 0xb8 is out of bounds.

Disassembly of section .debug_abbrev:

00000000 <.debug_abbrev>:
   0:   10001101    andne   r1, r0, r1, lsl #2
   4:   12011106    andne   r1, r1, #-2147483647    ; 0x80000001
   8:   1b080301    blne    200c14 <__bss_end__+0x1f8bc4>
   c:   13082508    tstne   r8, #33554432   ; 0x2000000
  10:   00000005    andeq   r0, r0, r5
  14:   10011101    andne   r1, r1, r1, lsl #2
  18:   11011206    tstne   r1, r6, lsl #4
  1c:   13082501    tstne   r8, #4194304    ; 0x400000
  20:   1b08030b    blne    200c54 <__bss_end__+0x1f8c04>
  24:   02000008    andeq   r0, r0, #8  ; 0x8
  28:   0c3f002e    ldceq   0, cr0, [pc], #-184
  2c:   0b3a0803    bleq    e82040 <__bss_end__+0xe79ff0>
  30:   13490b3b    cmpne   r9, #60416  ; 0xec00
  34:   01120111    tsteq   r2, r1, lsl r1
  38:   00000a40    andeq   r0, r0, r0, asr #20
  3c:   03002403    tsteq   r0, #50331648   ; 0x3000000
  40:   3e0b0b08    fmacdcc d0, d11, d8
  44:   0000000b    andeq   r0, r0, fp
Disassembly of section .debug_line:

00000000 <.debug_line>:
   0:   00000032    andeq   r0, r0, r2, lsr r0
   4:   001a0002    andeqs  r0, sl, r2
   8:   01020000    tsteq   r2, r0
   c:   000a0efb    streqd  r0, [sl], -fp
  10:   01010101    tsteq   r1, r1, lsl #2
  14:   01000000    tsteq   r0, r0
  18:   74726300    ldrvcbt r6, [r2], #-768
  1c:   00532e30    subeqs  r2, r3, r0, lsr lr
  20:   00000000    andeq   r0, r0, r0
  24:   00020500    andeq   r0, r2, r0, lsl #10
  28:   12000000    andne   r0, r0, #0  ; 0x0
  2c:   2d2d2c2c    stccs   12, cr2, [sp, #-176]!
  30:   0002022d    andeq   r0, r2, sp, lsr #4
  34:   00330101    eoreqs  r0, r3, r1, lsl #2
  38:   00020000    andeq   r0, r2, r0
  3c:   0000001c    andeq   r0, r0, ip, lsl r0
  40:   0efb0102    cdpeq   1, 15, cr0, cr11, cr2, {0}
  44:   0101000a    tsteq   r1, sl
  48:   00000101    andeq   r0, r0, r1, lsl #2
  4c:   6c000100    stfvss  f0, [r0], {0}
  50:   6f5f6465    swivs   0x005f6465
  54:   00632e6e    rsbeq   r2, r3, lr, ror #28
  58:   00000000    andeq   r0, r0, r0
  5c:   18020500    stmneda r2, {r8, sl}
  60:   13000000    tstne   r0, #0  ; 0x0
  64:   2c808064    stccs   0, cr8, [r0], {100}
  68:   01000402    tsteq   r0, r2, lsl #8
  6c:   Address 0x6c is out of bounds.

Disassembly of section .debug_frame:

00000000 <.debug_frame>:
   0:   0000000c    andeq   r0, r0, ip
   4:   ffffffff    swinv   0x00ffffff
   8:   7c010001    stcvc   0, cr0, [r1], {1}
   c:   000d0c0e    andeq   r0, sp, lr, lsl #24
  10:   0000001c    andeq   r0, r0, ip, lsl r0
  14:   00000000    andeq   r0, r0, r0
  18:   00000018    andeq   r0, r0, r8, lsl r0
  1c:   00000038    andeq   r0, r0, r8, lsr r0
  20:   440c0d44    strmi   r0, [ip], #-3396
  24:   038d028e    orreq   r0, sp, #-536870904 ; 0xe0000008
  28:   0c44048b    cfstrdeq    mvd0, [r4], {139}
  2c:   0000040b    andeq   r0, r0, fp, lsl #8
用C语言轮流点亮LED
由之前的原理图可以看出来,三个LED分别接到了2440的GPF4、GPF5和GPF6的三个引脚。
我们只需要把这三个引脚设置为输出引脚,轮流输出0或1即可
首先,对于硬件和软件的初始化是必不可少的步骤,依然是:关闭看门狗、(修改计时器频率、初始化SDRAM),设置栈、设置main函数的返回值地址、调用main函数、清理工作
.text
.global _start
_start:
        ldr     r0,=0x530000000
        mov     r1,#0x0
        str     r0,[r1]

        ldr     sp, 1024*4
        bl      main
halt_loop:
        b       halt_loop
C代码:
#define GPFCON (*(volatile unsigned long*) 0x56000050)
#define GPFDAT (*(volatile unsigned long*) 0x56000054)

#define GPF4_out  (1<<(4*2))     //左移4*2位,每个引脚占据GPFCON的两位,所以就是把第4个2位设置为01
#define GPF5_out  (1<<(5*2))
#define GPF6_out  (1<<(6*2))

void wait(volatile unsigned long dly)
{
  for(;dly > 0; dly --);
}

int main()
{
  unsigned long i = 0;

  GPFCON = GPF4_out | GPF5_out | GPF6_out;  //将GPF4/5/6都设为了输出引脚

  while(1)
  {
    wait(30000);
    GPFDAT = (~(i << 4));  //左移4位
    if(++i == 8)
      i = 0;
  }

  return 0;
}
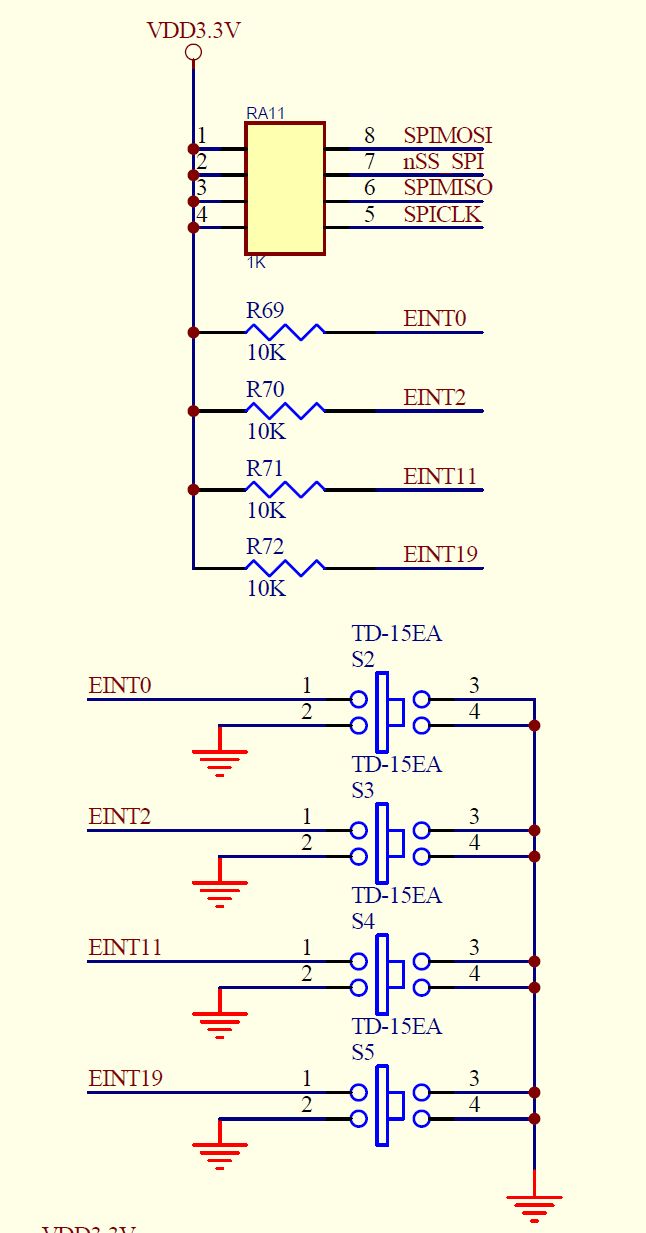
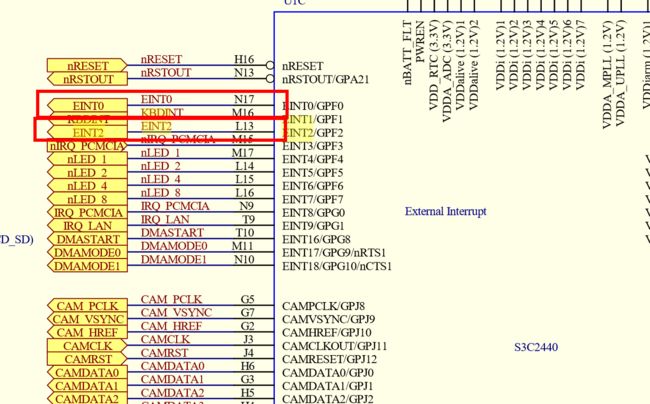
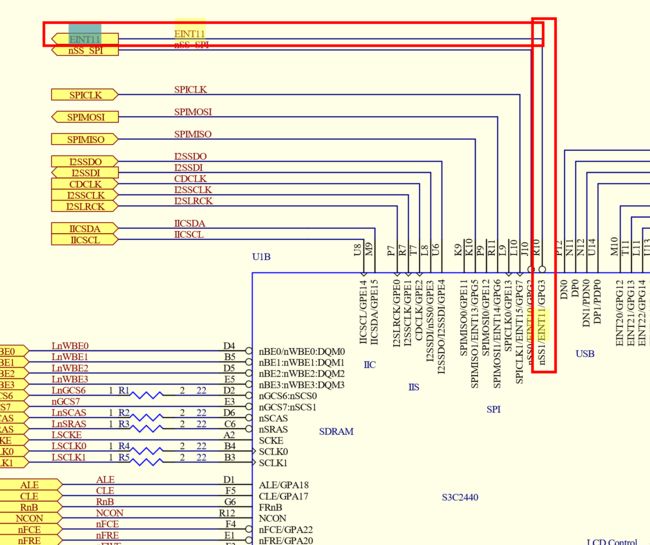
按键控制LED
.text
.global _start
_start:
      ldr    r0, =0x53000000
      mov    r1,#0x0
      str    r1,[r0]

      ldr    sp,1024*4
      bl     main
halt_loop:
      b     halt_loop
volatile unsigned long* const GPFCON = (volatile unsigned long*)0x56000050;
volatile unsigned long* const GPFDAT = (volatile unsigned long*)0x56000054;
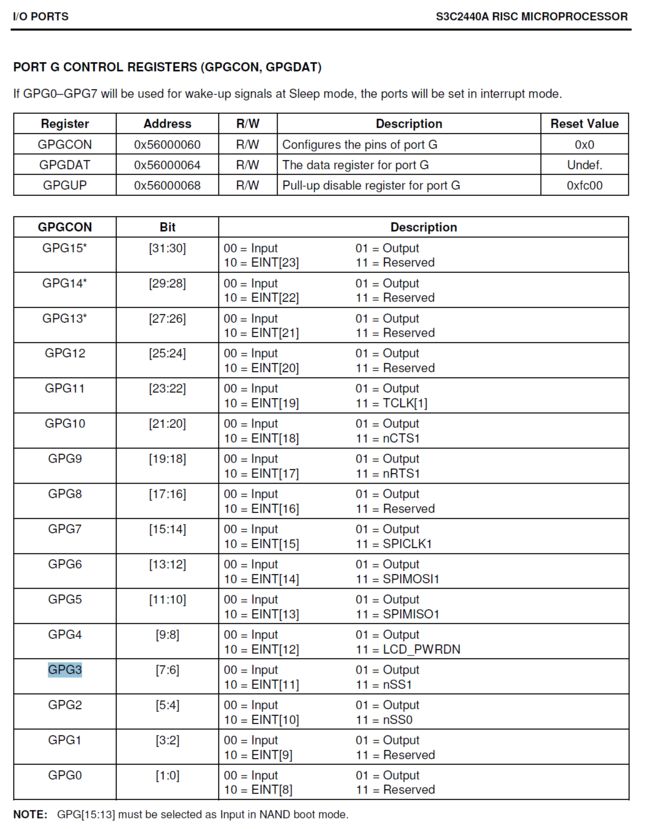
volatile unsigned long* const GPGCON = (volatile unsigned long*)0x56000060;
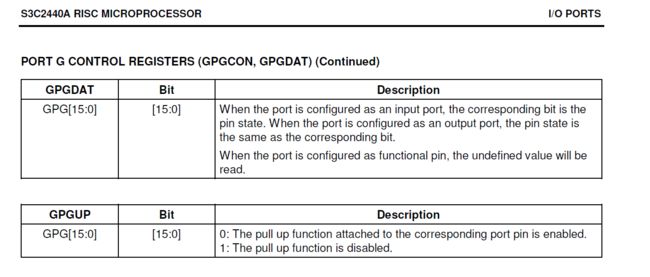
volatile unsigned long* const GPGDAT = (volatile unsigned long*)0x56000064;

void led_control(unsigned int key, unsigned pos)
{
        if(key) *GPFDAT  |= (key << pos);
        else   *GPFDAT &= (key << pos);
}

int main(void)
{

        //GPF0 GPF2 GPG3 设为输入
        *GPFCON &= ~((0x3 << (0 * 2)) | (0x3 << (2 * 2)));  //  清零
        *GPGCON &= ~(0x3 << (3 * 2));

        //GPF4 5 6 设为输出
        *GPFCON &= ~((0x3 << (4 * 2)) | (0x3 << (5 * 2)) | (0x3 << (6 * 2)));  //  清零
        *GPFCON |= ((0x1 << (4 * 2)) | (0x1 << (5 * 2)) | (0x1 << (6 * 2)));

        while(1){
                //  取出按键值,放在变量的最低位
                unsigned int b1, b2, b3;
                b1 = *GPFDAT & 0x1;
                b2 = (*GPFDAT & 0x4) >> 2;
                b3 = (*GPGDAT & 0x8) >> 3;

                led_control(b1, 4);
                led_control(b2, 5);
                led_control(b3, 6);
        }
        return 0;
}

