1.添加操作,代码如下:
复制代码 代码如下:
IList
private void btnNewConfig_Click(object sender, EventArgs e)
{
try
{
string _lampNo = UpDownSelfLampNo.Value.ToString();
int _ctrlGpNo = Convert.ToInt16(UpDownCtrlGpCnt.Value);
string _opWay = string.Format("{0}", rbConfig.Checked == true ? 1 : 0);
string _opCtuch = GetSelectedCtuCh();
if (CheckNewConfigIsLega(_ctrlGpNo, _opCtuch))
{
string _opType = rbCgOpen.Checked == true ? "01" : rbCgClose.Checked == true ? "00" : "02";
selfRunConfigs.Add(new SelfRun(_opCtuch, _opType, Convert.ToInt32(UpDownTime.Value)));
}
BindGridViewForIList
}
catch (Exception ex)
{
MessageBox.Show(string.Format("新增配置失败,原因:{0}", ex.Message.Trim()));
}
}
private void BindGridViewForIList
{
BindingList
BindingSource _source = new BindingSource(_bindinglist, null);
gv.DataSource = _source;
}
SelfRun实体类代码如下:
复制代码 代码如下:
public struct SelfRun
{
public SelfRun(string _opCtuCh, string _opWay, int _opTime)
: this()
{
OpCtuCh = _opCtuCh;
OpWay = _opWay;
OpTime = _opTime;
}
public string OpCtuCh
{
get;
set;
}
public string OpWay { get; set; }
public int OpTime { get; set; }
}
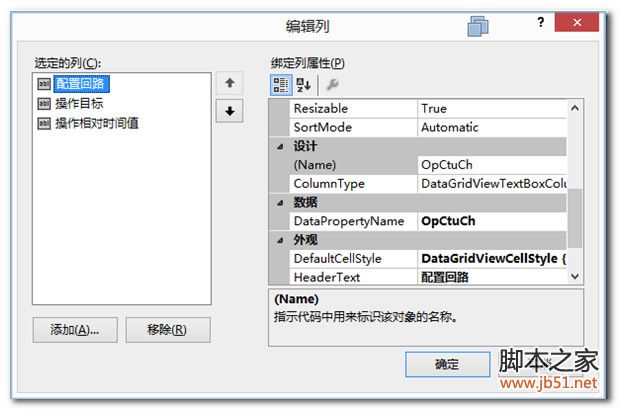
界面绑定,如图:
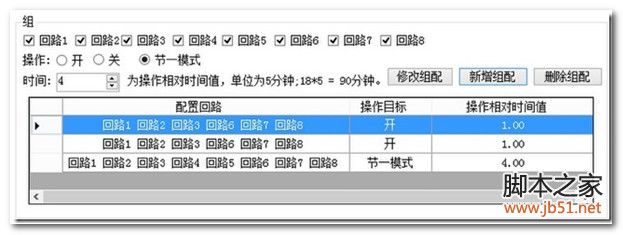
效果如图:
2.修改操作,代码如下:
其实思路很简单,就是点击行的时候,获取行内数据信息,然后填充到控件内,修改后,点击‘修改配置'后即可保存修改。
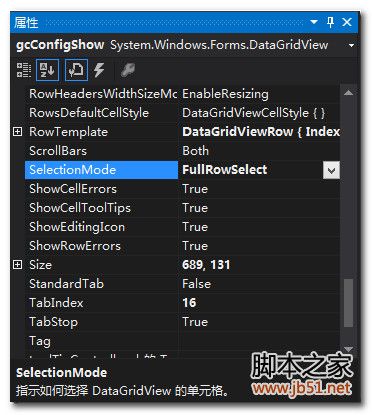
所以首先设置点击控件的时候,是选择一行,如图:
在CellClick事件中完成,当点击行的时候,将行数据填充到控件内,代码如下:
复制代码 代码如下:
private void gcConfigShow_CellClick(object sender, DataGridViewCellEventArgs e)
{
if (e.RowIndex < 0) return;
DataGridView _dgv = (DataGridView)sender;
string _opWay = _dgv.Rows[e.RowIndex].Cells["OpWay"].Value.ToString();
switch (_opWay)
{
case "00":
ThreadSafeOpRadioButton(rbCgClose, true);
break;
case "01":
ThreadSafeOpRadioButton(rbCgOpen, true);
break;
case "02":
ThreadSafeOpRadioButton(rbSaveOne, true);
break;
}
string _opCtuch = _dgv.Rows[e.RowIndex].Cells["OpCtuCh"].Value.ToString();
for (int i = 0; i < _opCtuch.Length; i++)
{
if (i == 0)
ThreadSafeCheckBox(ckch1, _opCtuch[i].Equals('1'));
if (i == 1)
ThreadSafeCheckBox(ckch2, _opCtuch[i].Equals('1'));
if (i == 2)
ThreadSafeCheckBox(ckch3, _opCtuch[i].Equals('1'));
if (i == 3)
ThreadSafeCheckBox(ckch4, _opCtuch[i].Equals('1'));
if (i == 4)
ThreadSafeCheckBox(ckch5, _opCtuch[i].Equals('1'));
if (i == 5)
ThreadSafeCheckBox(ckch6, _opCtuch[i].Equals('1'));
if (i == 6)
ThreadSafeCheckBox(ckch7, _opCtuch[i].Equals('1'));
if (i == 7)
ThreadSafeCheckBox(ckch8, _opCtuch[i].Equals('1'));
}
string _opTime = _dgv.Rows[e.RowIndex].Cells["OpTime"].Value.ToString();
decimal _time;
if (decimal.TryParse(_opTime, out _time))
ThreadSfeOpUpDown(UpDownTime, _time);
}
点击修改按钮内代码如下:
复制代码 代码如下:
private void btnUpdateConfig_Click(object sender, EventArgs e)
{
try
{
if (CheckSelectedRow())
{
int _rowIndex = gcConfigShow.CurrentCell.RowIndex;
int _ctrlGpNo = Convert.ToInt16(UpDownCtrlGpCnt.Value);
string _opWay = string.Format("{0}", rbConfig.Checked == true ? 1 : 0);
string _opCtuch = GetSelectedCtuCh();
string _opType = rbCgOpen.Checked == true ? "01" : rbCgClose.Checked == true ? "00" : "02";
SelfRun _selfRunByRowIndex = selfRunConfigs[_rowIndex];
_selfRunByRowIndex.OpCtuCh = GetSelectedCtuCh();
_selfRunByRowIndex.OpTime = Convert.ToInt32(UpDownTime.Value);
_selfRunByRowIndex.OpWay = _opType;
selfRunConfigs.RemoveAt(_rowIndex);
selfRunConfigs.Add(_selfRunByRowIndex);
BindGridViewForIList
}
}
catch (Exception ex)
{
MessageBox.Show(string.Format("修改配置失败,原因:{0}", ex.Message.Trim()));
}
}
3.删除操作,代码如下:
复制代码 代码如下:
private void btnDeleteConfig_Click(object sender, EventArgs e)
{
if (CheckSelectedRow())
{
if (MessageBox.Show("是否删除该行数据?", "消息", MessageBoxButtons.YesNo, MessageBoxIcon.Question) == DialogResult.Yes)
{
selfRunConfigs.RemoveAt(gcConfigShow.CurrentCell.RowIndex);
BindGridViewForIList
}
}
}


