上次业务逻辑和展示层的架构都写了,可以开始进行具体功能的实现,这次先实现管理员的登录、验证和注销功能。
一、业务逻辑层1、实现256散列加密方法。
Ninesky.Core【右键】-> 添加->文件夹,输入文件夹名General。
General文件夹【右键】->添加->类,输入类名Security。
引用System.Security.Cryptography命名空间(1),并实现SHA256静态加密方法。
2、Administrator模型类
Ninesky.Core【右键】-> 添加->类,输入类名Administrator。
添加引用System.ComponentModel.DataAnnotations; 完成的类代码
using System;
using System.ComponentModel.DataAnnotations;

namespace Ninesky.Core
{
 ///
 /// 管理员模型
 ///
 public class Administrator
 {
  [Key]
  public int AdministratorID { get; set; }

  ///
  /// 帐号
  ///
  [Required(ErrorMessage = "必须输入{0}")]
  [StringLength(30, MinimumLength = 4, ErrorMessage ="{0}长度为{2}-{1}个字符")]
  [Display(Name ="帐号")]
  public string Accounts { get; set; }

  ///
  /// 密码
  ///
  [DataType(DataType.Password)]
  [Required(ErrorMessage = "必须输入{0}")]
  [StringLength(256,ErrorMessage = "{0}长度少于{1}个字符")]
  [Display(Name = "密码")]
  public string Password { get; set; }

  ///
  /// 登录IP
  ///
  [Display(Name = "登录IP")]
  public string LoginIP { get; set; }

  ///
  /// 登录时间
  ///
  [Display(Name = "登录时间")]
  public Nullable LoginTime { get; set; }

  ///
  /// 创建时间
  ///
  [Display(Name = "创建时间")]
  public DateTime CreateTime { get; set; }
 }
}
3、数据上下文
打开Ninesky.Core->NineskyContext.cs 添加Administrators属性
红框内为添加内容。
4、AdministratorManager管理类
Ninesky.Core【右键】-> 添加->类,输入类名AdministratorManager。
类继承自BaseManager
为类添加Ninesky.Core.Types引用。
using Ninesky.Core.Types;
using System;
namespace Ninesky.Core
{
public class AdministratorManager : BaseManager
{
///
/// 添加
///
/// 管理员实体
///
/// 修改密码
///
/// 主键
/// 新密码【密文】
///
/// 删除
///
/// 主键
///
/// 查找
///
/// 帐号
///
/// 帐号是否存在
///
/// 帐号
///
/// 更新登录信息
///
/// 主键
/// IP地址
/// 时间
///
/// 验证
///
/// 帐号
/// 密码【密文】
/// Code:1-成功;2-帐号不存在;3-密码错误
public Response Verify(string accounts, string password)
{
Response _resp = new Response();
var _admin = base.Repository.Find(a => a.Accounts == accounts);
if (_admin == null)
{
_resp.Code = 2;
_resp.Message = "帐号为:【" + accounts + "】的管理员不存在";
}
else if (_admin.Password == password)
{
_resp.Code = 1;
_resp.Message = "验证通过";
}
else
{
_resp.Code = 3;
_resp.Message = "帐号密码错误";
}
return _resp;
}
}
}
二、展示层实现
首先,添加css。
Ninesky.Web->Content【右键】->添加->试样表,输入名称StyleControl。
打开Ninesky.Web->App_Start->BundleConfig.cs。
添加红框内代码。StyleControl.css具体内容这里省略了。
其次,添加对Ninesky.Core的引用。
Ninesky.Web->引用【右键】->添加引用.。在引用管理器中选择 项目->解决方案->Ninesky.Core.
处理完这两项内容就继续具体内容了:
1、管理员身份验证类AdminAuthorizeAttribute
AdminAuthorizeAttribute继承自AuthorizeAttribute,重写AuthorizeCore方法,通过Session["AdminID"]来判断管理员是否已经登录,重写HandleUnauthorizedRequest方法来处理未登录时的页面跳转。
using System.Web;
using System.Web.Mvc;
namespace Ninesky.Web.Areas.Control
{
///
/// 管理员身份验证类
///
public class AdminAuthorizeAttribute : AuthorizeAttribute
{
///
/// 重写自定义授权检查
///
///
/// 重写未授权的 HTTP 请求处理
///
protected override void HandleUnauthorizedRequest(AuthorizationContext filterContext)
{
filterContext.Result = new RedirectResult("~/Control/Admin/Login");
}
}
}
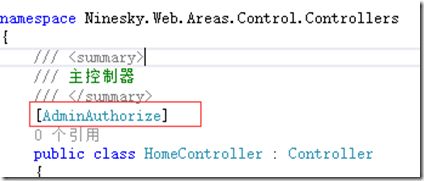
Ninesky.Web->Areas->Control【右键】->添加->类,输入控制器名称HomeController。
为HomeController添加[AdminAuthorize]
2、管理员控制器Ninesky.Web->Areas->Control->Controllers【右键】->添加->控制器。选择 MVC5 控制器 �C 空, 输入控制器名称Admin。
在控制器中引用Ninesky.Core、Ninesky.Core.General和Ninesky.Web.Areas.Control.Models命名空间。
添加私有变量private AdministratorManager adminManager = new AdministratorManager();
为AdminController添加[AdminAuthorize]
3.1 管理员登录
3.1.1 登录视图模型
Ninesky.Web->Areas->Control->Models【右键】->添加->类,输入类名LoginViewModel。
namespace Ninesky.Web.Areas.Control.Models
{
 ///
 /// 登录模型
 ///
 public class LoginViewModel
 {
 ///
 /// 帐号
 ///
 [Required(ErrorMessage = "必须输入{0}")]
 [StringLength(30, MinimumLength = 4, ErrorMessage = "{0}长度为{2}-{1}个字符")]
 [Display(Name = "帐号")]
 public string Accounts { get; set; }

 ///
 /// 密码
 ///
 [DataType(DataType.Password)]
 [Required(ErrorMessage = "必须输入{0}")]
 [StringLength(20,MinimumLength =6, ErrorMessage = "{0}长度{2}-{1}个字符")]
 [Display(Name = "密码")]
 public string Password { get; set; }
 }
}
3.1.2 登录方法
在AdminController中添加Login()方法
////// 登录 /// ///[AllowAnonymous] public ActionResult Login() { return View(); }
3.1.3 登录视图
在Login()方法上点【右键】->添加视图
模板选Create,模型类选LoginViewModel ,选项选中引用脚本库。完成后代码
@model Ninesky.Web.Areas.Control.Models.LoginViewModel

@{
 Layout = null;
}


 登录
 @Styles.Render("~/Content/controlcss")
 @Scripts.Render("~/bundles/modernizr")


 @Scripts.Render("~/bundles/jquery")
 @Scripts.Render("~/bundles/jqueryval")


  登录
  @using (Html.BeginForm())
  {
  @Html.AntiForgeryToken()
  @Html.ValidationSummary(true, "", new { @class = "text-danger" })

   @Html.EditorFor(model => model.Accounts, new { htmlAttributes = new { @class = "form-control", placeholder = "帐号" } })
   @Html.ValidationMessageFor(model => model.Accounts, "", new { @class = "text-danger" })


   @Html.EditorFor(model => model.Password, new { htmlAttributes = new { @class = "form-control", placeholder = "密码" } })
   @Html.ValidationMessageFor(model => model.Password, "", new { @class = "text-danger" })


  }
在AdminController中添加登录的处理方法public ActionResult Login(LoginViewModel loginViewModel)
[AllowAnonymous]
 [ValidateAntiForgeryToken]
 [HttpPost]
 public ActionResult Login(LoginViewModel loginViewModel)
 {
  if(ModelState.IsValid)
  {
  string _passowrd = Security.SHA256(loginViewModel.Password);
  var _response = adminManager.Verify(loginViewModel.Accounts, _passowrd);
  if (_response.Code == 1)
  {
   var _admin = adminManager.Find(loginViewModel.Accounts);
   Session.Add("AdminID", _admin.AdministratorID);
   Session.Add("Accounts", _admin.Accounts);
   _admin.LoginTime = DateTime.Now;
   _admin.LoginIP = Request.UserHostAddress;
   adminManager.Update(_admin);
   return RedirectToAction("Index", "Home");
  }
  else if (_response.Code == 2) ModelState.AddModelError("Accounts", _response.Message);
  else if (_response.Code == 3) ModelState.AddModelError("Password", _response.Message);
  else ModelState.AddModelError("",_response.Message);
  }
  return View(loginViewModel);
 }
4、注销
在AdminController中添加注销的处理方法public ActionResult Logout()
////// 注销 /// ///public ActionResult Logout() { Session.Clear(); return RedirectToAction("Login"); }
完工可以按F5测试了。
登录界面,输入帐号mzwhj 密码123456,登录成功。
登录成功界面。
=====================================================
代码见:https://ninesky.codeplex.com/SourceControl/latest
代码下载:https://ninesky.codeplex.com 点击SOURCE CODE 点击Download下载源文件。
以上就是本文的全部内容,希望对大家的学习有所帮助,也希望大家多多支持脚本之家。


