下载教程文件**
·····密码: ahgt**
选择对应名称的文件夹下载,内包含一个(开始)和一个(已完成)文件;(开始)文件用来和教程同步操作,(已完成)是最终结果。
Add horizontal scroll behavior to your designs. 添加垂直滚动。
Scrolling views are easy to build in Origami and highly flexible too. We're going to learn how to use scroll by creating a basic Messenger prototype. Make sure you download the tutorial files to follow along.
滚动视图在 Origami 里超简单啊。怎么给消息列表添加一个基础的滚动呢?下载好教程文件,跟着一步一步来。
Setting up 配置
Once you have the tutorial files open, you might notice that we have a layer named List set up below the Navigation Bar and the Tab Bar in our Layers panel. Take note of how the List layer is anchored to the top, and positioned exactly below the Navigation Bar.
打开标记为(开始)的文件,图层窗口中 Navigation Bar 和 Tab Bar 下面由一个叫 List 的图层。注意 List 图层的锚点,图层被锚定到顶部,并且位于 Navigation Bar 下面一层被遮挡了一部分。
Adding scroll interaction 添加滚动交互
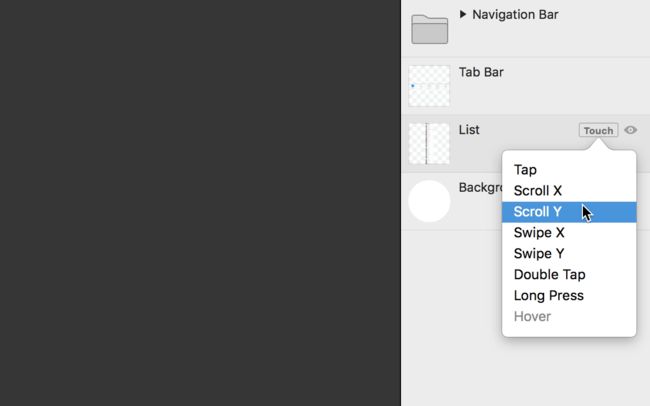
We can add Scroll to our layer just like any other type of interaction. Hover over the List layer, click the Touch button, and since we want vertical scrolling, select Scroll Y from the menu.
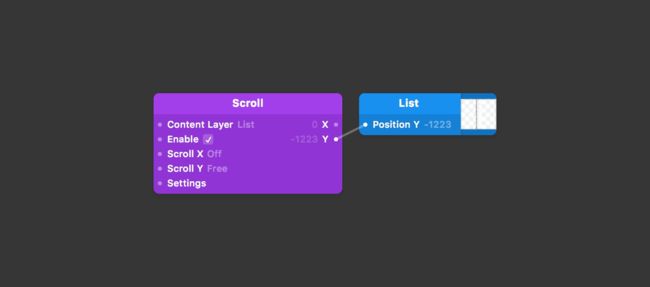
鼠标悬停到 List 图层上,点击 Touch 菜单里的 Scroll Y ,编辑器中添加了一个 Scroll 模块。
Our List layer is now scrollable with all the behaviors you would expect from something scrollable — things like velocity and rubber banding etc.
现在 List 图层可以滚动了。
Containing a scroll 创建容器
You might have noticed that adding Scroll interaction to the layer reset its position to 0
, clipping the Navigation Bar from view. Hide the Navigation Bar layer to see the List layer is now positioned at the top of the screen, rather than below the Navigation Bar as intended.
你肯能注意到了 List 图层被 Navigation Bar 遮盖了一步分,不是按照预期位从 Navigation Bar 下面开始滚动。
Another issue is at the very bottom of the scroll. The prototype is not taking into account that our Tab Bar is in the way.This Scroll should be contained above the Tab Bar.
还有一个问题就是结束滚动后,List 图层没有在 Tab Bar 上面,底部被 Tab Bar 挡住了。
We need to contain our List view Scroll to the space between the Navigation Bar and the above the Tab Bar. We can do this with a Group layer.
解决这俩问题需要把 List 的滚动范围限制在 Navigation Bar 和 Tab Bar 之间。可以用组 Group 图层解决。
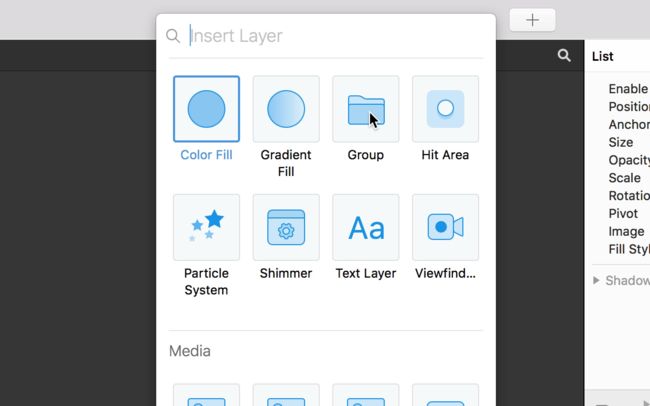
Add a Group by clicking on the New Layer button Shift Cmd N, and selecting Group. Make sure the Group is placed below the Navigation Bar and Tab Bar layers.
新建一个 Group ,按 Shift Cmd N 打开新图层下拉框,选择 Group。把 Group 放在 Navigation Bar 和 Tab Bar 下面。
Visual alignment 对齐
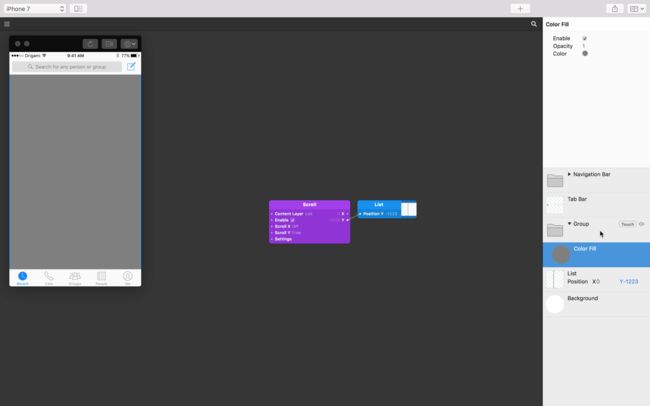
It can be useful to temporarily add a Color Fill to a new Group layer, just to see how much space it is occupying. Add in a Color Fill layer by clicking on the New Layer button Shift Cmd N, and adding in a Color Fill. Move your Color Fill layer into Group.
在 Group 内添加一个 Color Fill 图层,用来检查 Group 的大小。按 Shift Cmd N 打开新图层下拉框,选择 Color Fill,把 Color Fill 拖到 Group 内。
板栗:这步和上一步觉得可以调一下,先添加 Color Fill,选中 Color Fill 按 Cmd G 给 Color Fill 添加一个父级 Group。
Re-enable the Navigation Bar for the remaining steps.
Adjusting our container 调整容器尺寸
The layer size of Group is the same size as the device screen by default. The screen width is fine in the case, as our List content fits within it. Our height however needs some tweaking.
默认情况下 Group 图层的尺寸和屏幕的尺寸一样。List 的宽度和屏幕宽度一样,所以宽度保持不变,只需要调整高度就行了。
The height we wish to achieve is equivalent to the device screen height minus the height of the Navigation Bar layer, 64.5, minus the height of the Tab Bar layer, 49.
高度等于屏幕高度减去 Navigation Bar 图层的高度64.5,减去Tab Bar 图层的高度 49。
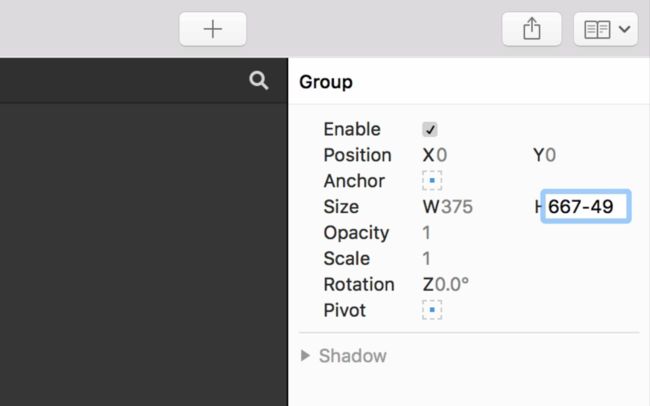
Select the Group layer. In the Size H property inside the Layers panel, enter 667-49-64.5 and hit Return.
选中 Group 图层,在属性 Size H 中输出 -64.5-49,按 Return 确定。
Aligning our container 对齐容器位置
In in the Viewer you should see that the List (underneath our Color Fill) is not perfectly aligned with our new height values. This is because our Group is still anchored to the center of the screen.
在查看器中可以到看到计算后的新高度值也没有对齐 List 图层(Color Fill 下方)。这是因为 Group 图层对齐屏幕的中心。
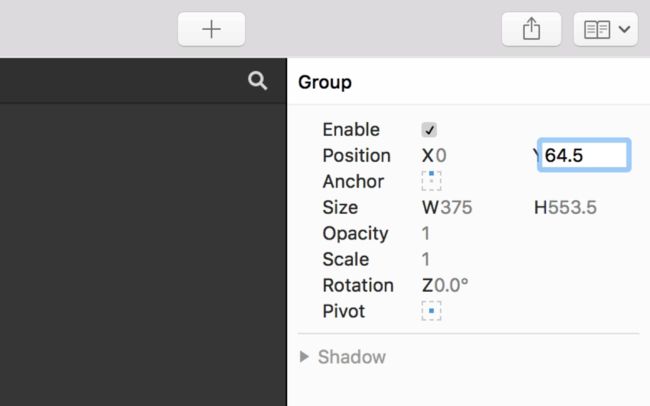
Change the Anchor of our Group to the top of the screen. Then change the Group Y position to the height of the Navigation Bar, which was 64.5. You should then see that our Group (and Color Fill) are now perfectly aligned in our prototype.
将 Group 的锚点改为上中点,Y 轴位置输入和 Navigation Bar 一样的64.5。现在 Group 的位置和原型一致了。
Ordering the container
Now that the Group is correctly placed, we can delete our temporary Color Fill, and drag our layer List inside the Group.
现在 Group 在正确的位置上,可以临时图层 Color Fill 了,并将 List 拖动到 Group 内。
You can now give the prototype a spin in the Viewer. Notice how List is now neatly constrained between the top Navigation Bar and the bottom Tab Bar.
完成。
相关教程
6. Horizontal Scrolling 水平滚动
创建水平分页滚动。
7. Screen Transitions 屏幕切换
创建页面流程
案例
11. Messenger Home
滚动对话列表。
▲ 教程文件里的
5. Facebook New Stories
当新闻滚动一定距离时触发提示出现。
6. Facebook Popular Events
创建一个简单的水平滚动。
相关模块
Scroll Scroll Settings
相关图层
Group Color Fill
NEXT UP
6. Horizontal Scrolling 水平滚动
创建水平分页滚动。

