上一篇文章Mybatis逆工程的使用主要是讲了mybatis-generator-core-1.3.2.jar的使用,这一篇我要介绍的是,修改jar包代码,实现生成自定义模板。
1.我们从这里可以下载mybatis-generator-core-1.3.2.jar项目源码
http://maven.outofmemory.cn/org.mybatis.generator/mybatis-generator-core/1.3.2/
2.在eclipse下导入存在的maven项目,File->Import


选择项目源码位置,点finish完成导入。
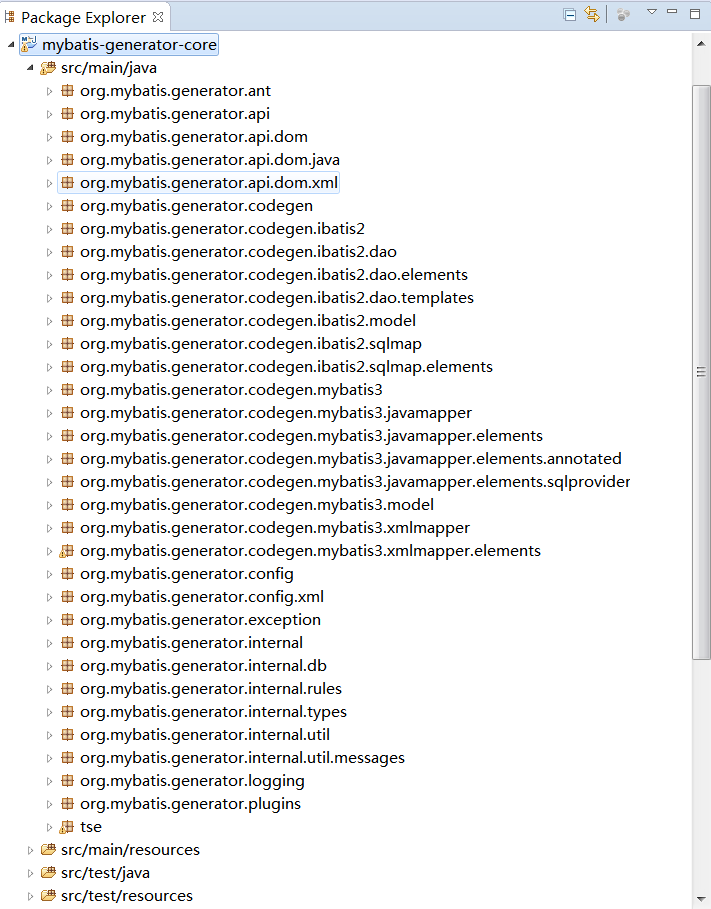
项目目录结构大概这样子。
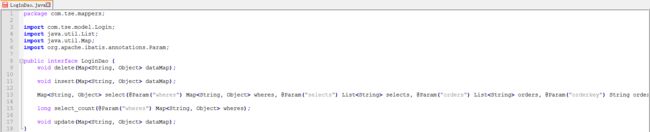
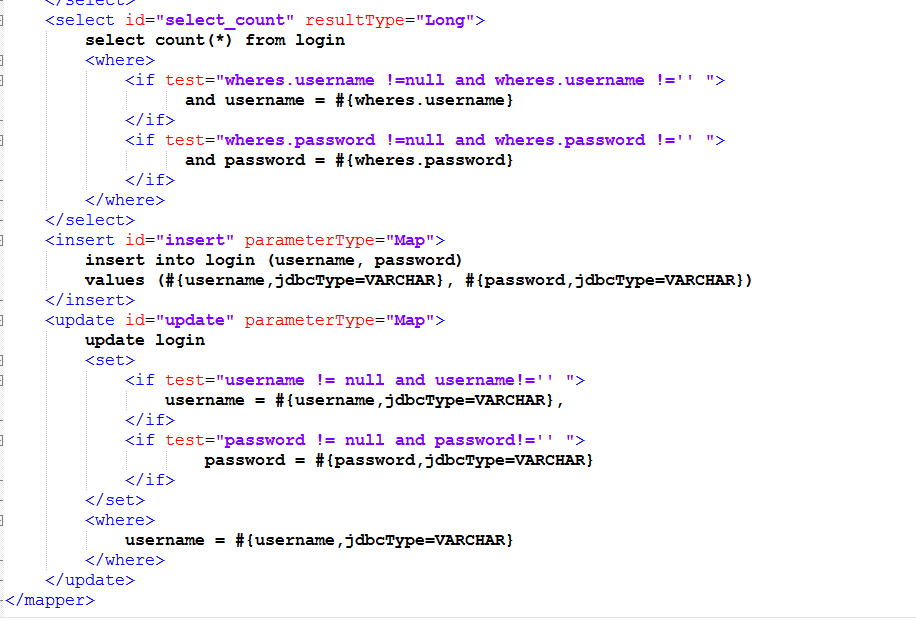
3.下面我逆工程要生成的mapping和xml格式。

4.开始修改,首先说明一下各目录

最底边的tse包是我自定义的包,里面是个主类,测试生成的代码是否达到预期标准。
由于这个架包是老外写的,生成的代码风格和我们不大一一样,如果你想修改代码格式,建议你看一下菠萝大象的文章,我这里就不讲代码格式了。
http://www.blogjava.net/bolo/archive/2015/03/20/423683.html
首先,我们先修改逆工程要生成的接口文件mapping的代码,默认情况下有增删改查,我们讲其中一个改方法update吧
比如 我要让生成的mapping中有这样的一个方法 void update(Map
就修改org.mybatis.generator.codegen.mybatis3.javamapper.elements包下的UpdateByPrimaryKeyWithoutBLOBsMethodGenerator类,如下:
/*
* Copyright 2009 The Apache Software Foundation
*
* Licensed under the Apache License, Version 2.0 (the "License");
* you may not use this file except in compliance with the License.
* You may obtain a copy of the License at
*
* http://www.apache.org/licenses/LICENSE-2.0
*
* Unless required by applicable law or agreed to in writing, software
* distributed under the License is distributed on an "AS IS" BASIS,
* WITHOUT WARRANTIES OR CONDITIONS OF ANY KIND, either express or implied.
* See the License for the specific language governing permissions and
* limitations under the License.
*/
package org.mybatis.generator.codegen.mybatis3.javamapper.elements;
import java.util.Set;
import java.util.TreeSet;
import org.mybatis.generator.api.dom.java.FullyQualifiedJavaType;
import org.mybatis.generator.api.dom.java.Interface;
import org.mybatis.generator.api.dom.java.JavaVisibility;
import org.mybatis.generator.api.dom.java.Method;
import org.mybatis.generator.api.dom.java.Parameter;
/**
*
* @author Jeff Butler
*
*/
public class UpdateByPrimaryKeyWithoutBLOBsMethodGenerator extends
AbstractJavaMapperMethodGenerator {
public UpdateByPrimaryKeyWithoutBLOBsMethodGenerator() {
super();
}
@Override
public void addInterfaceElements(Interface interfaze) {
Set importedTypes = new TreeSet();
FullyQualifiedJavaType parameterType = new FullyQualifiedJavaType(
introspectedTable.getBaseRecordType());
importedTypes.add(parameterType);
//新增一个方法
Method method = new Method();
//添加方法修饰符PUBLIC
method.setVisibility(JavaVisibility.PUBLIC);
//设置返回值,这里我用的是自定义的void,无返回值方法 getVoidInstance()
//FullyQualifiedJavaType类中可以自定义返回值方法,大家可以自己进去添加
//不想那么麻烦的话,可以 new FullyQualifiedJavaType("void") , 构造函数写上返回类型就行了
method.setReturnType(FullyQualifiedJavaType.getVoidInstance());
//设置方法名,同样可以自己进去看
method.setName(introspectedTable.getUpdateByPrimaryKeyStatementId());
//method.addParameter(new Parameter(parameterType, "record")); //$NON-NLS-1$
FullyQualifiedJavaType mapType=FullyQualifiedJavaType.getMyMapInstance();
//方法的参数,这里是Map类型的dateMap参数
Parameter parameter = new Parameter(mapType, "dataMap");
method.addParameter(parameter);
context.getCommentGenerator().addGeneralMethodComment(method,
introspectedTable);
addMapperAnnotations(interfaze, method);
if (context.getPlugins()
.clientUpdateByPrimaryKeyWithoutBLOBsMethodGenerated(method,
interfaze, introspectedTable)) {
interfaze.addImportedTypes(importedTypes);
interfaze.addMethod(method);
}
}
public void addMapperAnnotations(Interface interfaze, Method method) {
return;
}
}
大家可以根据注释来修改。
接下来修改mapping对应的xml中的代码,同样的,这里我只介绍修改update方法,相信看完你就能自己修改其它方法。
就修改org.mybatis.generator.codegen.mybatis3.xmlmapper.elements包下的UpdateByPrimaryKeyWithoutBLOBsElementGenerator类,如下:
/*
* Copyright 2009 The Apache Software Foundation
*
* Licensed under the Apache License, Version 2.0 (the "License");
* you may not use this file except in compliance with the License.
* You may obtain a copy of the License at
*
* http://www.apache.org/licenses/LICENSE-2.0
*
* Unless required by applicable law or agreed to in writing, software
* distributed under the License is distributed on an "AS IS" BASIS,
* WITHOUT WARRANTIES OR CONDITIONS OF ANY KIND, either express or implied.
* See the License for the specific language governing permissions and
* limitations under the License.
*/
package org.mybatis.generator.codegen.mybatis3.xmlmapper.elements;
import java.util.Iterator;
import java.util.List;
import org.mybatis.generator.api.IntrospectedColumn;
import org.mybatis.generator.api.dom.OutputUtilities;
import org.mybatis.generator.api.dom.xml.Attribute;
import org.mybatis.generator.api.dom.xml.TextElement;
import org.mybatis.generator.api.dom.xml.XmlElement;
import org.mybatis.generator.codegen.mybatis3.MyBatis3FormattingUtilities;
/**
*
* @author Jeff Butler
*
*/
public class UpdateByPrimaryKeyWithoutBLOBsElementGenerator extends
AbstractXmlElementGenerator {
//private boolean isSimple;
public UpdateByPrimaryKeyWithoutBLOBsElementGenerator(boolean isSimple) {
super();
//this.isSimple = isSimple;
}
@Override
public void addElements(XmlElement parentElement) {
//update标签(方法最外层)
XmlElement answer = new XmlElement("update"); //$NON-NLS-1$
//update标签的属性
answer.addAttribute(new Attribute(
"id", introspectedTable.getUpdateByPrimaryKeyStatementId())); //$NON-NLS-1$
answer.addAttribute(new Attribute("parameterType", //$NON-NLS-1$
"Map"));
//把标签加进去
context.getCommentGenerator().addComment(answer);
StringBuilder sb = new StringBuilder();
sb.append("update "); //$NON-NLS-1$
sb.append(introspectedTable.getFullyQualifiedTableNameAtRuntime());
//标签内容,即文本元素
answer.addElement(new TextElement(sb.toString()));
sb.setLength(0);
//set标签
XmlElement setElement = new XmlElement("set"); //$NON-NLS-1$
//获取数据库表中的所有字段
List  cols=introspectedTable.getAllColumns();
//迭代
java.util.Iterator iter =cols.iterator();
while (iter.hasNext()) {//迭代
//迭代到某一字段
IntrospectedColumn introspectedColumn = iter.next();
//if标签
XmlElement ifElement = new XmlElement("if"); //$NON-NLS-1$
//字段名
String str=MyBatis3FormattingUtilities
.getEscapedColumnName(introspectedColumn);
//if标签添加属性test,值为 字段 !=null and 字段!=''
ifElement.addAttribute(new Attribute("test",str+" != null and "+str+"!='' "));
//if标签内容 ,文本元素,给字段赋予即将修改的值
sb.append(MyBatis3FormattingUtilities
.getEscapedColumnName(introspectedColumn));
sb.append(" = "); //$NON-NLS-1$
sb.append(MyBatis3FormattingUtilities
.getParameterClause(introspectedColumn));
if (iter.hasNext()) {
sb.append(',');
}
//if标签添加上面的文本元素
ifElement.addElement(new TextElement(sb.toString()));
if (iter.hasNext()) {
sb.setLength(0);
OutputUtilities.xmlIndent(sb, 1);
}
setElement.addElement(ifElement);
}
//where元素(修改的字段前提条件)
XmlElement whereElement =new XmlElement("where");
for (IntrospectedColumn introspectedColumn : introspectedTable
.getPrimaryKeyColumns()) {//遍历表中字段进行判断
sb.setLength(0);
sb.append(MyBatis3FormattingUtilities
.getEscapedColumnName(introspectedColumn));
sb.append(" = "); //$NON-NLS-1$
sb.append(MyBatis3FormattingUtilities
.getParameterClause(introspectedColumn));
whereElement.addElement(new TextElement(sb.toString()));
}
//方法中最外层xml元素 update元素添加set元素和where元素
answer.addElement(setElement);
answer.addElement(whereElement);
if (context.getPlugins()
.sqlMapUpdateByPrimaryKeyWithoutBLOBsElementGenerated(answer,
introspectedTable)) {
parentElement.addElement(answer);
}
}
}
其它方法大家可以根据这个update方法改。
如果要添加新方法的话参考下面这个帖子
http://m.blog.csdn.net/article/details?id=35985705
下面我来验证修改成果
generatorConfig.xml //先配置xml 放在src/main/resources/ 目录下
StartUp.java//验证的主程序
package tse;
import static org.junit.Assert.assertEquals;
import java.io.File;
import java.util.ArrayList;
import java.util.List;
import org.mybatis.generator.api.MyBatisGenerator;
import org.mybatis.generator.config.Configuration;
import org.mybatis.generator.config.xml.ConfigurationParser;
import org.mybatis.generator.internal.DefaultShellCallback;
public class StartUp {
public static void main(String []args)throws Exception{
List warnings = new ArrayList();
File configFile=new File(StartUp.class.getResource("/generatorConfig.xml").toURI());
ConfigurationParser cp = new ConfigurationParser(warnings);
Configuration config = cp.parseConfiguration(configFile);
DefaultShellCallback shellCallback = new DefaultShellCallback(true);
MyBatisGenerator myBatisGenerator = new MyBatisGenerator(config, shellCallback, warnings);
myBatisGenerator.generate(null);
System.out.println(warnings);
}
}
好了,运行StartUp.java

就根据generatorConfig.xml的配置在目标目录生成对应文件。
OK,和我预期结果一样。
5.上面修改完了,我们开始打包。
由于是个maven项目,我用的是maven3.3.9,大家也可以用eclipse内置的maven,反正我是不喜欢。
下面是我maven项目的pom.xml文件代码
4.0.0 org.mybatis.generator mybatis-generator 1.3.2 mybatis-generator-core jar MyBatis Generator Core org.codehaus.mojo cobertura-maven-plugin cobertura-instrument pre-integration-test instrument org.apache.maven.plugins maven-jar-plugin 2.4 attach-jar integration-test jar true org.mybatis.generator.api.ShellRunner **/org/** org.apache.maven.plugins maven-install-plugin cobertura-install integration-test install cobertura org.apache.maven.plugins maven-assembly-plugin false ${basedir}/src/main/assembly/src.xml make-assembly package single com.googlecode.maven-gcu-plugin maven-gcu-plugin deploy upload ${project.build.directory}/${project.artifactId}-${project.version}-bundle.zip MyBatis Generator ${project.version} org.apache.maven.plugins maven-release-plugin -Prelease,gupload org.codehaus.mojo jdepend-maven-plugin 2.0-beta-2 org.codehaus.mojo cobertura-maven-plugin log4j log4j provided org.apache.ant ant provided junit junit test org.hsqldb hsqldb test org.apache.maven.plugins maven-surefire-plugin 2.12 https://mybatis.googlecode.com/svn/sub-projects/generator/tags/mybatis-generator-1.3.2/mybatis-generator-core scm:svn:https://mybatis.googlecode.com/svn/sub-projects/generator/tags/mybatis-generator-1.3.2/mybatis-generator-core scm:svn:https://mybatis.googlecode.com/svn/sub-projects/generator/tags/mybatis-generator-1.3.2/mybatis-generator-core
然后是修改src/main/assembly/src.xml代码
bundle

zip


src/main/resources
/

generatorConfig.xml


log4j.properties
src.xml


src/main/scripts
/

run.bat


${project.build.directory}
/

${project.artifactId}-${project.version}.jar


${project.build.directory}
/

${project.artifactId}-${project.version}-sources.jar
接下来,在src/main/ 下面新建scripts文件夹,在scripts文件夹新建txt文本文档,输入以下代码
java -jar mybatis-generator-1.3.2.jar -configfile generatorConfig.xml �Coverwrite
pause
改文件名为run.bat
至此,打包配置完毕。
大家可以在项目下右键Run as->maven build 在goal里输入package。或者命令行cmd中 进入项目的目录,运行mvn package,这里第一次运行会等待很久,因为maven会下载依赖的jar包,请耐心等待。
打包完毕,就会在项目根目录下的target目录生成如下结构

从上图中我们可以看到mybatis-generator-core-1.3.2.jar包已经生成。接下来我们可以用它加上generatorConfig.xml来生成自己想要的代码。
如果修改代码过程中有什么不懂的,请多看源代码。
OK,晒下成果图


本文就讲到这里!
以上所述是小编给大家介绍的Mybatis逆工程jar包的修改和打包的相关知识,希望对大家有所帮助!