前言:上篇介绍了下ko增删改查的封装,确实节省了大量的js代码。博主是一个喜欢偷懒的人,总觉得这些基础的增删改查效果能不能通过一个什么工具直接生成页面效果,啥代码都不用写了,那该多爽。于是研究了下T4的语法,虽然没有完全掌握,但是算是有了一个大致的了解。于是乎有了今天的这篇文章:通过T4模板快速生成页面。
KnockoutJS系列文章:
BootstrapTable与KnockoutJS相结合实现增删改查功能【一】
BootstrapTable与KnockoutJS相结合实现增删改查功能【二】
BootstrapTable+KnockoutJS相结合实现增删改查解决方案(三)两个Viewmodel搞定增删改查
一、T4的使用介绍
我们知道,MVC里面在添加视图的时候可以自动生成增删改查的页面效果,那是因为MVC为我们内置了基础增删改查的模板,这些模板的语法就是使用T4,那么这些模板在哪里呢?找了下相关文章,发现MVC4及以下的版本模板位置和MVC5及以上模板的位置有很大的不同。
•MVC4及以下版本的模板位置:VS的安装目录+\ItemTemplates\CSharp\Web\MVC 2\CodeTemplates。比如博主的D:\Program Files (x86)\Microsoft Visual Studio 12.0\Common7\IDE\ItemTemplates\CSharp\Web\MVC 4\CodeTemplates。
找到cshtml对应的模板,里面就有相应的增删改查的tt文件
•MVC5及以上版本的模板位置:直接给出博主的模板位置D:\Program Files (x86)\Microsoft Visual Studio 12.0\Common7\IDE\Extensions\Microsoft\Web\Mvc\Scaffolding\Templates
知道了这个,那么接下来就是改造模板,添加自己的生成内容了。可以直接将List和Edit模板拷贝到过来自行改造,但是最后想了想,还是别动MVC内置的东西了,我们自己来建自己的模板不是更好。
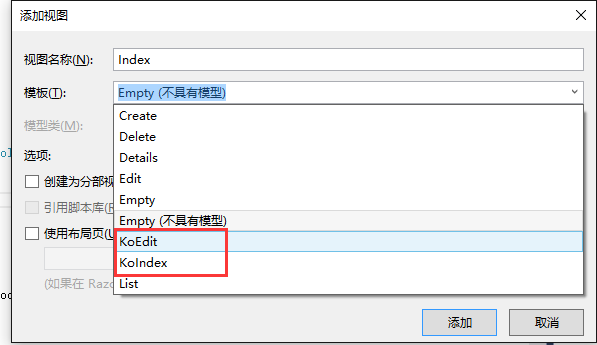
在当前Web项目的根目录下面新建一个文件夹,命名为CodeTemplates,然后将MVC模板里面的MvcControllerEmpty和MvcView两个模板文件夹拷贝到CodeTemplates文件夹下面,去掉它里面的原始模板,然后新建几个自己的模板,如下图:
这样我们在添加新的控制器和新建视图的时候就可以看到我们自定义的模板了:
二、T4代码介绍
上面介绍了如何新建自己的模板,模板建好之后就要开始往里面塞相应的内容了,如果T4的语法展开了说,那一篇是说不完的,有兴趣的园友可以去园子里找找,文章还是挺多的。这里主要还是来看看几个模板内容。还有一点需要说明下,貌似从MVC5之后,T4的模板文件后缀全部改成了t4,而之前的模板一直是tt结尾的,没有细究它们语法的区别,估计应该差别不大。
1、Controller.cs.t4
为什么要重写这个空的控制器模板呢?博主觉得增删改查的好多方法都需要手动去写好麻烦,写一个模板直接生成可以省事很多。来看看模板里面的实现代码:
<#@ template language="C#" HostSpecific="True" #>
<#@ output extension="cs" #>
<#@ parameter type="System.String" name="ControllerName" #>
<#@ parameter type="System.String" name="ControllerRootName" #>
<#@ parameter type="System.String" name="Namespace" #>
<#@ parameter type="System.String" name="AreaName" #>
<#
var index = ControllerName.LastIndexOf("Controller");
var ModelName = ControllerName.Substring(0, index);
#>
using System;
using System.Collections.Generic;
using System.Linq;
using System.Web;
using System.Web.Mvc;
using TestKO.Models;
namespace <#= Namespace #>
{
public class <#= ControllerName #> : Controller
{
public ActionResult Index()
{
return View();
}
public ActionResult Edit(<#= ModelName #> model)
{
return View(model);
}
[HttpGet]
public JsonResult Get(int limit, int offset)
{
return Json(new { }, JsonRequestBehavior.AllowGet);
}
//新增实体
[HttpPost]
public JsonResult Add(<#= ModelName #> oData)
{
<#= ModelName #>Model.Add(oData);
return Json(new { }, JsonRequestBehavior.AllowGet);
}
//更新实体
[HttpPost]
public JsonResult Update(<#= ModelName #> oData)
{
<#= ModelName #>Model.Update(oData);
return Json(new { }, JsonRequestBehavior.AllowGet);
}
//删除实体
[HttpPost]
public JsonResult Delete(List<<#= ModelName #>> oData)
{
<#= ModelName #>Model.Delete(oData);
return Json(new { }, JsonRequestBehavior.AllowGet);
}
}
}
这个内容不难理解,直接查看生成的控制器代码:
using System;
using System.Collections.Generic;
using System.Linq;
using System.Web;
using System.Web.Mvc;
using TestKO.Models;
namespace TestKO.Controllers
{
public class UserController : Controller
{
public ActionResult Index()
{
return View();
}
public ActionResult Edit(User model)
{
return View(model);
}
[HttpGet]
public JsonResult Get(int limit, int offset)
{
return Json(new { }, JsonRequestBehavior.AllowGet);
}
//新增实体
[HttpPost]
public JsonResult Add(User oData)
{
UserModel.Add(oData);
return Json(new { }, JsonRequestBehavior.AllowGet);
}
//更新实体
[HttpPost]
public JsonResult Update(User oData)
{
UserModel.Update(oData);
return Json(new { }, JsonRequestBehavior.AllowGet);
}
//删除实体
[HttpPost]
public JsonResult Delete(List oData)
{
UserModel.Delete(oData);
return Json(new { }, JsonRequestBehavior.AllowGet);
}
}
}
2、KoIndex.cs.t4
这个模板主要用于生成列表页面,大致代码如下:
<#@ template language="C#" HostSpecific="True" #>
<#@ output extension=".cshtml" #>
<#@ include file="Imports.include.t4" #>
<#
// The following chained if-statement outputs the file header code and markup for a partial view, a view using a layout page, or a regular view.
if(IsPartialView) {
#>
<#
} else if(IsLayoutPageSelected) {
#>
@{
ViewBag.Title = "<#= ViewName#>";
<#
if (!String.IsNullOrEmpty(LayoutPageFile)) {
#>
Layout = "<#= LayoutPageFile#>";
<#
}
#>
}
<#
} else {
#>
@{
Layout = null;
}
<#= ViewName #>
<#
PushIndent(" ");
}
#>
| <# IEnumerable | <#= GetValueExpression(property) #> | <# } }#>
|---|
添加一个视图Index,然后选择这个模板
得到的页面内容
@{
Layout = null;
}
Index
| Name | FullName | Age | Des | Createtime | strCreatetime |
|---|
我们将上篇说的viewmodel搬到页面上面来了,这样每次就不用从controller里面传过来了。稍微改一下表格的列名,页面就可以跑起来了。
这里有待优化的几点:
(1)查询条件没有生成,如果将T4的语法研究深一点,可以在需要查询的字段上面添加特性标识哪些字段需要查询,然后自动生成对应的查询条件。
(2)表格的列名似乎也可以通过属性的字段特性来生成。这点和第一点类似,都需要研究T4的语法。
3、KoEdit.cs.t4
第三个模板页就是编辑的模板了,它的大致代码如下:
<#@ template language="C#" HostSpecific="True" #>
<#@ output extension=".cshtml" #>
<#@ include file="Imports.include.t4" #>
@model <#= ViewDataTypeName #>
<#
// "form-control" attribute is only supported for all EditorFor() in System.Web.Mvc 5.1.0.0 or later versions, except for checkbox, which uses a div in Bootstrap
string boolType = "System.Boolean";
Version requiredMvcVersion = new Version("5.1.0.0");
bool isControlHtmlAttributesSupported = MvcVersion >= requiredMvcVersion;
// The following chained if-statement outputs the file header code and markup for a partial view, a view using a layout page, or a regular view.
if(IsPartialView) {
#>
<#
} else if(IsLayoutPageSelected) {
#>
@{
ViewBag.Title = "<#= ViewName#>";
<#
if (!String.IsNullOrEmpty(LayoutPageFile)) {
#>
Layout = "<#= LayoutPageFile#>";
<#
}
#>
}
<#= ViewName#>
<#
} else {
#>
@{
Layout = null;
}


<#= ViewName #>


<#
PushIndent(" ");
}
#>
<#
if (ReferenceScriptLibraries) {
#>
<#
if (!IsLayoutPageSelected && IsBundleConfigPresent) {
#>
@Scripts.Render("~/bundles/jquery")
@Scripts.Render("~/bundles/jqueryval")
<#
}
#>
<#
else if (!IsLayoutPageSelected) {
#>


<#
}
#>
<#
}
#>
<#
var index = ViewDataTypeName.LastIndexOf(".");
var ModelName = ViewDataTypeName.Substring(index+1, ViewDataTypeName.Length-index-1);
#>
<#
if(IsLayoutPageSelected && ReferenceScriptLibraries && IsBundleConfigPresent) {
#>
@section Scripts {
@Scripts.Render("~/bundles/jqueryval")
}
<#
}
#>
<#
else if(IsLayoutPageSelected && ReferenceScriptLibraries) {
#>
<#
}
#>
<#
// The following code closes the tag used in the case of a view using a layout page and the body and html tags in the case of a regular view page
#>
<#
if(!IsPartialView && !IsLayoutPageSelected) {
ClearIndent();
#>
<#
}
#>
<#@ include file="ModelMetadataFunctions.cs.include.t4" #>
生成的代码:
@model TestKO.Models.UserEdit.cshtml
当然,代码也需要做稍许修改。通过添加自定义的模板页,只要后台对应的实体模型建好了,在前端只需要新建两个自定义视图,一个简单的增删改查即可完成,不用写一句js代码。
三、select组件的绑定
上面介绍了下T4封装增删改查的语法,页面所有的组件基本都是文本框,然而,在实际项目中,很多的查询和编辑页面都会存在下拉框的展示,对于下拉框,我们该如何处理呢?不卖关子了,直接给出解决方案吧,比如编辑页面我们可以在后台将下拉框的数据源放在实体里面。
用户的实体
[DataContract]
public class User
{
[DataMember]
public int id { get; set; }
[DataMember]
public string Name { get; set; }
[DataMember]
public string FullName { get; set; }
[DataMember]
public int Age { get; set; }
[DataMember]
public string Des { get; set; }
[DataMember]
public DateTime Createtime { get; set; }
[DataMember]
public string strCreatetime { get; set; }
[DataMember]
public string DepartmentId { get; set; }
[DataMember]
public object Departments { get; set; }
}
然后编辑页面
public ActionResult Edit(User model)
{
model.Departments = DepartmentModel.GetData();
return View(model);
}
然后前端绑定即可。
JS代码不用做任何修改,新增和编辑的时候部门字段就能自动添加到viewmodel里面去。
当然,我们很多项目使用的下拉框都不是单纯的select,因为单纯的select样式实在是难看,于是乎出了很多的select组件,比如博主之前分享的select2、MultiSelect等等。当使用这些组件去初始化select时,审核元素你会发现,这个时候界面上的下拉框已经不是单纯的select标签了,而是由组件自定义的很多其他标签组成。我们就以select2组件为例来看看直接按照上面的这样初始化是否可行。
我们将编辑页面初始化的js代码增加最后一句:
通过新增和编辑发现,这样确实可行!分析原因,虽然初始化成select2组件之后,页面的html发生了变化,但是组件最终还是会将选中值呈现在原始的select控件上面。不知道除了select2,其他select初始化组件会不会这样,待验证。但是这里有一点需要说明下,在初始化select2之前,下拉框的options必须先绑定值,也就是说,组件的初始化必须要放在ko.applyBinding()之后。
四、总结
至此,ko结合bootstrapTable的模板生成以及select控件的使用基本可用,当然,还有待完善。后面如果有时间,博主会整理下其他前端组件和ko的联合使用,比如我们最常见的日期控件。如果大家有任何疑问请给我留言,小编会及时回复大家的。在此也非常感谢大家对脚本之家网站的支持!


