一、架构和组件关系图
Spring 5的架构图如下:
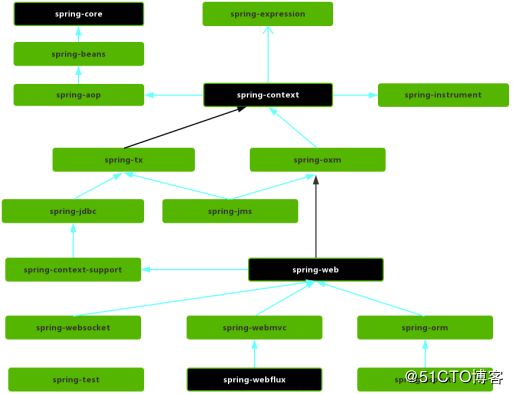
各组件之间的依赖图如下:
Spring5有20 个组件(1300多个文件),这些组件被分别整合在核心容器(Core Container)、AOP(Aspect Oriented Programming)和设备支持(Instrmentation)、数据访问及集成(Data Access/Integeration)、Web、报文发送(Messaging)、Test中。
1、核心容器
由 spring-beans、spring-core、spring-context 和 spring-expression(Spring Expression Language, SpEL)组成,4个组件。
spring-beans 和 spring-core 模块是 Spring 框架的核心模块,包含了控制反转(Inversion of
Control, IOC)和依赖注入(Dependency Injection, DI)。
其中,BeanFactory 接口是 Spring 框架中的核心接口,它是工厂模式的具体实现。BeanFactory 使用控制反转对应用程序的配置和依赖性规范与实际的应用程序代码进行了分离。但 BeanFactory 容器实例化后并不会自动实例化 Bean,只有当 Bean被使用时 BeanFactory 容器才会对该 Bean 进行实例化与依赖关系的装配。
spring-context 模块构架于核心模块之上,他扩展了 BeanFactory,为她添加了 Bean 生命周期控制、框架事件体系以及资源加载透明化等功能。此外该模块还提供了许多企业级支持,如邮件访问、远程访问、任务调度等,ApplicationContext 是该模块的核心接口,她是 BeanFactory 的超类,与BeanFactory 不同,ApplicationContext 容器实例化后会自动对所有的单实例 Bean 进行实例化与依赖关系的装配,使之处于待用状态。
spring-expression 模块是统一表达式语言(EL)的扩展模块,可以查询、管理运行中的对象,
同时也方便的可以调用对象方法、操作数组、集合等。它的语法类似于传统 EL,但提供了额外的功能,最出色的要数函数调用和简单字符串的模板函数。这种语言的特性是基于 Spring 产品的需求而设计,他可以非常方便地同 Spring IOC 进行交互。
2、AOP 和设备支持
由 spring-aop、spring-aspects 和 spring-instrument组成,3个组件。
spring-aop 是 Spring 的另一个核心模块,是 AOP 主要的实现模块。作为继 OOP 后,对程序员影响最大的编程思想之一,AOP 极大地开拓了人们对于编程的思路。在 Spring 中,他是以 JVM 的动态代理技术为基础,然后设计出了一系列的 AOP 横切实现,比如前置通知、返回通知、异常通知等,同时, Pointcut 接口来匹配切入点,可以使用现有的切入点来设计横切面,也可以扩展相关方法根据需求进行切入。
spring-aspects 模块集成自 AspectJ 框架,主要是为 Spring AOP 提供多种 AOP 实现方法。
spring-instrument 模块是基于 JAVA SE 中的“ava.lang.instrument”进行设计的,应该算是
AOP 的一个支援模块,主要作用是在 JVM 启用时,生成一个代理类,程序员通过代理类在运行时修改类的字节,从而改变一个类的功能,实现 AOP 的功能。
3、数据访问及集成
由spring-jdbc、spring-tx、spring-orm、spring-jms 和 spring-oxm组成,5个组件。
spring-jdbc 模块是 Spring 提供的 JDBC 抽象框架的主要实现模块,用于简化 Spring JDBC。主要是提供 JDBC 模板方式、关系数据库对象化方式、SimpleJdbc 方式、事务管理来简化 JDBC编程,主要实现类是 JdbcTemplate、SimpleJdbcTemplate 以及 NamedParameterJdbcTemplate。
spring-tx模块是 Spring JDBC 事务控制实现模块。使用 Spring 框架,它对事务做了很好的封装, 通过它的 AOP 配置,可以灵活的配置在任何一层;但是在很多的需求和应用,直接使用 JDBC 事务控制还是有其优势的。其实,事务是以业务逻辑为基础的;一个完整的业务应该对应业务层里的一个方法; 如果业务操作失败,则整个事务回滚;所以,事务控制是绝对应该放在业务层的;但是,持久层的设计则应该遵循一个很重要的原则:保证操作的原子性,即持久层里的每个方法都应该是不可以分割的。所以,在使用 Spring JDBC 事务控制时,应该注意其特殊性。
spring-orm 模块是 ORM 框架支持模块,主要集成 Hibernate, Java Persistence API (JPA) 和Java Data Objects (JDO) 用于资源管理、数据访问对象(DAO)的实现和事务策略。
spring-jms 模块(Java Messaging Service)能够发送和接受信息,自 Spring Framework 4.1
以后,他还提供了对 spring-messaging 模块的支撑。
spring-oxm 模块主要提供一个抽象层以支撑 OXM(OXM 是 Object-to-XML-Mapping 的缩写,它是一个 O/M-mapper,将 java 对象映射成 XML 数据,或者将 XML 数据映射成 java 对象),例如:JAXB,Castor, XMLBeans, JiBX 和 XStream 等。
4、Web
由 spring-web、spring-webmvc、spring-websocket 和 spring-webflux 组成,4个组件。
spring-web 模块为 Spring 提供了最基础 Web 支持,主要建立于核心容器之上,通过 Servlet 或 者 Listeners 来初始化 IOC 容器,也包含一些与 Web 相关的支持。
spring-webmvc模块是一个的Web-Servlet模块,实现了Spring MVC (model-view-Controller)的 Web 应用。
spring-websocket 模块主要是与 Web 前端的全双工通讯的协议。
spring-webflux 是一个新的非堵塞函数式 Reactive Web 框架,可以用来建立异步的,非阻塞,事件驱动的服务,并且扩展性非常好。
5、报文发送
包括spring-messaging ,1个组件。
spring-messaging是从 Spring4 开始新加入的一个模块,主要职责是为 Spring 框架集成一些基础的报文传送应用。
6、Test
包含spring-test,1个组件。
spring-test 模块主要为测试提供支持的,毕竟在不需要发布(程序)到你的应用服务器或者连接到其他企业设施的情况下能够执行一些集成测试或者其他测试对于任何企业都是非常重要的。
二、 Spring Bean基础
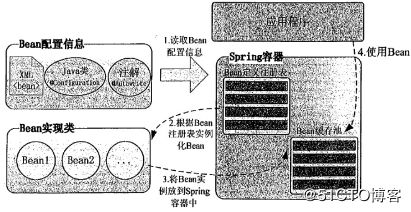
Bean配置信息定义了Bean的实现及依赖关系,Spring容器根据各种形式的Bean配置信息在容器内部建立Bean定义注册表,然后根据注册表加载、实例化Bean,并建立Bean和Bean的依赖关系,最后将这些准备就绪的Bean放到Bean缓存池中,以供外层的应用程序进行调用。下图是一张老图:
1、bean配置
bean配置有三种方法:
基于xml配置Bean
使用注解定义Bean
基于java类提供Bean定义信息
1.1 基于xml配置Bean
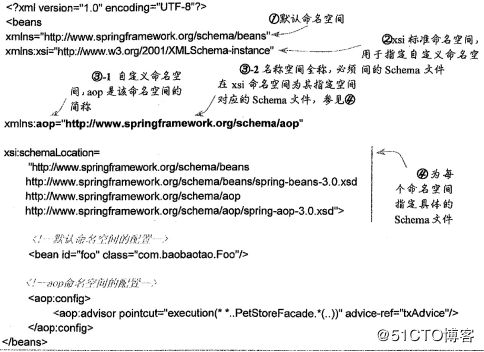
对于基于XML的配置,Spring 2.0以后使用Schema的格式,使得不同类型的配置拥有了自己的命名空间,是配置文件更具扩展性。
①默认命名空间:它没有空间名,用于Spring Bean的定义;
②xsi命名空间:这个命名空间用于为每个文档中命名空间指定相应的Schema样式文件,是标准组织定义的标准命名空间;
③aop命名空间:这个命名空间是Spring配置AOP的命名空间,是用户自定义的命名空间。
命名空间的定义分为两个步骤:第一步指定命名空间的名称;第二步指定命名空间的Schema文档样式文件的位置,用空格或回车换行进行分分隔。
1.1.1 Bean基本配置
在Spring容器的配置文件中定义一个简要Bean的配置片段如下所示:
一般情况下,Spring IOC容器中的一个Bean即对应配置文件中的一个
下面是基于XML的配置文件定义了两个简单的Bean:
xmlns:xsi="http://www.w3.org/2001/XMLSchema-instance"
xsi:schemaLocation="http://www.springframework.org/schema/beans
http://www.springframework.org/schema/beans/spring-beans-3.0.xsd">
1.1.2 依赖注入
属性注入
构造函数注入
工厂方式注入
1.2 使用注解定义Bean
我们知道,Spring容器成功启动的三大要件分别是:Bean定义信息、Bean实现类以及Spring本身。如果采用基于XML的配置,Bean定义信息和Bean实现类本身是分离的,而采用基于注解的配置方式时,Bean定义信息即通过在Bean实现类上标注注解实现。
下面是使用注解定义一个DAO的Bean:
package com.baobaotao.anno;
import org.springframework.stereotype.Component;
import org.springframework.stereotype.Repository;
//①通过Repository定义一个DAO的Bean
@Component("userDao")
public class UserDao {
}
在①处,我们使用@Component注解在UserDao类声明处对类进行标注,它可以被Spring容器识别,Spring容器自动将POJO转换为容器管理的Bean。
它和以下的XML配置是等效的:
<bean id="userDao" class="com.baobaotao.anno.UserDao"/>
除了@Component以外,Spring提供了3个功能基本和@Component等效的注解,它们分别用于对DAO、Service及Web层的Controller进行注解,所以也称这些注解为Bean的衍型注解:(类似于xml文件中定义Bean
@Repository:用于对DAO实现类进行标注;
@Service:用于对Service实现类进行标注;
@Controller:用于对Controller实现类进行标注;
之所以要在@Component之外提供这三个特殊的注解,是为了让注解类本身的用途清晰化,此外Spring将赋予它们一些特殊的功能。
1.2.1 使用注解配置信息启动spring容器
Spring提供了一个context的命名空间,它提供了通过扫描类包以应用注解定义Bean的方式:
xmlns:xsi="http://www.w3.org/2001/XMLSchema-instance"
xmlns:context="http://www.springframework.org/schema/context"
xsi:schemaLocation="http://www.springframework.org/schema/beans
http://www.springframework.org/schema/beans/spring-beans-3.0.xsd
http://www.springframework.org/schema/context
http://www.springframework.org/schema/context/spring-context-3.0.xsd"
>
在①处声明context命名空间,在②处即可通过context命名空间的component-scan的base-package属性指定一个需要扫描的基类包,Spring容器将会扫描这个基类包里的所有类,并从类的注解信息中获取Bean的定义信息。
如果仅希望扫描特定的类而非基包下的所有类,你们可以使用resource-pattern属性过滤特定的类,如下所示:
< context:component-scan base-package="com.baobaotao" resource-pattern="anno/*.class"/ >
这里我们将基类包设置为com.baobaotao,默认情况下resource-pattern属性的值为"**/*.class",即基类包里的所有类。这里我们设置为"anno/*.class",则Spring仅会扫描基包里anno子包中的类。
1.3 基于java类提供Bean定义
在普通的POJO类中只要标注@Configuration注解,就可以为spring容器提供Bean定义的信息了,每个标注了@Bean的类方法都相当于提供了一个Bean的定义信息。
package com.baobaotao.conf;
import org.springframework.context.annotation.Bean;
import org.springframework.context.annotation.Configuration;
//①将一个POJO标注为定义Bean的配置类
@Configuration
public class AppConf {
//②以下两个方法定义了两个Bean,以提供了Bean的实例化逻辑
@Bean
public UserDao userDao(){
return new UserDao();
}
@Bean
public LogDao logDao(){
return new LogDao();
}
//③定义了logonService的Bean
@Bean
public LogonService logonService(){
LogonService logonService = new LogonService();
//④将②和③处定义的Bean注入到LogonService Bean中
logonService.setLogDao(logDao());
logonService.setUserDao(userDao());
return logonService;
}
}
①处在APPConf类的定义处标注了@Configuration注解,说明这个类可用于为Spring提供Bean的定义信息。类的方法处可以标注@Bean注解,Bean的类型由方法返回值类型决定,名称默认和方法名相同,也可以通过入参显示指定Bean名称,如@Bean(name="userDao").直接在@Bean所标注的方法中提供Bean的实例化逻辑。
在②处userDao()和logDao()方法定义了一个UserDao和一个LogDao的Bean,它们的Bean名称分别是userDao和logDao。在③处,又定义了一个logonService Bean,并且在④处注入②处所定义的两个Bean。
因此,以上的配置和以下XML配置时等效的:
<bean id="userDao" class="com.baobaotao.anno.UserDao"/>
<bean id="logDao" class="com.baobaotao.anno.LogDao"/>
<bean id="logService" class="com.baobaotao.conf.LogonService"
p:logDao-ref="logDao" p:userDao-ref="userDao"/>
基于java类的配置方式和基于XML或基于注解的配置方式相比,前者通过代码的方式更加灵活地实现了Bean的实例化及Bean之间的装配,但后面两者都是通过配置声明的方式,在灵活性上要稍逊一些,但是配置上要更简单一些。
2 Bean注入
Bean注入的方式有两种,一种是在XML中配置,此时分别有属性注入、构造函数注入和工厂方法注入;另一种则是使用注解的方式注入 @Autowired,@Resource,@Required。
2.1 在xml文件中配置依赖注入
2.1.1 属性注入
属性注入即通过setXxx()方法注入Bean的属性值或依赖对象,由于属性注入方式具有可选择性和灵活性高的优点,因此属性注入是实际应用中最常采用的注入方式。
属性注入要求Bean提供一个默认的构造函数,并为需要注入的属性提供对应的Setter方法。Spring先调用Bean的默认构造函数实例化Bean对象,然后通过反射的方式调用Setter方法注入属性值。
package com.baobaotao.anno;
import org.springframework.beans.factory.BeanNameAware;
public class LogonService implements BeanNameAware{
private LogDao logDao;
private UserDao userDao;
public void setUserDao(UserDao userDao) {
this.userDao = userDao;
}
public void setLogDao(LogDao logDao) {
this.logDao = logDao;
}
public LogDao getLogDao() {
return logDao;
}
public UserDao getUserDao() {
return userDao;
}
public void setBeanName(String beanName) {
System.out.println("beanName:"+beanName);
}
public void initMethod1(){
System.out.println("initMethod1");
}
public void initMethod2(){
System.out.println("initMethod2");
}
}
bean.xml配置:
xmlns:xsi="http://www.w3.org/2001/XMLSchema-instance"
xmlns:context="http://www.springframework.org/schema/context"
xsi:schemaLocation="http://www.springframework.org/schema/beans
http://www.springframework.org/schema/beans/spring-beans-3.0.xsd
http://www.springframework.org/schema/context
http://www.springframework.org/schema/context/spring-context-3.0.xsd"
default-autowire="byName"
>
2.1.2 构造方法注入
使用构造函数注入的前提是Bean必须提供带参数的构造函数。例如:
package com.baobaotao.anno;
import org.springframework.beans.factory.BeanNameAware;
public class LogonService implements BeanNameAware{
public LogonService(){}
public LogonService(LogDao logDao, UserDao userDao) {
this.logDao = logDao;
this.userDao = userDao;
}
private LogDao logDao;
private UserDao userDao;
public void setUserDao(UserDao userDao) {
this.userDao = userDao;
}
public void setLogDao(LogDao logDao) {
this.logDao = logDao;
}
public LogDao getLogDao() {
return logDao;
}
public UserDao getUserDao() {
return userDao;
}
public void setBeanName(String beanName) {
System.out.println("beanName:"+beanName);
}
public void initMethod1(){
System.out.println("initMethod1");
}
public void initMethod2(){
System.out.println("initMethod2");
}
}
bean.xml配置:
xmlns:xsi="http://www.w3.org/2001/XMLSchema-instance"
xmlns:context="http://www.springframework.org/schema/context"
xsi:schemaLocation="http://www.springframework.org/schema/beans
http://www.springframework.org/schema/beans/spring-beans-3.0.xsd
http://www.springframework.org/schema/context
http://www.springframework.org/schema/context/spring-context-3.0.xsd"
default-autowire="byName">
2.1.3 工厂方法注入
非静态工厂方法:
有些工厂方法是非静态的,即必须实例化工厂类后才能调用工厂方法。
package com.baobaotao.ditype;
public class CarFactory {
public Car createHongQiCar(){
Car car = new Car();
car.setBrand("红旗CA72");
return car;
}
public static Car createCar(){
Car car = new Car();
return car;
}
}
工厂类负责创建一个或多个目标类实例,工厂类方法一般以接口或抽象类变量的形式返回目标类实例,工厂类对外屏蔽了目标类的实例化步骤,调用者甚至不用知道具体的目标类是什么。
xmlns:xsi="http://www.w3.org/2001/XMLSchema-instance"
xmlns:p="http://www.springframework.org/schema/p"
xsi:schemaLocation="http://www.springframework.org/schema/beans
http://www.springframework.org/schema/beans/spring-beans-3.0.xsd">
静态工厂方法:
很多工厂类都是静态的,这意味着用户在无须创建工厂类实例的情况下就可以调用工厂类方法,因此,静态工厂方法比非静态工厂方法的调用更加方便。
xmlns:xsi="http://www.w3.org/2001/XMLSchema-instance"
xmlns:p="http://www.springframework.org/schema/p"
xsi:schemaLocation="http://www.springframework.org/schema/beans
http://www.springframework.org/schema/beans/spring-beans-3.0.xsd">
factory-method="createCar">
2.2 使用注解的方式注入
2.2.1 使用@Autowired进行自动注入
Spring通过@Autowired注解实现Bean的依赖注入,下面是一个例子:
package com.baobaotao.anno;
import org.springframework.beans.factory.BeanNameAware;
import org.springframework.beans.factory.annotation.Autowired;
import org.springframework.beans.factory.annotation.Qualifier;
import org.springframework.stereotype.Service;
//① 定义一个Service的Bean(不需要在XML中定义Bean)
@Service
public class LogonService implements BeanNameAware{
//② 分别注入LogDao及UserDao的Bean(不需要在XML中定义property属性注入)
@Autowired(required=false)
private LogDao logDao;
@Autowired
@Qualifier("userDao")
private UserDao userDao;
public LogDao getLogDao() {
return logDao;
}
public UserDao getUserDao() {
return userDao;
}
public void setBeanName(String beanName) {
System.out.println("beanName:"+beanName);
}
public void initMethod1(){
System.out.println("initMethod1");
}
public void initMethod2(){
System.out.println("initMethod2");
}
}
在①处,我们使用@Service将LogonService标注为一个Bean,在②处,通过@Autowired注入LogDao及UserDao的Bean。@Autowired默认按类型匹配的方式,在容器查找匹配的Bean,当有且仅有一个匹配的Bean时,Spring将其注入到@Autowired标注的变量中。
2.2.2 使用@Autowired的required属性
如果容器中没有一个和标注变量类型匹配的Bean,Spring容器启动时将报NoSuchBeanDefinitionException的异常。如果希望Spring即使找不到匹配的Bean完成注入也不用抛出异常,那么可以使用@Autowired(required=false)进行标注:
@Service
public class LogonService implements BeanNameAware{
@Autowired(required=false)
private LogDao logDao;
...
}
默认情况下,@Autowired的required属性的值为true,即要求一定要找到匹配的Bean,否则将报异常。
2.2.3 使用@Qualifier指定注入Bean的名称
如果容器中有一个以上匹配的Bean时,则可以通过@Qualifier注解限定Bean的名称,如下所示:
@Service
public class LogonService implements BeanNameAware{
@Autowired(required=false)
private LogDao logDao;
//①注入名为UserDao,类型为UserDao的Bean
@Autowired
@Qualifier("userDao")
private UserDao userDao;
}
这里假设容器有两个类型为UserDao的Bean,一个名为userDao,另一个名为otherUserDao,则①处会注入名为userDao的Bean。
2.2.4 对类方法进行标注
@Autowired可以对类成员变量及方法的入参进行标注,下面我们在类的方法上使用@Autowired注解:
package com.baobaotao.anno;
import org.springframework.beans.factory.BeanNameAware;
import org.springframework.beans.factory.annotation.Autowired;
import org.springframework.beans.factory.annotation.Qualifier;
import org.springframework.stereotype.Service;
@Service
public class LogonService implements BeanNameAware{
private LogDao logDao;
private UserDao userDao;
@Autowired
public void setLogDao(LogDao logDao) {
this.logDao = logDao;
}
@Autowired
@Qualifier("userDao")
public void setUserDao(UserDao userDao) {
System.out.println("auto inject");
this.userDao = userDao;
}
}
如果一个方法拥有多个入参,在默认情况下,Spring自动选择匹配入参类型的Bean进行注入。Spring允许对方法入参标注@Qualifier以指定注入Bean的名称,如下所示:
@Autowired
public void init(@Qualifier("userDao")UserDao userDao,LogDao logDao){
System.out.println("multi param inject");
this.userDao = userDao;
this.logDao =logDao;
}
在以上例子中,UserDao的入参注入名为userDao的Bean,而LogDao的入参注入LogDao类型的Bean。
一般情况下,在Spring容器中大部分的Bean都是单实例的,所以我们一般都无须通过@Repository、@Service等注解的value属性为Bean指定名称,也无须使用@Qualifier按名称进行注入。
2.2.5 对标准注解的支持
此外,Spring还支持@Resource和@Inject注解,这两个标准注解和@Autowired注解的功能类似,都是对类变量及方法入参提供自动注入的功能。@Resource要求提供一个Bean名称的属性,如果属性为空,则自动采用标注处的变量名或方法名作为Bean的名称。
package com.baobaotao.anno;
import javax.annotation.PostConstruct;
import javax.annotation.PreDestroy;
import javax.annotation.Resource;
import org.springframework.stereotype.Component;
@Component
public class Boss {
private Car car;
public Boss(){
System.out.println("construct...");
}
// @Autowired
// private void setCar(Car car){
// System.out.println("execute in setCar");
// this.car = car;
// }
@Resource("car")
private void setCar(Car car){
System.out.println("execute in setCar");
this.car = car;
}
@PostConstruct
private void init1(){
System.out.println("execute in init1");
}
@PostConstruct
private void init2(){
System.out.println("execute in init1");
}
@PreDestroy
private void destory1(){
System.out.println("execute in destory1");
}
@PreDestroy
private void destory2(){
System.out.println("execute in destory2");
}
}
这时,如果@Resource未指定"car"属性,则也可以根据属性方法得到需要注入的Bean名称。可见@Autowired默认按类型匹配注入Bean,@Resource则按名称匹配注入Bean。而@Inject和@Autowired一样也是按类型匹配注入的Bean的,只不过它没有required属性。可见不管是@Resource还是@Inject注解,其功能都没有@Autowired丰富,因此除非必须,大可不必在乎这两个注解。(类似于Xml中使用
2.2.6 关于Autowired和@Resource
1.@Autowired注入是按照类型注入的,只要配置文件中的bean类型和需要的bean类型是一致的,这时候注入就没问题。但是如果相同类型的bean不止一个,此时注入就会出现问题,Spring容器无法启动。
2.@Resourced标签是按照bean的名字来进行注入的,如果我们没有在使用@Resource时指定bean的名字,同时Spring容器中又没有该名字的bean,这时候@Resource就会退化为@Autowired即按照类型注入,这样就有可能违背了使用@Resource的初衷。所以建议在使用@Resource时都显示指定一下bean的名字@Resource(name="xxx")
2.2.7 让@Resource和@Autowired生效的几种方式
1.在xml配置文件中显式指定
<bean class="org.springframework.beans.factory.annotation.AutowiredAnnotationBeanPostProcessor" />
<bean class="org.springframework.context.annotation.CommonAnnotationBeanPostProcessor" />
2.在xml配置文件中使用context:annotation-config
<context:annotation-config />
3.在xml配置文件中使用context:component-scan
<context:component-scan base-package="com.baobaotao.anno"/>
4.重写Spring容器的Context,在自定义BeanFactory时调用AnnotationConfigUtils.registerAnnotationConfigProcessors()把这两个注解处理器增加到容器中。
编写自己的XmlWebApplicationContext,在这个context中重写customizeBeanFactory(),在这个方法中调用了AnnotationConfigUtils.registerAnnotationConfigProcessors()方法把这两自动注解处理器加入到BeanDefinitions中,这样公在web层就支持@Resource和@Autowired进行自动注入。如下:
package com.alibaba.citrus.springext.support.context;
import com.alibaba.citrus.springext.ResourceLoadingExtendable;
import com.alibaba.citrus.springext.ResourceLoadingExtender;
import com.alibaba.citrus.springext.support.context.InheritableListableBeanFactory;
import com.alibaba.citrus.springext.support.resolver.XmlBeanDefinitionReaderProcessor;
import java.io.IOException;
import org.springframework.beans.factory.support.DefaultListableBeanFactory;
import org.springframework.beans.factory.xml.XmlBeanDefinitionReader;
import org.springframework.context.ApplicationListener;
import org.springframework.context.annotation.AnnotationConfigUtils;
import org.springframework.core.io.Resource;
import org.springframework.core.io.support.ResourcePatternResolver;
public class XmlWebApplicationContext extends org.springframework.web.context.support.XmlWebApplicationContext implements ResourceLoadingExtendable {
private ResourceLoadingExtender resourceLoadingExtender;
private boolean parentResolvableDependenciesAccessible = true;
public XmlWebApplicationContext() {
}
public boolean isParentResolvableDependenciesAccessible() {
return this.parentResolvableDependenciesAccessible;
}
public void setParentResolvableDependenciesAccessible(boolean parentResolvableDependenciesAccessible) {
this.parentResolvableDependenciesAccessible = parentResolvableDependenciesAccessible;
}
public void setResourceLoadingExtender(ResourceLoadingExtender resourceLoadingExtender) {
if(this.resourceLoadingExtender != null) {
this.getApplicationListeners().remove(this.resourceLoadingExtender);
}
this.resourceLoadingExtender = resourceLoadingExtender;
if(resourceLoadingExtender instanceof ApplicationListener) {
this.addApplicationListener((ApplicationListener)resourceLoadingExtender);
}
}
protected void initBeanDefinitionReader(XmlBeanDefinitionReader beanDefinitionReader) {
(new XmlBeanDefinitionReaderProcessor(beanDefinitionReader)).addConfigurationPointsSupport();
}
protected void customizeBeanFactory(DefaultListableBeanFactory beanFactory) {
super.customizeBeanFactory(beanFactory);
//AnnotationConfigUtils.registerAnnotationConfigProcessors()方法把这两自动注解处理器加入到BeanDefinitions中,在web层就支持@Resource和@Autowired进行自动注入
AnnotationConfigUtils.registerAnnotationConfigProcessors(beanFactory, (Object)null);
}
protected DefaultListableBeanFactory createBeanFactory() {
return (DefaultListableBeanFactory)(this.isParentResolvableDependenciesAccessible()?new InheritableListableBeanFactory(this.getInternalParentBeanFactory()):super.createBeanFactory());
}
protected Resource getResourceByPath(String path) {
Resource resource = null;
if(this.resourceLoadingExtender != null) {
resource = this.resourceLoadingExtender.getResourceByPath(path);
}
if(resource == null) {
resource = super.getResourceByPath(path);
}
return resource;
}
protected ResourcePatternResolver getResourcePatternResolver() {
final ResourcePatternResolver defaultResolver = super.getResourcePatternResolver();
return new ResourcePatternResolver() {
public Resource[] getResources(String locationPattern) throws IOException {
ResourcePatternResolver resolver = null;
if(XmlWebApplicationContext.this.resourceLoadingExtender != null) {
resolver = XmlWebApplicationContext.this.resourceLoadingExtender.getResourcePatternResolver();
}
if(resolver == null) {
resolver = defaultResolver;
}
return resolver.getResources(locationPattern);
}
public ClassLoader getClassLoader() {
return defaultResolver.getClassLoader();
}
public Resource getResource(String location) {
return defaultResolver.getResource(location);
}
};
}
}
三、 ×××
1、克隆
git clone https://github.com/spring-projects/spring-framework.git
2、使用maven
(1)Core
支持dependency injection, events, resources, i18n, validation, data binding, type conversion, SpEL, AOP,其依赖为:
(2)WebMVC
支持MVC, View Technologies, CORS, Web Socket, RESTful,同时继承Spring Web的功能core HTTP integration,包括Servlet filters, Spring HTTP Invoker, infrastructure to integrate with
other web frameworks and HTTP technologies e.g. Hessian, Burlap。其依赖为:
注意:依赖了spring-webmvc就不需要依赖spring-web
(3)spring-boot-starter-web
注意:启动器spring-boot-starter-web基于Spring MVC构建RESTful风格的web应用,使用内嵌tomcat作为默认容器
3、使用Gradle
(1)spring-core和spring-webmvc
dependencies {
api 'org.springframework:spring-core:5.0.8.RELEASE'
api 'org.springframework:spring-webmvc:5.0.8.RELEASE'
}
或者
dependencies {
compile group: 'org.springframework', name: 'spring-core', version: '5.0.8.RELEASE'
compile group: 'org.springframework', name: 'spring-webmvc', version: '5.0.8.RELEASE'
}
(2)spring-boot-starter-web
dependencies {
compile("org.springframework.boot:spring-boot-starter-web")
}
注意:启动器spring-boot-starter-web基于Spring MVC构建RESTful风格的web应用,使用内嵌tomcat作为默认容器
可以在“Spring Boot”中了解注解和启动器清单。
四、SOAP Web Service生产服务
(1)依赖Spring Web
***Maven***
***Gradle***
dependencies {
compile("org.springframework.boot:spring-boot-starter-web-services")
}
(2)定义web service domain
使用XSD(XML schema file)定义Domain。
例如:在resources目录下创建countries.xsd文件来定义国家的名称、人口、首都和货币。
<xs:schema xmlns:xs="http://www.w3.org/2001/XMLSchema" xmlns:tns="http://jiaxiaomei.com/test/soap-test"
targetNamespace="http://jiaxiaomei.com/test/soap-test" elementFormDefault="qualified">
<xs:element name="getCountryRequest">
<xs:complexType>
<xs:sequence>
<xs:element name="name" type="xs:string"/>
xs:sequence>
xs:complexType>
xs:element>
<xs:element name="getCountryResponse">
<xs:complexType>
<xs:sequence>
<xs:element name="country" type="tns:country"/>
xs:sequence>
xs:complexType>
xs:element>
<xs:complexType name="country">
<xs:sequence>
<xs:element name="name" type="xs:string"/>
<xs:element name="population" type="xs:int"/>
<xs:element name="capital" type="xs:string"/>
<xs:element name="currency" type="tns:currency"/>
xs:sequence>
xs:complexType>
<xs:simpleType name="currency">
<xs:restriction base="xs:string">
<xs:enumeration value="GBP"/>
<xs:enumeration value="EUR"/>
<xs:enumeration value="PLN"/>
xs:restriction>
xs:simpleType>
xs:schema>
(3)产生Domain 类
由maven或者gradle基于xsd文件自动创建Domain类。
***Maven*** 修改pom.xml
首先新增依赖:
然后增加构建插件:
<plugin>
<groupId>org.codehaus.mojogroupId>
<artifactId>jaxb2-maven-pluginartifactId>
<version>1.6version>
<executions>
<execution>
<id>xjcid>
<goals>
<goal>xjcgoal>
goals>
execution>
executions>
<configuration>
<schemaDirectory>${project.basedir}/src/main/resources/schemaDirectory>
<outputDirectory>${project.basedir}/src/main/javaoutputDirectory>
<clearOutputDir>falseclearOutputDir>
configuration>
plugin>
注意plugin标签放在plugins标签里面。
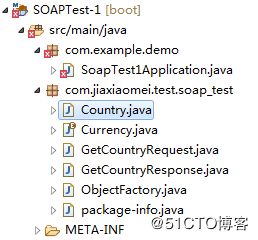
保存后,eclipse会自动执行xjc,在java目录下自动生成六个java文件:
***Gradle*** 需要在build.gradle中配置JAXB:
A、在bootJar里面增加:
from genJaxb.classesDir
B、新增configurations:
configurations {
jaxb
}
C、在dependencies里面增加对Spring WS和JAXB的依赖:
compile("wsdl4j:wsdl4j:1.6.1")
jaxb("org.glassfish.jaxb:jaxb-xjc:2.2.11")
compile(files(genJaxb.classesDir).builtBy(genJaxb))
D、增加genJaxb任务(Ant任务,因为gradle还不支持JAXB任务):
task genJaxb {
ext.sourcesDir = "${buildDir}/generated-sources/jaxb"
ext.classesDir = "${buildDir}/classes/jaxb"
ext.schema = "src/main/resources/countries.xsd"
outputs.dir classesDir
doLast() {
project.ant {
taskdef name: "xjc", classname: "com.sun.tools.xjc.XJCTask",
classpath: configurations.jaxb.asPath
mkdir(dir: sourcesDir)
mkdir(dir: classesDir)
xjc(destdir: sourcesDir, schema: schema) {
arg(value: "-wsdl")
produces(dir: sourcesDir, includes: "**/*.java")
}
javac(destdir: classesDir, source: 1.6, target: 1.6, debug: true,
debugLevel: "lines,vars,source",
classpath: configurations.jaxb.asPath) {
src(path: sourcesDir)
include(name: "**/*.java")
include(name: "*.java")
}
copy(todir: classesDir) {
fileset(dir: sourcesDir, erroronmissingdir: false) {
exclude(name: "**/*.java")
}
}
}
}
}
E、增加afterEclipseImport任务
task afterEclipseImport {
dependsOn "genJaxb"
}
保存后自动生成java类,注意gradle采用了ant任务,比maven复杂很多。
关于jaxb和ant任务的更多知识,参见“9、JAXB和ANT”。
(4)创建Repository类
该类需要注解@Component,给web service提供数据。
例如:
A、创建CountryRepository类,并增加注解@Component
B、增加一个静态成员:
private static final Map
C、增加初始化数据的方法initData,返回类型为void,代码为:
Country spain = new Country();
spain.setName("Spain");
spain.setCapital("Madrid");
spain.setCurrency(Currency.EUR);
spain.setPopulation(46704314);
countries.put(spain.getName(), spain);
Country poland = new Country();
poland.setName("Poland");
poland.setCapital("Warsaw");
poland.setCurrency(Currency.PLN);
poland.setPopulation(38186860);
countries.put(poland.getName(), poland);
Country uk = new Country();
uk.setName("United Kingdom");
uk.setCapital("London");
uk.setCurrency(Currency.GBP);
uk.setPopulation(63705000);
countries.put(uk.getName(), uk);
D、增加查找方法findCountry,参数为name,返回Country
Assert.notNull(name, "The country's name must not be null");
return countries.get(name);
(5)创建service endpoint来处理SOAP请求
A、创建endpoint类,加注解@Endpoint,增加构造函数并注解@Autowired:
按照country例子:
@Autowired
public CountryEndpoint(CountryRepository countryRepository) {
this.countryRepository = countryRepository;
}
其中,@Endpoint注册一个Spring WS类作为处理SOAP消息的候选者。
B、增加静态成员NAMESPACE_URI
例如:
private static final String NAMESPACE_URI = "http://jiaxiaomei.com/test/soap-test";
C、增加Repository的私有成员
例如:
private CountryRepository countryRepository;
D、增加查询方法,注解@PayloadRoot、@RequestPayload和@ResponsePayload
例如:
@PayloadRoot(namespace = NAMESPACE_URI, localPart = "getCountryRequest")
@ResponsePayload
public GetCountryResponse getCountry(@RequestPayload GetCountryRequest request) {
GetCountryResponse response = new GetCountryResponse();
response.setCountry(countryRepository.findCountry(request.getName()));
return response;
}
其中,@PayloadRoot由Spring WS提供,选择处理方法,属性包括namespace和localpart。
@RequestPayload由Spring WS提供,表示SOAP消息将会绑定到request参数。
@ResponsePayload由Spring WS提供,映射返回值到响应负载中。
(6)配置web service bean
A、从WsConfigurerAdapter继承一个webservice配置类,并注解@EnableWs、@Configuration
例如:
@EnableWs
@Configuration
public class WebServiceConfig extends WsConfigurerAdapter {
B、自定义DispatcherServlet bean
Spring WS使用不同的servlet类型来处理SOAP消息,该类型是MessageDispatcherServlet。
需要注入ApplicationContext到方法中,这样才能让Spring WS自动侦测到Spring bean。
重新命名MessageDispatcherServlet注入方法,就不替换Spring Boot的默认DispatcherServlet bean,默认bean通过链接点”/”提供服务,自定义的MessageDispatcherServlet通过ServletRegistrationBean重新设定链接点。
前面的@Endpoint注解已经提示DefaultMethodEndpointAdapter设置注解驱动Spring WS编程模型。这里就采用这种注解驱动模型。
例如:
@Bean
public ServletRegistrationBean messageDispatcherServlet(ApplicationContext applicationContext) {
MessageDispatcherServlet servlet = new MessageDispatcherServlet();
servlet.setApplicationContext(applicationContext);
servlet.setTransformWsdlLocations(true);
return new ServletRegistrationBean(servlet, "/ws/*");
}
C、基于DefaultWsdl11Definition构建WSDL定义
DefaultWsdl11Definition使用XsdSchema接口展示WSDL1.1标准。
例如:
@Bean(name = "countries")
public DefaultWsdl11Definition defaultWsdl11Definition(XsdSchema countriesSchema) {
DefaultWsdl11Definition wsdl11Definition = new DefaultWsdl11Definition();
wsdl11Definition.setPortTypeName("CountriesPort");
wsdl11Definition.setLocationUri("/ws");
wsdl11Definition.setTargetNamespace("http://jiaxiaomei.com/test/soap-test");
wsdl11Definition.setSchema(countriesSchema);
return wsdl11Definition;
}
其中@Bean的属性name实际上指定了wsdl的文件名,所以,wsdl文件可以获得于这个链接:
http://
(7)构建Application类,注解@SpringBootApplication
Build后启动这个服务,创建一个请求xml,编写进入SOAP请求。
例如:
<soapenv:Envelope xmlns:soapenv="http://schemas.xmlsoap.org/soap/envelope/"
xmlns:gs="http://jiaxiaomei.com/test/soap-test">
<soapenv:Header/>
<soapenv:Body>
<gs:getCountryRequest>
<gs:name>Spaings:name>
gs:getCountryRequest>
soapenv:Body>
soapenv:Envelope>
下载curl,地址:https://curl.haxx.se/,设置bin目录到环境变量path。然后,在命令行中使用curl发送soap请求,如下:
下载libxml2,包含三个文件iconv-1.14-win32-x86_64.7z、zlib-1.2.8-win32-x86_64.7z和libxml2-2.9.3-win32-x86_64.7z,下载地址:https://www.zlatkovic.com/pub/libxml/64bit/;解压后把三个bin都放到path环境变量中。然后在命令行中执行:
curl --header "content-type: text/xml" -d @request.xml http://localhost:8080/ws |xmllint --format
这让soap response文件更规整。
五、 RESTful Web Service生产服务
参考:https://spring.io/guides/gs/rest-service/做了一个实际例子。
(1)新建一个gradle project,修改build.gradle
A、修改依赖为:
dependencies {
// This dependency is exported to consumers, that is to say found on their compile classpath.
//api 'org.springframework.boot:spring-boot-starter-web:2.1.0.RELEASE'
// This dependency is used internally, and not exposed to consumers on their own compile classpath.
implementation 'org.springframework.boot:spring-boot-starter-web:2.1.0.RELEASE'
// spring-boot-starter-test based on JUnit test framework
testImplementation 'org.springframework.boot:spring-boot-starter-test:2.1.0.RELEASE'
}
B、修改构建脚本
buildscript {
repositories {
mavenCentral()
}
dependencies {
classpath("org.springframework.boot:spring-boot-gradle-plugin:2.1.0.RELEASE")
}
}
C、引用插件
apply plugin: 'eclipse'
apply plugin: 'idea'
apply plugin: 'org.springframework.boot'
apply plugin: 'io.spring.dependency-management'
D、增加jar包输出信息
bootJar {
baseName = 'restfultest'
version = '0.1.0'
}
E、增加兼容性信息
sourceCompatibility = 1.8
targetCompatibility = 1.8
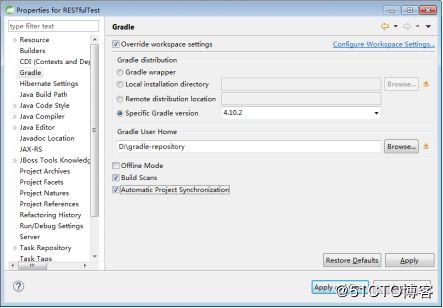
保存后刷新项目(项目右键菜单àgradleàrefresh gradle project),提示:
修改项目gradle设置:
(2)新建一个model
(3)新建一个controller
@RestController在Spring4里面引入,参见“5、Spring Boot”的“Annotation”,用于标注类为控制器,该控制器每个方法都返回一个model,而不是view。
@RequestMapping注解映射HTTP请求http://host:port/msg到所标注的方法上。
@RequestParam注解绑定HTTP请求参数到所标注的方法参数上(http://host:port/msg?name=)。
注意:这是一个RESTful web service controller,而不是传统的MVC controller。这个controller仅仅返回一个model对象,这个对象数据直接使用JSON写到HTTP response,MappingJackson2HttpMessageConverter自动被执行来支持Jackson 2。传统MVC controller使用view技术在server-side把数据转换为html。
(4)新建一个Application
(5)执行
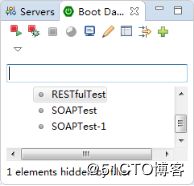
使用Boot Dashboard的左上角按钮启动服务。
在Chrome中验证:
六、 SOAP Web Service消费服务
参考:https://spring.io/guides/gs/consuming-web-service/
(1)新建一个maven项目
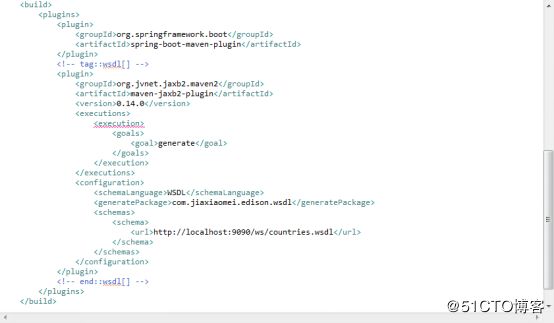
修改pom.xml
(2)编写任务,自动从WSDL产生类。
(3)创建一个web service客户端
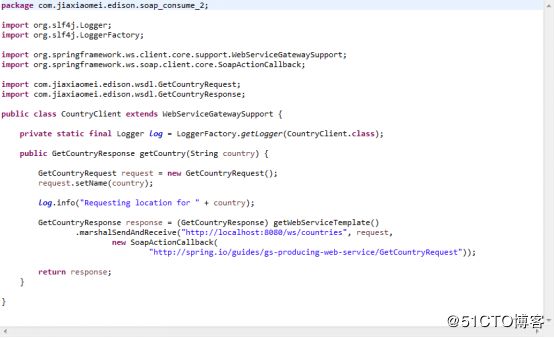
从WebServiceGatewaySupport类继承而来:
其中getCountry方法完成SOAP数据交换任务。
GetCountryRequest和GetCountryResponse都是jaxb自动产生的。
WebServiceGatewaySupport的方法getWebServiceTemplate获得WebServiceTemplate,然后使用marshalSendAndReceive方法来实际完成wsdl文件接收和解析。
SoapActionCallback用来获取SOAPAction header,WSDL解析时需要这个头,其中包含
(4)配置web service
Spring WS通过Spring Framework的OXM模块中的Jaxb2Marshaller来存取XML请求。
marshaller bean指向domain对象集合,在XML和POJOs之间转换。
countryClient bean用来配置web service的URI,并绑定marshaller。
(5)配置应用入口类
七、 RESTful Web Service消费服务
参考:https://spring.io/guides/gs/consuming-rest/
(1)新建一个gradle project,修改build.gradle,如下
(2)创建一个domain类,如下:
(3)创建一个Application类,如下:
其中服务地址引用“RESTful Web Service生产服务”,执行后输出:
(4)改造Application类
其中@Bean把restTemplate注解到CommandLineRunner回调函数中。
由于和“RESTful Web Service生产服务”使用的8080端口冲突,所以需要增加Application.yml,如下:
![]()
启动后,如下:

