Xcode6.1创建仅xib文件无storyboard的hello world应用
原文地址:http://www.mamicode.com/info-detail-514151.html
源码
由于Xcode6之后,默认创建storyboard而非xib文件,而作为初学,了解xib的加载原理很重要,所以,需要创建一个没有storyboard的项目
1. 创建一个新的工程
2. 选择仅一个视图的模板
选择 Single View Application , 点击Next
3. 填写项目信息
不需要选择core data,填好信息后,点击next,然后点击create
4. 删除storyboard和launchscreen.xib文件
将storyboard和launchscreen扔进废纸篓
5. 修改info.plist文件
删除info.plist文件中Main storyboard file base name和Launch screen interface file base name两个属性
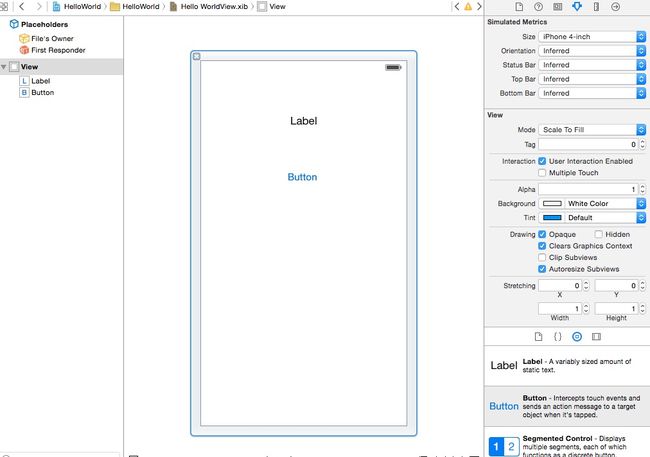
6. 创建user interface的视图xib文件
点击next,然后Save as “HelloWorldView”点击Create

从object library中拖出一个Lable,再拖出一个button形成下面图即可
7. 修改视图控制器文件
创建视图和控制器的关联,Xcode默认创建了ViewController.h和ViewController.m文件,所以就不用自己创建了
1)修改xib视图文件的File‘s Owner
点击列表中的File‘s Owner,按command+option+3 打开 Identity Inspector,修改Custom Class中的Class为ViewController
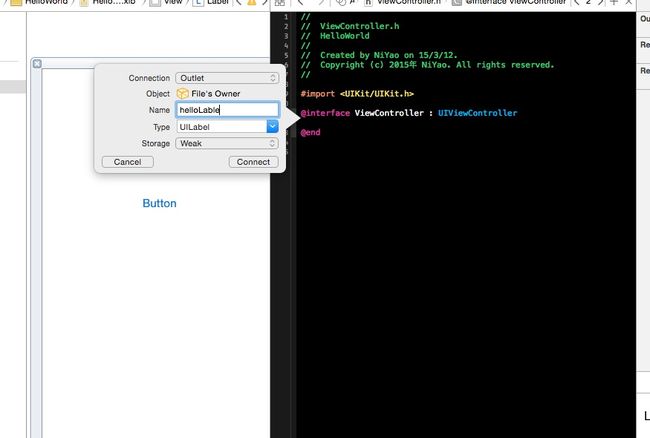
2)创建输出口和动作方法的关联
点击中间的两个圈,打开辅助编辑器
选定Lable视图同时按住control键拖到ViewController.h的@interface与@end中间会弹出菜单,按照下图填写内容,然后回车创建输出口
创建button的动作方法也是选定视图并按住controll键拖到辅助编辑区
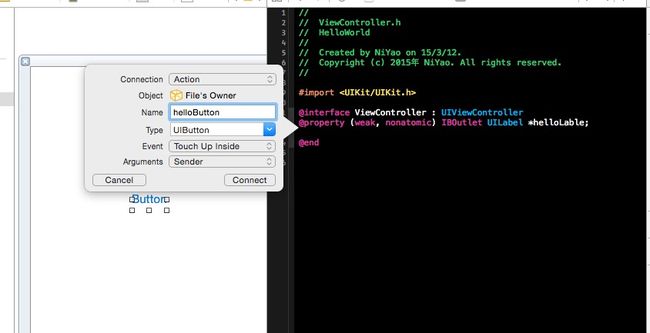
创建好关联后,ViewController.h的代码变为:
#import

@interface ViewController : UIViewController

@property (weak, nonatomic) IBOutlet UILabel *helloLable;
- (IBAction)helloButton:(id)sender;

@end
点击xib列表中的File‘s Owner,然后按command+option+6 打开Connection Inspector查看输出口和动作的关联,将View与ViewController从UIViewController中继承的view属性进行关联(从右向左拖动松开)
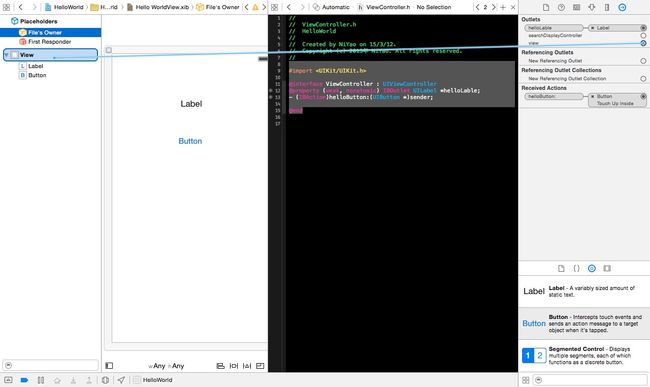
关联好的连接检查器如下所示

3) 修改ViewController.m的代码
#import "ViewController.h"

@interface ViewController ()

@end

@implementation ViewController

- (void)viewDidLoad {
    [super viewDidLoad];
    // Do any additional setup after loading the view, typically from a nib.
}

- (void)didReceiveMemoryWarning {
    [super didReceiveMemoryWarning];
    // Dispose of any resources that can be recreated.
}

- (IBAction)helloButton:(id)sender {
    self.helloLable.text = @"Hello World!";
}
@end
8. 修改AppDelegate.m 文件
在Xcode默认创建的AppDelegate.h文件中已存在以下代码:
#import

@interface AppDelegate : UIResponder

@property (strong, nonatomic) UIWindow *window;


@end
Xcode默认为应用委托创建了window的属性,打开AppDlegate.m文件,引入ViewController.h
重写AppDlegate.m文件的- (BOOL)application:(UIApplication *)application didFinishLaunchingWithOptions:(NSDictionary *)launchOptions方法
其他代码不作修改,代码如下
#import "AppDelegate.h"
#import "ViewController.h"

@interface AppDelegate ()

@end

@implementation AppDelegate


- (BOOL)application:(UIApplication *)application didFinishLaunchingWithOptions:(NSDictionary *)launchOptions {
    // Override point for customization after application launch.
    //创建window
    self.window = [[UIWindow alloc] initWithFrame:[[UIScreen mainScreen] bounds]];
    //创建ViewController实例
    ViewController *viewController = [[ViewController alloc] initWithNibName:@"HelloWorldView" bundle:nil];
    //设置window根视图控制器
    self.window.rootViewController = viewController;
    self.window.backgroundColor = [UIColor whiteColor];
    [self.window makeKeyAndVisible];    return YES;
}

@end