企业级 ##elk日志分析平台##
1.安装应用:
(1)下载安装包:
[root@server1 elk]# ls
bigdesk-master.zip               jemalloc-devel-3.6.0-1.el6.x86_64.rpm
elasticsearch-2.3.3.rpm          kibana-4.5.1-1.x86_64.rpm
elasticsearch-head-master.zip    logstash-2.3.3-1.noarch.rpm
elk日志分析平台.pdf              nginx-1.8.0-1.el6.ngx.x86_64.rpm
jemalloc-3.6.0-1.el6.x86_64.rpm  redis-3.0.6.tar.gz
[root@server1 elk]# yum install -y elasticsearch-2.3.3.rpm
(2)增加服务配置:
[root@server1 elk]# cd /etc/elasticsearch/
[root@server1 elasticsearch]# ls
elasticsearch.yml  logging.yml  scripts
[root@server1 elasticsearch]# vim elasticsearch.yml
[root@server1 ~]# rpm -ivh jdk-8u121-linux-x64.rpm
Preparing...                ########################################### [100%]
   1:jdk1.8.0_121           ########################################### [100%]
Unpacking JAR files...
    tools.jar...
    plugin.jar...
    javaws.jar...
    deploy.jar...
    rt.jar...
    jsse.jar...
    charsets.jar...
    localedata.jar...
(4)启动服务:
[root@server1 ~]# /etc/init.d/elasticsearch  start
Starting elasticsearch:                                    [  OK  ]
[root@server1 ~]# netstat -antlp
tcp        0      0 ::ffff:172.25.39.1:9200     :::*                        LISTEN      1352/java
tcp        0      0 ::ffff:172.25.39.1:9300     :::*                        LISTEN      1352/java
(5)安装依赖包:
[root@server1 elk]# /usr/share/elasticsearch/bin/plugin install file:/root/elk/elasticsearch-head-master.zip
-> Installing from file:/root/elk/elasticsearch-head-master.zip...
Trying file:/root/elk/elasticsearch-head-master.zip ...
Downloading .........DONE
Verifying file:/root/elk/elasticsearch-head-master.zip checksums if available ...
NOTE: Unable to verify checksum for downloaded plugin (unable to find .sha1 or .md5 file to verify)
Installed head into /usr/share/elasticsearch/plugins/head
[root@server1 elk]# /usr/share/elasticsearch/bin/plugin list                 ##查看是否安装启动
Installed plugins in /usr/share/elasticsearch/plugins:
    - head
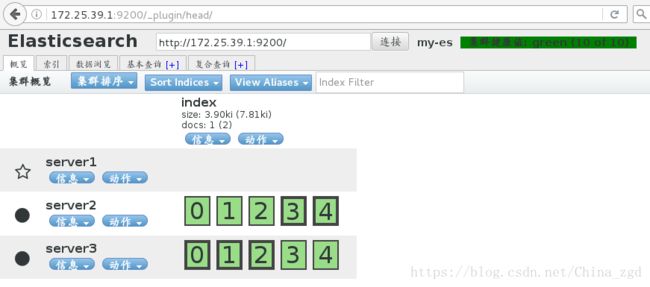
2.访问页面:http://172.25.39.1:9200/_plugin/head/
3.添加节点:
(1)【server1】中增加节点配置:
[root@server1 ~]# cd /etc/elasticsearch/
[root@server1 elasticsearch]# ls
elasticsearch.yml  logging.yml  scripts
[root@server1 elasticsearch]# vim elasticsearch.yml       ##必须有主机名解析
(2)在【server2】【server3】节点上安装elasticsearch服务,做法与【server1】相同
(3)发送配置文件到【server2】【server3】,修改IP,主机名,打开服务
(4)访问页面:http://172.25.39.1:9200/_plugin/head/ 节点建立成功

4.设置节点用途与应用:
【server1】[root@server1 elasticsearch]# vim elasticsearch.yml
[server1为主节点,可以上传数据]

[root@server1 elk]# /etc/init.d/elasticsearch reload
Stopping elasticsearch:                                    [  OK  ]
Starting elasticsearch:                                    [  OK  ]
【server2】[root@server1 elasticsearch]# vim elasticsearch.yml
[server2为工作节点,可以储存数据]

【server3】[root@server1 elasticsearch]# vim elasticsearch.yml
[server3为工作节点,可以储存数据]

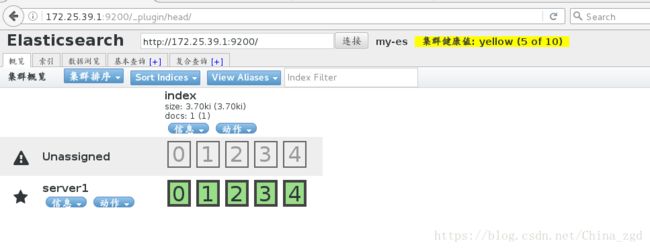
5.访问页面:http://172.25.39.1:9200/_plugin/head/ 节点配置建立成功
【查看集群信息】
[root@server1 elasticsearch]# curl -XGET 'http://172.25.39.1:9200/_cluster/health?pretty=true'
{
  "cluster_name" : "my-es",
  "status" : "green",
  "timed_out" : false,
  "number_of_nodes" : 3,
  "number_of_data_nodes" : 2,
  "active_primary_shards" : 5,
  "active_shards" : 10,
  "relocating_shards" : 0,
  "initializing_shards" : 0,
  "unassigned_shards" : 0,
  "delayed_unassigned_shards" : 0,
  "number_of_pending_tasks" : 0,
  "number_of_in_flight_fetch" : 0,
  "task_max_waiting_in_queue_millis" : 0,
  "active_shards_percent_as_number" : 100.0
6.数据采集:
针对数据:单独添加数据
(1)【server1】中安装数据采集服务插件
[root@server1 ~]# cd elk/
[root@server1 elk]# ls
bigdesk-master.zip               jemalloc-devel-3.6.0-1.el6.x86_64.rpm
elasticsearch-2.3.3.rpm          kibana-4.5.1-1.x86_64.rpm
elasticsearch-head-master.zip    logstash-2.3.3-1.noarch.rpm
elk日志分析平台.pdf              nginx-1.8.0-1.el6.ngx.x86_64.rpm
jemalloc-3.6.0-1.el6.x86_64.rpm  redis-3.0.6.tar.gz
[root@server1 elk]# rpm -ivh logstash-2.3.3-1.noarch.rpm
Preparing...                ########################################### [100%]
   1:logstash               ########################################### [100%]
(2)编辑脚本,添加要采集的信息:
[root@server1 conf.d]# pwd
/etc/logstash/conf.d
[root@server1 conf.d]# vim es.conf
input {
stdin {}
}
output {
elasticsearch {
hosts => ["172.25.39.1"]
index => "logstash-%{+YYYY.MM.dd}"
}
stdout {
codec => rubydebug
}
}
(3)执行脚本:
[root@server1 conf.d]# /opt/logstash/bin/logstash -f /etc/logstash/conf.d/es.conf
Settings: Default pipeline workers: 1
Pipeline main started
westos
{
       "message" => "westos",
      "@version" => "1",
    "@timestamp" => "2018-08-25T03:19:01.439Z",
          "host" => "server1"
}
linux
{
       "message" => "linux",
      "@version" => "1",
    "@timestamp" => "2018-08-25T03:19:12.371Z",
          "host" => "server1"
}
redhat
{
       "message" => "redhat",
      "@version" => "1",
    "@timestamp" => "2018-08-25T03:19:16.915Z",
          "host" => "server1"
}
(4)在网页上查看添加的数据
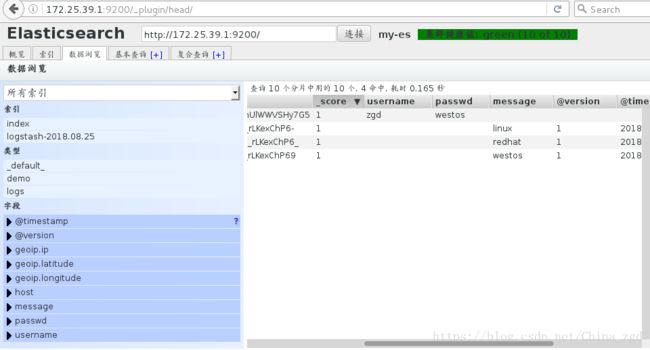
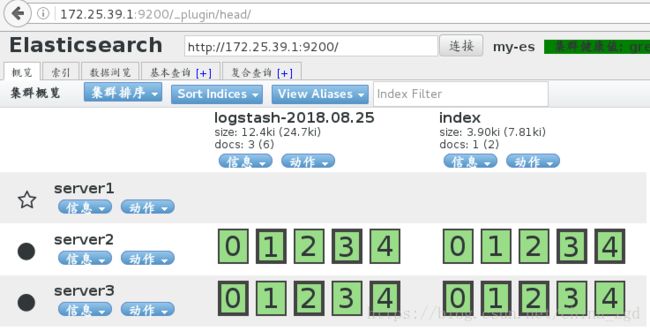
数据储存已经储存,master收集到日志后,会把一部分数据碎片到salve上(随机的一部分数据),master和slave又都会各自做副本,并把副本放到对方机器上,这样就保证了数据不会丢失。
如下,master收集到的数据放到了server2的第1,3分片上,其他的放到了server3的第0,2,4分片上。
针对文件:整合数据到文件,添加数据
(1)编辑脚本:[root@server1 conf.d]# vim es.conf
input {
        stdin {}
}

output {
        elasticsearch {
                hosts => ["172.25.39.1"]
                index => "logstash-%{+YYYY.MM.dd}"
        }

        stdout {
                codec => rubydebug
        }
        file {
                path => "/tmp/testfile"
                codec => line {format => "custom format: %{message}"}
        }
}
(2)执行脚本,给testfile文件里添加数据:
[root@server1 conf.d]# /opt/logstash/bin/logstash -f /etc/logstash/conf.d/es.conf
Settings: Default pipeline workers: 1
Pipeline main started
assa
{
       "message" => "assa",
      "@version" => "1",
    "@timestamp" => "2018-08-25T03:42:40.740Z",
          "host" => "server1"
}
bssb
{
       "message" => "bssb",
      "@version" => "1",
    "@timestamp" => "2018-08-25T03:42:46.703Z",
          "host" => "server1"
}
cssc
{
       "message" => "cssc",
      "@version" => "1",
    "@timestamp" => "2018-08-25T03:42:52.089Z",
          "host" => "server1"
}
^CSIGINT received. Shutting down the agent. {:level=>:warn}
stopping pipeline {:id=>"main"}
^CSIGINT received. Terminating immediately.. {:level=>:fatal}
[root@server1 conf.d]# cd /tmp/
[root@server1 tmp]# ls
hsperfdata_elasticsearch  hsperfdata_root  jna--1985354563  testfile  yum.log
[root@server1 tmp]# cat testfile
custom format: assa
custom format: bssb
custom format: cssc针对日志:收集系统日志
1.整合系统日志:
(1)编辑文件:[root@server1 conf.d]# vim es.conf
input {
        file {
                path => "/var/log/messages"
        }
}

output {
        elasticsearch {
                hosts => ["172.25.39.1"]
                index => "logstash-%{+YYYY.MM.dd}"
        }

} [root@server1 conf.d]# cp es.conf message.conf
[root@server1 conf.d]# ls
es.conf message.conf
[root@server1 conf.d]# vim message.conf
input {
file {
path => "/var/log/messages"
start_position => "beginning"
}
}
output {
elasticsearch {
hosts => ["172.25.39.1"]
index => "message-%{+YYYY.MM.dd}"
}
}
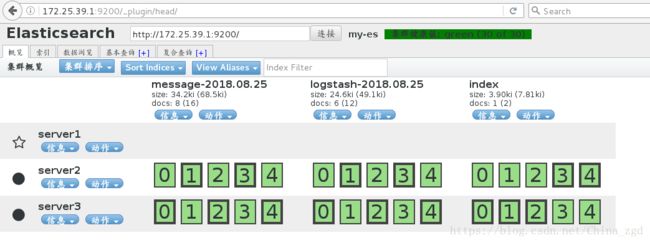
(2)执行messages脚本,创建数据:
【本来的server1】
[root@server1 conf.d]# /opt/logstash/bin/logstash -f /etc/logstash/conf.d/message.conf
Settings: Default pipeline workers: 1
Pipeline main started
【第二个server1】:在shell中重新连接一个【server1】
[root@server1 ~]# logger hello
[root@server1 ~]# logger hello
[root@server1 ~]# logger hello
[root@server1 ~]# logger hello
[root@server1 ~]# logger hello
2.日志的远程传输:
【server1】打开514端口
[root@server1 conf.d]# vim message.conf
input {
        syslog {
                port => 514
        }
}

output {
#       elasticsearch {
#               hosts => ["172.25.39.1"]
#               index => "message-%{+YYYY.MM.dd}"
#       }

        stdout {
                codec => rubydebug
        }
}
[root@server1 conf.d]# /opt/logstash/bin/logstash -f /etc/logstash/conf.d/message.conf
Settings: Default pipeline workers: 1
Pipeline main started
在另一台【server1】查看端口:
[root@server1 conf.d]# netstat -antulp |grep 514
tcp        0      0 :::514                      :::*                        LISTEN      2199/java
udp        0      0 :::514                      :::*                                    2199/java
【server2】添加日志传输主机IP
[root@server2 elasticsearch]# vim /etc/rsyslog.conf 【server1】执行日志message脚本
[root@server1 conf.d]# /opt/logstash/bin/logstash -f /etc/logstash/conf.d/message.conf
Settings: Default pipeline workers: 1
Pipeline main started
【server2】重启rsyslog服务
[root@server2 elasticsearch]# /etc/init.d/rsyslog restart
Shutting down system logger:                               [  OK  ]
Starting system logger:                                    [  OK  ]
【测试】
在【server2】:[root@server2 elasticsearch]# logger fff
在【server1】就可以查看到【server2】的日志信息

3.日志的多行合并:
【server1】修改配置管理日志显示格式
[root@server1 conf.d]# vim /etc/logstash/conf.d/message.conf
input {
        file {
                path => "/var/log/elasticsearch/my-es.log"
                start_position => "beginning"
        }
}

filter {
  multiline {
#       type => "type"
        pattern => "^\["
        negate => true
        what => "previous"
  }
}

output {
#       elasticsearch {
#               hosts => ["172.25.39.1"]
#               index => "message-%{+YYYY.MM.dd}"
#       }

        stdout {
                codec => rubydebug
        }
}
【server1】查看没合并前的日志
[root@server1 ~]# cd /var/log/elasticsearch/
[root@server1 elasticsearch]# ls
my-es_deprecation.log             my-es_index_search_slowlog.log
my-es_index_indexing_slowlog.log  my-es.log
[root@server1 elasticsearch]# cat my-es.log
/etc/security/limits.conf, for example:
    # allow user 'elasticsearch' mlockall
    elasticsearch soft memlock unlimited
    elasticsearch hard memlock unlimited
执行脚本,查看合并后的日志显示:
[root@server1 elasticsearch]# /opt/logstash/bin/logstash -f /etc/logstash/conf.d/message.conf
4.httpd服务日志的整合:
(1)【server1】下载httpd服务
[root@server1 ~]# yum install -y httpd
[root@server1 ~]# /etc/init.d/httpd start
Starting httpd: httpd: Could not reliably determine the server's fully qualified domain name, using 172.25.39.1 for ServerName
                                                           [  OK  ]
(2)编辑发布首页,查看httpd服务是否正常:
[root@server1 ~]# cd /var/www/html/
[root@server1 html]# vim index.html
[root@server1 html]# cat index.html
dyyaiaiaiazdd
(3)编辑messages脚本,定义httpd日志采集格式
[root@server1 httpd]# cd /etc/logstash/conf.d/
[root@server1 conf.d]# vim message.conf
[root@server1 conf.d]# cat message.conf
input {
    file {
        path => ["/var/log/httpd/access_log","/var/log/httpd/error_log"]
        start_position => "beginning"
    }
}

#filter {
#  multiline {
##  type => "type"
#   pattern => "^\["
#   negate => true
#   what => "previous"
#  }
#}

output {
    elasticsearch {
        hosts => ["172.25.39.1"]
        index => "apache-%{+YYYY.MM.dd}"
    }

    stdout {
        codec => rubydebug
    }
}
[root@server1 conf.d]# /opt/logstash/bin/logstash -f /etc/logstash/conf.d/message.conf
Settings: Default pipeline workers: 1
Pipeline main started
{
       "message" => "172.25.39.250 - - [25/Aug/2018:14:44:32 +0800] \"GET / HTTP/1.1\" 200 23 \"-\" \"Mozilla/5.0 (X11; Linux x86_64; rv:45.0) Gecko/20100101 Firefox/45.0\"",
      "@version" => "1",
    "@timestamp" => "2018-08-25T07:39:48.803Z",
          "path" => "/var/log/httpd/access_log",
          "host" => "server1"
}
(4)在网页上查看httpd日志是否上监测到

5.日志分片:
[root@server1 conf.d]# ls
es.conf  message.conf
[root@server1 conf.d]# vim test.conf
[root@server1 conf.d]# cat test.conf
input {
    stdin {}
}
filter {
  grok {
    match => { "message" => "%{IP:client} %{WORD:method} %{URIPATHPARAM:request} %{NUMBER:bytes} %{NUMBER:duration}" }
 }
}

output {
    shdout {
        codec => rubydebug
    }
}


[root@server1 conf.d]# /opt/logstash/bin/logstash -f /etc/logstash/conf.d/test.conf
Settings: Default pipeline workers: 1
Pipeline main started
55.3.244.1 GET /index.html 15824 0.043               ##手动输入
{
       "message" => "55.3.244.1 GET /index.html 15824 0.043",
      "@version" => "1",
    "@timestamp" => "2018-08-25T08:09:43.518Z",
          "host" => "server1",
        "client" => "55.3.244.1",
        "method" => "GET",
       "request" => "/index.html",
         "bytes" => "15824",
      "duration" => "0.043"
}
[root@server1 ~]# cd /etc/logstash/conf.d/
[root@server1 conf.d]# vim message.conf
[root@server1 conf.d]# cat message.conf
input {
    file {
        path => ["/var/log/httpd/access_log","/var/log/httpd/error_log"]
        start_position => "beginning"
    }
}

filter {

    grok {
        match => {"message" => "%{COMBINEDAPACHELOG}"}
    }
}

output {
    elasticsearch {
        hosts => ["172.25.39.1"]
        index => "apache-%{+YYYY.MM.dd}"
    }

    stdout {
        codec => rubydebug
    }
}
[root@server1 ~]# l.
.              .bash_profile      .sincedb_452905a167cf4509fd08acb964fdb20c  .tcshrc
..             .bashrc            .sincedb_d5a86a03368aaadc80f9eeaddba3a9f5  .viminfo
.bash_history  .cshrc             .sincedb_ef0edb00900aaa8dcb520b280cb2fb7d
.bash_logout   .oracle_jre_usage  .ssh
[root@server1 ~]# rm -f .sincedb_ef0edb00900aaa8dcb520b280cb2fb7d
[root@server1 ~]# /opt/logstash/bin/logstash -f /etc/logstash/conf.d/message.conf
6.kibana日志可视化展示:
【server3】
(1)安装kibana服务:
[root@server3 elk]# rpm -ivh kibana-4.5.1-1.x86_64.rpm
Preparing...                ########################################### [100%]
   1:kibana                 ########################################### [100%]
(2)添加master(apache)端的IP
[root@server3 elk]# cd /opt/kibana/config/
[root@server3 config]# ls
kibana.yml
[root@server3 config]# vim kibana.yml
[root@server3 config]# /etc/init.d/kibana start
kibana started
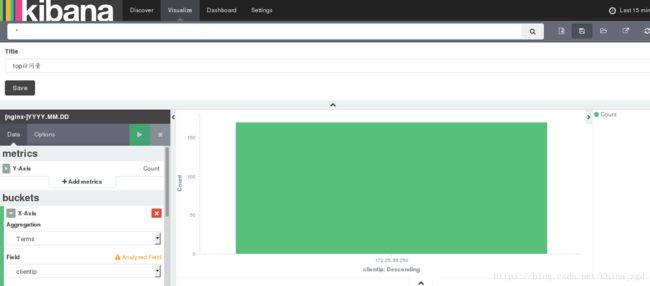
(4)创建一个apache监控

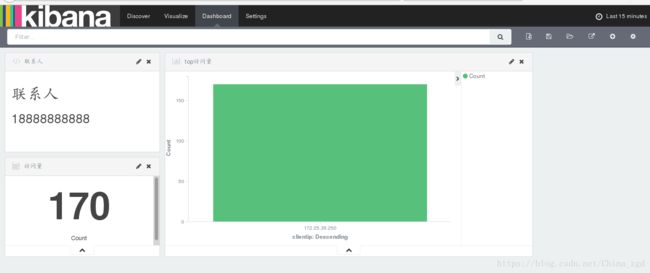
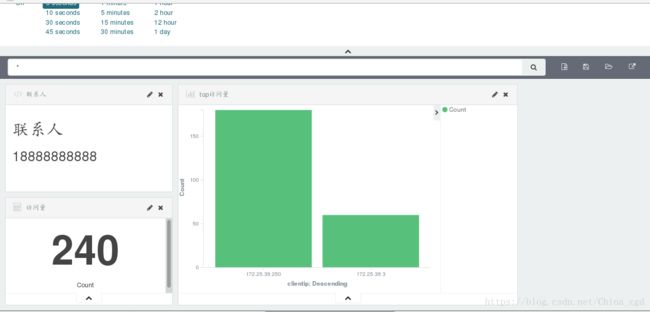
(5)查看监控到的apache进程

7.redis
(1)安装编译redis:
【server2】
[root@server2 elk]# tar zxf redis-3.0.6.tar.gz
[root@server2 elk]# cd redis-3.0.6
[root@server2 redis-3.0.6]# make $$ make install
[root@server2 utils]# pwd
/root/elk/redis-3.0.6/utils
[root@server2 utils]# ./install_server.sh
【server1】
[root@server1 ~]#    /etc/init.d/httpd stop
Stopping httpd:                                            [  OK  ]
(2)安装nginx服务:
[root@server1 elk]# rpm -ivh nginx-1.8.0-1.el6.ngx.x86_64.rpm
warning: nginx-1.8.0-1.el6.ngx.x86_64.rpm: Header V4 RSA/SHA1 Signature, key ID 7bd9bf62: NOKEY
Preparing...                ########################################### [100%]
   1:nginx                  ########################################### [100%]
(3)配置nginx日志文件:
[root@server1 logstash]# cd /etc/logstash/conf.d/
[root@server1 conf.d]# cp message.conf  nginx.conf
[root@server1 conf.d]# vim nginx.conf
[root@server1 conf.d]# cat nginx.conf
input {
    file {
        path => "/var/log/nginx/access.log"
        start_position => "beginning"
    }
}

filter {

    grok {
        match => {"message" => "%{COMBINEDAPACHELOG} %{QS:x_forwarded_for}"}
    }
}

output {
    redis {
        host => ["172.25.39.2"]
        port => 6379
        data_type => "list"
        key => "logstash:redis"
    }

    stdout {
        codec => rubydebug
    }
}
(4)在真机上做压测:
[root@foundation39 ~]# ab -c 1 -n 10 http://172.25.39.1/index.html
This is ApacheBench, Version 2.3 <$Revision: 1430300 $>
Copyright 1996 Adam Twiss, Zeus Technology Ltd, http://www.zeustech.net/
Licensed to The Apache Software Foundation, http://www.apache.org/

Benchmarking 172.25.39.1 (be patient).....done


Server Software:        nginx/1.8.0
Server Hostname:        172.25.39.1
Server Port:            80

Document Path:          /index.html
Document Length:        612 bytes

Concurrency Level:      1
Time taken for tests:   0.040 seconds
Complete requests:      10
Failed requests:        0
Write errors:           0
Total transferred:      8440 bytes
HTML transferred:       6120 bytes
Requests per second:    246.92 [#/sec] (mean)
Time per request:       4.050 [ms] (mean)
Time per request:       4.050 [ms] (mean, across all concurrent requests)
Transfer rate:          203.52 [Kbytes/sec] received

Connection Times (ms)
              min  mean[+/-sd] median   max
Connect:        0    0   0.1      0       0
Processing:     0    4  12.1      0      38
Waiting:        0    4  12.1      0      38
Total:          0    4  12.2      0      39

Percentage of the requests served within a certain time (ms)
  50%      0
  66%      0
  75%      0
  80%      0
  90%     39
  95%     39
  98%     39
  99%     39
 100%     39 (longest request)
(5)【server1】上可以看到
/opt/logstash/bin/logstash -f /etc/logstash/conf.d/nginx.conf8.
(1)
[root@server2 elk]# rpm -ivh logstash-2.3.3-1.noarch.rpm
Preparing...                ########################################### [100%]
   1:logstash               ########################################### [100%]
[root@server1 conf.d]# scp es.conf  server2:/etc/logstash/conf.d/
root@server2's password:
es.conf                                         100%  150     0.2KB/s   00:00
[root@server2 elk]# cd /etc/logstash/conf.d/
[root@server2 conf.d]# vim es.conf
[root@server2 conf.d]# cat es.conf
input {
    redis {
        host => "172.25.39.2"
        port => 6379
        data_type => "list"
        key => "logstash:redis"
    }
}

output {
    elasticsearch {
        hosts => ["172.25.39.1"]
        index => "logstash-%{+YYYY.MM.dd}"
    }

}
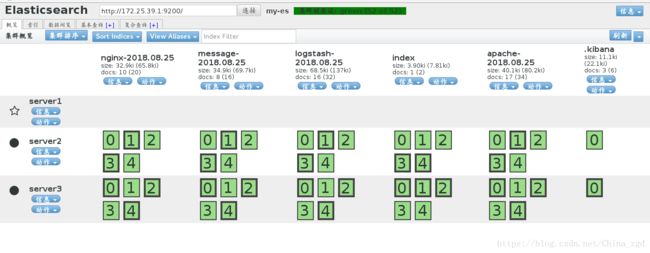
[root@server2 conf.d]# /opt/logstash/bin/logstash -f /etc/logstash/conf.d/es.conf (2)在网页上刷新,查看nginx监测【server1】nginx端必须要有数据/opt/logstash/bin/logstash -f /etc/logstash/conf.d/nginx.conf不能退出
(3)新建

![]()
![]()


![]()
![]()
