如何快速部署OpenStack环境——devstack项目
题记
每次只要提到部署OpenStack都是一件非常复杂的事情,当然很多人都会提及使用devstack来快速部署Openstack,一般我们都用Devstack部署开发环境,它可以实现在一台机器上部署一个独立版本同时包含主体组件的Openstack环境,一直以来我都没有试过,这两天一直在适用,最大的感受就是虽然确实很傻瓜,但是经常会遇到莫名的问题。
Devstack
Devstack采用自动化源码安装,用户只需要下载响应的分支(版本)脚本,修改相关的配置文件,就可以实现自动化安装,自动化解决依赖关系,非常方面。
环境
一般都是在本机的虚拟机环境下进行测试VM WorkStation
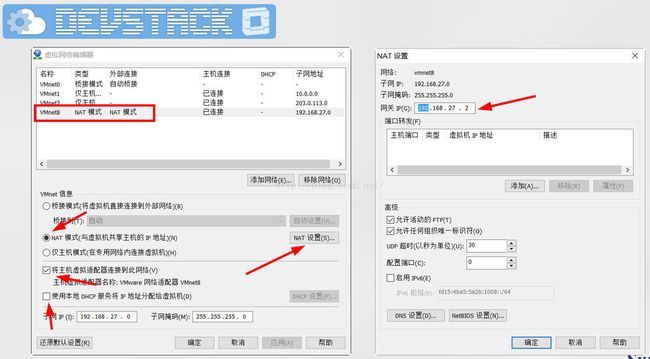
这里面需要注意,用户可以选择Workstation的两种网络模式,必须可以实现连接外网。
1、桥接模式 (缺点,由于桥接模式直接连接宿主机所在的局域网络,所以相关虚拟机可能占用已有的IP资源)
2、NAT(既可以实现连接外网,又可以自己共享一个Ip段供虚拟机IP使用,推荐使用)
3、由于OpenStack需要获得一个固定的连接IP,而不建议使用DHCP,所以上述不勾选DHCP,而且在虚拟机固定相关的IP地址。
4、我使用的虚拟机OS为Ubuntu 14.04 LTS,设置固定IP
root@controller:~# cat /etc/network/interfaces
# This file describes the network interfaces available on your system
# and how to activate them. For more information, see interfaces(5).

# The loopback network interface
auto lo
iface lo inet loopback

# The primary network interface
auto eth0
iface eth0 inet static
        address 192.168.27.128
        netmask 255.255.255.0
        gateway 192.168.27.2
        network 192.168.27.0
        broadcast 192.168.27.255
        # dns-* options are implemented by the resolvconf package, if installed
        dns-nameservers 114.114.114.114
5、设置apt源,由于你可能安装最新版本的Openstack,所以建议将源修改为国内ubuntu的官方源
root@controller:~# cat /etc/apt/sources.list
deb http://cn.archive.ubuntu.com/ubuntu/ trusty main restricted universe multiverse
deb http://cn.archive.ubuntu.com/ubuntu/ trusty-security main restricted universe multiverse
deb http://cn.archive.ubuntu.com/ubuntu/ trusty-updates main restricted universe multiverse
deb http://cn.archive.ubuntu.com/ubuntu/ trusty-proposed main restricted universe multiverse
deb http://cn.archive.ubuntu.com/ubuntu/ trusty-backports main restricted universe multiverse
6、安装git并下载devstack相关版本
apt-get install git下载devstack相关的mitaka(最新版本)
cd /home
git clone http://git.trystack.cn/openstack-dev/devstack.git -b stable/mitaka
直接通过工具脚本创建stack用户(目前不支持root用户运行stack.sh)
cd /home/devstack/tools/
./create-stack-user.sh
修改devstack目录权限
chown -R stack:stack /home/devstack
chmod 777 /dev/pts/0
切换stack用户
su stack
cd /home/devstack
7、进入/home/devstack目录下,我们可以看到有如下文件
stack@controller:/home/devstack$ ll
total 372
drwxr-xr-x 17 stack stack  4096 Jul 12 12:46 ./
drwxr-xr-x  4 root  root   4096 Jul 12 10:03 ../
drwxr-xr-x  9 stack stack  4096 Jul 12 12:46 accrc/
-rwxr-xr-x  1 stack stack  3306 Jul 12 10:03 clean.sh*
drwxr-xr-x  2 stack stack  4096 Jul 12 10:03 data/
drwxr-xr-x  3 stack stack  4096 Jul 12 10:03 doc/
drwxr-xr-x  2 stack stack  4096 Jul 12 10:03 driver_certs/
-rw-r--r--  1 stack stack   923 Jul 12 10:03 exerciserc
drwxr-xr-x  2 stack stack  4096 Jul 12 10:03 exercises/
-rwxr-xr-x  1 stack stack  1974 Jul 12 10:03 exercise.sh*
drwxr-xr-x  2 stack stack  4096 Jul 12 10:03 extras.d/
drwxr-xr-x  9 stack stack  4096 Jul 12 10:51 files/
-rw-r--r--  1 stack stack 24769 Jul 12 10:03 functions
-rw-r--r--  1 stack stack 73963 Jul 12 10:03 functions-common
-rw-r--r--  1 stack stack  3774 Jul 12 10:03 FUTURE.rst
drwxr-xr-x  2 stack stack  4096 Jul 12 10:03 gate/
drwxr-xr-x  8 stack stack  4096 Jul 12 10:03 .git/
-rw-r--r--  1 stack stack   330 Jul 12 10:03 .gitignore
-rw-r--r--  1 stack stack   109 Jul 12 10:03 .gitreview
-rw-r--r--  1 stack stack 14888 Jul 12 10:03 HACKING.rst
drwxr-xr-x  2 stack stack  4096 Jul 12 10:03 inc/
drwxr-xr-x  8 stack stack  4096 Jul 12 10:03 lib/
-rw-r--r--  1 stack stack 10143 Jul 12 10:03 LICENSE
-rw-rw-r--  1 stack stack  1726 Jul 12 11:34 local.conf
-rw-r--r--  1 stack stack  1738 Jul 12 12:32 .localrc.auto
-rw-r--r--  1 stack stack   340 Jul 12 10:03 .mailmap
-rw-r--r--  1 stack stack  1506 Jul 12 10:03 MAINTAINERS.rst
-rw-r--r--  1 stack stack  2489 Jul 12 10:03 Makefile
-rw-r--r--  1 stack stack  3822 Jul 12 10:03 openrc
drwxr-xr-x  2 stack stack  4096 Jul 12 10:03 pkg/
-rw-r--r--  1 stack stack    40 Jul 12 12:35 .prereqs
-rw-r--r--  1 stack stack  3795 Jul 12 10:03 README.md
-rwxr-xr-x  1 stack stack  1188 Jul 12 10:03 run_tests.sh*
drwxr-xr-x  2 stack stack  4096 Jul 12 10:03 samples/
-rw-r--r--  1 stack stack   481 Jul 12 10:03 setup.cfg
-rwxr-xr-x  1 stack stack   781 Jul 12 10:03 setup.py*
-rw-r--r--  1 stack stack   672 Jul 12 12:46 .stackenv
-rw-r--r--  1 stack stack 33564 Jul 12 10:03 stackrc
-rw-r--r--  1 stack stack  4908 Jul 12 12:45 stack-screenrc
-rwxr-xr-x  1 stack stack 40292 Jul 12 10:03 stack.sh*
drwxr-xr-x  2 stack stack  4096 Jul 12 10:03 tests/
drwxr-xr-x  4 stack stack  4096 Jul 12 10:03 tools/
-rw-r--r--  1 stack stack  1644 Jul 12 10:03 tox.ini
-rwxr-xr-x  1 stack stack  4204 Jul 12 10:03 unstack.sh*
-rw-r--r--  1 stack stack   396 Jul 12 12:38 userrc_early
- stack.sh #自动化部署的入口;判断是否存在localrc文件; 否,进入交互模式; 是,进入配置模式(如果需要输入输入stack.sh需要的参数,如:数据库的密码、Rabbit MQ的密码、Service TOKEN 等)
- localrc #配置文件;传入stack.sh的参数;nova部署在哪个节点,用户名密码是什么
- openrc #环境变量脚本;在执行openstack命令时要导入一些环境变量 如:export OS_USERNAME = admin
- unstack.sh #卸载脚本
- lib #每个服务的自动化安装脚本;通常存放nova,swift等自动化安装脚本,手动安装时执行的所有命令;每一个openstack服务对应一个文件
8、一般情况下,我们需要在该目录创建一个local.conf文件,这里面可以设置我们相关信息:
例如git的源地址设置,Host IP设置,外部网络和私有网络的IP段设置,安装组件的选择及版本,相关密码设置,日志路径设置等。
[[local|localrc]]

# use TryStack git mirror
GIT_BASE=http://git.trystack.cn
NOVNC_REPO=http://git.trystack.cn/kanaka/noVNC.git
SPICE_REPO=http://git.trystack.cn/git/spice/spice-html5.git

#OFFLINE=True
RECLONE=True

# Define images to be automatically downloaded during the DevStack built process.
DOWNLOAD_DEFAULT_IMAGES=False
IMAGE_URLS="http://images.trystack.cn/cirros/cirros-0.3.4-x86_64-disk.img"

HOST_IP=192.168.27.128


# Credentials
DATABASE_PASSWORD=pass
ADMIN_PASSWORD=pass
SERVICE_PASSWORD=pass
SERVICE_TOKEN=pass
RABBIT_PASSWORD=pass

HORIZON_BRANCH=stable/mitaka
KEYSTONE_BRANCH=stable/mitaka
NOVA_BRANCH=stable/mitaka
NEUTRON_BRANCH=stable/mitaka
GLANCE_BRANCH=stable/mitaka
CINDER_BRANCH=stable/mitaka


#keystone
KEYSTONE_TOKEN_FORMAT=UUID

##Heat
HEAT_BRANCH=stable/mitaka
enable_service h-eng h-api h-api-cfn h-api-cw


## Swift
SWIFT_BRANCH=stable/mitaka
ENABLED_SERVICES+=,s-proxy,s-object,s-container,s-account
SWIFT_REPLICAS=1
SWIFT_HASH=011688b44136573e209e


# Enabling Neutron (network) Service
disable_service n-net
enable_service q-svc
enable_service q-agt
enable_service q-dhcp
enable_service q-l3
enable_service q-meta
enable_service q-metering
enable_service neutron

## Neutron options
Q_USE_SECGROUP=True
FLOATING_RANGE="192.168.27.0/24"
FIXED_RANGE="10.0.0.0/24"
Q_FLOATING_ALLOCATION_POOL=start=192.168.27.102,end=192.168.27.110
PUBLIC_NETWORK_GATEWAY="192.168.27.2"
Q_L3_ENABLED=True
PUBLIC_INTERFACE=eth0
Q_USE_PROVIDERNET_FOR_PUBLIC=True
OVS_PHYSICAL_BRIDGE=br-ex
PUBLIC_BRIDGE=br-ex
OVS_BRIDGE_MAPPINGS=public:br-ex

# #VLAN configuration.
Q_PLUGIN=ml2
ENABLE_TENANT_VLANS=True

# Logging
LOGFILE=/opt/stack/logs/stack.sh.log
VERBOSE=True
LOG_COLOR=True
SCREEN_LOGDIR=/opt/stack/logs
9、接下来只需要在stack用户下,执行./stack.sh即可
安装完毕的效果
安装时间估计20分钟,在安装之前也看了不少博客介绍,devstack安装可能不会一遍成功,果不出所料,我也是碰了N个坑才得以完成。
问题1:在安装过程中经常出现如下错误
+functions-common:apt_get:1122 return 0
+tools/install_pip.sh:main:127 install_get_pip
+tools/install_pip.sh:install_get_pip:49 [[ -r /home/stack/devstack/files/get-pip.py ]]
+tools/install_pip.sh:install_get_pip:66 [[ ! -r /home/stack/devstack/files/get-pip.py ]]
+tools/install_pip.sh:install_get_pip:69 local timecond=
+tools/install_pip.sh:install_get_pip:70 [[ -r /home/stack/devstack/files/get-pip.py ]]
+tools/install_pip.sh:install_get_pip:74 curl -f –retry 6 –retry-delay 5 -o /home/stack/devstack/files/get-pip.py https://bootstrap.pypa.io/get-pip.py
% Total % Received % Xferd Average Speed Time Time Time Current
Dload Upload Total Spent Left Speed
100 1488k 100 1488k 0 0 6489 0 0:03:54 0:03:54 –:–:– 23270
+tools/install_pip.sh:install_get_pip:77 touch /home/stack/devstack/files/get-pip.py.downloaded
+tools/install_pip.sh:install_get_pip:79 sudo -H -E python /home/stack/devstack/files/get-pip.py -c /home/stack/devstack/tools/cap-pip.txt
Collecting pip!=8 (from -c /home/stack/devstack/tools/cap-pip.txt (line 1))
/tmp/tmpfip0Vp/pip.zip/pip/_vendor/requests/packages/urllib3/util/ssl_.py:318: SNIMissingWarning: An HTTPS request has been made, but the SNI (Subject Name Indication) extension to TLS is not available on this platform. This may cause the server to present an incorrect TLS certificate, which can cause validation failures. You can upgrade to a newer version of Python to solve this. For more information, see https://urllib3.readthedocs.org/en/latest/security.html#snimissingwarning.
/tmp/tmpfip0Vp/pip.zip/pip/_vendor/requests/packages/urllib3/util/ssl_.py:122: InsecurePlatformWarning: A true SSLContext object is not available. This prevents urllib3 from configuring SSL appropriately and may cause certain SSL connections to fail. You can upgrade to a newer version of Python to solve this. For more information, see https://urllib3.readthedocs.org/en/latest/security.html#insecureplatformwarning.
Downloading pip-8.1.2-py2.py3-none-any.whl (1.2MB)
24% |####### | 296kB 4.7kB/s eta 0:03:11Exception:
Traceback (most recent call last):
File “/tmp/tmpfip0Vp/pip.zip/pip/basecommand.py”, line 215, in main
status = self.run(options, args)
File “/tmp/tmpfip0Vp/pip.zip/pip/commands/install.py”, line 299, in run
requirement_set.prepare_files(finder)
File “/tmp/tmpfip0Vp/pip.zip/pip/req/req_set.py”, line 370, in prepare_files
ignore_dependencies=self.ignore_dependencies))
File “/tmp/tmpfip0Vp/pip.zip/pip/req/req_set.py”, line 587, in _prepare_file
session=self.session, hashes=hashes)
File “/tmp/tmpfip0Vp/pip.zip/pip/download.py”, line 810, in unpack_url
hashes=hashes
File “/tmp/tmpfip0Vp/pip.zip/pip/download.py”, line 649, in unpack_http_url
hashes)
File “/tmp/tmpfip0Vp/pip.zip/pip/download.py”, line 871, in _download_http_url
_download_url(resp, link, content_file, hashes)
File “/tmp/tmpfip0Vp/pip.zip/pip/download.py”, line 595, in _download_url
hashes.check_against_chunks(downloaded_chunks)
File “/tmp/tmpfip0Vp/pip.zip/pip/utils/hashes.py”, line 46, in check_against_chunks
for chunk in chunks:
File “/tmp/tmpfip0Vp/pip.zip/pip/download.py”, line 563, in written_chunks
for chunk in chunks:
File “/tmp/tmpfip0Vp/pip.zip/pip/utils/ui.py”, line 139, in iter
for x in it:
File “/tmp/tmpfip0Vp/pip.zip/pip/download.py”, line 552, in resp_read
decode_content=False):
File “/tmp/tmpfip0Vp/pip.zip/pip/_vendor/requests/packages/urllib3/response.py”, line 353, in stream
data = self.read(amt=amt, decode_content=decode_content)
File “/tmp/tmpfip0Vp/pip.zip/pip/_vendor/requests/packages/urllib3/response.py”, line 320, in read
flush_decoder = True
File “/usr/lib/python2.7/contextlib.py”, line 35, in __exit__
self.gen.throw(type, value, traceback)
File “/tmp/tmpfip0Vp/pip.zip/pip/_vendor/requests/packages/urllib3/response.py”, line 242, in _error_catcher
raise ReadTimeoutError(self._pool, None, ‘Read timed out.’)
ReadTimeoutError: HTTPSConnectionPool(host=’pypi.python.org’, port=443): Read timed out.
解决:这是由于默认devstack在使用pip下载django框架,由于国外的源不稳定,经常会出现超时情况,所以建议使用国内的源,例如使用豆瓣源。
1、在root用户根目录创建.pip文件夹(前面有一个“.”)
2、进入.pip文件夹里创建pip.conf文件,输入以下内容即可
[global]
trusted-host =  pypi.douban.com
index-url = http://pypi.douban.com/simple
问题2:该过程我没有记录,不过我印象中出现的错误无法解析images.trystack.cn
解决:这个问题好解决,直接ping images.trystack.cn获得相关域名的IP地址,然后进入/etc/hosts,添加域名与IP的对应关系即可。
问题3:在demo租户创建的虚拟机,设置浮动IP,无法ping通。
解决:这个是我个人的低级错误,没有留意demo组合的安全组,设置ICMP和SSH既可以ping通和SSH链接了。
如何实现重启devstack后,还能正常访问openstack?
1、如果你是物理机,在/home/devstack文件下面有一个stack-screenrc
stack@controller:/home/devstack$ screen -c stack-screenrc
Cannot open your terminal '/dev/pts/33' - please check.
出现该问题,切换root用户 chmod 777 /dev/pts/33后重新执行
2、如果你是虚拟机,你会连虚拟机的IP都无法连接。
因为eth0 桥接到br-ex 上面去了,而重启后br-ex 没有ip 配置,把eth0 从 br-ex 上去掉,或者手动通过ifconfig 给 br-ex 配置ip ,都可以解决问题。
当然,你也可以通过VMwork Station 创建一个快照,每次开启只需要恢复到该快照就可以了,不然你会连虚拟机的IP都无法连接上。
还有一种方式,就是将你的虚拟机创建双网卡,将控制网络和外部网络分开管理,也可以解决该问题。
参考文档:http://www.chenshake.com/openstack-project-series-3-devstack/


