Java NI/O
N/O 介绍
在jdk1.4 包中引入了新的JavaI/O 类库,其目的在于提高速度。其实旧的I/O 包已经使用NI/O 重新实现过,充分利用这种速度,因此即使我们不显示的使用nio 编写代码,也能从中受益。
这种速度的提升来自于所使用的结构更接近于操作系统执行的I/O 方式: 通道(Channel) 和缓冲区(Buffer)。我们可以将通道看成是一个含有煤层的矿藏,缓冲器是派送矿藏的卡车。卡车装满煤炭而归,我们再从卡车上获得煤炭。也就是说我们并不是直接和通道交互,我们只是和缓冲区交互,并把缓冲区派送到通道。通道要么是从缓冲器中获取数据,要么向缓冲区发送数据。
在旧的I/O 类库中有三个类被修改了(不考虑网络I/O)。分别是FileInputSteam、FileOutputStream、RandomAccessFile。需要注意的是这些是字节操纵流,与底层的nio 性质一致。Reader 与Writer 这种字符模式得类不能用于产生通道;但是java.nio.channels.Channels 类提供了使用方法,用以在通道中产生Reader 或 Writer。
在了解nio 后我们来详细了解一些Buffer(抽象类)。
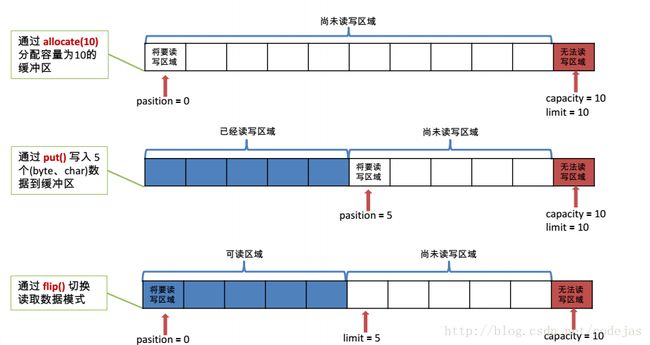
Buffer四个核心属性
capacity: 容量,是它所包含的元素的数量。缓冲区的容量不能为负并且不能更改。
limit:限制,是第一个不应该读取或写入的元素的索引。缓冲区的限制不能为负,并且不能大于其容量。
position:位置, 是下一个要读取或写入的元素的索引。缓冲区的位置不能为负,并且不能大于其限制。
mark: 标记,是一个索引,在调用 reset 方法时会将缓冲区的位置重置为该索引。
这四个属性遵循一个不变式: 0 <= mark <= position <= limit <= capacity
下面是上面有关属性的关系图:
@Test
    public void testBuffer(){
        String str = "abc";
        ByteBuffer bf = ByteBuffer.allocate(1024);

        getBufferProperty(bf,"getProperty");

        bf.put(str.getBytes());     //利用put() 将数据存放到缓冲区
        getBufferProperty(bf,"put()");

        bf.flip();      //切换到读模式
        getBufferProperty(bf,"flip()");

        byte[] bytes = new byte[bf.limit()];
        bf.get(bytes);      //获取缓冲区中的数据
        getBufferProperty(bf,"get()");

        bf.rewind();        //可重复读
        getBufferProperty(bf,"rewind()");

        bf.clear();     //清空缓冲区,但是缓冲区的数据依然存在只是处于被遗忘的状态
        getBufferProperty(bf,"clear()");
    }
    public void getBufferProperty(ByteBuffer bf,String str){
        System.out.println("-----------"+ str +"------------");
        System.out.println("position:" + bf.position());
        System.out.println("capacity:" + bf.capacity());
        System.out.println("limit:" + bf.limit());
    }
/** 输出:*/
-----------getProperty------------
position:0
capacity:1024
limit:1024
-----------put()------------
position:3
capacity:1024
limit:1024
-----------flip()------------
position:0
capacity:1024
limit:3
-----------get()------------
position:3
capacity:1024
limit:3
-----------rewind()------------
position:0
capacity:1024
limit:3
-----------clear()------------
position:0
capacity:1024
limit:1024直接缓冲区与分直接缓冲区
下面是API 中关于字节缓冲区的介绍:
字节缓冲区要么是直接的,要么是非直接的。如果为直接字节缓冲区,则 Java 虚拟机会尽最大努力直接在此缓冲区上执行本机 I/O 操作。也就是说,在每次调用基础操作系统的一个本机 I/O 操作之前(或之后),虚拟机都会尽量避免将缓冲区的内容复制到中间缓冲区中(或从中间缓冲区中复制内容)。
直接字节缓冲区可以通过调用此类的 allocateDirect 工厂方法来创建(你可以通过查看源码的方式比较allocateDirect () 与allocate() 方法的不同 )。此方法返回的缓冲区进行分配和取消分配所需成本通常高于非直接缓冲区。直接缓冲区的内容可以驻留在常规的垃圾回收堆之外,因此,它们对应用程序的内存需求量造成的影响可能并不明显。所以,建议将直接缓冲区主要分配给那些易受基础系统的本机 I/O 操作影响的大型、持久的缓冲区。一般情况下,最好仅在直接缓冲区能在程序性能方面带来明显好处时分配它们。
直接字节缓冲区还可以通过 mapping 将文件区域直接映射到内存中来创建。Java 平台的实现有助于通过 JNI 从本机代码创建直接字节缓冲区。如果以上这些缓冲区中的某个缓冲区实例指的是不可访问的内存区域,则试图访问该区域不会更改该缓冲区的内容,并且将会在访问期间或稍后的某个时间导致抛出不确定的异常。
字节缓冲区是直接缓冲区还是非直接缓冲区可通过调用其 isDirect 方法来确定。提供此方法是为了能够在性能关键型代码中执行显式缓冲区管理。
非直接缓冲区:通过allocate() 方法分配缓冲区,将缓冲区建立在JVM 的内存中,通过copy 的形式在物理内存与虚拟机内存中传输。

直接缓冲区:通过allocateDirect() 方法分配直接缓冲区,将缓冲区建立在物理内存中,减少了一次数据在物理内存与虚拟机内存之间的拷贝,这也是为什么直接缓冲区的速度要快于非直接缓冲区。
我们通过文件的拷贝这个案例来体验一下直接缓冲区与非直接缓冲区。为了省略一系列的关流操作与异常处理,这里均采用最简单的方式,下同。
非直接缓冲区:
 @Test
    public void test1() throws IOException {
        FileInputStream inputStream = new FileInputStream("1.txt");
        FileOutputStream outputStream = new FileOutputStream("2.txt");
        //1. 获取通道
        FileChannel inputChannel = inputStream.getChannel();
        FileChannel outputChannel = outputStream.getChannel();
        //2. 指定缓冲区的大小
        ByteBuffer buffer = ByteBuffer.allocate(1024);

        //3. 将通道中的数据写入到缓冲区
        while (inputChannel.read(buffer) != -1){
            buffer.flip();   //切换到读数据模式
            //4. 将缓冲区的数据写入到通道中
            outputChannel.write(buffer);
            buffer.clear();    //清空缓冲区的数据
        }

        //5. 关流
        inputStream.close();
        inputChannel.close();
        outputChannel.close();
        outputStream.close();
    }
直接缓冲区:这里我们使用内存映射文件的方式完成。
/**  */
@Test
    public void test2() throws IOException {
        FileChannel inChannel =
                FileChannel.open(Paths.get("1.txt"), StandardOpenOption.READ);   //open() 方法在jdk1.7 中才被定义
        FileChannel outChannel =
                FileChannel.open(Paths.get("3.txt"),
StandardOpenOption.READ,StandardOpenOption.WRITE,StandardOpenOption.CREATE);
        //内存映射文件
        MappedByteBuffer inMappedBuf =
                inChannel.map(FileChannel.MapMode.READ_ONLY,0,inChannel.size());
        MappedByteBuffer outMappedBuf =
                outChannel.map(FileChannel.MapMode.READ_WRITE,0,inChannel.size());

        byte [] bytes = new byte[inMappedBuf.limit()];      //直接对缓冲区进行数据的读写
        inMappedBuf.get(bytes);
        outMappedBuf.put(bytes);

        inChannel.close();
        outChannel.close();
    }
直接缓冲区:使用Channel 中的transferTo() 方法 transferFrom() 方法类似。
/**  */
 @Test
    public void test3() throws IOException {
        FileChannel inChannel =
                FileChannel.open(Paths.get("1.txt"), StandardOpenOption.READ);
        FileChannel outChannel =
                FileChannel.open(Paths.get("4.txt"),
                        StandardOpenOption.READ,StandardOpenOption.WRITE,StandardOpenOption.CREATE);

        inChannel.transferTo(0,inChannel.size(),outChannel);
        inChannel.close();
        outChannel.close();
    }
