(Android)使用NavigationView实现侧滑菜单栏
一、事先在build.gradle(Module:app)中添加依赖
compile 'com.android.support:appcompat-v7:27.1.1'
compile 'com.android.support:design:27.1.1'
二、主页面布局
activity.xml
<android.support.v4.widget.DrawerLayout
    xmlns:android="http://schemas.android.com/apk/res/android"
    xmlns:app="http://schemas.android.com/apk/res-auto"
    android:id="@+id/drawer_main_layout"
    android:layout_width="match_parent"
    android:layout_height="match_parent"
    android:clipToPadding="false"
    android:fitsSystemWindows="true">

    <LinearLayout
        android:layout_width="match_parent"
        android:layout_height="match_parent"
        android:orientation="vertical">
        <android.support.v7.widget.Toolbar
            android:id="@+id/tb_main_toolbar"
            android:layout_width="match_parent"
            android:layout_height="50dp"
            android:background="#3399FE"
            app:contentInsetStart="0dp"
            >
            <TextView
                android:layout_width="match_parent"
                android:layout_height="match_parent"
                android:gravity="center"
                android:paddingRight="60dp"
                android:text="首页"
                android:textSize="25sp"
                android:textColor="#fff"
                />
        android.support.v7.widget.Toolbar>

        <FrameLayout
            android:id="@+id/frame_main_content"
            android:layout_width="match_parent"
            android:layout_height="match_parent">
        FrameLayout>
    LinearLayout>

    <android.support.design.widget.NavigationView
        android:id="@+id/nv_main_menu"
        android:layout_width="wrap_content"
        android:layout_height="match_parent"
        android:layout_gravity="left"
        app:headerLayout="@layout/navigation_header"
        app:menu="@menu/drawer"
        >

    android.support.design.widget.NavigationView>
android.support.v4.widget.DrawerLayout>
navigation_header.xml
<LinearLayout android:layout_width="match_parent"
    android:layout_height="200dp"
    android:background="#3399FE"
    android:gravity="center"
    xmlns:android="http://schemas.android.com/apk/res/android">
    <TextView
        android:id="@+id/tv_header_text"
        android:layout_width="wrap_content"
        android:layout_height="wrap_content"
        android:text="HeaderLayout"
        android:textColor="#fff"
        android:textSize="25sp"/>
LinearLayout>
在values文件夹下新建menu文件夹,在menu文件夹下新建drawer.xml
values/menu/drawer.xml
<menu xmlns:android="http://schemas.android.com/apk/res/android">
<item
android:id="@+id/item_first"
android:icon="@drawable/ic_launcher_foreground"
android:title="首页">
item>
<item
android:id="@+id/item_second"
android:icon="@drawable/ic_launcher_foreground"
android:title="第二页">
item>
<item
android:id="@+id/item_third"
android:icon="@drawable/ic_launcher_foreground"
android:title="第三页">
item>
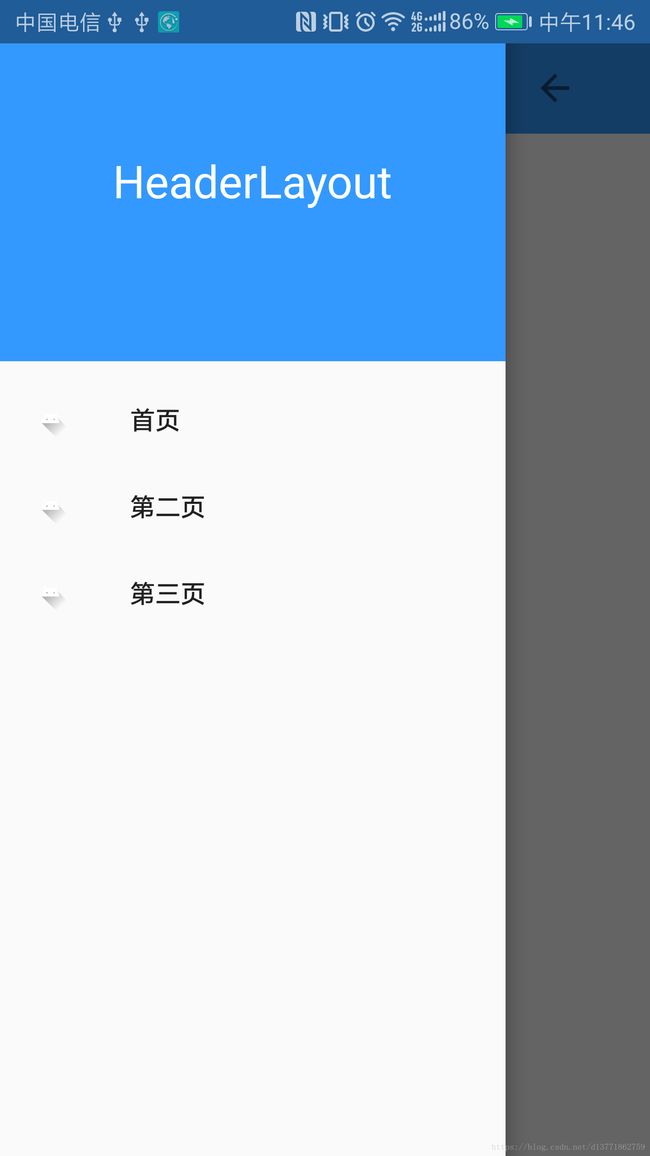
menu>最后的结果:

上图就是最初的结果,但是还是很粗糙,所有要对齐进行修改,首先要将APP自带的Toolbar去掉。
三:去除APP自带的Toolbar以及修改信息栏的背景颜色
在styles.xml中添加一个style
接着在AndroidManifest.xml文件中修改Theme
<application
        android:allowBackup="true"
        android:icon="@mipmap/ic_launcher"
        android:label="@string/app_name"
        android:roundIcon="@mipmap/ic_launcher_round"
        android:supportsRtl="true"
        修改这里的话会去除Toolbar
        android:theme="@style/AppTheme.NoActionBar">
        <activity android:name=".MainActivity">
            <intent-filter>
                <action android:name="android.intent.action.MAIN" />

                <category android:name="android.intent.category.LAUNCHER" />
            intent-filter>
        activity>
    application>
修改信息栏的背景颜色
添加依赖
compile 'com.readystatesoftware.systembartint:systembartint:1.0.3'MainActivity.java
    private void initWindow(){
        if (Build.VERSION.SDK_INT >= Build.VERSION_CODES.KITKAT){
            getWindow().addFlags(WindowManager.LayoutParams.FLAG_TRANSLUCENT_STATUS);
            getWindow().addFlags(WindowManager.LayoutParams.FLAG_TRANSLUCENT_NAVIGATION);
            SystemBarTintManager tintManager = new SystemBarTintManager(this);
            tintManager.setStatusBarTintColor(Color.parseColor("#3399FE"));
            tintManager.setStatusBarTintEnabled(true);
        }
    }
在onCreate中调用即可
四、在Toolbar上添加图标,并使Toolbar随侧滑菜单滑动
  /**
     * 设置侧拉框(NavigationView)
     *
     * @param toolbarChild
     */
    private void initSlid(final Toolbar toolbarChild) {
        final DrawerLayout mDrawerLayout = findViewById(R.id.drawer_main_layout);
        ActionBarDrawerToggle mDrawerToggle = new ActionBarDrawerToggle(MainActivity.this,
            mDrawerLayout,toolbarChild, R.string.drawer_open, R.string.drawer_close) {
            @Override
            public void onDrawerSlide(View drawerView, float slideOffset) {
                View content = mDrawerLayout.getChildAt(0);
                int offset = (int) (drawerView.getWidth() * slideOffset);
                content.setTranslationX(offset);
            }

            @Override
            public void onDrawerOpened(View drawerView) {
                super.onDrawerOpened(drawerView);
            }

            @Override
            public void onDrawerClosed(View drawerView) {
                super.onDrawerClosed(drawerView);
            }

            @Override
            public void onDrawerStateChanged(int newState) {
                super.onDrawerStateChanged(newState);
            }
        };

        mDrawerToggle.syncState();
        mDrawerLayout.addDrawerListener(mDrawerToggle);

        mNavigation.setItemIconTintList(null);
    }
在strings.xml文件中添加
<string name="drawer_open">openstring>
<string name="drawer_close">closestring>
最终结果:
五、侧滑菜单操作
1、获取headerLayout的布局控件
View mHeaderView =  mNavigation.getHeaderView(0);
TextView tv = mHeaderView.findViewById(R.id.XX_XX_XX);
2、设置menu的item默认选中
// 设置导航栏默认选中
mNavigation.getMenu().getItem(0).setChecked(true);
3、设置点击事件
 mNavigation.setNavigationItemSelectedListener(new NavigationView.OnNavigationItemSelectedListener() {
            @Override
            public boolean onNavigationItemSelected(@NonNull MenuItem item) {
                switch (item.getItemId()) {
                    case R.id.item_one:
                        getSupportFragmentManager().beginTransaction().replace(R.id.frame_content, new MenuOne).commit();
                        // HeaderLayout的控件
                        tvName.setText(R.string.menu1);
                        tvName.setTypeface(Typeface.SANS_SERIF);
                        break;
                    case R.id.item_two:
                        getSupportFragmentManager().beginTransaction().replace(R.id.frame_content, new MenuTwo()).commit();
                        tvName.setText(R.string.menu2);
                        tvName.setTypeface(Typeface.SANS_SERIF);
                        break;
                    case R.id.item_three:
                        getSupportFragmentManager().beginTransaction().replace(R.id.frame_content, new MenuThree()).commit();
                        tvName.setText(R.string.menu3);
                        tvName.setTypeface(Typeface.SANS_SERIF);
                        break;
                    default:
                        break;
                }
                item.setChecked(true);
                // DrawerLayout控件
                mDrawerLayout.closeDrawers();
                return true;
            }
        });