UIAutomator2.0详解(UIDevice篇----Screen操作)
UIAutomator2.0的UIDevice类共有62个方法,其中与屏幕相关的操作共有13个,占了总数的五分之一。本篇我们将依次介绍一下这些方法,并通过实例来使用这些方法。
(1)public boolean isScreenOn() throws RemoteException
用于判断屏幕是否休眠(即是否亮屏),若未休眠则,返回true,否则返回false.
(2)public void wakeUp() throws RemoteException
用于唤醒屏幕,即点亮屏幕。
(3)public void sleep() throws RemoteException
用于屏幕休眠,即灭屏。
(4)public int getDisplayHeight()
以物理像素为单位获取显示器的高度。
(5)public int getDisplayWidth()
以物理像素为单位,获取显示器的宽度。
(6)public Point getDisplaySizeDp()
以设备独立像素为单位,以Point类的形式,返回显示器的大小。
未能搞清其与物理像素的区别,若有同学知晓,望指教。
(7)public int getDisplayRotation()
获取当前屏幕的旋转角度,返回值可能为:Surface.ROTATION_0,Surface.ROTATION_90,Surface.ROTATION_180,Surface.ROTATION_270。对应整数值为0,1,2,3,即0度,90度,180度,270度。
(8)public boolean isNaturalOrientation()
检查设置是否是在其自然旋转竖屏的位置上,即是否为0度,或180度。
(9)public void setOrientationLeft() throws RemoteException
屏幕向左旋转,并固定位置。
(10)public void setOrientationRight() throws RemoteException
屏幕向右旋转,并固定位置。
(11)public void setOrientationNatural() throws RemoteException
将屏幕旋转至自然竖屏的位置上,并固定。
(12)public void freezeRotation() throws RemoteException
禁用传感器和设备的旋转,且在当前的旋转状态冻结。
(13)public void unfreezeRotation() throws RemoteException
重新启用传感器,允许物理旋转。
下面我们用两个例子,来实验上述方法。
(1)实例1:判断屏幕状态,进行亮屏息屏操作,输出屏幕尺寸信息。
代码如下:
package com.breakloop.u2demo;

import android.graphics.Point;
import android.os.RemoteException;
import android.support.test.InstrumentationRegistry;
import android.support.test.uiautomator.UiDevice;
import android.util.Log;
import android.view.Surface;

import org.junit.After;
import org.junit.Before;
import org.junit.BeforeClass;
import org.junit.Test;
import org.junit.runner.RunWith;
import org.junit.runners.JUnit4;

/**
 * Created by user on 2017/11/1.
 */

@RunWith(JUnit4.class)
public class UIDeviceTest1 {

    private final String TAG=getClass().getName();
    private static UiDevice mDevice;

    @BeforeClass
    public static void initDevice(){
        mDevice= UiDevice.getInstance(InstrumentationRegistry.getInstrumentation());
    }

    @Before
    public void screenOn(){
        try {
            if(!mDevice.isScreenOn()){
                Log.i(TAG, "Screen is OFF, so Wakeup");
                mDevice.wakeUp();
            }
        } catch (RemoteException e) {
            e.printStackTrace();
        }
    }

    @Test
    public void getDisplayInfo(){
        Log.i(TAG, "get Device Display High: "+mDevice.getDisplayHeight());
        Log.i(TAG, "get Device Display Width: "+mDevice.getDisplayWidth());
        checkRotation();
        Point point=mDevice.getDisplaySizeDp();
        Log.i(TAG, "get Device Size X: "+point.x);
        Log.i(TAG, "get Device Size Y: "+point.y);
    }

    private void checkRotation(){
        int rotation=mDevice.getDisplayRotation();
        switch (rotation){
            case Surface.ROTATION_0:
                Log.i(TAG, "get Device Display Rotation: 0");
                break;
            case Surface.ROTATION_90:
                Log.i(TAG, "get Device Display Rotation: 90");
                break;
            case Surface.ROTATION_180:
                Log.i(TAG, "get Device Display Rotation: 180");
                break;
            case Surface.ROTATION_270:
                Log.i(TAG, "get Device Display Rotation: 270");
                break;
        }
    }

    @After
    public void screenOff(){
        try {
            if(mDevice.isScreenOn()){
                Log.i(TAG, "Screen is ON, so Sleep");
                mDevice.sleep();
            }
        } catch (RemoteException e) {
            e.printStackTrace();
        }
    }
}
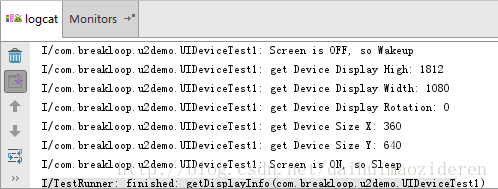
执行结果如下:
(2)实例2:启动helloword Activity,并进行屏幕旋转操作。
这里,我们需要再次调用自定义的Utils方法。
public static void closeAPP(UiDevice uiDevice, String sPackageName){
        try {
            uiDevice.executeShellCommand("am force-stop "+sPackageName);
        } catch (IOException e) {
            e.printStackTrace();
        }
    }

    public static void startAPP(UiDevice uiDevice,String sPackageName, String sLaunchActivity){
        try {
            uiDevice.executeShellCommand("am start -n "+sPackageName+"/"+sLaunchActivity);
        } catch (IOException e) {
            e.printStackTrace();
        }
    }
我们在之前的测试用例集合UIDeviceTest1中,添加测试案例OrientationTest
    @Test
    public void OrientationTest(){
        String packageName="com.breakloop.test";
        String activityName=".MainActivity";

        //(1)start APP
        Utils.startAPP(mDevice,packageName,activityName);
        mDevice.waitForWindowUpdate(packageName,1000);

        //(2)freeze Orientation
        try {
            mDevice.freezeRotation();
            Log.i(TAG, "Freeze Orientation");
            mDevice.waitForWindowUpdate(packageName,1000);
        } catch (RemoteException e) {
            e.printStackTrace();
        }
        checkRotation();

        //(3)turn left and check Orientation
        try {
            mDevice.setOrientationLeft();
            Log.i(TAG, "turn left");
            mDevice.waitForWindowUpdate(packageName,1000);
        } catch (RemoteException e) {
            e.printStackTrace();
        }
        checkRotation();

        //(4)turn right and check Orientation
        try {
            mDevice.setOrientationRight();
            Log.i(TAG, "turn right");
            mDevice.waitForWindowUpdate(packageName,1000);
        } catch (RemoteException e) {
            e.printStackTrace();
        }
        checkRotation();

        //(5)unfreeze Orientation
        try {
            mDevice.unfreezeRotation();
            Log.i(TAG, "Unfreeze Orientation");
            mDevice.waitForWindowUpdate(packageName,1000);
        } catch (RemoteException e) {
            e.printStackTrace();
        }

        //(6)turn left and check Orientation
        try {
            mDevice.setOrientationLeft();
            Log.i(TAG, "turn left");
            mDevice.waitForWindowUpdate(packageName,1000);
        } catch (RemoteException e) {
            e.printStackTrace();
        }
        checkRotation();

        //(7)turn right and check Orientation
        try {
            mDevice.setOrientationRight();
            Log.i(TAG, "turn right");
            mDevice.waitForWindowUpdate(packageName,1000);
        } catch (RemoteException e) {
            e.printStackTrace();
        }
        checkRotation();

        //(8)check whether is Natural Orientation
        if(mDevice.isNaturalOrientation()){
            Log.i(TAG, "Natural Orientation");
        }else {
            Log.i(TAG, "Not Natural Orientation");
        }
        mDevice.waitForWindowUpdate(packageName,1000);

        //(9)set to Natural Orientation and then check Orientation
        try {
            Log.i(TAG, "set Orientation Natural");
            mDevice.setOrientationNatural();
            mDevice.waitForWindowUpdate(packageName,1000);
        } catch (RemoteException e) {
            e.printStackTrace();
        }
        checkRotation();

        //(10)close APP
        Utils.closeAPP(mDevice,packageName);
    }
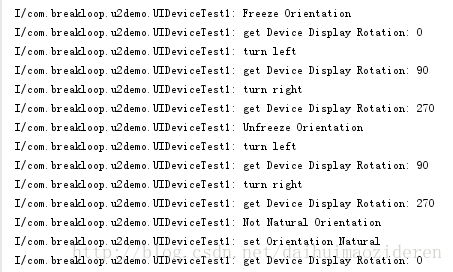
运行结果如下:
从结果可见,在freezeOrientation时,屏幕也可旋转。


