介绍
何为Overlay Icon(覆盖图标),如果你有用过Github,Sky Drive,Dropbox,TortoiseSVN中的一款或者多款产品,就可以在相关的同步文件夹中看到文件夹和文件的图标上会有相关状态(新增、修改等)状态的显示,如下图所示。而显示这个状态用到的就是在Windows中注册的Overlay Icon。
本文就是介绍如何创建自己的Overlay Icon,以实现自己的功能。
开发方式
有两种开发方式,用C++ ATL开发需要手动在程序中编写相关的注册表,调试也有一些难度;用C#调SharpShell来实现会方便很多,且有相关的调试工具。
C++ ATL编写动态链接库
由于开发相对耗时,本次并未采用此种开发方式-
C#使用SharpShell编写类库
本节内容有参考.NET Shell Extensions - Shell Icon Overlay Handlers,对其作者,也是SharpShell的开发者Dave Kerr表示感谢!1.新建Visual C#项目,选择“类库” 2.添加对SharpShell.dll的引用3.添加对应的显示覆盖图标的类,且该类要继承SharpShell.dll的
SharpIconOverlayHandler类,并实现该类的方法。如在此我要实现一个显示 图标,创建
图标,创建AddedFileStateOverlayHandler类,并根据实际要求实现对应的逻辑。具体代码如下:
///
/// The AddedFileStateOverlayHandler is an IconOverlayHandler that shows
/// a padlock icon over files that are localadded or serveradded.
///
[ComVisible(true)]
public class AddedFileStateOverlayHandler : SharpIconOverlayHandler
{
///
/// Called by the system to get the priority, which is used to determine
/// which icon overlay to use if there are multiple handlers. The priority
/// must be between 0 and 100, where 0 is the highest priority.
///
///
/// A value between 0 and 100, where 0 is the highest priority.
///
protected override int GetPriority()
{
// The read only icon overlay is very low priority.
return 10;
}
///
/// Determines whether an overlay should be shown for the shell item with the path 'path' and
/// the shell attributes 'attributes'.
///
/// The path for the shell item. This is not necessarily the path
/// to a physical file or folder.
/// The attributes of the shell item.
///
/// true if this an overlay should be shown for the specified item; otherwise, false .
///
protected override bool CanShowOverlay(string path, FILE_ATTRIBUTE attributes)
{
try
{
string folderPath = Path.GetDirectoryName(path);
string fileName = Path.GetFileName(path);
FileInfo fi = new FileInfo(path);
if (fi.Attributes == (FileAttributes.Normal | FileAttributes.System | FileAttributes.NotContentIndexed | FileAttributes.Hidden))
return false;
if (fileName.StartsWith("."))
return false;
if(!XmlHelper.isCfgFileExist(folderPath))
return false;
OverlayFile overlayFile = XmlHelper.getFileByName(fileName, folderPath);
if (overlayFile == null)
{
string physicalId =File.Exists(path)?WindowsApi.GetPhysicalId(path).ToString():string.Empty;
//cxb added 2017-04-18
if (!File.Exists(path) && Directory.Exists(path))
{
long folderId = FileHelper.ReadOatosSyncFile(path);
if (folderId != -1)
physicalId = folderId.ToString();
}
if(!string.IsNullOrEmpty(physicalId))
overlayFile = XmlHelper.getFileByPhysicalId(physicalId, folderPath);
}
if (overlayFile == null)
{
FileHelper.SetFolderOverlayState(folderPath,"LocalModified");
return true;
}
else
{
//当为文件夹时,PhysicalId可以标识该文件夹是否已经上传到云盘
if (overlayFile.ChangeType.Equals("ServerNew") || overlayFile.ChangeType.Equals("LocalNew")
|| (overlayFile.IsFolder && string.IsNullOrEmpty(overlayFile.PhysicalId)))
{
FileHelper.SetFolderOverlayState(folderPath,"LocalModified");
return true;
}
else
return false;
}
}
catch (Exception)
{
return false;
}
}
///
/// Called to get the icon to show as the overlay icon.
///
///
/// The overlay icon.
///
protected override System.Drawing.Icon GetOverlayIcon()
{
return Properties.Resources.AddedIcon;
}
}
编写完成后,编译即可生成dll.
安装部署
C++ ATL编写的动态链接库
使用regsvr32.exe注册,使用管理员权限运行cmd(命令行),regsvr32.exe mydll.dll-
C#使用SharpShell编写类库
使用regasm.exe注册.net程序集,使用管理员权限运行cmd(命令行),%windir%\regasm.exe mydll.dll /codebase,其中codebase选项用于将该程序集注册到全局GAC中。
注意:regasm.exe的版本必须要与要注册的程序的.net framework版本一致,如mydll.dll是在.net Framework 4.0平台下编写的,就需要使用4.0版本的regasm.exe注册
需要区分64位和32位系统,采用对应系统的regasm.exe
卸载
C++ ATL编写的动态链接库
使用regsvr32.exe注册,使用管理员权限运行cmd(命令行),regsvr32.exe mydll.dll -u-
C#使用SharpShell编写类库
使用regasm.exe卸载.net程序集,使用管理员权限运行cmd(命令行),%windir%\regasm.exe mydll.dll /u。
注意:regasm.exe的版本必须要与要注册的程序的.net framework版本一致,如mydll.dll是在.net Framework 4.0平台下编写的,就需要使用4.0版本的regasm.exe注册
需要区分64位和32位系统,采用对应系统的regasm.exe
常见问题
1.安装后未能显示OverlayIcon
注册后,需要重启资源管理器,资源管理器才会重新加载注册表中我们通过Shell注册进去的覆盖图标。
2.安装后未能显示OverlayIcon或者未全部显示
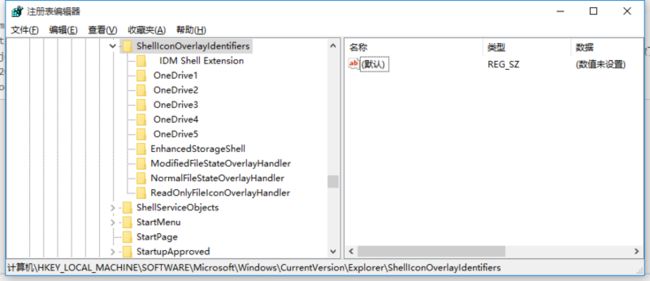
Windows系统对于能够显示的Overlay Icon数目做了限制,按注册表中的顺序只取前10个,确保你写的OverlayIcon注册的顺序在前10个,注册表位置见下图:
此处有一个小技巧:注册表的显示顺序是按照字母顺序来的,如果注意观察,就会发现像svn这类的产品,在注册表中对应的注册表项名称中多是以多个空格开始的,这样会排得比较靠前。可以在注册完成后,通过批处理文件(bat)将对应的注册表项改名来实现。
集成到安装包
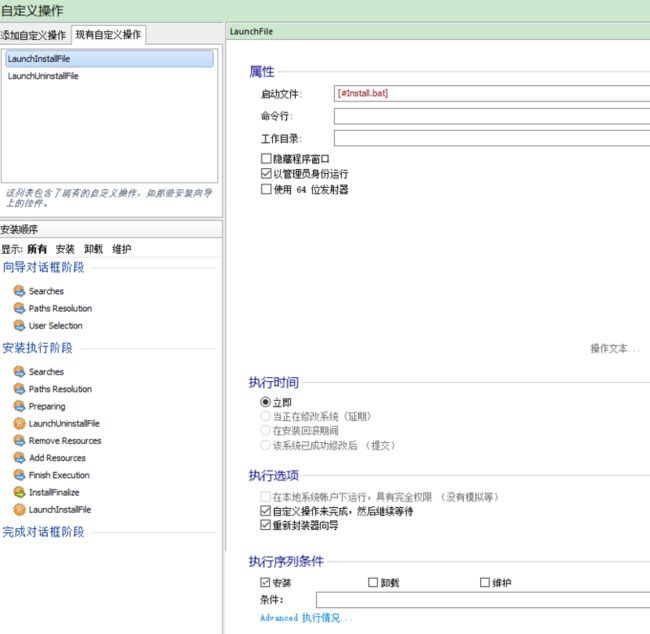
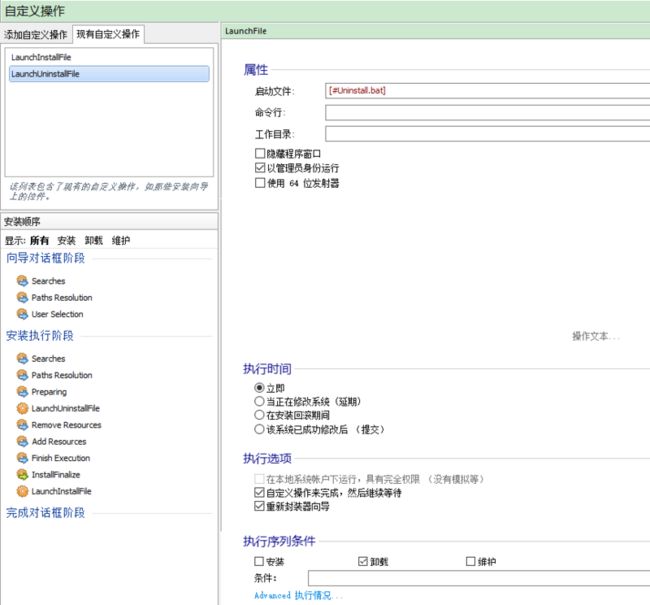
本文是采用Advanced installer 11.0来制作安装包的,为了在安装及卸载过程中能注册和取消注册我们的覆盖图标类库(dll),需要分别写两个批处理文件,Install.bat和Uninstall.bat,前者负责在安装时注册类库,后者负责在卸载时取消注册类库。
Install.bat代码如下:
::type .\AutoRegisterOverlay.txt
::关闭回显
@echo off
::清除屏幕
cls
::当前系统32位
SET fwpath="%windir%\Microsoft.NET\Framework\v4.0.30319"
SET regPara="/reg:32"
::当前系统64
if exist %windir%\SysWOW64 (SET fwpath="%windir%\Microsoft.NET\Framework64\v4.0.30319")
if exist %windir%\SysWOW64 (SET regPara="/reg:64")
@echo %fwpath%
@echo %regPara%
@echo %~dp0
::install
%fwpath%\regasm.exe "%~dp0\FileStateOverlayHandler.dll" /register /codebase
::Rename Registry
reg copy "HKEY_LOCAL_MACHINE\SOFTWARE\Microsoft\Windows\CurrentVersion\Explorer\ShellIconOverlayIdentifiers\AddedFileStateOverlayHandler" "HKEY_LOCAL_MACHINE\SOFTWARE\Microsoft\Windows\CurrentVersion\Explorer\ShellIconOverlayIdentifiers\   AddedFileStateOverlayHandler" /s /f  %regPara%
reg delete "HKEY_LOCAL_MACHINE\SOFTWARE\Microsoft\Windows\CurrentVersion\Explorer\ShellIconOverlayIdentifiers\AddedFileStateOverlayHandler" /f  %regPara%
reg copy "HKEY_LOCAL_MACHINE\SOFTWARE\Microsoft\Windows\CurrentVersion\Explorer\ShellIconOverlayIdentifiers\ModifiedFileStateOverlayHandler" "HKEY_LOCAL_MACHINE\SOFTWARE\Microsoft\Windows\CurrentVersion\Explorer\ShellIconOverlayIdentifiers\   ModifiedFileStateOverlayHandler" /s /f  %regPara%
reg delete "HKEY_LOCAL_MACHINE\SOFTWARE\Microsoft\Windows\CurrentVersion\Explorer\ShellIconOverlayIdentifiers\ModifiedFileStateOverlayHandler" /f  %regPara%
reg copy "HKEY_LOCAL_MACHINE\SOFTWARE\Microsoft\Windows\CurrentVersion\Explorer\ShellIconOverlayIdentifiers\NormalFileStateOverlayHandler" "HKEY_LOCAL_MACHINE\SOFTWARE\Microsoft\Windows\CurrentVersion\Explorer\ShellIconOverlayIdentifiers\   NormalFileStateOverlayHandler" /s /f  %regPara%
reg delete "HKEY_LOCAL_MACHINE\SOFTWARE\Microsoft\Windows\CurrentVersion\Explorer\ShellIconOverlayIdentifiers\NormalFileStateOverlayHandler" /f  %regPara%
::完成后重启windows文件资源管理器
taskkill   /im   explorer.exe   /f

start   %windir%\explorer.exe
Uninstall.bat的代码如下:
::type .\AutoRegisterOverlay.txt
::关闭回显
@echo off
::清除屏幕
cls
::当前系统32位
SET fwpath="%windir%\Microsoft.NET\Framework\v4.0.30319"
SET regPara="/reg:32"
::当前系统64
if exist %windir%\SysWOW64 (SET fwpath="%windir%\Microsoft.NET\Framework64\v4.0.30319")
if exist %windir%\SysWOW64 (SET regPara="/reg:64")
@echo %fwpath%
@echo %regPara%
::Rename Registry
reg copy "HKEY_LOCAL_MACHINE\SOFTWARE\Microsoft\Windows\CurrentVersion\Explorer\ShellIconOverlayIdentifiers\   AddedFileStateOverlayHandler" "HKEY_LOCAL_MACHINE\SOFTWARE\Microsoft\Windows\CurrentVersion\Explorer\ShellIconOverlayIdentifiers\AddedFileStateOverlayHandler" /s /f  %regPara%
reg delete "HKEY_LOCAL_MACHINE\SOFTWARE\Microsoft\Windows\CurrentVersion\Explorer\ShellIconOverlayIdentifiers\   AddedFileStateOverlayHandler" /f  %regPara%
reg copy "HKEY_LOCAL_MACHINE\SOFTWARE\Microsoft\Windows\CurrentVersion\Explorer\ShellIconOverlayIdentifiers\   ModifiedFileStateOverlayHandler" "HKEY_LOCAL_MACHINE\SOFTWARE\Microsoft\Windows\CurrentVersion\Explorer\ShellIconOverlayIdentifiers\ModifiedFileStateOverlayHandler" /s /f  %regPara%
reg delete "HKEY_LOCAL_MACHINE\SOFTWARE\Microsoft\Windows\CurrentVersion\Explorer\ShellIconOverlayIdentifiers\   ModifiedFileStateOverlayHandler" /f  %regPara%
reg copy "HKEY_LOCAL_MACHINE\SOFTWARE\Microsoft\Windows\CurrentVersion\Explorer\ShellIconOverlayIdentifiers\   NormalFileStateOverlayHandler" "HKEY_LOCAL_MACHINE\SOFTWARE\Microsoft\Windows\CurrentVersion\Explorer\ShellIconOverlayIdentifiers\NormalFileStateOverlayHandler" /s /f  %regPara%
reg delete "HKEY_LOCAL_MACHINE\SOFTWARE\Microsoft\Windows\CurrentVersion\Explorer\ShellIconOverlayIdentifiers\   NormalFileStateOverlayHandler" /f  %regPara%
@echo %~dp0
::uninstall
%fwpath%\regasm.exe "%~dp0\FileStateOverlayHandler.dll" /u
完成以上步骤后,在Advanced Installer中选择“自定义操作”->“LaunchFile”,创建对应的操作过程,并注意其执行顺序。Install.bat是在完成了所有的安装复制操作后才执行的,Uninstall.bat是卸载一开始就要执行的,具体执行步骤见下图:


参考资料
Managing overlay icons for Dropbox and TortoiseSVN and TortoiseGit
.NET Shell Extensions - Shell Icon Overlay Handlers
Troubleshooting SharpShell Servers