Stm32串口通信(UART)
串口通信的分类
串口通信三种传递方式
串口通信的通信方式
串行通信的方式:

异步通信:它用一个起始位表示字符的开始,用停止位表示字符的结束。其每帧的格式如下:
在一帧格式中,先是一个起始位0,然后是8个数据位,规定低位在前,高位在后,接下来是奇偶校验位(能省略),最后是停止位1。用这种格式表示字符,则字符能一个接一个地传送。

在异步通信中,CPU与外设之间必须有两项规定,即字符格式和波特率。字符格式的规定是双方能够在对同一种0和1的串理解成同一种意义。原则上字符格式能由通信的双方自由制定,但从通用、方便的角度出发,一般还是使用一些标准为好,如采用ASCII标准。
波特率即数据传送的速率,其定义是每秒钟传送的二进制数的位数。例如,数据传送的速率是120字符/s,而每个字符如上述规定包含10数位,则传送波特率为1200波特。

同步通信:在同步通信中,每个字符要用起始位和停止位作为字符开始和结束的标志,占用了时间;所以在数据块传递时,为了提高速度,常去掉这些标志,采用同步传送。由于数据块传递开始要用同步字符来指示,同时要求由时钟来实现发送端与接收端之间的同步,故硬件较复杂。
USART通信
USART异步通信方式特点
USART异步通信
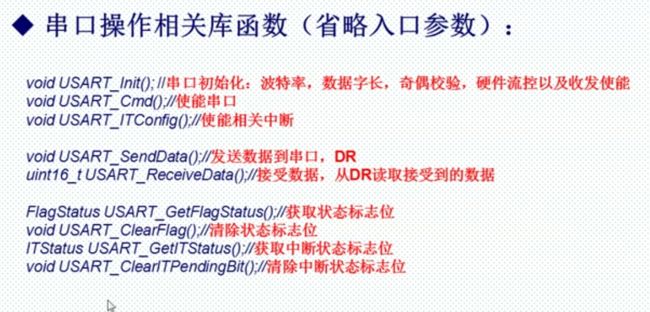
串口通信示例程序
#include "stm32f10x.h"


void My_USARTI_Init(void)
    {
    GPIO_InitTypeDef GPIO_InitStructure;//定义GPIO结构体
    USART_InitTypeDef USART_InitStrue;//定义USART结构体
    NVIC_InitTypeDef NVIC_InitStruct;//定义NVTO结构体
    RCC_APB2PeriphClockCmd(RCC_APB2Periph_GPIOA,ENABLE);//使能GPIOA
    RCC_APB2PeriphClockCmd(RCC_APB2Periph_USART1,ENABLE);//使能USART1

    //GPIOA.9,复用推挽输出
    GPIO_InitStructure.GPIO_Pin =GPIO_Pin_9;
    GPIO_InitStructure.GPIO_Mode=GPIO_Mode_AF_PP;
    GPIO_InitStructure.GPIO_Speed=GPIO_Speed_10MHz;
    GPIO_Init(GPIOA,&GPIO_InitStructure);

    //GPIOA.10上浮输入
    GPIO_InitStructure.GPIO_Pin =GPIO_Pin_10;
    GPIO_InitStructure.GPIO_Mode=GPIO_Mode_IN_FLOATING;
    GPIO_InitStructure.GPIO_Speed=GPIO_Speed_10MHz;
    GPIO_Init(GPIOA,&GPIO_InitStructure);


    //串口初始化
    USART_InitStrue.USART_Mode= USART_Mode_Rx | USART_Mode_Tx;
    USART_InitStrue.USART_BaudRate=115200;//波特率
    USART_InitStrue.USART_HardwareFlowControl=USART_HardwareFlowControl_None;//不使用硬件流
    USART_InitStrue.USART_Parity=USART_Parity_No;//不用奇偶验证
    USART_InitStrue.USART_StopBits=USART_StopBits_1;//停止位
    USART_InitStrue.USART_WordLength=USART_WordLength_8b;//数据位
    USART_Init(USART1,&USART_InitStrue);


    //使能串口1
    USART_Cmd(USART1,ENABLE);


    //开启接收中断,接收到数据就会执行中断函数
    USART_ITConfig(USART1,USART_IT_RXNE,ENABLE);


    //中断优先级设置
    NVIC_InitStruct.NVIC_IRQChannel=USART1_IRQn;//stm32f10x.h文件的顶部查找
    NVIC_InitStruct.NVIC_IRQChannelCmd=ENABLE;
    NVIC_InitStruct.NVIC_IRQChannelPreemptionPriority=1;
    NVIC_InitStruct.NVIC_IRQChannelSubPriority=1;
    NVIC_Init(&NVIC_InitStruct);

}
    //中断服务函数
void USART1_IRQHandler(void)
{
    u8 res;
 if(USART_GetITStatus(USART1,USART_IT_RXNE))
     {
         //读取串口的数据
        res=USART_ReceiveData(USART1);
        USART_SendData(USART1,res);

 }

}

//电脑每给开发板发送一次数据,就会触发中断//接下来执行一次中断服务函数//res=USART_ReceiveData(USART1)就会接收到数据
//USART_SendData(USART1,res)又把接收到的数据发送给电脑,在串口助手就能看到
int main(void)
 {
     //系统中断优先级分组为2
     NVIC_PriorityGroupConfig(NVIC_PriorityGroup_2);
     My_USARTI_Init();
     while(1)
         {


     }

 }
完整的官方示例代码
usart.h
#ifndef __USART_H
#define __USART_H
#include "stdio.h"
#include "sys.h"

#define USART_REC_LEN              200      //定义最大接收字节数 200
#define EN_USART1_RX             1        //使能(1)/禁止(0)串口1接收

extern u8  USART_RX_BUF[USART_REC_LEN]; //接收缓冲,最大USART_REC_LEN个字节.末字节为换行符
extern u16 USART_RX_STA;                 //接收状态标记
//如果想串口中断接收,请不要注释以下宏定义
void uart_init(u32 bound);
#endif
usart.c
#include "sys.h"
#include "usart.h"

//如果使用ucos,则包括下面的头文件即可.
#if SYSTEM_SUPPORT_OS
#include "includes.h"                    //ucos 使用
#endif


//////////////////////////////////////////////////////////////////
//加入以下代码,支持printf函数,而不需要选择use MicroLIB
#if 1
#pragma import(__use_no_semihosting)
//标准库需要的支持函数
struct __FILE
{
    int handle;

};

FILE __stdout;
//定义_sys_exit()以避免使用半主机模式
_sys_exit(int x)
{
    x = x;
}
//重定义fputc函数
int fputc(int ch, FILE *f)
{
    while((USART1->SR&0X40)==0);//循环发送,直到发送完毕
    USART1->DR = (u8) ch;
    return ch;
}
#endif

/*使用microLib的方法*/
 /*
int fputc(int ch, FILE *f)
{
    USART_SendData(USART1, (uint8_t) ch);

    while (USART_GetFlagStatus(USART1, USART_FLAG_TC) == RESET) {}

    return ch;
}
int GetKey (void)  {

    while (!(USART1->SR & USART_FLAG_RXNE));

    return ((int)(USART1->DR & 0x1FF));
}
*/

#if EN_USART1_RX   //如果使能了接收
//串口1中断服务程序
//注意,读取USARTx->SR能避免莫名其妙的错误
u8 USART_RX_BUF[USART_REC_LEN];     //接收缓冲,最大USART_REC_LEN个字节.
//接收状态
//bit15,    接收完成标志
//bit14,    接收到0x0d
//bit13~0,    接收到的有效字节数目
u16 USART_RX_STA=0;       //接收状态标记

void uart_init(u32 bound){
  //GPIO端口设置
  GPIO_InitTypeDef GPIO_InitStructure;
    USART_InitTypeDef USART_InitStructure;
    NVIC_InitTypeDef NVIC_InitStructure;

    RCC_APB2PeriphClockCmd(RCC_APB2Periph_USART1|RCC_APB2Periph_GPIOA, ENABLE);    //使能USART1,GPIOA时钟

    //USART1_TX   GPIOA.9
  GPIO_InitStructure.GPIO_Pin = GPIO_Pin_9; //PA.9
  GPIO_InitStructure.GPIO_Speed = GPIO_Speed_50MHz;
  GPIO_InitStructure.GPIO_Mode = GPIO_Mode_AF_PP;    //复用推挽输出
  GPIO_Init(GPIOA, &GPIO_InitStructure);//初始化GPIOA.9

  //USART1_RX      GPIOA.10初始化
  GPIO_InitStructure.GPIO_Pin = GPIO_Pin_10;//PA10
  GPIO_InitStructure.GPIO_Mode = GPIO_Mode_IN_FLOATING;//浮空输入
  GPIO_Init(GPIOA, &GPIO_InitStructure);//初始化GPIOA.10

  //Usart1 NVIC 配置
  NVIC_InitStructure.NVIC_IRQChannel = USART1_IRQn;
    NVIC_InitStructure.NVIC_IRQChannelPreemptionPriority=3 ;//抢占优先级3
    NVIC_InitStructure.NVIC_IRQChannelSubPriority = 3;        //子优先级3
    NVIC_InitStructure.NVIC_IRQChannelCmd = ENABLE;            //IRQ通道使能
    NVIC_Init(&NVIC_InitStructure);    //根据指定的参数初始化VIC寄存器

   //USART 初始化设置

    USART_InitStructure.USART_BaudRate = bound;//串口波特率
    USART_InitStructure.USART_WordLength = USART_WordLength_8b;//字长为8位数据格式
    USART_InitStructure.USART_StopBits = USART_StopBits_1;//一个停止位
    USART_InitStructure.USART_Parity = USART_Parity_No;//无奇偶校验位
    USART_InitStructure.USART_HardwareFlowControl = USART_HardwareFlowControl_None;//无硬件数据流控制
    USART_InitStructure.USART_Mode = USART_Mode_Rx | USART_Mode_Tx;    //收发模式

  USART_Init(USART1, &USART_InitStructure); //初始化串口1
  USART_ITConfig(USART1, USART_IT_RXNE, ENABLE);//开启串口接受中断
  USART_Cmd(USART1, ENABLE);                    //使能串口1

}

void USART1_IRQHandler(void)                    //串口1中断服务程序
    {
    u8 Res;
#if SYSTEM_SUPPORT_OS         //如果SYSTEM_SUPPORT_OS为真,则需要支持OS.
    OSIntEnter();
#endif
    if(USART_GetITStatus(USART1, USART_IT_RXNE) != RESET)  //接收中断(接收到的数据必须是0x0d 0x0a结尾)
        {
        Res =USART_ReceiveData(USART1);    //读取接收到的数据

        if((USART_RX_STA&0x8000)==0)//接收未完成
            {
            if(USART_RX_STA&0x4000)//接收到了0x0d
                {
                if(Res!=0x0a)USART_RX_STA=0;//接收错误,重新开始
                else USART_RX_STA|=0x8000;    //接收完成了
                }
            else //还没收到0X0D
                {
                if(Res==0x0d)USART_RX_STA|=0x4000;
                else
                    {
                    USART_RX_BUF[USART_RX_STA&0X3FFF]=Res ;
                    USART_RX_STA++;
                    if(USART_RX_STA>(USART_REC_LEN-1))USART_RX_STA=0;//接收数据错误,重新开始接收
                    }
                }
            }
     }
#if SYSTEM_SUPPORT_OS     //如果SYSTEM_SUPPORT_OS为真,则需要支持OS.
    OSIntExit();
#endif
}
#endif
main.c
#include "stm32f10x.h"


void My_USARTI_Init(void)
    {
    GPIO_InitTypeDef GPIO_InitStructure;//定义GPIO结构体
    USART_InitTypeDef USART_InitStrue;//定义USART结构体
    NVIC_InitTypeDef NVIC_InitStruct;//定义NVIC结构体

    RCC_APB2PeriphClockCmd(RCC_APB2Periph_GPIOA,ENABLE);//使能GPIOA
    RCC_APB2PeriphClockCmd(RCC_APB2Periph_USART1,ENABLE);//使能USART1

    //GPIOA.9,复用推挽输出
    GPIO_InitStructure.GPIO_Pin =GPIO_Pin_9;
    GPIO_InitStructure.GPIO_Mode=GPIO_Mode_Out_PP;
    GPIO_InitStructure.GPIO_Speed=GPIO_Speed_10MHz;
    GPIO_Init(GPIOA,&GPIO_InitStructure);

    //GPIOA.10,上浮输入
    GPIO_InitStructure.GPIO_Pin =GPIO_Pin_10;
    GPIO_InitStructure.GPIO_Mode=GPIO_Mode_IN_FLOATING;
    GPIO_InitStructure.GPIO_Speed=GPIO_Speed_10MHz;
    GPIO_Init(GPIOA,&GPIO_InitStructure);


    //串口初始化
    USART_InitStrue.USART_Mode= USART_Mode_Rx | USART_Mode_Tx;
    USART_InitStrue.USART_BaudRate=115200;//波特率
    USART_InitStrue.USART_HardwareFlowControl=USART_HardwareFlowControl_None;//不使用硬件流
    USART_InitStrue.USART_Parity=USART_Parity_No;//不用奇偶验证
    USART_InitStrue.USART_StopBits=USART_StopBits_1;//停止位
    USART_InitStrue.USART_WordLength=USART_WordLength_8b;//数据位
    USART_Init(USART1,&USART_InitStrue);


    //使能串口1
    USART_Cmd(USART1,ENABLE);


    //开启接收中断,接收到数据就会执行中断函数
    USART_ITConfig(USART1,USART_IT_RXNE,ENABLE);


    //中断优先级设置
    NVIC_InitStruct.NVIC_IRQChannel=USART1_IRQn;//stm32f10x.h文件顶部查找
    NVIC_InitStruct.NVIC_IRQChannelCmd=ENABLE;
    NVIC_InitStruct.NVIC_IRQChannelPreemptionPriority=1;
    NVIC_InitStruct.NVIC_IRQChannelSubPriority=1;
    NVIC_Init(&NVIC_InitStruct);

}

void USART1_IRQHandler(void)
{
    u8 res;
 if(USART_GetITStatus(USART1,USART_IT_RXNE))
     {
         //读取串口的数据
        res=USART_ReceiveData(USART1);
        USART_SendData(USART1,res);

 }

}

//电脑每给开发板发送一次数据,就会触发中断
//就会执行一次中断服务函数
//res=USART_ReceiveData(USART1)就会接收到数据
//USART_SendData(USART1,res)又把接收到的数据发送给电脑,在串口助手就能看到
int main(void)
 {
     //系统中断优先级分组为2
     NVIC_PriorityGroupConfig(NVIC_PriorityGroup_2);
     My_USARTI_Init();
     while(1)
         {


     }

 }


