本文详细讲述如何搭建一个Spring+SpringMVC+Maven+Mybatis+MySQL项目环境。
eclipse、maven 及 mysql的安装和配置在此不赘述,可参考这里。
本文demo源码可参考这里。
本文demo所用 Eclipse Java EE IDE 版本信息:
Eclipse Java EE IDE for Web Developers.

Version: Neon.3 Release (4.6.3)
Build id: 20170314-1500

(c) Copyright Eclipse contributors and others 2000, 2017.  All rights reserved. Eclipse and the Eclipse logo are trademarks of the Eclipse Foundation, Inc., https://www.eclipse.org/. The Eclipse logo cannot be altered without Eclipse's permission. Eclipse logos are provided for use under the Eclipse logo and trademark guidelines, https://www.eclipse.org/logotm/. Oracle and Java are trademarks or registered trademarks of Oracle and/or its affiliates. Other names may be trademarks of their respective owners.

This product includes software developed by other open source projects including the Apache Software Foundation, https://www.apache.org/.
Maven 配置settings.xml(参考这里,这是一个非常好的 maven 配置,资源更新速度特别快...):
E:\Repositories\Maven
org.mortbay.jetty
releases
ali
ali
Snapshots
ali
ali
nexus
*
http://maven.aliyun.com/nexus/content/groups/public/
nexus-public-snapshots
public-snapshots
http://maven.aliyun.com/nexus/content/repositories/snapshots/
development
central
http://central
true always true always
central
http://central
true always true always
public-snapshots
public-snapshots
http://public-snapshots
false true always
public-snapshots
http://public-snapshots
false true always
development
public-snapshots
开始搭建项目:
1.mysql 数据库及表准备:
CREATE TABLE `T_USER` (
  `id` bigint(20) NOT NULL AUTO_INCREMENT,
  `user_type` tinyint(4) DEFAULT NULL COMMENT '0、系统管理,1、业务管理员,2、普通操作员',
  `mobile` varchar(255) DEFAULT NULL COMMENT '管理员手机号',
  `is_biz_operator` tinyint(4) DEFAULT NULL COMMENT '是否业务操作员 0: 不是 1:是的',
  `is_sys_operator` tinyint(4) DEFAULT NULL COMMENT '是否系统操作员 0: 不是 1:是的',
  `login_name` varchar(255) NOT NULL COMMENT '员工后台管理账号',
  `real_name` varchar(100) DEFAULT NULL COMMENT '用户名',
  `password` varchar(255) NOT NULL COMMENT '员工后台管理密码',
  `status` tinyint(4) NOT NULL COMMENT '是否有效 0:无效  1:有效',
  `creator` bigint(20) DEFAULT NULL COMMENT '创建者',
  `updator` bigint(20) DEFAULT NULL COMMENT '更新者',
  `create_date` datetime DEFAULT NULL COMMENT '创建日期',
  `update_date` datetime DEFAULT NULL COMMENT '更新日期',
  `deleted` tinyint(4) NOT NULL DEFAULT '0' COMMENT '0:没删除 1:删除',
  PRIMARY KEY (`id`),
  UNIQUE KEY `unique_login_name` (`login_name`) USING BTREE
) ENGINE=InnoDB AUTO_INCREMENT=50 DEFAULT CHARSET=utf8;
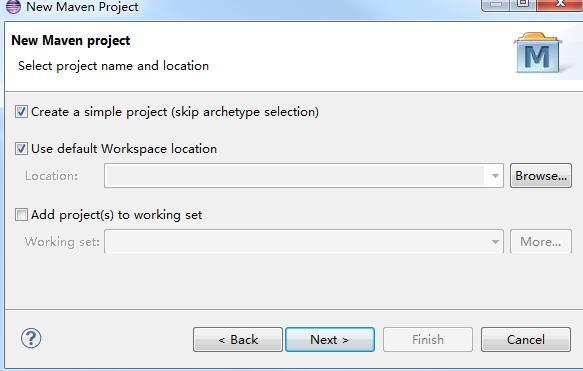
2.maven 工程创建


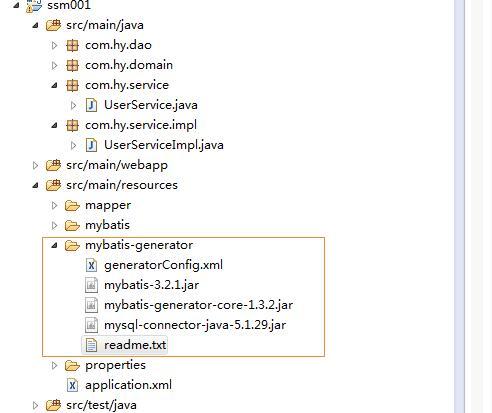
工程新建完成后,工程的目录结构如下:
3.编辑 pom.xml 文件,添加工程的包依赖
  4.0.0
  com.hy
  ssm001
  0.0.1-SNAPSHOT
  war


        3.2.8.RELEASE

        1.6.6
        1.2.12

        4.10

        3.2.1


            org.springframework
            spring-core
            ${spring.version}


            org.springframework
            spring-webmvc
            ${spring.version}


            org.springframework
            spring-context
            ${spring.version}


            org.springframework
            spring-context-support
            ${spring.version}


            org.springframework
            spring-aop
            ${spring.version}


            org.springframework
            spring-aspects
            ${spring.version}


            org.springframework
            spring-tx
            ${spring.version}


            org.springframework
            spring-jdbc
            ${spring.version}


            org.springframework
            spring-web
            ${spring.version}


            junit
            junit
            ${junit.version}
            test


            log4j
            log4j
            ${log4j.version}


            org.slf4j
            slf4j-api
            ${slf4j.version}


            org.slf4j
            slf4j-log4j12
            ${slf4j.version}


            org.springframework
            spring-test
            ${spring.version}
            test


            org.mybatis
            mybatis
            ${mybatis.version}


            org.mybatis
            mybatis-spring
            1.2.0


            mysql
            mysql-connector-java
            5.1.29
4.配置文件初始化。
分别初始化mybatis配置文件、数据库配置文件、Spring配置文件。
mybatis配置文件 mybatis-config.xml:
数据库配置文件 jdbc.properties:
jdbc_driverClassName=com.mysql.jdbc.Driver
jdbc_url=jdbc:mysql://192.168.8.*:3306/db_user
jdbc_username=*
jdbc_password=*
spring配置文件 application.xml:
               classpath:properties/*.properties


            ${jdbc_driverClassName}


            ${jdbc_url}


            ${jdbc_username}


            ${jdbc_password}
5.mybatis 反向生成代码
MyBatis属于一种半自动的ORM框架,由于手写Mapping映射文件很容易出错,所以可利用 MyBatis生成器 自动生成实体类、DAO接口和Mapping映射文件。有两种方式:
第一种方式:安装 eclipse mybatis generator 插件,使用该插件实现代码生成。
可参考这里。
第二种方式:直接用 mybatis-generator.jar 包的命令方式。
相关的jar包及命令可查看本demo源码:
在本文的 demo 中使用了第二种方式。mybatis generator 配置文件generatorConfig.xm内容如下:
cd:G:\javaSpace\ssm001\src\main\resources\mybatis-generator
java -jar mybatis-generator-core-1.3.2.jar -configfile generatorConfig.xml -overwrite
执行以上命令后,工程目录中生成了与 mybatis 相关的代码,主要有实体类、DAO接口和Mapping映射文件。
6.接口声明并实现接口
声明一个UserService接口:
package com.hy.service;

import com.hy.domain.User;

public interface UserService {
    User getUserById(Long id);
}
新建一个类 UserServiceImpl,并实现 UserService 接口 :
package com.hy.service.impl;

import org.springframework.beans.factory.annotation.Autowired;
import org.springframework.stereotype.Service;

import com.hy.dao.UserMapper;
import com.hy.domain.User;
import com.hy.service.UserService;

@Service
public class UserServiceImpl implements UserService{

    @Autowired
    private UserMapper userMapper;

    public User getUserById(Long id) {
        return userMapper.selectByPrimaryKey(id);
    }

}
7.单元测试
单元测试是为了验证第6步中 UserService 接口的 getUserById 方法。
com.hy.baseTest 中新增类 SpringTestCase.java,使用 SpringJUnit4ClassRunner 实现单元测试:
package com.hy.baseTest;

import org.junit.runner.RunWith;
import org.springframework.test.context.ContextConfiguration;
import org.springframework.test.context.junit4.AbstractJUnit4SpringContextTests;
import org.springframework.test.context.junit4.SpringJUnit4ClassRunner;


//指定bean注入的配置文件
@ContextConfiguration(locations = { "classpath:application.xml" })
//使用标准的JUnit @RunWith注释来告诉JUnit使用Spring TestRunner
@RunWith(SpringJUnit4ClassRunner.class)
public class SpringTestCase extends AbstractJUnit4SpringContextTests {

}
在 com.hy.test 中新增 UserServiceTest 类文件:
package com.hy.test;

import org.junit.Test;
import org.springframework.beans.factory.annotation.Autowired;

import com.hy.baseTest.SpringTestCase;
import com.hy.domain.User;
import com.hy.service.UserService;

public class UserServiceTest extends SpringTestCase {

    @Autowired
    private UserService userService;

    @Test
    public void selectUserByIdTest(){
        User user = userService.getUserById((long) 1);
        System.out.println("userLoginName:" + user.getLoginName());
    }
}
运行单元测试:UserServiceTest 右键 Run As –>Junit Test, 运行结果:
log4j:WARN No appenders could be found for logger (org.springframework.test.context.junit4.SpringJUnit4ClassRunner).
log4j:WARN Please initialize the log4j system properly.
userLoginName:admin
到此,我们已经搭建了一个基于 Spring+Maven+Mybatis+Mysql 的项目环境。文中使用了很多Spring相关的技术,如自动注入注解@Service、@Autowired,以及Spring配置文件,这些知识可参考:
http://www.cnblogs.com/szlbm/...