Postfix+Dovecot搭建MailServer配置说明
Postfix+Dovecot搭建MailServer配置说明
1. 概述
MailServer是网络邮件传递及接受服务器,只需注册个人邮箱,通过邮件客户端与他人发送邮件。
MailServer通过SMTP协议发送邮件,提供这种服务器的软件有很多,在这里采用Postfix,Postfix担任两种角色一种是“邮件投递代理”(MTA),一种是“本地信使”。作为MTA时,Postfix使用SMTP协议通过网络收发E-mail信息;作为“本地信使”时,则是直接将邮件分发到邮箱。
用户想要从邮箱中提取他们的邮件,必须使用邮件客户端连接到POP/IMAPserver,由服务器代为访问邮箱。提供POP/IMAPserver的软件很多a,这里采用Dovecot软件。
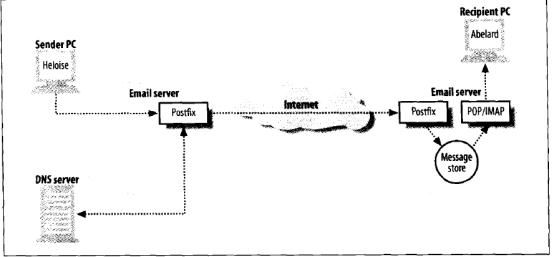
MailServer结构示意图如下:
2. 安装Postfix和Dovecot
本文档下述操作是基于Linux操作系统版本: Fedora12(内核版本Red Hat 4.4.2-7)
采用在线安装,输入命令如下
#yum -y install dovecot
#yum -y install postfix
完成安装后,键入如下命令,看是否安装完全:
#rpm -qa | grep ‘dovecot’
dovecot-1.2.11-3.fc12.i686
#rpm –qa | grep ‘postfix’
postfix-2.6.5-2.fc12.i686
(注:对于不同版本系统,可能需要的包有所区别,但大多数包是相同的,这里仅供参考)
3. 配置
3.1 准备工作
安装Postfix后会生成一些默认的目录文件:
/etc/postfix/
配置文件与查询表
/usr/libexec/postfix/
Postfix的各项服务程序
/var/spool/postfix/
队列文件
其中,主要配置文件是 /etc/postfix/main.cf
查看main.cf中参数的命令如下:
#postconf -n
安装Dovecot后生成配置文件
/etc/dovecot.conf
3.2 基本配置
3.2.1 Postfix配置
配置方式有两种,一种是直接编辑/etc/postfix/main.cf
#vi /etc/postfix/main.cf
配置文件中的参数有些是被#注释的,只需去掉注释符号,有些这是要修改参数的值
第二种方式是使用命令修改
#postconf -e ‘parameter = value’ //parameter是参数名,value是参数的值
修改main.cf文件
# vi /etc/postf/main.cf
home_mailbox = Maildir/ #使用maildir 格式邮箱
myhostname = mail.abc.com #设置postfix服务的邮件主机名
mydomain =abc.com #设置域名
myorigin = $mydomain #设置由本机寄出的邮件所使用的域名
mydestination = $myhostname, $mydomain, localhost.$mydomain,localhost, 10.1.0.0/254 #设置可接受邮件的域名和主机名,还有ip段,其中 10.1.0.0/254表示10.1.0.0-10.1.0.254的IP地址都可以用
inet_interfaces = all #设置postfix服务监听的网络接口
inet_interfaces = localhost 删除
relay_domains = $mydestination #设置可以转发那些域的邮件
recipient_bcc_maps = hash:/etc/postfix/recipient_bcc_maps #接受转发邮件地址
sender_bcc_maps = hash:/etc/postfix/sender_bcc_maps #发送转发邮件地址
myhostname = mail.abc.com #设置postfix服务的邮件主机名、域名
在/etc/postfix/建立两个文件recipient_bcc_maps,sender_bcc_maps两个文件。两个邮件地址之间用tab键隔开。
#vi /etc/postfix/sender_bcc_maps
[email protected] [email protected]
该文件表示发向[email protected],转发给abc@126.com。
#postmap /etc/postfix/sender_bcc_maps
#postmap /etc/postfix/recipient_bcc_maps
保存之后,如果postfix是启动的,就要使用如下命令重新加载main.cf
#postfix reload
3.2.2 Dovecot配置
打开dovecot.conf配置文件
#vi /etc/dovecot.conf
protocols = pop3 #使用POP3协议
ssl = no #不启动ssl认证
mail_location = maildir:~/Maildir #为系统用户建立邮箱目录
mechanisms = plain login # 认证方式
socket listen{
client {
path = /var/run/dovecot/auth-client #启动路径
mode = 0660
user = postfix
group = postfix
}
}
4. 启动Postfix 和 Dovecot
首先检查系统中是否安装了sendmail,一般情况都有sendmail,这里要先将sendmail服务关闭,或者是卸载sendmail
#service sendmail stop #关闭sendmail服务
#chkconfig sendmail off #关闭开机自动运行sendmail服务
#postfix start #打开postfix服务
#chkconfig postfix on #开机自动运行postfix服务(我设置后开机任旧不会自动运行postfix)
#service dovecot start #打开dovecot服务
#chkconfig dovecot on #开机自动运行dovecot服务
将postfix加入到root的组:
#usermod -G root postfix
检查服务是否开启,如果服务打开会显示如下结果
#nmap localhost
PORT STATE SERVICE
22/tcp open ssh
25/tcp open smtp
110/tcp open pop3
如果没有安装nmap命令,可以使用netstat命令
#netstat -nlt
5. 添加邮件服务器用户并分配邮箱
首先添加邮件服务器用户
#adduser username //添加用户
#passwd username //设置密码
由于前面设置mail_location=mail:~/Maildir,所以,所创建的用户目录下有具有Maildir目录,如果不存在该目录,如下操作
#telnet ip地址 110
#user username
+OK
#pass password
+login
#chmod 700 /home/username/Maildir //很重要
6. 测试
首先,在另一台机器上打开一个终端,使用telnet命令测试
#telnet 10.1.0.3 25 //测试邮件服务器postfix是否运行
Trying 10.1.0.3...
Connected to 10.1.0.3.
Escape character is ‘^]’
220 mail.abc.com ESMTP Postfix //连接成功
helo 10.1.0.3 //输入helo加ip测试
250 mail.abc.com
#telnet 10.1.0.3 110 //测试dovecot是否正确运行
Trying 10.1.0.3...
Connected to 10.1.0.3.
Escape character is ‘^]’
+OK Dovecot ready
以上结果显示,表明postfix和dovecot正常运行。
打开邮件客户端,设置好就可以局域网内发送邮件了,如果想要向外网发送邮件,只需在DNS服务器上,MX记录加上邮件域名就可以了,形式如下:
IN MX 0 mail.abc.com
mail IN A 10.1.0.4
