phpStorm+XAMPP的安装和配置
Installing and configuring XAMPP
Contents[hide]
|
This tutorial is obsolete!
Find up-to-date tutorials about configuring PHP development environment:
- Installing and Configuring MAMP with PhpStorm IDE
- Installing and Configuring XAMPP with PhpStorm IDE
Introduction
XAMPP is a cross-platform package consisting of a Apache HTTP server, MySQL database, PHP interpreter, and Perl interpreter. So the word "XAMPP" is an acronym, where "X" stands for "cross", meaning "cross-platform", and the other letters stand for the package components.
XAMPP is a reliable and fast way to set up environment for PHP programming. It provides all the components required for developing, running, debugging, and unit testing of PHP applications. XAMPP is a good alternative to installing and configuring a Web server, a PHP engine, a database server, and a debug engine separately. All you need, is download XAMPP, run XAMPP installer.exe, and start the components using the XAMPP control panel.
This tutorial will walk you step by step through choosing and downloading the appropriate edition of XAMPP, downloading and installing the package, starting its components, and integrating them with the IDE.
Prerequisites
- You are working with IntelliJ IDEA Ultimate Edition, version 9.0 and higher or PhpStorm, version 2.1 and higher.
- The Deployment bundled plugin is enabled.
- For IDEA, you also need the PHP plugin installed and enabled.
Choosing XAMPP edition
First of all, open the official site of Apache friends where all the products are listed. Now let's decide on the edition and version to take depending on the platform and operating system used.
- XAMPP for Windows.
- The latest version that fits Windows NT is XAMPP 1.7.2.
- The earliest version that fits Windows Vista is XAMPP 1.7.2.
- The earliest version that fits Windows 7 is XAMPP 1.7.4.
- XAMPP for Linux
- XAMPP for Mac OS X
- XAMPP for Solaris works only on SPARC systems and does not fit x86 processors.
XAMPP for Windows
In this tutorial, we will use the latest, XAMPP 1.7.4, version of the tool.
Downloading XAMPP Installer
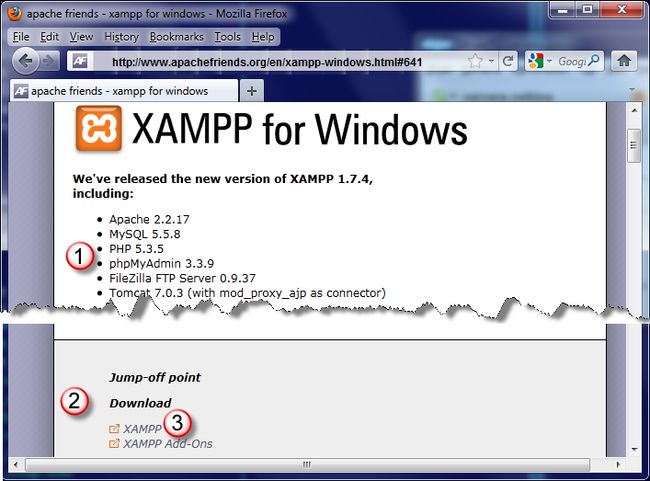
First of all, open the XAMPP 1.7.4 page (Figure 1). The page shows a list of bundled tools (1). In the Download section (2), click XAMPP (3), because we do not need add-on packages.
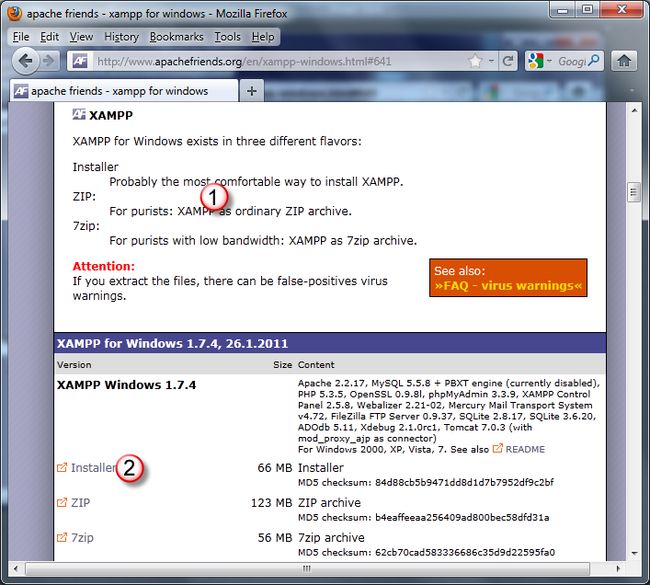
Upon clicking the XAMPP link, you are brought to the XAMPP download page (Figure 2). Here we will choose what to download depending on the installation method. The list of packages available for download (1) shows two installation strategies:
- Download an installation executable file and run it to have all the XAMPP folder structure set up and populated automatically.
- Download an archive, extract the XAMPP files, then run the
"setup_xampp.batfile to set up XAMPP in your system.
Let's choose the easiest way and choose Installer (2) to have all done automatically.
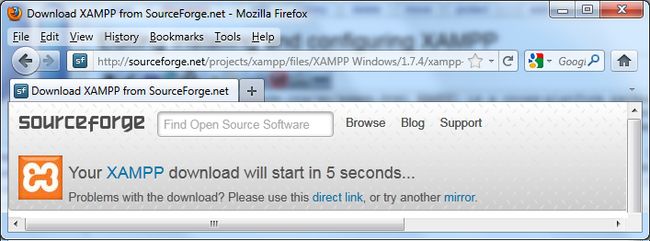
When you click the Installer link, the start download page opens (Figure 3) where the count-down start.
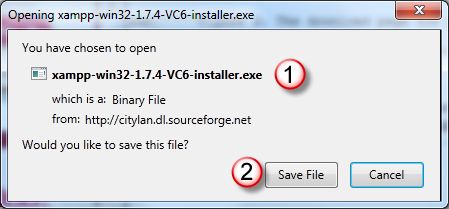
In five seconds, the download dialog box (Figure 4) opens informing you that the installation executable file (2) is going to be downloaded. Click Save (2) to start the download.
Upon clicking Save, the Downloads (Figure 5) dialog box opens showing the download progress graphically in the progress bar (1).
When the installer is downloaded and checked for viruses successfully, the progress bar disappears (Figure 6). To initiate XAMPP installation, click the downloaded installation executable file (1) twice.
The XAMPP Installation Wizard starts.
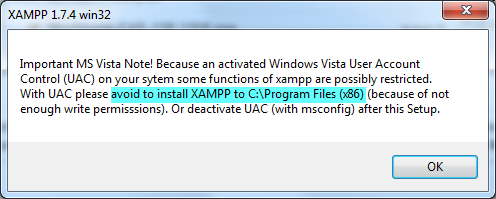
Note: For Windows Vista and Windows 7 a warning is displayed (Figure 7) advising not to install XAMPP under the Program Filesfolder:
When you click OK, the XAMPP Installation Wizard starts.
XAMPP Installation Wizard
The first, Welcome, page (Figure 8) of the wizard recommends (1)that you close other applications before setting up XAMPP to enable updating system files, if necessary. Click Next (2), when ready.
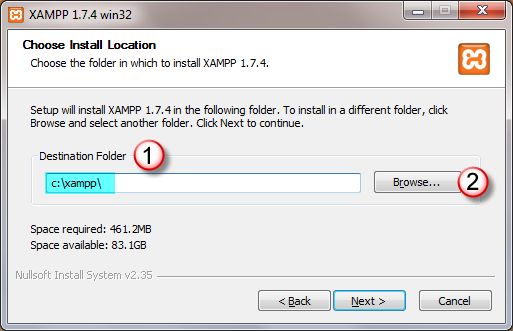
Upon clicking Next, the Choose Install Location (Figure 9) page opens.
In the Destination Folder (1) text box, specify the path to the folder where you want XAMPP installed. The text box already shows the default location c:/xampp. You can change it by clicking the Browse button (2) and choosing another location in the dialog box that opens. However, in this tutorial let's accept the suggested default location. Click Next to pass on to the XAMPP Options(Figure 10) page.
Now let's decide how the Apache Web server and the MySql database server will be launched. This can be done automatically, upon the operating system start, or manually, through the XAMPP Control Panel.
If you prefer to have a component start automatically, set it up as service by selecting the Install as service check box next to the component name in the Services section (3). However, in this tutorial, let's leave the check boxes clear to practice working with the Control Panel.
Finally, define the way to access the XAMPP Control Panel:
- By clicking the dedicated desktop icon. To have the icon created, select the Create a XAMPP desktop icon check box (1).
- Through the dedicated menu command. To have the4 command added to the Start menu, select the Create an Apache Friends folder in the Start menu check box (2).
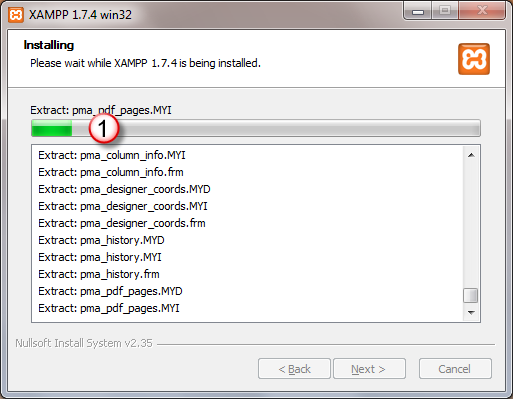
When you click Install (4), the Wizard brings you to the next, Installing, page (Figure 11) where you can monitor the installation process in the progress bar (1).
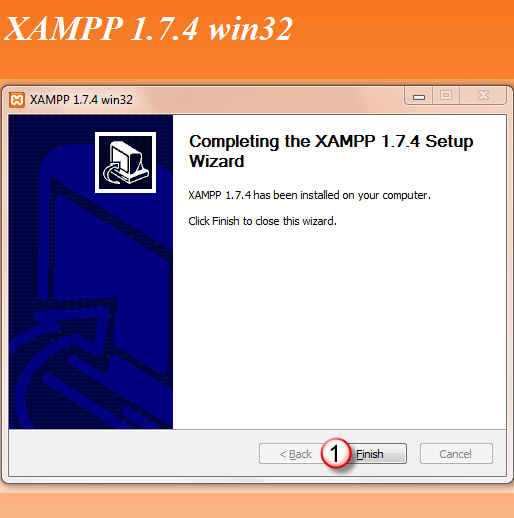
When the installation is completed successfully, click Next to pass on to the last page of the Wizard (Figure 12).
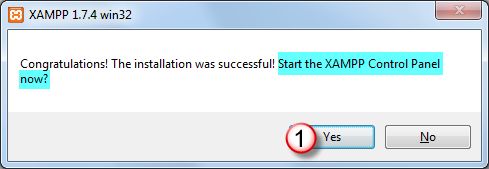
The page informs you that XAMPP has been installed successfully. When you click Finish (1), the Wizard closes and the XAMPP information dialog box opens (Figure 13).
In this dialog box, XAMPP asks whether you want to open its Control Panel right now. Let's agree and click Yes (1).
XAMPP Control Panel
During the installation we decided not to set up XAMPP components as services, so they are handled through the XAMPP Control Panel. At the last step, we also agreed to open the XAMPP Control Panel. Now it's time to see how the XAMPP Control Panel will help us.
Starting and Stopping XAMPP Components
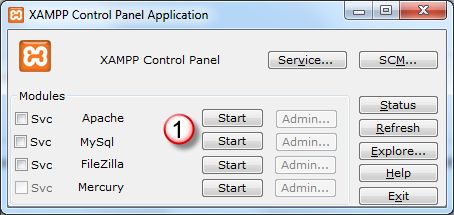
First of all, let's start the Apache and the MySql servers, which are obviously inactive when the XAMPP control panes opens upon the installation completion (Figure 14).
To start the servers, click the Start buttons (1) next to them.
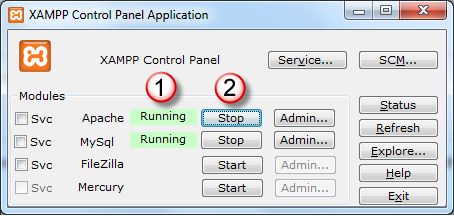
As you can see from Figure 15, the status has changed to Running (1) and the titles of the buttons are now Stop (2).
Note: If the Apache server does not start, this means that its default port 80 is already busy. Most likely, it is Skype. To solve the problem without changing the default XAMPP settings is to close Skype or just set the status to Offline. The start the Apache server and activate Skype, when ready. Skype will find another free port to listen to.
Setting Up a Component as Service
You may also remember that we decided not to set up the Apache and the MySql servers as services during installation. However, you can do it now. Let's, for example, define the Apache server as a service, so it is automatically launched upon the operating system start.
First stop the running Apache server by clicking the Stop button. The server stops and the status indication Running disappears (Figure 16).
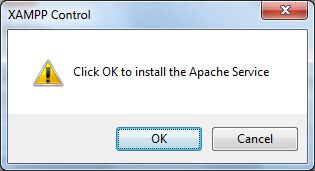
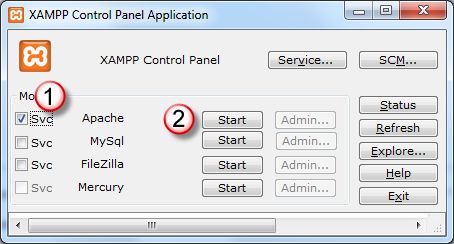
Now select the Svc check box (1) next to the server. In the Install Apache Service dialog box (Figure 17), that opens, clickOK.
You return to the XAMPP Control Panel (Figure 18), where the Apache server is marked as service (1). All you need to do is clickStart (2).
Integrating XAMPP with the IDE
Now that we have installed XAMPP and launched its components, we need to tell our IDE where these components are stored and how they are configured.
Integrating the PHP Interpreter
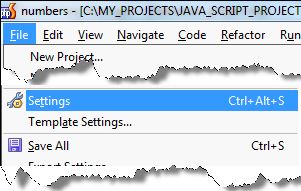
Installations of third-party tools, such as, for example, PHP interpreter, are generally registered in the Settings dialog box. To open it, choose File | Settingson the main menu (Figure 19).
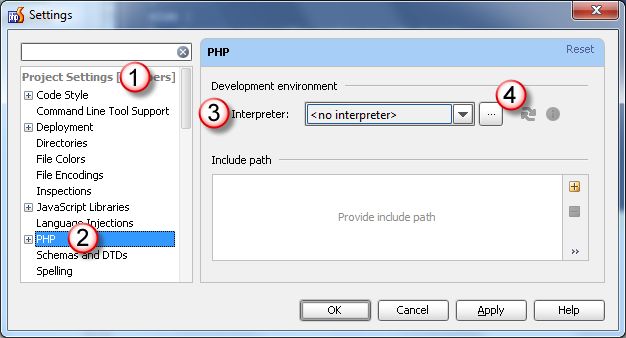
The Settings dialog box opens (Figure 20). In the left-hand pane, click PHP (1) under the Project Settings node (2) to get to the PHP page:
With IntelliJ IDEA and PHPStorm, you can have several installations of PHP interpreters registered at the IDE level and every time switch to the one that fits your current project. All the registered installations of PHP interpreters are displayed in theInterpreter drop-down list (3). To register a new one, that we have just installed with XAMPP, click the Browse button ![]() (4) next to the drop-down list. You are brought to the Interpreters dialog box (Figure 21).
(4) next to the drop-down list. You are brought to the Interpreters dialog box (Figure 21).
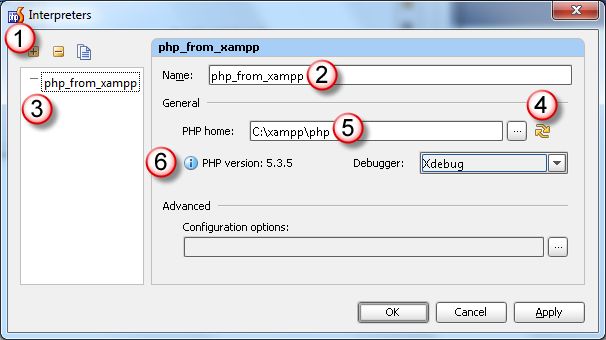
- In the left-hand pane, click the Add button
 (1) on the toolbar.
 - In the Name text box (2), type the name to identify the current installation, for example,
php_from_xampp. As you can see, the specified name is displayed in the left-hand pane (3). - In the PHP Home text box, specify the folder where the PHP executable file
php.exeis stored. We have installed the entire XAMPP atC:/xampp, so the PHP home directory will beC:/xampp/php. Type this path manually (5) or click the Browse button (4) next to the text box and select the folder in the Choose PHP Home dialog box that opens. The IDE checks whether the specified folder actually contains a PHP executable file, detects the PHP version, and displays it in the PHP Info read-only field (6).
 - Now click OK to return to the PHP page where the new installation is added to the Interpreter drop-down list (Figure 22).
Now the PHP interpreter within our XAMPP installation is available for using in your IntelliJ IDEA or PHPStorm projects.
Integrating the Apache Server
Interaction between IntelliJ IDEA or PHPStorm with Web, FTTP, and other servers is supported through the Deployment bundled plugin, which is enabled by default. The IDE accesses servers using connection settings specified in the registered server access configurations. These configurations are created and managed on the Deployment page of the Settings dialog box.
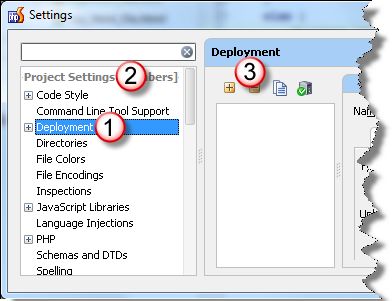
Choose File | Settings on the main menu again to open the Settings dialog (Figure 23). Click Deployment (1) under the Project Settings node (2) to go to the Deployment page.
Click the Add button ![]() (3) on the toolbar. The Add Server dialog box opens (Figure 24).
(3) on the toolbar. The Add Server dialog box opens (Figure 24).
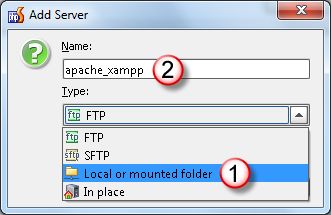
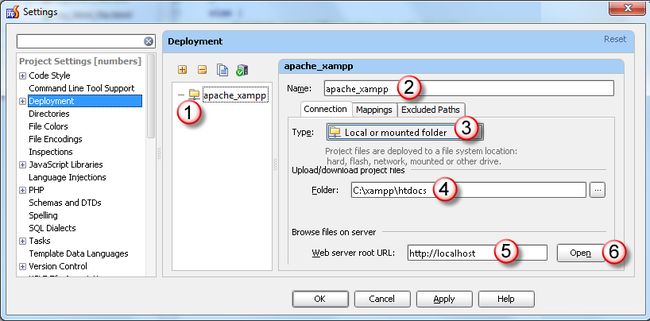
We are going to integrate a locally installed Web server, so skip the FTP and SFTP options and choose Local or mounted folder(1) from the Type drop-down list. Type the name of the new server access configuration, say, apache_xampp (2) in the Name text box. Upon clicking OK you return to the Deployment page (Figure 25), where the new server access configuration is displayed to the list of configurations in the central pane (1).
As you can see, the Name text box is already filled in with the name of the server access configuration apache_xampp (2), and the server type Local or mounted folder (3) is preselected in the Type drop-down list. To complete the configuration, we need to tell the IDE where the files to be processed should be located and how to access these files through http.
- In the Upload/download project files area, specify the Apache Web server document root folder. Type
C:\xampp\htdocsin theFolder text box (4), whereC:\xamppis the XAMPP home folder that we chose during the installation and\htdocsis the default Apache DocumentRoot, that is, the directory out of which you will serve your documents. - In the Browse files on server area, specify the URL address that points at the Apache Web server document root
C:\xampp\htdocs. Typehttp://localhostin the Web server root URL text box (5), wherelocalhostis the Apache ServerNamem through which the server identifies itself.
Note: You can learn more about the Apache Web server settings from its configuration file C:\xampp\apache\conf\httpd.conf
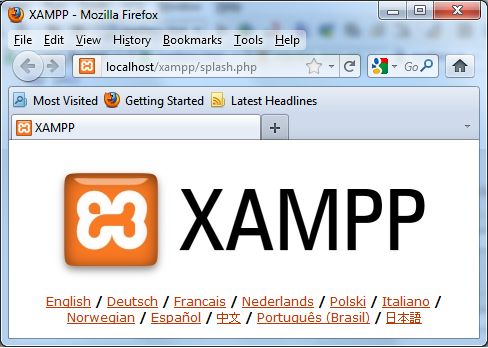
Finally, let's check that the specified settings ensure successful connection to the server. Click the Open button (6) next to theWeb server root URL text box. The XAMPP Welcome page opens in the browser (Figure 26).
This means that our server access configuration integrates works correctly, so we only need to click OK.
Congratulations! You have configured the PHP development environment to start with. To implement real-life applications, you will definitely need a database server, which we have also installed and launched. However this will be a subject for another tutorial.
from:wiki
