Android初级开发----用Handle机制更新UI界面
- 引入:
之前对Android讲义的一个小项目——–随指尖移动的小球进行修改,利用View中的invalidate()方法实现每次触碰屏幕更新(UI线程)小球的位置并且附加判断大小,实现触碰更新小球大小随之更改颜色.
API引入:

每次执行invalidate()方法都会调用ondraw()

ondraw()用于刷新界面此处为canvas(画布)
2. 简单源码:
变色小球1.0
新建一个DrawView类继承View
package com.example.drawview_without_thread;


import android.content.Context;
import android.graphics.Canvas;
import android.graphics.Color;
import android.graphics.Paint;
import android.util.AttributeSet;
import android.util.Log;
import android.view.MotionEvent;
import android.view.View;
import android.widget.Button;

public class DrawView extends View{

    public float currentX = 200;        //球起始位置
    public float currentY = 500;

//  String touchsign = "Never touch";
    boolean range = true;       //大小判断标记

    Paint p = new Paint();      //画笔
    public DrawView(Context context) {      //构造函数1 直接定义视图      //final DrawView draw = new DrawView(this);
        super(context);
    }

    public DrawView(Context context,AttributeSet set) {     //构造函数2 传入AttributeSet set在布局文件xml中加载属性
        super(context,set);
    }


    int [] colors = new int[]{
        Color.RED,
        Color.BLUE,
        Color.GREEN,
        Color.MAGENTA,
        Color.YELLOW,
    };

    int size = 10;          //初始半径10
    static int colornum = 0;        //大小,颜色下标序号


    @Override
    public void onDraw(Canvas canvas){          //canvas 画布
        super.onDraw(canvas);
        if (size >= 350) {
                range = false;  //大小判断
        }if(size <= 20) {
            range = true;
        }
        //半径视情况 改变
        if (range) {
            size += 15;
            Log.d("DrawTest", "半径递增:"+ size );
        }
        else {
            size -= 15;
            Log.d("DrawTest", "半径递减:"+ size );
        }

        colornum = ++colornum % colors.length;  //每次触碰滚动换色
        p.setColor(colors[colornum]);
        Log.d("Color", "新画笔颜色"+colornum);
        //设置位置,大小,颜色
        canvas.drawCircle(currentX, currentY, size, p); //设置点的半径和位置
    }


    @Override
    //touch reaction
    public boolean onTouchEvent(MotionEvent event){
        currentX = event.getX();
        currentY = event.getY();
        //touchsign = "touched"; //改变表示已经触碰
        invalidate();           //用来刷新View,系统会自动回调 View的onDraw()方法

//      只要是view的子类,都会从view中继承invalidate和postInvalidate这两个方法。
//
//      当invalidate方法被调用的时候,就是在告诉系统,当前的view发生改变,应该尽可能快的来进行重绘。
//
//      这个方法仅能在UI(主)线程中被调用。如果想要在工作线程中进行刷新界面,那么其他的方法将会被调用,这个方法就是postInvalidate方法。

        return true;
    }

}
为了让每次点击都改变小球位置,通过一个颜色数组colors来获取当前周期性改变的颜色,于是我想为什么不额外创建一个线程实现改变颜色呢?
问题引入:
Android制订了一条规则:它只允许 (主)User Interface线程修改Activity里的UI组件,当程序第一次启动, Main Thread主要负责处理与UI相关的事件,如按钮和用户屏幕点击事件.
- 引用Handler类
官方文档解释
Handler
A Handler allows you to send and process Message and Runnable objects associated with a thread’s MessageQueue. Each Handler instance is associated with a single thread and that thread’s message queue. When you create a new Handler, it is bound to the thread / message queue of the thread that is creating it – from that point on, it will deliver messages and runnables to that message queue and execute them as they come out of the message queue.
Handler : 解决,处理.这里可以理解为消息处理器.
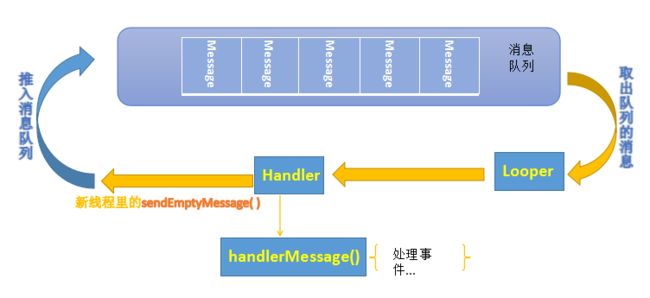
大概的意思是,一个Handler可以让你发送消息,这个消息会推入MessageQueue(消息队列)里等待处理. - MessageQueue管家——–Looper
Looper类中的loop()方法会不断的取出消息队列的Message发送给Handler,并且将Message传递给Handler的handleMessage()方法中. - handleMessage() 常用结构:
大概流程可以参考此图:
final Handler handler = new Handler()
        {
            @Override
            public void handleMessage(Message msg)     //接受通过Looper从MessageQueue队列提取对应发送过来的消息.
            {
                if (msg.what == 0x123) {
                    //新线程要做的事...
                }
                super.handleMessage(msg);
            }
        };
//              激发事件
                @Override
                public void run() {

                   Log.d("Sent", "向处理器发送消息");
                   handler.sendEmptyMessage(0x123);

               }
           }).start();
通过对msg的判断新消息是否符合该处理操作,如果符合则对应处理.
所以利用额外的一个线程实现周期性改变,如今不用每次点击屏幕只要启动线程就会在原地周期改变颜色.注意的是,我们不是新建一个线程来改变UI界面,而是新建一个线程来发送消息给Handler,让位于主线程的Handler更新界面
变色小球2.0
修改DrawView的部分代码,并且在MainActivity新建Handler处理器,相关代码如下:
修改DrawView:
@Override
    public void onDraw(Canvas canvas){          //canvas 画布
        super.onDraw(canvas);
        if (size >= 350) {
            range = false;  //大小判断
        }if(size <= 20) {
            range = true;
        }
        //半径视情况 改变
        if (range) {
            size += 15;
            Log.d("DrawTest", "半径递增:"+ size );
        }
        else {
            size -= 15;
            Log.d("DrawTest", "半径递减:"+ size );
        }

        Log.d("Color", "新画笔颜色"+colornum);
        //设置位置,大小,颜色
        canvas.drawCircle(currentX, currentY, size, p); //设置点的半径和位置
    }

    public void thread_change() {//通过UI线程的handler来调用

        colornum = ++colornum % colors.length;  //周期性滚动换色
        p.setColor(colors[colornum]);

        Log.d("DrawTest", "新线程重设画笔颜色");
        invalidate();    //加入了原地更新界面的方法
}修改MainActivity:
加入Handler
//处理器
        final Handler handler = new Handler()
        {
            @Override
            public void handleMessage(Message msg)     //接受通过Looper从MessageQueue队列提取对应发送过来的消息.
            {
                if (msg.what == 0x123) {
                    draw.thread_change();
                }
                super.handleMessage(msg);
            }
        };


        //按钮
        Button shine = (Button)findViewById(R.id.shine);
        shine.setOnClickListener(new View.OnClickListener() {
            @Override
            public void onClick(View arg0) {
                Log.d("DrawTest", "点击按钮");

                new Timer().schedule(new TimerTask() {

                    @Override
                    public void run() {

                        Log.d("DrawTest", "向处理器发送消息");
                        handler.sendEmptyMessage(0x123);

                    }
                }, 0, 500);       //新线程用timer周期性的向handler发送消息,此处也可以通过start()来启动新线程
            }
});此时handleMessage()就是在主线程运行的,所以可以进行UI操作.
参考来源:<疯狂android讲义>p208,<第一行代码>p348
