搭建Postfix-Devocot邮件服务器详细步骤
环境准备:CentOS6.5服务器,安装了MySQL5.6.23
脚本准备:系统报警shell脚本
1.克隆之前安装好的CentOS系统,注意需要修改网卡配置信息
注意点:(1)修改网卡的参数HWaddr为ifconfig -a 出现的一样(原HWaddr是之前克隆的,没有更新为新的)
(2) 执行命令
rm -rf /etc/udev/rules.d/70-persistent-net.rules(3)修改网络DNS,在重启机器,就可以正常上网

2.查看主机是否安装有sendmail服务,若有需要卸载
yum list installed | grep sendmail
rpm -qa | grep sendmail
rpm -e sendmail-8.14.4-9.el6_8.1.x86_64

3.安装postfix,并配置
yum list | grep postfix
yum -y install postfix.x86_64
配置文件
vi /etc/postfix/main.cf需要修改以下地方
*myhostname*  //主机名
myhostname = mail.dingguanyi.com

*mydomain*   //使用邮件域
mydomain = dingguanyi.com   //mydomain 设置本地网络的邮件域

*myorigin*  //外发邮件时发件人的邮件域名
myorigin = $mydomain  //在通过Postfix发送邮件的时候,如果From字段不完整,Postfix会根据myorigin的值将地址补全为*@mail.100p.com,此处可以填$mydomain 或者 $myhostname

*端口*  //端口扫描监控全部的端口
inet_interfaces = all
#inet_interfaces = $myhostname
#inet_interfaces = $myhostname, localhost
#inet_interfaces = localhost

*mydestination*  //可接受邮件地址域名
mydestination = $myhostname,$mydomain   //mydestination指定了postfix在收到这些域名地址为目标的邮件时,作为接受方收下邮件。如果收到的邮件既不符合转发规则,又不符合接受规则,则拒绝收信。

*mynetworks*  //需要收发的客户端的地址
mynetworks = 0.0.0.0   //mynetworks指定了本地网络的IP段,默认只包含主机自己,你可以添加需要收发的客户端的地址。
启动服务,查看端口
service postfix start
netstat -lnp | grep :25
4.安装dovecot,并配置
查看已经安装dovecot

需要配置三个文件如下
vi /etc/dovecot/dovecot.confprotocols = imap pop3 lmtp
mail_location = mbox:/var/mail:INBOX=/var/mail/%u ---添加在配置文件最后vi /etc/dovecot/conf.d/10-auth.confdisable_plaintext_auth = novi /etc/dovecot/conf.d/10-ssl.confssl = no启动服务,查看端口
service dovecot restart
netstat -lnp | grep :110
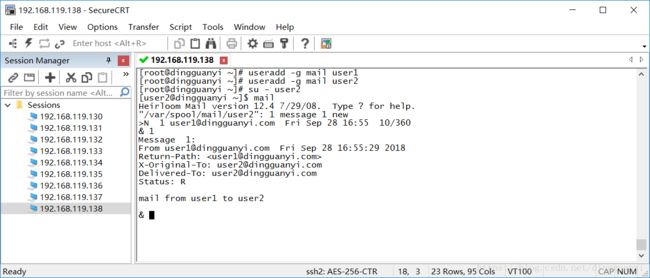
5.新增两个用户,测试postfix和dovecot的安装配置情况,由于需要访问到mail权限组的文件,所建用户需要分配mail组
useradd -g mail user1
useradd -g mail user1
passwd user1
passwd user2
cmd窗口测试postfix和dovecot登录情况
telnet 192.168.119.138 25
telnet 192.168.119.138 110

6.在电脑安装postfix客户端,并配置账号,在客户端测试两个账户互发邮件


至此邮件服务已经搭建好了。
7.安装nc服务,安装httpd服务。
yum -y install nc.x86_648.将报警脚本放置在用户目录下,并运行脚本测试报警邮件是否正常发送
#!/bin/bash
#warn.sh
#服务器运行状态预警脚本


#------------------web-----------------------
nc -w 3 localhost 80 &>/dev/null

if [ $? -eq 0 ];then
	str="apache web status Running!!!"
else
	str="apache web status Shuting!!!"
fi

echo $str > temp.del


#------------------mysql-----------------------
nc -w 3 localhost 3306 &>/dev/null

if [ $? -eq 0 ]; then
	str="mysql status Running!!!"
else
	str="mysql status Shuting!!!"
fi

echo $str >> temp.del


#------------------disk-----------------------
ds=`df|awk '{if(NR==2){print int($5)}}'`

if [ $ds -lt 45 ]; then
	str="disk space is $ds%, less than 45%!!!"
else
	str="disk space is $ds%, greater than 45%!!!!"
fi

echo $str >> temp.del


#------------------disk-----------------------
use=`free -m|awk '{if(NR==2){print int($3*100/$2)}}'`

if [ $use -lt 50 ]; then
	str="men space is $use%, less than 50%!!!"
else
	str="men space is $use%, greater than 50%!!!"
fi

echo $str >> temp.del


cat temp.del|mail -s 'linux service status' [email protected]

rm -rf temp.del

9.使用root用户,给报警脚本设置定时任务,可以看到关于服务器的预警信息实时发送给用户邮箱了。
crontab -e
crontab -l
service crond start
service crond status
