本文将介绍网络数据采集的基本原理:
- 如何用Python从网络服务器请求信息
- 如何对服务器的响应进行基本处理
- 如何以自动化手段与网站进行交互
- 如何创建具有域名切换、信息收集以及信息存储功能的爬虫
学习路径
爬虫的基本原理
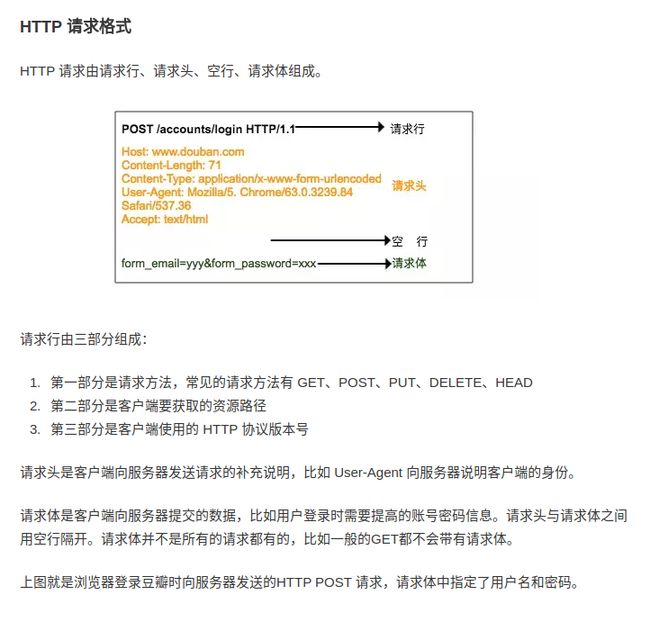
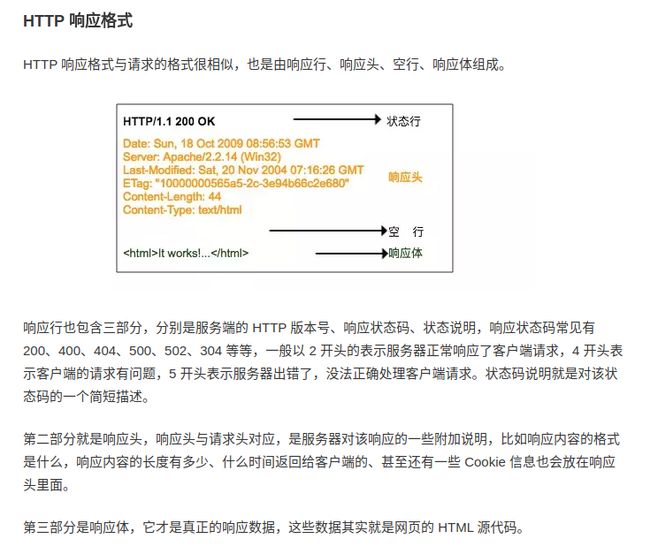
所谓爬虫就是一个自动化数据采集工具,你只要告诉它要采集哪些数据,丢给它一个 URL,就能自动地抓取数据了。其背后的基本原理就是爬虫程序向目标服务器发起 HTTP 请求,然后目标服务器返回响应结果,爬虫客户端收到响应并从中提取数据,再进行数据清洗、数据存储工作。
以下截图来自 掘金小册 基于 Python 实现微信公众号爬虫对《图解HTTP》的总结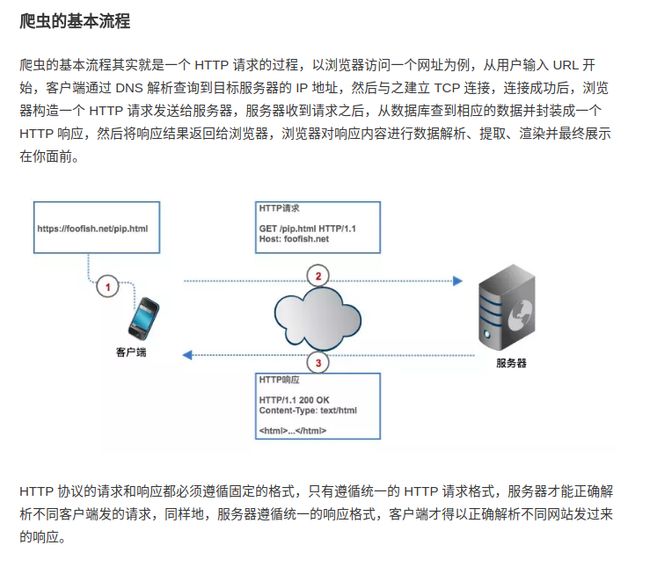
Python的一些基础爬虫模块
urllib
Python 提供了非常多工具去实现 HTTP 请求,但第三方开源库提供的功能更丰富,你无需从 socket 通信开始写,比如使用Pyton内建模块 urllib 请求一个 URL
这里我们先操练起来,写个测试爬虫
from urllib.request import urlopen//查找python的urllib库的request模块,导出urlopen函数
html = urlopen("http://jxdxsw.com/")//urlopen用来打开并读取一个从网络获取的远程对象
print(html.read())
然后,把这段代码保存为`scrapetest.py`,终端中运行如下命令
python3 scrapetest.py这里会输出http://jxdxsw/这个网页首页的全部HTML代码
鲸鱼注:
Python 3.x中urllib分为子模块:
- urllib.request
- urllib.parse
- urllib.error
- urllib.robotparser
urllib是python的标准库,它能够:
- 从网络请求数据
- 处理cookie
- 改变 请求头和用户代理 等元数据的函数
更多查看python官方文档
标准示例
import ssl

from urllib.request import Request
from urllib.request import urlopen
context = ssl._create_unverified_context()

# HTTP请求
request = Request(url = "http://jxdxsw.com",
                  method="GET",
                  headers= {"Host": "jxdxsw.com"},
                  data=None)
# HTTP响应
response = urlopen(request, context=content)
headers = response.info() #响应头
content = response.read() #响应体
code = response.getcode() #状态码- 这里的请求体 data 为空,因为你不需要提交数据给服务器,所以你也可以不指定
- urlopen 函数会自动与目标服务器建立连接,发送 HTTP 请求,该函数的返回值是一个响应对象 Response
- 里面有响应头信息,响应体,状态码之类的属性。
requests
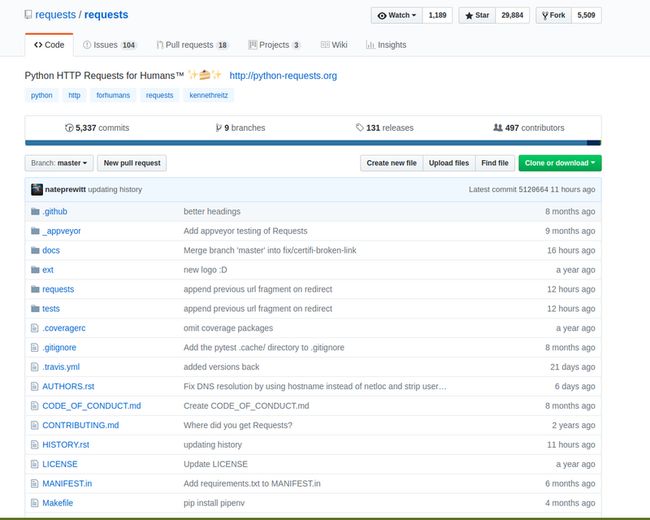
Python 提供的urllib内建模块过于低级,需要写很多代码,使用简单爬虫可以考虑 Requests
http://python-requests.org
quickstart
安装 requests
pip3 install requestsGET请求
>>> r = requests.get("https://httpbin.org/ip")
>>> r
 # 响应对象
>>> r.status_code  # 响应状态码
200

>>> r.content  # 响应内容
'{\n  "origin": "183.237.232.123"\n}\n'...
POST 请求
>>> r = requests.post('http://httpbin.org/post', data = {'key':'value'})自定义请求头
服务器反爬虫机制会判断客户端请求头中的User-Agent是否来源于真实浏览器,所以,我们使用Requests经常会指定UA伪装成浏览器发起请求
>>> url = 'https://httpbin.org/headers'
>>> headers = {'user-agent': 'Mozilla/5.0'}
>>> r = requests.get(url, headers=headers)
参数传递
很多时候URL后面会有一串很长的参数,为了提高可读性,requests 支持将参数抽离出来作为方法的参数(params)传递过去,而无需附在 URL 后面,例如请求 url http://bin.org/get?key=val
>>> url = "http://httpbin.org/get"
>>> r = requests.get(url, params={"key":"val"})
>>> r.url
u'http://httpbin.org/get?key=val'
指定Cookie
Cookie 是web浏览器登录网站的凭证,虽然 Cookie 也是请求头的一部分,我们可以从中剥离出来,使用 Cookie 参数指定
>>> s = requests.get('http://httpbin.org/cookies', cookies={'from-my': 'browser'})
>>> s.text
u'{\n  "cookies": {\n    "from-my": "browser"\n  }\n}\n'
设置超时
当发起一个请求遇到服务器响应非常缓慢而你又不希望等待太久时,可以指定 timeout 来设置请求超时时间,单位是秒,超过该时间还没有连接服务器成功时,请求将强行终止。
r = requests.get('https://google.com', timeout=5)设置代理
一段时间内发送的请求太多容易被服务器判定为爬虫,所以很多时候我们使用代理IP来伪装客户端的真实IP。
import requests

proxies = {
    'http': 'http://127.0.0.1:1080',
    'https': 'http://127.0.0.1:1080',
}

r = requests.get('http://www.kuaidaili.com/free/', proxies=proxies, timeout=2)
Session
如果想和服务器一直保持登录(会话)状态,而不必每次都指定 cookies,那么可以使用 session,Session 提供的API和 requests 是一样的。
import requests

s = request.Session()
s.cookies = requests.utils.cookiejar_from_dict({"a":"c"})

r = s.get('http://httpbin.org/cookies')
print(r.text)
# '{"cookies": {"a": "c"}}'
实例
使用Requests完成一个爬取知乎专栏用户关注列表的简单爬虫
以一起学习爬虫这个专栏为例,打开关注列表关注列表
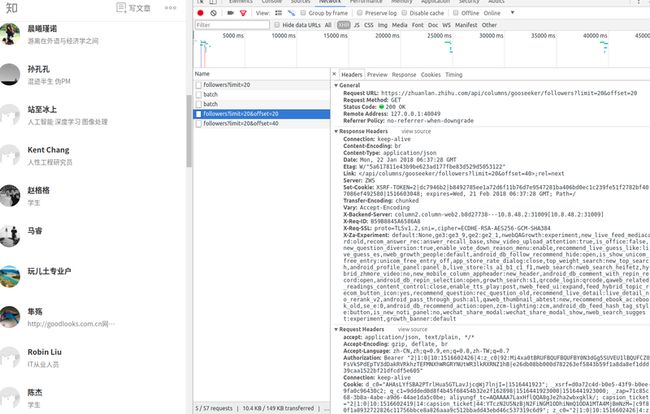
用 Chrome 找到获取粉丝列表的请求地址
https://zhuanlan.zhihu.com/ap...
import json

import requests


class SimpleCrawler:
    init_url = "https://zhuanlan.zhihu.com/api/columns/pythoneer/followers"
    offset = 0

    def crawl(self, params=None):
        # 必须指定UA,否则知乎服务器会判定请求不合法
        headers = {
            "Host": "zhuanlan.zhihu.com",
            "User-Agent": "Mozilla/5.0 (Windows NT 10.0; Win64; x64) "
                          "AppleWebKit/537.36 (KHTML, like Gecko) Chrome/63.0.3239.84 Safari/537.36",
        }
        response = requests.get(self.init_url, headers=headers, params=params)
        print(response.url)
        data = response.json()
        # 7000表示所有关注量
        # 分页加载更多,递归调用
        while self.offset < 7000:
            self.parse(data)
            self.offset += 20
            params = {"limit": 20, "offset": self.offset}
            self.crawl(params)

    def parse(self, data):
    # 以json格式存储到文件
        with open("followers.json", "a", encoding="utf-8") as f:
            for item in data:
                f.write(json.dumps(item))
                f.write('\n')

if __name__ == '__main__':
    SimpleCrawler().crawl()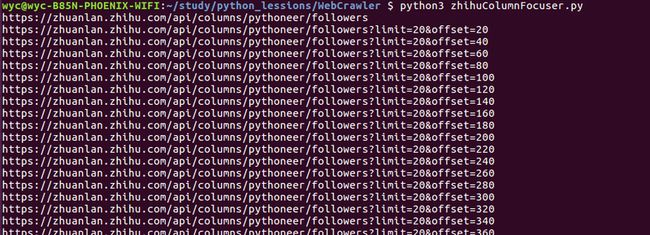
这就是一个最简单的基于 Requests 的单线程知乎专栏粉丝列表的爬虫,requests 非常灵活,请求头、请求参数、Cookie 信息都可以直接指定在请求方法中,返回值 response 如果是 json 格式可以直接调用json()方法返回 python 对象
python-requests 文档
BeatifulSoup
beatifulsoup非python标准库需要单独安装
安装使用详情
鲸鱼使用的是ubuntu所以一下几行命令即可
sudo apt-get install python-bs4
sudo apt-get install python3-pip //安装python包管理工具
pip3 install beautifulsoup4
使用BeautifulSoup解析这段代码,能够得到一个 BeautifulSoup 的对象,并能按照标准的缩进格式的结构输出:
from urllib.request import urlopen
from bs4 import BeautifulSoup
html = urlopen("http://jxdxsw.com/")
bsobj = BeautifulSoup(html.read())
print(bsobj.prettify())

print("-----------------------------我是分割线---------------------------")
print(bsobj.title)

print("-----------------------------我是分割线---------------------------")
print(bsobj.find_all('a'))
异常处理
html = urlopen("http://jxdxsw.com/")这行代码主要可能会发生两种异常:
- 网页在服务器上不存在(或者获取页面的时候出现错误)
- 服务器不存在
第一种异常会返回HTTP错误,如:"404 Page Not Found" "500 Internal Server Error",所有类似情况, urlopen函数都会抛出“HTTPError”异常,遇到这种异常,我们可以这样处理:
try:
   html = urlopen("http://jxdxsw.com/")
except HTTPError as e:
   print(e)
   # 返回空值,中断程序,或者执行另一个方案
else:
   # 程序继续。注意,如果你已经在上面异常捕获那段代码里返回或中断(break)
  #那就不需要使用else语句,这段代码也不会执行
第二种服务器不存在(就是说链接http://jxdxsw.com/打不开,或者url写错),urlopen 会返回一个None对象,这个对象与其他编程语言中的null类似
# 添加一个判断语句检测返回的html是不是None
if html is None:
  print("URL is not found)
else:
   #程序继续
实例2
我们创建一个网络爬虫来抓取http://www.pythonscraping.com...。
这个网页中,小说人物对话内容都是红色,人物名称都是绿色
实例3
用Requests + Beautifulsoup 爬取 Tripadvisor
- 服务器与本地的交换机制 --> 爬虫的基本原理
- 解析真实网页的方法、思路
from bs4 import BeautifulSoup
import requests

url = 'https://www.tripadvisor.cn/Attractions-g294220-Activities-Nanjing_Jiangsu.html'
urls = ['https://www.tripadvisor.cn/Attractions-g294220-Activities-oa{}-Nanjing_Jiangsu.html#FILTERED_LIST'.format(str(i)) for i in range(30,800,30)]

def get_attraction(url, data=None):
    wb_data = requests.get(url)
    soup = BeautifulSoup(wb_data.text, 'html.parser')
    # print(soup)
    # 使用BeautifulSoup对html解析时,当使用css选择器,对于子元素选择时,要将nth-child改写为nth-of-type才行
    #titles = soup.select('#taplc_attraction_coverpage_attraction_0 > div:nth-of-type(1) > div > div > div.shelf_item_container > div:nth-of-type(1) > div.poi > div > div.item.name > a')
    titles = soup.select('a.poiTitle')
    # imgs = soup.select('img.photo_image')
    imgs = soup.select('img[width="200"]')

    # 把信息转入字典
    for title, img in zip(titles,imgs):
        data = {
            'title': title.get_text(),
            'img': img.get('src'),
        }
        print(data)


for single_url in urls:
    get_attraction(single_url)
{'title': '夫子庙景区', 'img': 'https://cc.ddcdn.com/img2/x.gif'}
{'title': '南京夫子庙休闲街', 'img': 'https://cc.ddcdn.com/img2/x.gif'}
{'title': '南京1912街区', 'img': 'https://cc.ddcdn.com/img2/x.gif'}
{'title': '栖霞寺', 'img': 'https://cc.ddcdn.com/img2/x.gif'}
{'title': '夫子庙大成殿', 'img': 'https://cc.ddcdn.com/img2/x.gif'}
{'title': '南京毗卢寺', 'img': 'https://cc.ddcdn.com/img2/x.gif'}
细心的朋友会发现,这个图片地址都是一个url,这是因为图片地址不在页面的dom结构里面,都是后来js注入的。这也是一种反爬取的手段,我们可以这样解决: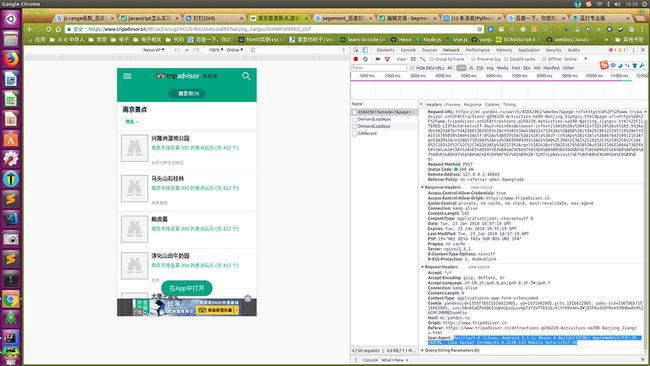
爬取移动端的(前提是反爬不严密)
from bs4 import BeautifulSoup
import requests
headers = {
    'User-Agent':'Mozilla/5.0 (iPhone; CPU iPhone OS 10_3 like Mac OS X) AppleWebKit/602.1.50 (KHTML, like Gecko) CriOS/56.0.2924.75 Mobile/14E5239e Safari/602.1'
}
url = 'https://www.tripadvisor.cn/Attractions-g294220-Activities-Nanjing_Jiangsu.html'
mb_data = requests.get(url,headers=headers)
soup = BeautifulSoup(mb_data.text,'html.parser')
imgs = soup.select('div.thumb.thumbLLR.soThumb > img')
for img in imgs:
    print(img.get('src'))
实例4
抓取异步数据
from bs4 import BeautifulSoup
import requests
import time

url = 'https://knewone.com/discover?page='

def get_page(url, data=None):
    wb_data = requests.get(url)
    soup = BeautifulSoup(wb_data.text, 'html.parser')
    imgs = soup.select('a.cover-inner > img')
    titles = soup.select('section.content > h4 > a')
    links = soup.select('section.content > h4 > a')

    for img, title, link in zip(imgs, titles, links):
        data = {
            'img': img.get('src'),
            'title': title.get('title'),
            'link': link.get('href')
        }
        print(data)

def get_more_pages(start, end):
    for one in range(start, end):
        get_page(url+ str(one))
        time.sleep(2)

get_more_pages(1,10)
scrapy
http://scrapy-chs.readthedocs...
pip install Scrapy
scrapy startproject tutorial
学习实例
https://github.com/scrapy/quo...
正则表达式
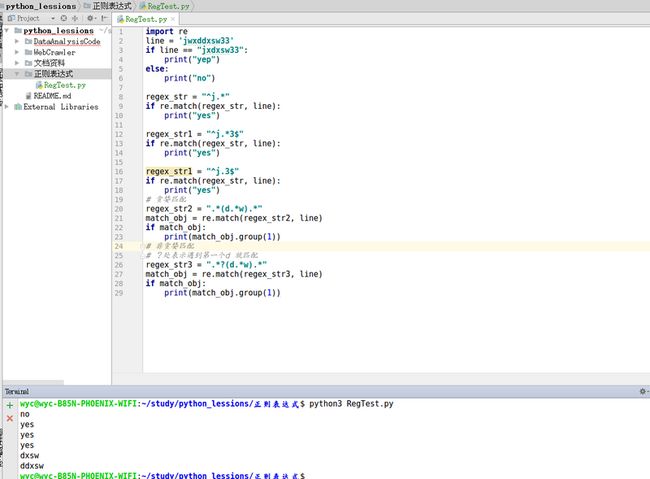
import re
line = 'jwxddxsw33'
if line == "jxdxsw33":
    print("yep")
else:
    print("no")

# ^ 限定以什么开头
regex_str = "^j.*"
if re.match(regex_str, line):
    print("yes")
#$限定以什么结尾
regex_str1 = "^j.*3$"
if re.match(regex_str, line):
    print("yes")

regex_str1 = "^j.3$"
if re.match(regex_str, line):
    print("yes")
# 贪婪匹配
regex_str2 = ".*(d.*w).*"
match_obj = re.match(regex_str2, line)
if match_obj:
    print(match_obj.group(1))
# 非贪婪匹配
# ?处表示遇到第一个d 就匹配
regex_str3 = ".*?(d.*w).*"
match_obj = re.match(regex_str3, line)
if match_obj:
    print(match_obj.group(1))
# * 表示>=0次  + 表示 >=0次
# ? 表示非贪婪模式
# + 的作用至少>出现一次  所以.+任意字符这个字符至少出现一次
line1 = 'jxxxxxxdxsssssswwwwjjjww123'
regex_str3 = ".*(w.+w).*"
match_obj = re.match(regex_str3, line1)
if match_obj:
    print(match_obj.group(1))
# {2}限定前面的字符出现次数 {2,}2次以上 {2,5}最小两次最多5次
line2 = 'jxxxxxxdxsssssswwaawwjjjww123'
regex_str3 = ".*(w.{3}w).*"
match_obj = re.match(regex_str3, line2)
if match_obj:
    print(match_obj.group(1))

line2 = 'jxxxxxxdxsssssswwaawwjjjww123'
regex_str3 = ".*(w.{2}w).*"
match_obj = re.match(regex_str3, line2)
if match_obj:
    print(match_obj.group(1))

line2 = 'jxxxxxxdxsssssswbwaawwjjjww123'
regex_str3 = ".*(w.{5,}w).*"
match_obj = re.match(regex_str3, line2)
if match_obj:
    print(match_obj.group(1))

# | 或

line3 = 'jx123'
regex_str4 = "((jx|jxjx)123)"
match_obj = re.match(regex_str4, line3)
if match_obj:
    print(match_obj.group(1))
    print(match_obj.group(2))
# [] 表示中括号内任意一个
line4 = 'ixdxsw123'
regex_str4 = "([hijk]xdxsw123)"
match_obj = re.match(regex_str4, line4)
if match_obj:
    print(match_obj.group(1))
# [0,9]{9} 0到9任意一个 出现9次(9位数)
line5 = '15955224326'
regex_str5 = "(1[234567][0-9]{9})"
match_obj = re.match(regex_str5, line5)
if match_obj:
    print(match_obj.group(1))
# [^1]{9}
line6 = '15955224326'
regex_str6 = "(1[234567][^1]{9})"
match_obj = re.match(regex_str6, line6)
if match_obj:
    print(match_obj.group(1))

# [.*]{9} 中括号中的.和*就代表.*本身
line7 = '1.*59224326'
regex_str7 = "(1[.*][^1]{9})"
match_obj = re.match(regex_str7, line7)
if match_obj:
    print(match_obj.group(1))

#\s 空格
line8 = '你 好'
regex_str8 = "(你\s好)"
match_obj = re.match(regex_str8, line8)
if match_obj:
    print(match_obj.group(1))

# \S 只要不是空格都可以(非空格)
line9 = '你真好'
regex_str9 = "(你\S好)"
match_obj = re.match(regex_str9, line9)
if match_obj:
    print(match_obj.group(1))

# \w  任意字符 和.不同的是 它表示[A-Za-z0-9_]
line9 = '你adsfs好'
regex_str9 = "(你\w\w\w\w\w好)"
match_obj = re.match(regex_str9, line9)
if match_obj:
    print(match_obj.group(1))

line10 = '你adsf_好'
regex_str10 = "(你\w\w\w\w\w好)"
match_obj = re.match(regex_str10, line10)
if match_obj:
    print(match_obj.group(1))
#\W大写的是非[A-Za-z0-9_]
line11 = '你 好'
regex_str11 = "(你\W好)"
match_obj = re.match(regex_str11, line11)
if match_obj:
    print(match_obj.group(1))

# unicode编码 [\u4E00-\u\9FA5] 表示汉字
line12= "镜心的小树屋"
regex_str12= "([\u4E00-\u9FA5]+)"
match_obj = re.match(regex_str12,line12)
if match_obj:
    print(match_obj.group(1))

print("-----贪婪匹配情况----")
line13 = 'reading in 镜心的小树屋'
regex_str13 = ".*([\u4E00-\u9FA5]+树屋)"
match_obj = re.match(regex_str13, line13)
if match_obj:
    print(match_obj.group(1))

print("----取消贪婪匹配情况----")
line13 = 'reading in 镜心的小树屋'
regex_str13 = ".*?([\u4E00-\u9FA5]+树屋)"
match_obj = re.match(regex_str13, line13)
if match_obj:
    print(match_obj.group(1))

#\d数字
line14 = 'XXX出生于2011年'
regex_str14 = ".*(\d{4})年"
match_obj = re.match(regex_str14, line14)
if match_obj:
    print(match_obj.group(1))

regex_str15 = ".*?(\d+)年"
match_obj = re.match(regex_str15, line14)
if match_obj:
    print(match_obj.group(1))
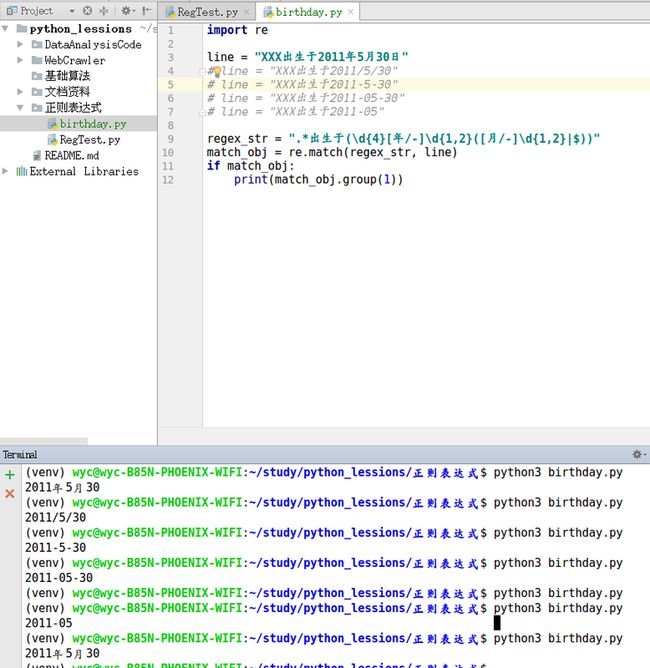
示例1
多种出生日期写法匹配
email 地址匹配
#!/usr/bin/env python3
# -*- coding: utf-8 -*-

###
# 试写一个验证Email地址的正则表达式。版本一应该可以验证出类似的Email:
#[email protected]
#[email protected]
###

import re
addr = '[email protected]'
addr2 = '[email protected]'
def is_valid_email(addr):
    if re.match(r'[a-zA-Z_\.]*@[a-aA-Z.]*',addr):
        return True
    else:
        return False

print(is_valid_email(addr))
print(is_valid_email(addr2))

# 版本二可以提取出带名字的Email地址:
#  [email protected] => Tom Paris
# [email protected] => bob

addr3 = ' [email protected]'
addr4 = '[email protected]'

def name_of_email(addr):
    r=re.compile(r'^(?)([\w\s]*)@([\w.]*)$')
    if not r.match(addr):
        return None
    else:
        m = r.match(addr)
        return m.group(2)

print(name_of_email(addr3))
print(name_of_email(addr4))
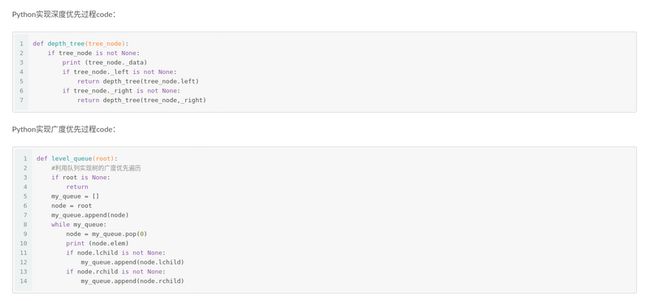
深度优先&广度优先遍历
-
深度优先(递归实现):顺着一条路,走到最深处。然后回头 -
广度优先(队列实现):分层遍历:遍历完儿子辈。然后遍历孙子辈
--> 关于这些基础算法 请戳鲸鱼之前的文章
数据结构与算法:二叉树算法
数据结构与算法:图和图算法(一)
url去重常见策略
实例1
使用scrapy抓取堆糖图片
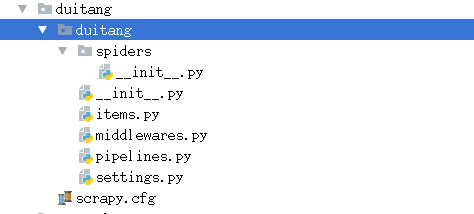
scrapy startproject duitang自动生成一个文件夹
.
├── duitang //该项目的python模块。之后您将在此加入代码。
│   ├── __init__.py
│   ├── items.py//项目中的item文件.
│   ├── middlewares.py
│   ├── pipelines.py //项目中的pipelines文件.
│   ├── __pycache__
│   ├── settings.py//项目的设置文件.
│   └── spiders //放置spider代码的目录.
│       ├── __init__.py
│       └── __pycache__
└── scrapy.cfg //项目的配置文件
然后是创建spider,也就是实现具体抓取逻辑的文件,scrapy提供了一个便捷的命令行工具,cd到生成的项目文件夹下执行
实例2
Scrapy爬虫框架教程(二)-- 爬取豆瓣电影TOP250
豆瓣美女
实例3
利用Scrapy爬取所有知乎用户详细信息并存至MongoDB(附视频和源码)
实例4
Scrapy分布式爬虫打造搜索引擎- (二)伯乐在线爬取所有文章
调试debug
调试(Debugging)Spiders
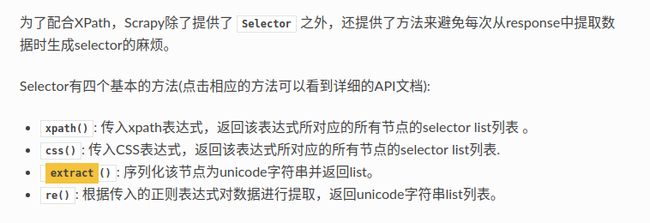
这里可以用
scrapy shell url -
extract(): 序列化该节点为unicode字符串并返回list。
所以spiders下可以这么写
# //ArticleSpider/ArticleSpider/spiders/jobbole.py
# -*- coding: utf-8 -*-
import re
import scrapy


class JobboleSpider(scrapy.Spider):
    name = 'jobbole'
    allowed_domains = ['blog.jobbole.com']
    start_urls = ['http://blog.jobbole.com/110287/']

    def parse(self, response):
        #提取文章的具体字段((xpath方式实现))
        title = response.xpath("//div[@class='entry-header']/h1/text()").extract_first("")
        create_date = response.xpath("//p[@class='entry-meta-hide-on-mobile']/text()").extract()[0].strip().replace(".","").strip()
        praise_nums = response.xpath("//span[contains(@class,'vote-post-up')]/h10/text()").extract()[0]

        fav_nums = response.xpath("//span[contains(@class,'bookmark-btn')]/text()").extract()[0]
        match_re = re.match(".*(\d+).*", fav_nums)
        if match_re:
            fav_nums = match_re.group(1)

        comment_nums = response.xpath("//a[@href='#article-comment']/span/text()").extract()[0]
        match_re = re.match(".*(\d+).*", comment_nums)
        if match_re:
            comment_nums = match_re.group(1)

        content = response.xpath("//div[@class='entry']").extract()[0]

        tag_list= response.xpath("//p[@class='entry-meta-hide-on-mobile']/a/text()").extract()
        # 去掉以评论结尾的字段
        tag_list = [element for element in tag_list if not element.strip().endswith("评论")]
        tags = ",".join(tag_list)
        print(tags)#职场,面试
        # print(create_date)
        pass
跑下爬虫 debug下
scrapy crawl jobbole
提取下一页url
# -*- coding: utf-8 -*-
import re
import scrapy
from scrapy.http import Request
from urllib import parse

class JobboleSpider(scrapy.Spider):
    name = 'jobbole'
    allowed_domains = ['blog.jobbole.com']
    start_urls = ['http://blog.jobbole.com/all-posts/']

    def parse(self, response):
        """
        1. 获取文章列表页的具体url,并交给scrapy下载 然后给解析函数进行具体字段的解析
        2. 获取下一页的url并交给scarpy进行下载, 下载完成后交给parse函数
        """

        #解析列表页中的所有url 并交给scrapy下载后进行解析
        post_nodes = response.css("#archive .floated-thumb .post-thumb a")
        for post_node in post_nodes:
            # 获取封面图url
            # response.url + post_node
            # image_url = post_node.css("img::attr(src)").extract_first("")
            post_url = post_node.css("::attr(href)").extract_first("")
            url = parse.urljoin(response.url, post_url)
            request = Request(url, callback= self.parse_detail)
            yield request

        #提取下一页并交给scrapy进行下载
        next_url = response.css(".next.page-numbers::attr(href)").extract_first()
        if next_url:
            yield Request(url=parse.urljoin(response.url, next_url), callback=self.parse)
    def parse_detail(self, response):
        print("--------")
        #提取文章的具体字段((xpath方式实现))
        title = response.xpath("//div[@class='entry-header']/h1/text()").extract_first("")
        create_date = response.xpath("//p[@class='entry-meta-hide-on-mobile']/text()").extract()[0].strip().replace(".","").strip()
        praise_nums = response.xpath("//span[contains(@class,'vote-post-up')]/h10/text()").extract()[0]

        fav_nums = response.xpath("//span[contains(@class,'bookmark-btn')]/text()").extract()[0]
        match_re = re.match(".*(\d+).*", fav_nums)
        if match_re:
            fav_nums = match_re.group(1)

        comment_nums = response.xpath("//a[@href='#article-comment']/span/text()").extract()[0]
        match_re = re.match(".*(\d+).*", comment_nums)
        if match_re:
            comment_nums = match_re.group(1)

        content = response.xpath("//div[@class='entry']").extract()[0]

        tag_list= response.xpath("//p[@class='entry-meta-hide-on-mobile']/a/text()").extract()
        # 去掉以评论结尾的字段
        tag_list = [element for element in tag_list if not element.strip().endswith("评论")]
        tags = ",".join(tag_list)
        print(tags)#职场,面试
        # print(create_date)
        pass
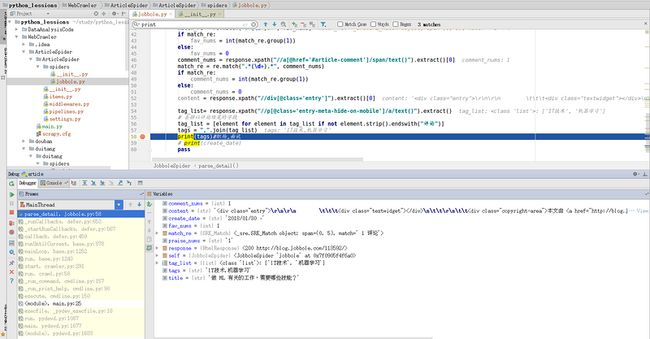
在代码最后打断点,debug下,我们发现抓取 的值都被提取出来了
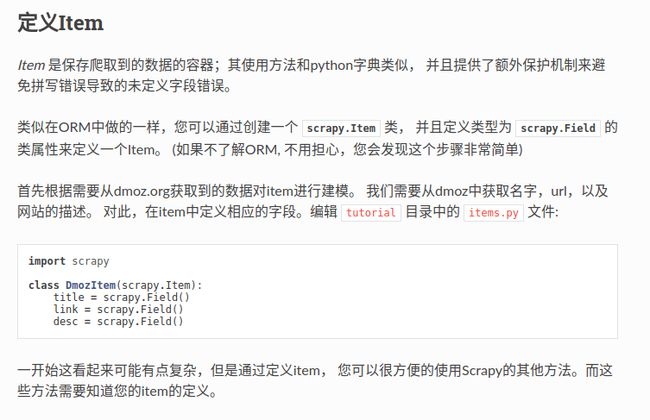
配置items.py
#//ArticleSpider/ArticleSpider/items.py

# -*- coding: utf-8 -*-

# Define here the models for your scraped items
#
# See documentation in:
# https://doc.scrapy.org/en/latest/topics/items.html

import scrapy


class JobBoleArticlespiderItem(scrapy.Item):
    # define the fields for your item here like:
    # name = scrapy.Field()

    title = scrapy.Field()
    created_date = scrapy.Field()
    url = scrapy.Field()
    url_object_id = scrapy.Field()
    front_image_url = scrapy.Field()
    front_image_path = scrapy.Field()
    praise_nums = scrapy.Field()
    comment_nums = scrapy.Field()
    fav_nums = scrapy.Field()
    tags = scrapy.Field()
    content = scrapy.Field()
实例化item并填充值
# -*- coding: utf-8 -*-
import re
import scrapy
from scrapy.http import Request
from urllib import parse

from ArticleSpider.items import JobBoleArticleItem
# from ArticleSpider.utils.common import get_md5

class JobboleSpider(scrapy.Spider):
    name = 'jobbole'
    allowed_domains = ['blog.jobbole.com']
    start_urls = ['http://blog.jobbole.com/all-posts/']

    def parse(self, response):
        """
        1. 获取文章列表页的具体url,并交给scrapy下载 然后给解析函数进行具体字段的解析
        2. 获取下一页的url并交给scarpy进行下载, 下载完成后交给parse函数
        """

        #解析列表页中的所有url 并交给scrapy下载后进行解析
        post_nodes = response.css("#archive .floated-thumb .post-thumb a")
        for post_node in post_nodes:
            # 获取封面图url
            image_url = post_node.css("img::attr(src)").extract_first("")
            post_url = post_node.css("::attr(href)").extract_first("")
            url = parse.urljoin(response.url, post_url)
            # post_url 是我们每一页的具体的文章url。
            # 下面这个request是文章详情页面. 使用回调函数每下载完一篇就callback进行这一篇的具体解析。
            # 我们现在获取到的是完整的地址可以直接进行调用。如果不是完整地址: 根据response.url + post_url
            # def urljoin(base, url)完成url的拼接
            request = Request(url,meta={"front_image_url": image_url}, callback= self.parse_detail)
            yield request

        #提取下一页并交给scrapy进行下载
        next_url = response.css(".next.page-numbers::attr(href)").extract_first()
        if next_url:
            yield Request(url=parse.urljoin(response.url, next_url), callback=self.parse)

    def parse_detail(self, response):
        # 实例化item
        article_item = JobBoleArticleItem()

        print("通过item loader 加载item")
        # 通过item loader 加载item
        front_image_url = response.meta.get("front_image_url","") #文章封面图


        #提取文章的具体字段((xpath方式实现))
        title = response.xpath("//div[@class='entry-header']/h1/text()").extract_first("")
        create_date = response.xpath("//p[@class='entry-meta-hide-on-mobile']/text()").extract()[0].strip().replace(".","").strip()
        praise_nums = response.xpath("//span[contains(@class,'vote-post-up')]/h10/text()").extract()[0]

        fav_nums = response.xpath("//span[contains(@class,'bookmark-btn')]/text()").extract()[0]
        match_re = re.match(".*(\d+).*", fav_nums)
        if match_re:
            fav_nums = int(match_re.group(1))
        else:
            fav_nums = 0
        comment_nums = response.xpath("//a[@href='#article-comment']/span/text()").extract()[0]
        match_re = re.match(".*(\d+).*", comment_nums)
        if match_re:
            comment_nums = int(match_re.group(1))
        else:
            comment_nums = 0
        content = response.xpath("//div[@class='entry']").extract()[0]

        tag_list= response.xpath("//p[@class='entry-meta-hide-on-mobile']/a/text()").extract()
        # 去掉以评论结尾的字段
        tag_list = [element for element in tag_list if not element.strip().endswith("评论")]
        tags = ",".join(tag_list)

        # 为实例化后的对象填充值
        # article_item["url_object_id"] = get_md5(response.url)
        article_item["title"] = title
        article_item["url"] = response.url
        article_item["create_date"] = create_date
        article_item["front_image_url"] = [front_image_url]
        article_item["praise_nums"] = praise_nums
        article_item["comment_nums"] = comment_nums
        article_item["fav_nums"] = fav_nums
        article_item["tags"] = tags
        article_item["content"] = content
        #print(tags)#职场,面试

        ## 已经填充好了值调用yield传输至pipeline
        yield article_item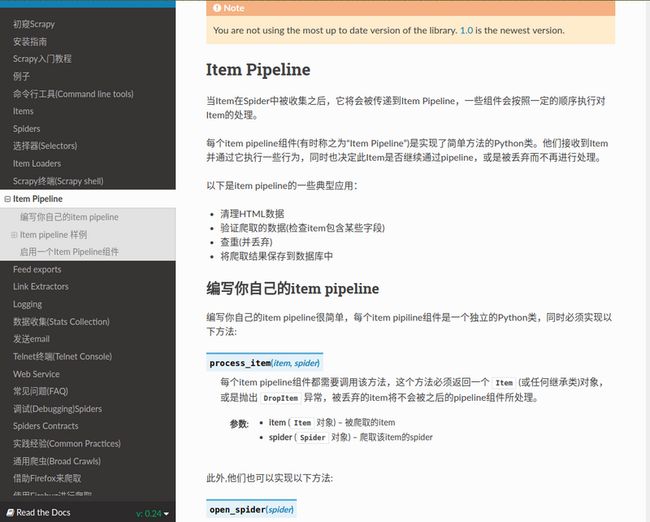
items.py中相当于对数据序列化,而数据传递到pipeline需要在settings.py设置,pipeline中主要做数据存储的
# Configure item pipelines
# See https://doc.scrapy.org/en/latest/topics/item-pipeline.html
ITEM_PIPELINES = {
   'ArticleSpider.pipelines.ArticlespiderPipeline': 300,

}
我们在pipelines.py文件中打两个断点debug下,会发现 item中value值就是我们之前提取要储存的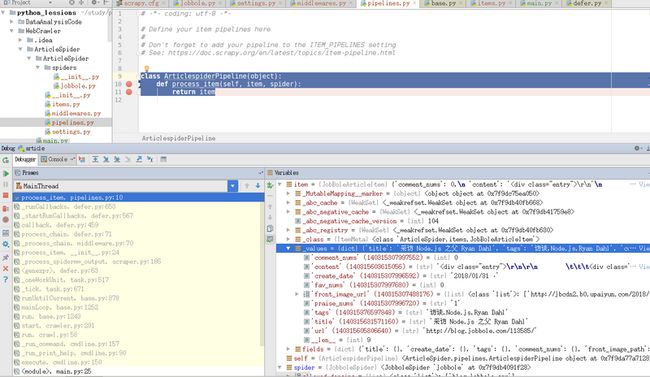
配置pipelines.py
# -*- coding: utf-8 -*-

# Define your item pipelines here
#
# Don't forget to add your pipeline to the ITEM_PIPELINES setting
# See: https://doc.scrapy.org/en/latest/topics/item-pipeline.html
import codecs
import json
from scrapy.pipelines.images import ImagesPipeline
from scrapy.exporters import JsonItemExporter

class ArticlespiderPipeline(object):
    def process_item(self, item, spider):
        return item

class JsonWithEncodingPipeline(object):
    #自定义json文件的到出
    def __init__(self):
        self.file = codecs.open('article.json', 'w', encoding="utf-8")
    def process_item(self, item, spider):
        lines = json.dumps(dict(item), ensure_ascii=False) + "\n"
        self.file.write(lines)
        return item
    def spider_closed(self, spider):
        self.file.close()

class JsonExporterPipeline(object):
    #调用scrapy提供的JsonItemExporter  到出json文件
    def __init__(self):
        self.file = open('articleecport.json', 'wb')
        self.exporter = JsonItemExporter(self.file, encoding="utf-8", ensure_ascii=False)
        self.exporter.start_exporting()
    def close_spider(self, spider):
        self.exporter.finish_exporting()
        self.file.close()
    def process_item(self, item, spider):
        self.exporter.export_item(item=item)
        return item
#图片处理pipline
class ArticleImagePipeline(ImagesPipeline):
    def item_completed(self, results, item, info):
        for ok, value in results:
            image_file_path_ = value["path"]
        item["front_image_path"] = image_file_path_
        return item
储存数据到mysql
设计数据表
# ubuntu下必须有这条,否则会报下面的错误
sudo apt-get install libmysqlclient-dev
# centos 下必须有这条,否则会报下面的错误
sudo yum install python-devel mysql-devel
 pip3 install -i https://pypi.douban.com/simple/ mysqlclient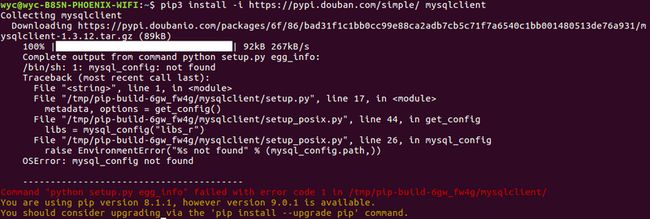
安装还遇到这种问题:
解决方法: 一条命令解决mysql_config not foundpipeline.py
import pymysql
class MysqlPipeline(object):
    def __init__(self):
        # 获取一个数据库连接,注意如果是UTF-8类型的,需要制定数据库
        self.conn = pymysql.connect('127.0.0.1', 'root', 'wyc2016','article_spider', charset='utf8',use_unicode=True)
        self.cursor = self.conn.cursor()#获取一个游标

    def process_item(self, item, spider):
        insert_sql = """INSERT INTO jobboleArticle(title, url, create_date, fav_nums) VALUES(%s, %s, %s, %s )"""
        try:
            self.cursor.execute(insert_sql, (item["title"], item["url"], item["create_date"], item["fav_nums"]))
            self.conn.commit()
        except Exception as e:
            self.conn.rollback()
        finally:
            self.conn.close()
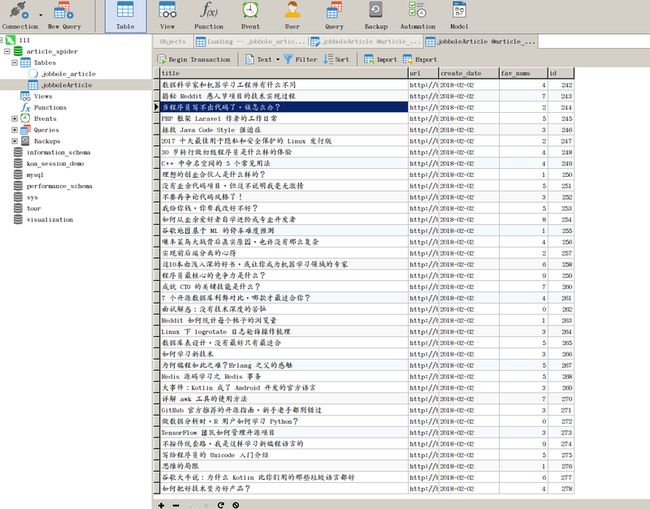
我们发现只存入了3条,因为上面的代码是同步方式,我爬虫的解析速度是比入数据库速度快的,这造成了堵塞
我们用异步写下:
class MysqlTwistedPipeline(object):
        def __init__(self, dbpool):
            self.dbpool = dbpool

        @classmethod
        def from_settings(cls, settings):
            dbparams =  dict(
                host = settings["MYSQL_HOST"],
                database = settings["MYSQL_DBNAME"],
                user = settings["MYSQL_USER"],
                password = settings["MYSQL_PASSWORD"],
                charset = 'utf8',
                cursorclass = pymysql.cursors.DictCursor,
                use_unicode = True
            )
            dbpool = adbapi.ConnectionPool("pymysql", **dbparams)
            return cls(dbpool)

        def process_item(self, item, spider):
            #使用twisted将mysql插入变成异步执行
            query = self.dbpool.runInteraction(self.do_insert, item)
            query.addErrorback(self.handle_error, item, spider)#   处理异常

        def handle_error(self, failure, item, spider):
            #处理异步插入异常
            print(failure)

        def do_insert(self, cursor,item):
            #执行具体的插入query
            insert_sql = """INSERT INTO jobboleArticle(title, url, create_date, fav_nums) VALUES(%s, %s, %s, %s )"""
            cursor.execute(insert_sql, (item["title"], item["url"], item["create_date"], item["fav_nums"]))
常见问题
scrapy - Request 中的回调函数不执行
常用工具
代理工具(抓包工具)
以微信公众号为例,它是封闭的,微信公众平台并没有对外提供 Web 端入口,只能通过手机客户端接收、查看公众号文章,所以,为了窥探到公众号背后的网络请求,我们需要借以代理工具的辅助
主流的抓包工具有:
- Windows 平台有 Fiddler
- macOS 有 Charles
- ubuntu下 可以用 Mono 打开 Fiddler
- 阿里开源了一款工具叫 AnyProxy
ubuntu下Fiddler抓包
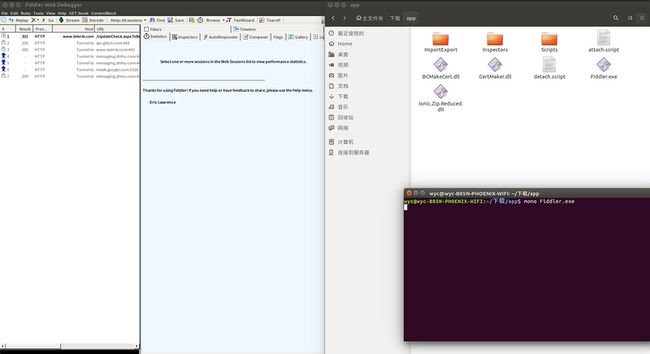
首先要确保你的手机和电脑在同一个局域网,如果不再同一个局域网,你可以买个随身WiFi,在你电脑上搭建一个极简无线路由器
Fiddler 配置
https://www.jianshu.com/p/be7...
copyheader
爬虫小工具-copyheader
参考
爬虫之路
Python网络数据采集
基于 Python 实现微信公众号爬虫
用Scrapy shell调试xpath
Scrapy分布式爬虫打造搜索引擎 注:这个笔记是记录的慕课网相关课程
python爬虫从入门到放弃(三)之 Urllib库的基本使用
ArticleSpider/ArticleSpider/spiders/jobbole.py
scrapy/quotesbot 官方简单示例
详解python3使用PyMysql连接mysql数据库步骤
python3.6 使用 pymysql 连接 Mysql 数据库及 简单的增删改查操作
总结:常用的 Python 爬虫技巧
python 读取本地txt,存入到mysql
https://www.cnblogs.com/shaos...
