文章首发:https://github.com/giscafer/g...
前言
node.js在 v8.5 版本之后可以直接支持ES6模块,但是有个限制就是,需要为.mjs后缀的文件才行,比如有个es6代码文件为test.mjs,可以直接用node.js运行调式: node --experimental-modules test.mjs。
有限制就不灵活了,看lodash源码文件,两百多个源码文件都是ES6语法,文件名称是.js,想在VS Code中直接node启动调式是不行的,还是需要用到babel才行。
下边介绍VS Code 如何配置 webpack+babel 调式es6代码的环境
第三方模块环境准备工作
npm i babel-core babel-loader webpack --save-dev
webpack配置文件
webpack.config.js
const path = require('path');
module.exports = {
    devtool: 'source-map',
    entry: {
        index: path.resolve('./test/index.js'), // 文件主入口
    },
    output: {
        path: path.resolve('./dist/'),  // 打包文件位置
        filename: '[name].js'
    },
    module: {
        loaders: [{
            test: /.js$/,
            loader: 'babel-loader'
        }]
    }
};
package.json文件scripts配置
"scripts": {
    "build": "webpack --progress",
}
VS Code 启动配置
按下 F5 会自动创建launch.json默认配置,我们做调整修改就行
{
    "version": "0.2.0",

    // 多个独立的配置项
    "configurations": [
        {
            // 语言
            "type": "node",

            // 是调试模式,还是附着到已运行的程序上
            "request": "launch",

            // 该配置项的名字
            "name": "Launch Program",

            // 程序的绝对路径
            "program": "${workspaceFolder}/test/index.js",

            // 调试之前要做的任务名
            "preLaunchTask": "build",

            // SourceMap
            "sourceMaps": true,

            // 是否自动停止程序
            "stopOnEntry": false,

            // 生成的代码中,如果无法映射回源代码,则自动单步执行。
            "smartStep": true,

            // 编译后的文件地址
            "outFiles": [
                "${workspaceRoot}/dist/**"
            ]
        }
    ]
}
然后创建任务 task.json,步骤:任务菜单——配置任务
{
    // See https://go.microsoft.com/fwlink/?LinkId=733558
    // for the documentation about the tasks.json format
    "version": "2.0.0",
    "tasks": [
        {
            "label": "build",  // 这里是任务名称,对应launch.json中的preLaunchTask属性配置
            "type": "npm",
            "script": "build",
            "problemMatcher": []
        }
    ]
}
调式测试
完成上边的步骤后,就结束了,在你配置的对应webpack entry文件入口,写ES6代码后,打断点,按下F5即可看到断点调式效果。
比如我的test/index.js文件代码如下,引入的是lodash的add.js源码
import add from '../add.js';

console.log(add(1,2));
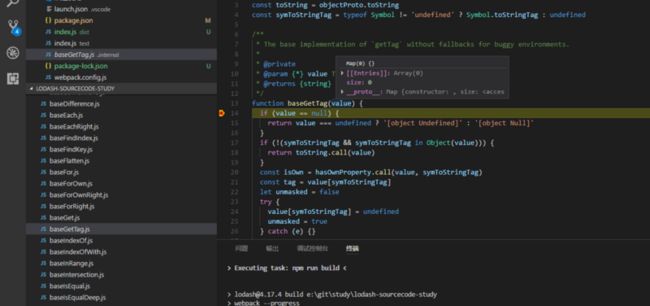
在add.js里边依赖的模块baseGetTag断点调式截图:
总结
不管什么框架还是库的源码,我们阅读源码的时候,为了更容易理解代码逻辑,肯定是需要源码调式的分析。使用nodejs环境调式使得效率更高,直接再IDE中阅读源码,直接调式看效果。


