搭建自己的gitlab服务器
搭建自己的gitlab服务器
- 1、在centos6.5上搭建
- 1.1安装并配置必要的依赖关系
- 1.2添加GitLab软件包存储库并安装软件包
- 1.3浏览到主机名并登录
- 1.4设置您的通信首选项
- 2、修改gitlab的配置文件
- 3、重新加载gitlab配置文件,重启
- 4、使用外部的nginx
- 4.1添加外部nginx的配置文件
- 5权限配置
- 6gitlab的命令
- 7配置邮件服务
- 8汉化gitlab
- 8.1克隆汉化版补丁
- 8.2查看当前gitlab版本并且获取对应版本的中文补丁
- 8.3将中文补丁导入gitlab
1、在centos6.5上搭建
安装前参考一下服务器官方说明:
https://github.com/gitlabhq/gitlabhq/blob/master/doc/install/requirements.md
参考官方文档上安装方法
https://www.gitlab.com.cn/installation/#centos-6
1.1安装并配置必要的依赖关系
在CentOS 6(和RedHat / Oracle / Scientific Linux 6)上,以下命令还将在系统防火墙中打开HTTP和SSH访问。
sudo yum install -y curl policycoreutils-python openssh-server cronie
sudo lokkit -s http -s ssh
接下来,安装Postfix以发送通知电子邮件。如果要使用其他解决方案发送电子邮件,请跳过此步骤并在安装GitLab后配置外部SMTP服务器。
sudo yum install postfix
sudo service postfix start
sudo chkconfig postfix on
在Postfix安装期间,可能会出现配置屏幕。选择“Internet Site”并按Enter键。使用服务器的外部DNS作为“邮件名称”,然后按Enter键。如果出现其他屏幕,请继续按Enter键接受默认值。
1.2添加GitLab软件包存储库并安装软件包
添加GitLab包存储库。
curl https://packages.gitlab.com/install/repositories/gitlab/gitlab-ee/script.rpm.sh | sudo bash
接下来,安装GitLab包。将http:// gitlab.example.com更改为您要访问GitLab实例的URL。安装将自动配置并启动该URL的GitLab。HTTPS 在安装后需要其他配置。
sudo EXTERNAL_URL=“http://gitlab.example.com” yum -y install gitlab-ee
1.3浏览到主机名并登录
首次访问时,您将被重定向到密码重置屏幕。提供初始管理员帐户的密码,您将被重定向回登录屏幕。使用默认帐户的用户名root登录。
有关安装和配置的详细说明,请参阅我们的文档。
https://docs.gitlab.com/omnibus/README.html#installation-and-configuration-using-omnibus-package
1.4设置您的通信首选项
访问我们的电子邮件订阅首选项中心,告知我们何时与您沟通。我们有明确的电子邮件选择加入政策,因此您可以完全控制我们向您发送电子邮件的频率和频率。
我们每月发送两次您需要了解的GitLab新闻,包括我们的开发团队的新功能,集成,文档和幕后故事。有关错误和系统性能的重要安全更新,请注册我们的专用安全通讯。
重要说明:如果您不选择加入安全通讯,则不会收到安全警报。
2、修改gitlab的配置文件
vim /etc/gitlab/gitlab.rb
external_url ‘http://gitlab.*****.com’
如果不使用域名将此改成ip+端口就可以了
3、重新加载gitlab配置文件,重启
sudo gitlab-ctl reconfigure
4、使用外部的nginx
公司的服务器上已经安装了nginx,所以没有使用gitlab自带的nginx,使用的自己的nginx
在上述的配置文件中添加
nginx[‘enable’] = false
重新加载配置文件
sudo gitlab-ctl reconfigure
4.1添加外部nginx的配置文件
我的配置文件在/usr/local/nginx/conf/conf.d/gitlab.conf
# gitlab socket 文件地址
upstream gitlab {
  # 7.x 版本在此位置
  # server unix:/var/opt/gitlab/gitlab-rails/tmp/sockets/gitlab.socket;
  # 8.0 位置
  server unix://var/opt/gitlab/gitlab-rails/sockets/gitlab.socket;
}

server {
  listen *:80;

  server_name gitlab.xiaochejiang.com;   # 请修改为你的域名

  server_tokens off;     # don't show the version number, a security best practice
  root /opt/gitlab/embedded/service/gitlab-rails/public;

  # Increase this if you want to upload large attachments
  # Or if you want to accept large git objects over http
  client_max_body_size 250m;

  # individual nginx logs for this gitlab vhost
  access_log  /var/log/gitlab/nginx/gitlab_access.log;
  error_log   /var/log/gitlab/nginx/gitlab_error.log;

  location / {
    # serve static files from defined root folder;.
    # @gitlab is a named location for the upstream fallback, see below
    try_files $uri $uri/index.html $uri.html @gitlab;
  }

  # if a file, which is not found in the root folder is requested,
  # then the proxy pass the request to the upsteam (gitlab unicorn)
  location @gitlab {
    # If you use https make sure you disable gzip compression
    # to be safe against BREACH attack

    proxy_read_timeout 300; # Some requests take more than 30 seconds.
    proxy_connect_timeout 300; # Some requests take more than 30 seconds.
    proxy_redirect     off;

    proxy_set_header   X-Forwarded-Proto $scheme;
    proxy_set_header   Host              $http_host;
    proxy_set_header   X-Real-IP         $remote_addr;
    proxy_set_header   X-Forwarded-For   $proxy_add_x_forwarded_for;
    proxy_set_header   X-Frame-Options   SAMEORIGIN;

    proxy_pass http://gitlab;
  }

  # Enable gzip compression as per rails guide: http://guides.rubyonrails.org/asset_pipeline.html#gzip-compression
  # WARNING: If you are using relative urls do remove the block below
  # See config/application.rb under "Relative url support" for the list of
  # other files that need to be changed for relative url support
  location ~ ^/(assets)/  {
    root /opt/gitlab/embedded/service/gitlab-rails/public;
    # gzip_static on; # to serve pre-gzipped version
    expires max;
    add_header Cache-Control public;
  }

  error_page 502 /502.html;
}
重启nginx
5权限配置
访问会报502。原本是 nginx 用户无法访问gitlab用户的 socket 文件,用户权限配置,这里直接修改成了最高权限
sudo chmod -R o+x /var/opt/gitlab/gitlab-rails
6gitlab的命令
gitlab-ctl start
gitlab-ctl stop
7配置邮件服务
vim /etc/gitlab/gitlab.rb
#配置下面,需要配置smtp_tls
#注意gitlab_rails['smtp_tls'] 这个是设定为true
gitlab_rails['smtp_enable'] = true
gitlab_rails['smtp_address'] = "smtp.exmail.qq.com"
gitlab_rails['smtp_port'] = 465
gitlab_rails['smtp_user_name'] = "lz.duan@*****.com"
gitlab_rails['smtp_password'] = "********"
gitlab_rails['smtp_domain'] = "smtp.exmail.qq.com"
gitlab_rails['smtp_authentication'] = "login"
gitlab_rails['smtp_enable_starttls_auto'] = true
gitlab_rails['smtp_tls'] = true
##配置邮箱来源, 与展示的名称
gitlab_rails['gitlab_email_enabled'] = true
gitlab_rails['gitlab_email_from'] = 'lz.duan@*****.com'
gitlab_rails['gitlab_email_display_name'] = 'Gitlab ***'
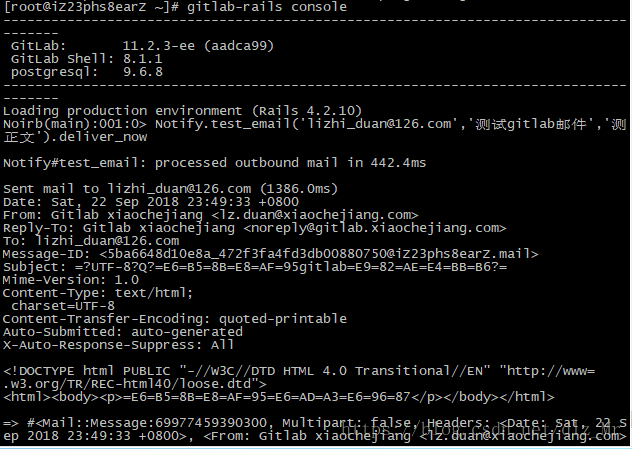
gitlab-rails console
Notify.test_email(‘[email protected]’, ‘测试gitlab邮件’, ‘测试邮件’).deliver_now

8汉化gitlab
8.1克隆汉化版补丁
git clone https://gitlab.com/xhang/gitlab.git
8.2查看当前gitlab版本并且获取对应版本的中文补丁
head -1 /opt/gitlab/version-manifest.txt
gitlab-ee 11.2.3
进入到刚刚克隆下来的中文补丁
用diff将英文原版与中文版的对比生成.diff文件
cd gitlab
git diff v11.2.3 v11.2.3-zh > …/v11.2.3-zh.diff

8.3将中文补丁导入gitlab
patch -d /opt/gitlab/embedded/service/gitlab-rails/ -p1 < ./v11.2.3-zh.diff

这是因为补丁中有一些较新的文件,但是我们安装的gitlab并没有这个文件存在,直接跳过就行