A2dp连接流程(android8及之前版本)
前言
Android P在a2dp协议有些许改动,支持多A2dp设备同时连接,流程上有变化,以下是记录Android O及以前的A2dp设备连接流程,以备我后续忘记时查阅.
正文
先简单讲讲应用层调用绑定和连接过程
扫描到设备后点击设备列表,通过反射调用BluetoothDevice的createBond方法发起绑定
 private void createBond(BluetoothDevice device) {
        try {
            Method method = BluetoothDevice.class.getMethod("createBond");
            method.invoke(device);

        } catch (Exception e) {
            e.printStackTrace();
        }
    }
发起绑定后会受到绑定状态变化的广播
 public static final String ACTION_BOND_STATE_CHANGED =
            "android.bluetooth.device.action.BOND_STATE_CHANGED";
绑定成功的状态变化为:
10(BOND_NONE) -> 11(BOND_BONDING) -> 12(BOND_BONDED)
如果是10 -> 11 - > 10 说明bond失败,可以重新发起bond
case BluetoothDevice.ACTION_BOND_STATE_CHANGED:
                    int bondState = intent.getIntExtra(BluetoothDevice.EXTRA_BOND_STATE, 10);
                    Log.i(TAG, "bond state change :bond state is " + bondState);
                    switch (bondState) {
                        case BluetoothDevice.BOND_BONDING:
                           //绑定中
                            break;
                        case BluetoothDevice.BOND_NONE:
                          //绑定失败
                            break;
                        case BluetoothDevice.BOND_BONDED:
                            //绑定成功,去连接设备
                            connect(device);

                            break;

                    }
                    break;
连接放在线程执行,需要区分不同的deviceType来获取不同的代理对象,关于deviceType我前面写过一个相关分析的博客
/**
     * 连接设备
     * 具体实现 int deviceType = device.getBluetoothClass().getMajorDeviceClass() = BITMASK & 下面的类型;
     * 不同设备类型该值不同,比如computer蓝牙为256、phone 蓝牙为512、打印机蓝牙为1536等等
     * public static class Major {
     * private static final int BITMASK           = 0x1F00;
     *
     * public static final int MISC              = 0x0000;
     * public static final int COMPUTER          = 0x0100;
     * public static final int PHONE             = 0x0200;
     * public static final int NETWORKING        = 0x0300;
     * public static final int AUDIO_VIDEO       = 0x0400;
     * public static final int PERIPHERAL        = 0x0500;
     * public static final int IMAGING           = 0x0600;
     * public static final int WEARABLE          = 0x0700;
     * public static final int TOY               = 0x0800;
     * public static final int HEALTH            = 0x0900;
     * public static final int UNCATEGORIZED     = 0x1F00;
     * }
     */
    public void connect(final BluetoothDevice device) {
        currentDevice = device;
        //测试,实际需要判断设备类型创建不同的profile
        final int deviceType = device.getBluetoothClass().getMajorDeviceClass();
        new Thread() {
            @Override
            public void run() {
                if (deviceType == (0x1F00 & 0x0500)) {//4:input_device
                    Log.i(TAG, "connect input device:" + device);
                    adapter.getProfileProxy(mContext, mProfileListener, INPUT_DEVICE);
                } else if (deviceType == (0x1F00 & 0x0400)) {//AUDIO_VIDEO
                    Log.i(TAG, "connect a2dp device:" + device);
                    adapter.getProfileProxy(mContext, mProfileListener, BluetoothProfile.A2DP);
                } else if (deviceType == (0x1F00 & 0x0200)) {//PHONE

                }
            }
        }.start();


    }
在回调里面来进行连接操作
 private BluetoothProfile mBluetoothProfile;
    private BluetoothA2dp mA2dp;
    private BluetoothProfile.ServiceListener mProfileListener = new BluetoothProfile.ServiceListener() {
        @Override
        public void onServiceConnected(int profile, BluetoothProfile proxy) {
            Log.i(TAG, "mConnectListener onServiceConnected");
            mBluetoothProfile = proxy;
            //判断连接的profile
            switch (profile) {
                case BluetoothProfile.A2DP:
                    mA2dp = (BluetoothA2dp) proxy;
                    setPriority(currentDevice, profile);
                    try {
                        //通过反射获取BluetoothA2dp中connect方法(hide的),进行连接。
                        Method connectMethod = BluetoothA2dp.class.getMethod("connect",
                                BluetoothDevice.class);
                        connectMethod.invoke(mA2dp, currentDevice);
                    } catch (Exception e) {
                        e.printStackTrace();
                    }
                    break;
                case INPUT_DEVICE:
                    try {
                        //得到BluetoothInputDevice然后反射connect连接设备
                        Class mInputDevice = Class.forName("android.bluetooth.BluetoothInputDevice");
                        Method method = mInputDevice.getMethod("connect", String.class);
                        method.invoke(mInputDevice.newInstance(), currentDevice);
                    } catch (Exception e) {
                        e.printStackTrace();
                    }
                    break;

            }


        }

        @Override
        public void onServiceDisconnected(int profile) {
            Log.i(TAG, "mConnectListener onServiceConnected");
        }
    };
连接状态会有广播回调,不同类型的设备连接状态的广播是不一样的,a2dp连接广播为:
 public static final String ACTION_CONNECTION_STATE_CHANGED =
        "android.bluetooth.a2dp.profile.action.CONNECTION_STATE_CHANGED";
下面就来看看framework层a2dp的连接流程
应用调用connect后到
framework/base/core/java/android/bluetooth/BluetoothA2dp.java
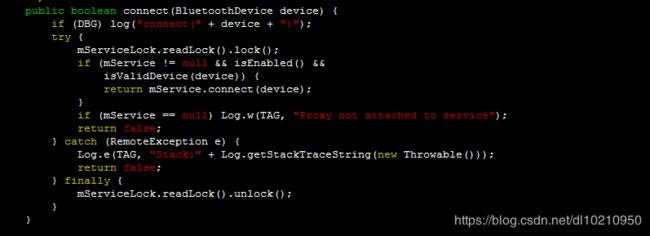
可以看到调用了mService.connect(device);
这里通过binder通信调到了Bluetooth.apk里的:
package/apps/Bluetooth/src/com/android/bluetooth/a2dp/A2dpService.java

这里
1,检查权限
2,判断优先级
3,检查设备是否支持a2dp和a2dpSink
4,检查当前设备是否已经连接,或者正在连接
接下来就到了同目录下的A2dpStateMachine.java的内部类
private class Connected extends State {
	@override
	public boolean processMessage(Message message){
	}
}
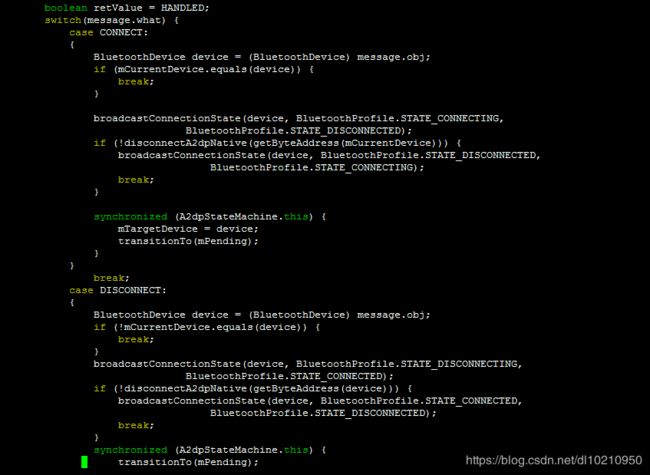
这里
1,当前要连接的设备和已经连接的设备(mCurrentDevice)是否一致,一致就不往下走
2,发送广播通知其他进程,状态从disconnected -> connecting
3,断开mCurrentDevice,if断开失败,发送当前设备连接失败connecting -> disconnected
4,mTargetDevice = device ,mTargetDevice 为即将要连接的设备
5,transitionTo(mPending);

将消息延迟,
未完待续…