制作Cocoapods管理自己的类库
前言:
在我们使用Cocoapods来管理我们的库时,我们需要创建一个podspec文件,并把这个文件提交到Cocoapods维护的specs仓库和自己维护的specs仓库中,Cocoapods管理的库仓库地址:https://github.com/CocoaPods/Specs,
Cocoapods的命令文档见:https://blog.csdn.net/dlm_211314/article/details/83575924
第一章、注册Cocoapods用户
参考文档:https://guides.cocoapods.org/making/getting-setup-with-trunk.html
1、查看是否注册了Cocoapods
➜ ~ pod trunk me
[!] You need to register a session first.
Usage:
$ pod trunk me COMMAND
Includes information about your registration, followed by all your sessions.
These are your current session, other valid sessions, unverified sessions,
and expired sessions.
Commands:
+ clean-sessions Remove sessions
Options:
--silent Show nothing
--verbose Show more debugging information
--no-ansi Show output without ANSI codes
--help Show help banner of specified command
说明还没有注册
➜ ~ pod trunk me
- Name: 你注册的名称
- Email: 你注册的邮箱
- Since: October 30th, 22:36
- Pods: None
- Sessions:
- October 30th, 22:36 - March 7th, 2019 22:51.
说明已经注册
2、注册
➜ ~ pod trunk register emailAddress 'name'
[!] Please verify the session by clicking the link in the verification email that has been sent to emailAddress
这样你会收到一封邮件,点击就可以激活了
第二章、对现有库进行Cocoapods管理
1、创建podspec文件
api文档:https://guides.cocoapods.org/making/specs-and-specs-repo.html
在已有的项目中创建podspec文件
pod spec create podspec名称
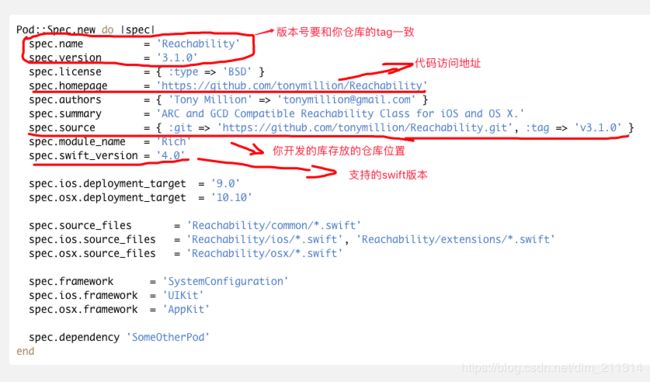
根据自己的类库编辑podspec文件
2、验证podspec
pod spec lint podspec名称.podspec --allow-warnings
-> podspec名称 (1.0)
- NOTE | xcodebuild: note: Using new build system
- NOTE | [iOS] xcodebuild: note: Planning build
- NOTE | [iOS] xcodebuild: note: Constructing build description
- NOTE | [iOS] xcodebuild: warning: Skipping code signing because the target does not have an Info.plist file. (in target 'App')
- WARN | xcodebuild: xxxxxxx.swift:25:34: warning: 'global(priority:)' was deprecated in iOS 8.0
- WARN | xcodebuild: xxxxxxx.swift:25:52: warning: 'default' was deprecated in iOS 8.0: Use qos attributes instead
- WARN | xcodebuild: xxxxxxx.swift:33:34: warning: 'global(priority:)' was deprecated in iOS 8.0
- WARN | xcodebuild: xxxxxxx.swift:33:52: warning: 'low' was deprecated in iOS 8.0: Use qos attributes instead
Analyzed 1 podspec.
podspec名称.podspec passed validation.
3、提交你的podspec到Cocoapods的Trunk
pod trunk push podspec名称.podspec
解决后重新执行提交步骤即可
其他参考文档:创建自己的Cocoapods库 ,发布自己的pods到CocoaPods trunk
第三章、对创建自己的类库并提交到Cocoapods维护的spec仓库
1、创建自己的类库
查看文档:https://guides.cocoapods.org/making/using-pod-lib-create.html
pod lib create MyLibrary
2、验证库
pod lib lint MyLibrary
3、编辑podspec文件,验证并提交到CocoaPods trunk
以上Podfile中的使用
source 'https://github.com/CocoaPods/Specs.git'
platform :ios, '8.0'
inhibit_all_warnings!
use_frameworks!
第四章、对自己的类库提交到自己维护spec仓库
1、在github上创建一个仓库,用来存储、管理和维护specs文件 如: https://github.com/dbk1985/DZSpace.git
也可以自己搭建一个git的服务器,并创建一个spec仓库
pod repo add DZSpace https://github.com/dbk1985/DZSpace.git
2、使用pod repo可以查看,本地的库源
➜ ~ pod repo
artsy
- Type: git (master)
- URL: https://github.com/Artsy/Specs.git
- Path: /Users/wzkj/.cocoapods/repos/artsy
DZSpace #自己维护的spec仓库
- Type: git (master)
- URL: https://github.com/dbk1985/DZSpace.git
- Path: /Users/wzkj/.cocoapods/repos/DZSpace
master #Cocoapods维护的spec仓库
- Type: git (master)
- URL: https://github.com/CocoaPods/Specs.git
- Path: /Users/wzkj/.cocoapods/repos/master
3、对现有的库只需创建一个podspec文件,并编辑、验证spec文件
pod spec create podspec名称
pod spec lint podspec名称.podspec --allow-warnings
4、没有库,使用pod命令创建类库,并编辑、验证spec文件
4.1 创建并验证类库
pod lib create MyLibrary
pod lib lint MyLibrary
4.2 编辑并验证podspec文件
pod spec lint MyLibrary.podspec --allow-warnings
5、创建一个spec仓库,可以在github上创建一个spec仓库,也可以在自己搭建的git服务器上创建一个spec仓库 或者使用Cocoapods的spec仓库:https://github.com/CocoaPods/Specs.git
使用Cocoapods的spec仓库只需要使用pod setup就可以了
查看spec仓库 pod repo
使用自己创建的仓库,需要使用
pod repo add spec名称 自己创建的spec仓库地址
查看spec仓库 使用命令 pod repo
就可以看到有一个自己的spec仓库,叫(spec名称)
5、提交到自己spec仓库
pod repo push spec名称 MyLibrary.podspec --allow-warnings
spec名称为使用pod spec add spec名称 spec服务器地址
mac下提交提示没有权限的问题参考:https://blog.csdn.net/dlm_211314/article/details/83578202
参考文献:创建自己的Cocoapods库 ,创建GitHub私有库,制作CocoaPods依赖库(史上最详细)
6、使用pod repo push xxx 提交到spec仓库时报错:
->
- ERROR | [iOS] xcodebuild: Returned an unsuccessful exit code.
- NOTE | xcodebuild: note: Using new build system
- NOTE | [iOS] xcodebuild: note: Planning build
- NOTE | [iOS] xcodebuild: note: Constructing build description
- NOTE | [iOS] xcodebuild: warning: Skipping code signing because the target does not have an Info.plist file. (in target 'App')
- ERROR | [iOS] xcodebuild: xxxxx.swift:9:12: error: overriding declaration requires an 'override' keyword
- NOTE | xcodebuild: ObjectiveC.NSObject:6:12: note: overridden declaration is here
- ERROR | [iOS] xcodebuild: xxxxxx.swift:21:12: error: overriding declaration requires an 'override' keyword
- WARN | [iOS] xcodebuild: xxxxxx.swift:25:34: warning: 'global(priority:)' was deprecated in iOS 8.0
- WARN | [iOS] xcodebuild: xxxxxx.swift:25:52: warning: 'default' was deprecated in iOS 8.0: Use qos attributes instead
- WARN | [iOS] xcodebuild: xxxxxx.swift:33:34: warning: 'global(priority:)' was deprecated in iOS 8.0
- WARN | [iOS] xcodebuild: xxxxxx.swift:33:52: warning: 'low' was deprecated in iOS 8.0: Use qos attributes instead
[!] The `MyLibrary.podspec` specification does not validate.
这个时候我们使用 pod repo push DZSpace MyLibrary.podspec --allow-warnings --verbose 来查看具体问题出来哪里,
修改还是报错,这个时候我们修改清除pod的缓存,因为使用pod repo push的使用,pod会从缓存中复制工程,然后在编译验证
细节如下:
-> Installing xxxxxxx(podspec名称) (1.1)
> Copying xxxxxxx(podspec名称) from `/Users/aaaaa/Library/Caches/CocoaPods/Pods/External/xxxxxxx(podspec名称)/7e5edc35e9cd0c2294b8629a9b1ed283-a04a3` to
`../../../../private/var/folders/35/7_wtqrpd54d_npk6l9j9ty8r0000gn/T/CocoaPods-Lint-20181101-30234-17i1jtl-xxxxxxx(podspec名称)/Pods/xxxxxxx(podspec名称)`
- Running pre install hooks
所以修改后总是报错,清除缓存或直接删除重新执行就OK,
pod 查看缓存命令
使用 pod cache list 查看看缓存
使用 pod cache clean --all 清除缓存
7、自己创建的spec库使用时,podfile中需要添加库源:spec仓库地址
source 'https://github.com/CocoaPods/Specs.git' // Cocoapods 仓库源
source "https://github.com/xxxx/xxxxxxx.git" // 自己创建的spec仓库源
platform :ios, '8.0'
inhibit_all_warnings!
use_frameworks!
