MDK5环境下stm32软件模拟
决定写写东西记忆下。
长话短说。emmm
- 开发环境
Win10,64位系统,MDK5.25
- 目标
做一个流水灯例程(不重要),进行软件模拟,调试做出波形图来验证程序是否符合预期
- 步骤
- 建立工程,project->new uvison project
- 选择芯片,这个我随便选择了个stm32f103,没有芯片的话用软件自带的pack installer在线官网装或者自己网上找pack用pack installer import
- 下一步是选择库文件,主要是startup,stdperiph这些。
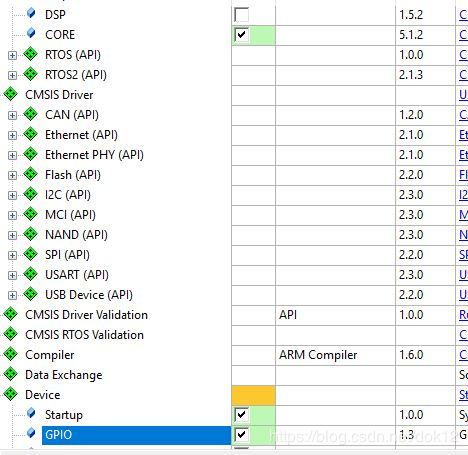
Cmsis里面的core和device 里面的startup是必须选的,流水灯用了gpio口,所以选择gpio

Stdperiph drivers里面根据需要选择驱动,其中framework是必须的,gpio是根据需要来。
这时候下面会有个警告提示显示需要RCC module,你可以点击勾选stdperiph drivers 里面的RCC,也可以选择下面的resolve按钮自动处理。
- 写main.c文件

文件网上随便找的,GPIOA.1,3,5轮流高低电平输出
#include "stm32f10x.h"
u16 DelayCounter=0;
void Delay_Init()
{
SysTick_CLKSourceConfig(SysTick_CLKSource_HCLK);
SysTick_Config(SystemCoreClock / 1000);
}
void SysTick_Handler(void)
{
if(DelayCounter!=0)
{
DelayCounter--;
}
}
void Delayms(u16 ms)
{
DelayCounter=ms;
while(DelayCounter!=0);
}
int main(void)
{
GPIO_InitTypeDef GPIO_InitStructure;
RCC_APB2PeriphClockCmd(RCC_APB2Periph_GPIOA, ENABLE);
GPIO_InitStructure.GPIO_Pin = GPIO_Pin_1|GPIO_Pin_3|GPIO_Pin_5;
GPIO_InitStructure.GPIO_Mode = GPIO_Mode_Out_PP;
GPIO_InitStructure.GPIO_Speed = GPIO_Speed_50MHz;
GPIO_Init(GPIOA, &GPIO_InitStructure);
GPIO_SetBits(GPIOA,GPIO_Pin_1|GPIO_Pin_3|GPIO_Pin_5);
Delay_Init();
while(1)
{
GPIO_SetBits(GPIOA,GPIO_Pin_1);
GPIO_SetBits(GPIOA,GPIO_Pin_3);
GPIO_ResetBits(GPIOA,GPIO_Pin_5);
Delayms(500);
GPIO_SetBits(GPIOA,GPIO_Pin_1);
GPIO_ResetBits(GPIOA,GPIO_Pin_3);
GPIO_SetBits(GPIOA,GPIO_Pin_5);
Delayms(500);
GPIO_ResetBits(GPIOA,GPIO_Pin_1);
GPIO_SetBits(GPIOA,GPIO_Pin_3);
GPIO_SetBits(GPIOA,GPIO_Pin_5);
Delayms(500);
}
}
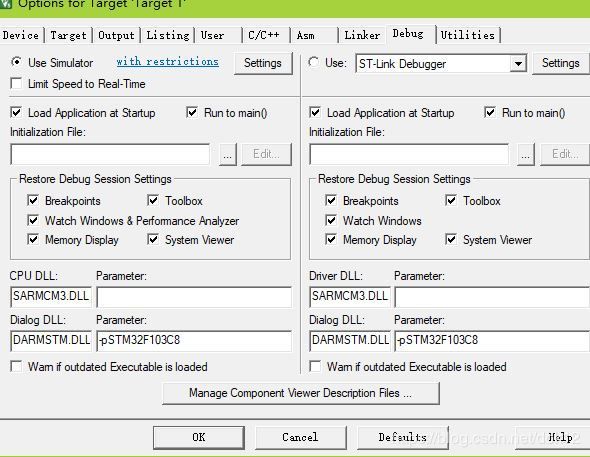
- 配置option for target,device,晶振(默认12MHZ,目前常用的是8MHZ),rom地址,debug,c/c++,output,listing这些都根据需要配置,我只配置了debug,其他的都没改,默认。因为想出波形图,所以Debug里面需要选择勾选use simulator,界面底部的两个dialog dll 要改成DARMSTM.DLL,parameter需要改成-pSTM32F103C8(我选择的是STM32F103C8,你选择的device不同芯片不一样就要改不同STM32),最后OK
6,build,没error,warning,一切ok之后,选择debug,开启debug session,(快捷键ctrl+F5)
7,选择逻辑分析仪logic analyzer,点setup,确定信号(依次大写字母建立PORTA.1,PORTA.3,PORTA.5),singnal play下面选择display type:bit,勾选hexdecimal display.最后close 保存

8,run,(快捷键F5),zoom in/out/all放大缩小
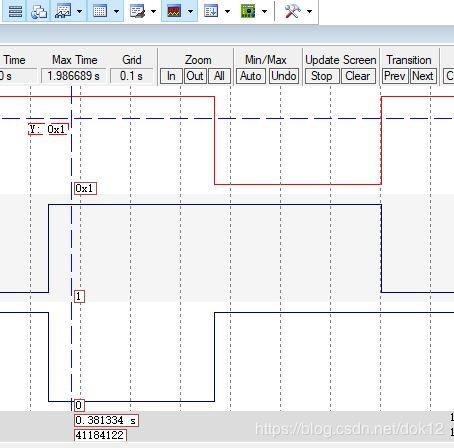
波形符合预期