1.HA架构注意事项
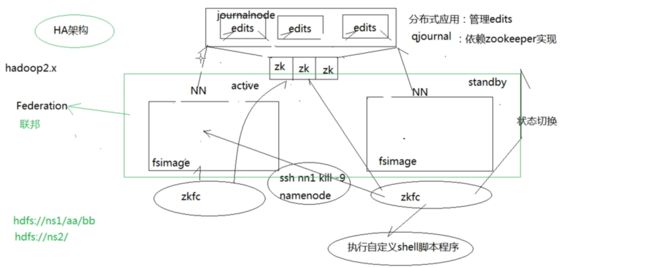
- 两个Namenode节点在某个时间只能有一个节点正常响应客户端请求,响应请求的节点状态必须是active
- standby状态要能够快速无缝切换成active状态,两个NN节点必须时刻保持元数据一致
- 将edits文件放到qjournal(一种分布式应用,依赖zookeeper实现,管理edits),而不存储在两个NN上,如果各个edits放在各个NN上,只能通过网络通信达到同步效果,可用性、安全性大大降低
- 每个namenode有一个监控进程zkfc,用来监控namenode是否异常
- 避免状态切换时发生brain split,执行自定义脚本杀死NN进程,确保只有一个NN是active状态
- 两个NN组成Federation
2.搭建准备
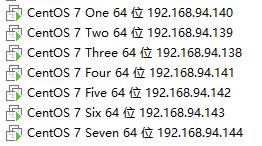
准备七台机器
3.安装过程
在CentOS7One机器上安装jdk、hadoop的过程不再赘述,参考本文
首先配置免密
CentOS7One需要免密连接CentOS7Five,CentOS7Six,CentOS7Seven,用以启动zookeeper,datanode
CentOS7Three需要免密连接CentOS7Five,CentOS7Six,CentOS7Seven,用以启动nodemanager
免密配置过程参考Hadoop免密钥配置
3.1 zookeeper配置
配置CentOS7Five的zoo.cfg
# The number of milliseconds of each tick
tickTime=2000
# The number of ticks that the initial
# synchronization phase can take
initLimit=10
# The number of ticks that can pass between
# sending a request and getting an acknowledgement
syncLimit=5 # the directory where the snapshot is stored. # do not use /tmp for storage, /tmp here is just # example sakes. dataDir=/opt/zkdata dataLogDir=/opt/zkdatalog # the port at which the clients will connect clientPort=2181 # the maximum number of client connections. # increase this if you need to handle more clients #maxClientCnxns=60 # # Be sure to read the maintenance section of the # administrator guide before turning on autopurge. # # http://zookeeper.apache.org/doc/current/zookeeperAdmin.html#sc_maintenance # # The number of snapshots to retain in dataDir #autopurge.snapRetainCount=3 # Purge task interval in hours # Set to "0" to disable auto purge feature #autopurge.purgeInterval=1 server.4=192.168.94.142:2888:3888 server.5=192.168.94.143:2888:3888 server.6=192.168.94.144:2888:3888
将配置好的zookeeper复制到CentOS7Six,CentOS7Seven
scp /opt/zookeeper/zookeeper-3.4.10 CentOS7Six:/opt/zookeeper/zookeeper-3.4.10
scp /opt/zookeeper/zookeeper-3.4.10 CentOS7Seven:/opt/zookeeper/zookeeper-3.4.10
3.2 hadoop配置
编辑CentOS7One的core-site.xml
"1.0" encoding="UTF-8"?> "text/xsl" href="configuration.xsl"?> fs.defaultFS hdfs://ns1/ hadoop.tmp.dir /usr/local/hadoop-2.6.5/data ha.zookeeper.quorum CentOS7Five:2181,CentOS7Six:2181,CentOS7Seven:2181
编辑CentOS7One的hdfs-site.xml
"1.0" encoding="UTF-8"?> "text/xsl" href="configuration.xsl"?> dfs.nameservices ns1 dfs.ha.namenodes.ns1 nn1,nn2 dfs.namenode.rpc-address.ns1.nn1 CentOS7One:9000 dfs.namenode.http-address.ns1.nn1 CentOS7One:50070 dfs.namenode.rpc-address.ns1.nn2 CentOS7Two:9000 dfs.namenode.http-address.ns1.nn2 CentOS7Two:50070 dfs.namenode.shared.edits.dir qjournal://CentOS7Five:8485;CentoS7Six:8485;CentOS7Seven:8485/ns1 dfs.journalnode.edits.dir /usr/local/hadoop-2.6.5/journaldata dfs.ha.automatic-failover.enabled true dfs.client.failover.proxy.provider.ns1 org.apache.hadoop.hdfs.server.namenode.ha.ConfiguredFailoverProxyProvider dfs.ha.fencing.methods sshfence shell(/bin/true) dfs.ha.fencing.ssh.private-key-files /root/.ssh/id_rsa dfs.ha.fencing.ssh.connect-timeout 30000
编辑CentOS7One的mapred-site.xml
"1.0"?>
"text/xsl" href="configuration.xsl"?>     mapreduce.framework.name yarn
编辑CentOS7One的yarn-site.xml
"1.0"?>
    yarn.resourcemanager.ha.enabled true    yarn.resourcemanager.cluster-id yrc    yarn.resourcemanager.ha.rm-ids rm1,rm2    yarn.resourcemanager.hostname.rm1 CentOS7Three   yarn.resourcemanager.hostname.rm2 CentOS7Four "yarn-site.xml" 52L, 1479C yarn.resourcemanager.hostname.rm2 CentOS7Four    yarn.resourcemanager.zk-address CentOS7Five:2181,CentOS7Six:2181,CentOS7Seven:2181   yarn.nodemanager.aux-services mapreduce_shuffle
将配置好的Hadoop发送给所有机器
scp -r /usr/local/hadoop-2.6.5 CentOS7Two:/usr/local/hadoop-2.6.5/
scp -r /usr/local/hadoop-2.6.5 CentOS7Three:/usr/local/hadoop-2.6.5/ scp -r /usr/local/hadoop-2.6.5 CentOS7Four:/usr/local/hadoop-2.6.5/ scp -r /usr/local/hadoop-2.6.5 CentOS7Five:/usr/local/hadoop-2.6.5/ scp -r /usr/local/hadoop-2.6.5 CentOS7Six:/usr/local/hadoop-2.6.5/ scp -r /usr/local/hadoop-2.6.5 CentOS7Seven:/usr/local/hadoop-2.6.5/
至此,配置完毕
4.启动流程
在CentOS7Five,CentOS7Six,CentOS7Seven启动zookeeper
sh zkServer.sh start
在CentOS7Five,CentOS7Six,CentOS7Seven启动journalnode
sh hadoop-daemon.sh start journalnode
在CentOS7One上格式化namenode(以后启动无需格式化)
hdfs namenode -format
在CentOS7One上格式化 ZKFC(以后启动无需格式化)
hdfs zkfc -formatZK
在CentOS7One上启动hdfs
sh start-dfs.sh
在CentOS7Three,CentOS7Four上启动yarn
sh start-yarn.sh
5.结果
CentOS7One启动成功应该有如下进程
[root@CentOS7One ~]# jps
17397 DFSZKFailoverController
17111 NameNode
17480 Jps
CentOS7Two
[root@CentOS7Two ~]# jps
2497 Jps
2398 DFSZKFailoverController
2335 NameNode
CentOS7Three
[root@CentOS7Three ~]# jps
2344 ResourceManager
2619 Jps
CentOS7Four
[root@CentOS7Four ~]# jps
2344 ResourceManager
2619 Jps
CentOS7Five
[root@CentOS7Five logs]# jps
2803 Jps
2310 QuorumPeerMain
2460 JournalNode 2668 NodeManager 2543 DataNode
CentOS7Six
[root@CentOS7Six ~]# jps
2400 JournalNode
2608 NodeManager
2483 DataNode 2743 Jps 2301 QuorumPeerMain
CentOS7Seven
[root@CentOS7Seven ~]# jps
2768 Jps
2313 QuorumPeerMain
2425 JournalNode 2650 NodeManager 2525 DataNode
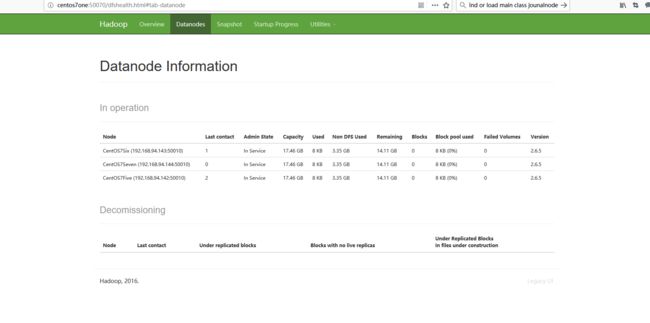
访问http://centos7one:50070,可以看到我们有三个datanode
访问http://centos7three:8088/
查看集群情况
6.致谢
https://www.cnblogs.com/biehongli/p/7660310.html
https://www.bilibili.com/video/av15390641/?p=44
7.常见问题
7.1 备用Namenode启动失败
原因:主节点格式化后备用节点的data目录还是原来的
解决:主节点格式化之后要将主节点data目录复制给备用
sh /usr/local/hadoop-2.6.5/hadoop-2.6.5/bin/hadoop namenode -format

scp -r /usr/local/hadoop-2.6.5/data/ CentOS7Two:/usr/local/hadoop-2.6.5/


