Linux FastDFS 互为主从
环境说明
系统:CentOS 6.6 IP:10.3.45.231 FastDFS_v5.03.+nginx-1.6.2+libevent-2.0.21-stable
系统:CentOS 6.6 IP:10.3.45.232 FastDFS_v5.03.+nginx-1.6.2+libevent-2.0.21-stable
备注:作为主从服务器的fastDFS和nginx 版本建议使用同一版本!
说明:在两台fastDFS服务器192.168.10.157和192.168.21.158上分别进行如下操作,
开始:
一、安装libevent
1、下载libevent-2.0.21-stable.tar.gz
wget https://github.com/downloads/libevent/libevent/libevent-2.0.21-stable.tar.gz
2、解压并安装配置
tar -zxvf libevent-2.0.21-stable.tar.gz
cd libevent-2.0.21-stable
mkdir -p /usr/local/libevnet
./configure --prefix=/usr/local/libevent
make && make install
#为libevent创建软链接到/lib库下,64位系统对应/lib64
ln -s /usr/local/libevent/lib/libevent-2.0.so.5 /usr/lib/libevent-2.0.so.5
ln -s /usr/local/libevent/lib/libevent-2.0.so.5 /usr/lib64/libevent-2.0.so.5
到此,libevent安装完成!
二、安装fastDFS文件服务器
1、下载lFastDFS_v5.03.tar.gz
wget http://sourceforge.net/projects/fastdfs/files/FastDFS%20Server%20Source%20Code/FastDFS%20Server%20with%20PHP%20Extension%20Source%20Code%20V5.05/FastDFS_v5.05.tar.gz/download
2、解压并安装配置
tar zxvf FastDFS_v5.03.tar.gz
cd FastDFS
vim make.sh
#WITH_LINUX_SERVICE=1 /取消此行的注释
./make.sh
./make.sh install
到此,fastDFS安装完成!
建立存储路径并配置fastDFS_v5.03
mkdir -p /data/storage #建立storage存储目录
mkdir -p /data/tracker #建立tracker调度器目录
mkdir -p /data/client #建立client客户端目录
cp /etc/fdfs/storage.conf /etc/fdfs/storage.conf-bak #备份配置文件
cp /etc/fdfs/tracker.conf /etc/fdfs/tracker.conf-bak #备份配置文件
cp /etc/fdfs/client.conf /etc/fdfs/client.conf-bak #备份配置文件
cp /usr/local/src/FastDFS/conf/storage_ids.conf /etc/fdfs/ #复制配置文件到相同目录下。
vim /etc/fdfs/storage.conf #修改storage配置文件修改参数
disabled=false
base_path=/data/storage    # 存储数据和日志文件的基本路径
store_path0=/data/storage  # tore_path#基于0,如果s tore_path0不存在,它的值是base_path
ttracker_server=10.3.45.231:22122    # 指定tracker server地址 可以有多个同步的IP
tracker_server=10.3.45.232:22122     # 指定tracker server地址 可以有多个同步的IP
http.server_port=80                           #指定浏览器访问文件端口
vim /etc/fdfs/tracker.conf #修改tracker配置文件修改参数disabled=false
base_path=/data/tracker # the base path to store data and log files
store_group=group1
http.server_port=80vim /etc/fdfs/client.conf #修改client配置文件修改参数
base_path=/data/client           # the base path to store log files
tracker_server=10.3.45.231:22122  #指定tracker server地址 可以有多个同步的IP
tracker_server=10.3.45.232:22122
vim /etc/fdfs/storage_ids.conf
 #
 100001   group1  10.3.45.231
 100002   group1  10.3.45.232
服务的启动和停止:
#trackerd
/usr/local/bin/stop.sh /usr/local/bin/fdfs_trackerd /etc/fdfs/tracker.conf
/usr/local/bin/restart.sh /usr/local/bin/fdfs_trackerd /etc/fdfs/tracker.conf
#storaged
/usr/local/bin/stop.sh /usr/local/bin/fdfs_storaged /etc/fdfs/storage.conf
/usr/local/bin/restart.sh /usr/local/bin/fdfs_storaged /etc/fdfs/storage.conf
测试fastDFS主从服务器双机热备是否成功
使用任意一台服务器上传文件,返回文件ID,说明文件上传成功
[root@pek1-perl62022 client]# /usr/local/bin/fdfs_upload_file /etc/fdfs/client.conf /usr/local/src/redis-3.2.9.tar.gz
group1/M00/00/00/CgMt6FwgNx2AehJuABedryBfAdY.tar.gz
分别从两台机器上传两个不同的文件,再从对方服务器用find去查找是否同步过去。
到这里小企业基本就够用啦,如果想从浏览器访问需要安装fastdfs-nginx模块。
三、fastdfs-nginx-mod-install 安装与配置
添加nginx用户
groupadd nginx
useradd -g nginx -s /bin/false -M nginx
安装依赖软包包
yum -y install gcc g++ gcc-c++ autoconf automake make unzip
yum -y install zlib zlib-devel openssl openssl-devel pcre pcre-devel
创建所需目录:
mkdir -p /usr/local/nginx/conf
mkdir -p /usr/local/nginx/logs
mkdir -p /usr/local/nginx/cache/fastcgi
mkdir -p /usr/local/nginx/cache/scgi
mkdir -p /usr/local/nginx/conf/vhost
mkdir -p /usr/local/nginx/cache/body
mkdir -p /usr/local/nginx/cache/uwsgi
mkdir -p /usr/local/nginx/cache/proxy
下载nginx及相关fastdfs软件包
cd /usr/local/nginx/
wget http://nginx.org/download/nginx-1.6.2.tar.gz
wget --no-check-certificate https://sourceforge.net/projects/fastdfs/files/FastDFS%20Nginx%20Module%20Source%20Code/fastdfs-nginx-module_v1.15.tar.gz/download
wget --no-check-certificate https://github.com/FRiCKLE/ngx_cache_purge/archive/master.zip -O ngx_cache_purge-master.zip
wget --no-check-certificate https://github.com/agentzh/echo-nginx-module/archive/master.zip -O echo-nginx-module-master.zip
wget --no-check-certificate https://github.com/gnosek/nginx-upstream-fair/archive/master.zip -O nginx-upstream-fair-master.zip
解压:
tar xf nginx-1.6.2.tar.gz
tar xf fastdfs-nginx-module_v1.15.tar.gz
unzip ngx_cache_purge-master.zip
unzip echo-nginx-module-master.zip
unzip nginx-upstream-fair-master.zip
编译:
cd nginx- 1.6.2
./configure --prefix=/usr/local/nginx \
--user=nginx \
--group=nginx \
--conf-path=/usr/local/nginx/conf/nginx.conf \
--error-log-path=/usr/local/nginx/logs/error.log \
--http-log-path=/usr/local/nginx/logs/access.log \
--lock-path=/usr/local/nginx/logs/nginx.lock \
--pid-path=/usr/local/nginx/logs/nginx.pid \
--http-client-body-temp-path=/usr/local/nginx/cache/body \
--http-fastcgi-temp-path=/usr/local/nginx/cache/fastcgi \
--http-uwsgi-temp-path=/usr/local/nginx/cache/uwsgi \
--http-scgi-temp-path=/usr/local/nginx/cache/scgi \
--http-proxy-temp-path=/usr/local/nginx/cache/proxy \
--with-pcre-jit \
--with-http_random_index_module \
--with-file-aio \
--with-debug \
--with-http_addition_module \
--with-http_gzip_static_module \
--with-http_realip_module \
--with-http_stub_status_module \
--with-http_sub_module \
--with-poll_module \
--with-http_ssl_module \
--add-module=/usr/local/nginx/echo-nginx-module-master \
--add-module=/usr/local/nginx/nginx-upstream-fair-master \
--add-module=/usr/local/nginx/ngx_cache_purge-master \
--add-module=/usr/local/nginx/fastdfs-nginx-module/src
编译安装:
make
make install
配置nginx mod_fastdfs
cp /usr/local/nginx/fastdfs-nginx-module/src/mod_fastdfs.conf /etc/fdfs/
cp /etc/fdfs/mod_fastdfs.conf /etc/fdfs/mod_fastdfs.conf.bak
mkdir -p /www/logs #创建mod_fastdfs日志目录
配置mod_fastdfs.conf:
vim /etc/fdfs/mod_fastdfs.conf
base_path=/www/logs               #the base path to store log files 存放日志文件
store_path0=/data/storage         # must same as storage.conf
url_have_group_name = ture
tracker_server=10.3.45.231:22122
tracker_server=10.3.45.232:22122
注意:/etc/fdfs/mod_fastdfs.conf 中必须要有 #include http.conf
注意不是##include http.conf
备份并配备nginx.conf文件
cp /usr/local/nginx/conf/nginx.conf /usr/local/nginx/conf/nginx.conf-bak
vim /usr/local/nginx/conf/nginx.conf
调用image.conf配置文件分别编辑如下:
vim /usr/local/nginx/conf/image.conf
server {
        listen 80;
        server_name 10.3.45.231;
        location ^~ /group1/M00 {
                root /data/storage/data;
                #ngx_fastdfs_module;
        }
        charset utf-8;
        root html;
        index index.html index.htm index.jsp login.jsp;
}

server {
        listen 80;
        server_name 10.3.45.232;
        location ^~ /group1/M00 {
                root /data/storage/data;
                #ngx_fastdfs_module;
        }
        charset utf-8;
        root html;
        index index.html index.htm index.jsp login.jsp;
}
分别执行下面命令:
# mkdir group1
# ln -s /data/storage/data/ /data/storage/data/group1/M00
重启fastDFS和nginx服务:
[root@www data]# /etc/init.d/fdfs_trackerd stop
stopping fdfs_trackerd ...
.
[root@www data]# /etc/init.d/fdfs_trackerd start
Starting FastDFS tracker server:
[root@www data]# /etc/init.d/fdfs_storaged stop
stopping fdfs_storaged ...
.
[root@www data]# /etc/init.d/fdfs_storaged start
Starting FastDFS storage server:
[root@www data]# /usr/local/nginx/sbin/nginx -s reload
ngx_http_fastdfs_set pid=2216
或者用下面的启动方法二选一都可:
#trackerd
/usr/local/bin/stop.sh /usr/local/bin/fdfs_trackerd /etc/fdfs/tracker.conf
/usr/local/bin/restart.sh /usr/local/bin/fdfs_trackerd /etc/fdfs/tracker.conf
tail -f /home/yuqing/fastdfs/logs/*.log
#storaged
/usr/local/bin/stop.sh /usr/local/bin/fdfs_storaged /etc/fdfs/storage.conf
/usr/local/bin/restart.sh /usr/local/bin/fdfs_storaged /etc/fdfs/storage.conf
tail -f /home/yuqing/fastdfs/logs/*.log
#nginx
chown -R nginx.nginx /usr/local/nginx/logs/
/usr/local/nginx/sbin/nginx -c /usr/local/nginx/conf/nginx.conf
/usr/local/nginx/sbin/nginx -s stop
tail -f /usr/local/nginx/logs/*.log
浏览器测试文件访问
任意一台服务器上传文件,返回文件ID,说明文件上传成功
[root@pek1-perl62022 client]# /usr/local/bin/fdfs_upload_file /etc/fdfs/client.conf /usr/local/src/redis-3.2.9.tar.gz
group1/M00/00/00/CgMt6FwgNx2AehJuABedryBfAdY.tar.gz
本地访问:
用浏览器访问:
http://10.3.45.231/group1/M00/00/00/CgMt6FwgNx2AehJuABedryBfAdY.tar.gz
http://10.3.45.232/group1/M00/00/00/CgMt6FwgNx2AehJuABedryBfAdY.tar.gz
完美。
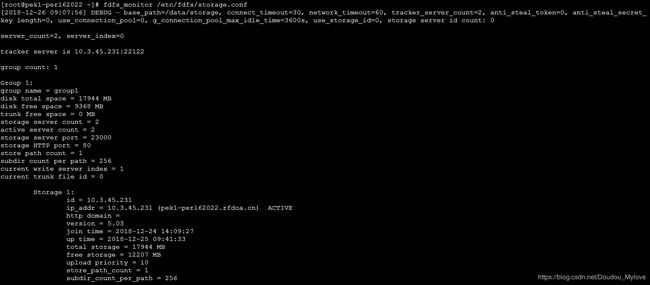
最后的监控如下:
分别执行fdfs_monitor /etc/fdfs/storage.conf
10.3.45.231
10.3.45.232
防火墙设置:
iptables -I INPUT -p tcp --dport 22122 -j ACCEPT
iptables -I INPUT -p tcp --dport 23000 -j ACCEPT
iptables -I INPUT -p tcp --dport 80 -j ACCEPT
/etc/init.d/iptables save
开机自启:
设置FastDFS跟踪器开机启动
关闭tracker
# /etc/init.d/ fdfs_trackerd stop
# echo '/etc/init.d/fdfs_trackerd start' >>/etc/rc.d/rc.local
设置FastDFS存储节点开机启动
关闭storage
# /etc/init.d/fdfs_storaged stop
# echo '/etc/init.d/fdfs_storaged start' >>/etc/rc.d/rc.local
启动nginx
# /usr/local/nginx/sbin/nginx
nginx 重启命令
# /usr/local/nginx/sbin/nginx -s reload
设置nginx开机启动
# echo /usr/local/nginx/sbin/nginx >> /etc/rc.d/rc.local
报错处理小计。
storage启动报错
日志提示空间不足,需要删除无效的storage server,执行如下命令:
/usr/local/bin/fdfs_monitor /etc/fdfs/client.conf delete group1 10.3.45.231
nginx启动报错
[root@www data]# /usr/local/nginx/sbin/nginx -s reload
nginx: [warn] conflicting server name "10.3.45.232" on 0.0.0.0:80, ignored
nginx: [error] open() "/usr/local/nginx/logs/nginx.pid" failed (2: No such file or directory)
如果上面启动报错就是用下面启动方式:
[root@www logs]# /usr/local/nginx/sbin/nginx -c /usr/local/nginx/conf/nginx.conf


