3. SpringSecurity 自定义手机号登录
距离上一次更新,不知不觉已经过去了半个月了,人真的是不能放松,一放松就肆意妄为了。希望这个月内可以把 SpringSecurity 系列更新完毕吧,加油!。
OK,言归正传上一章我们利用 SpringSecurity 提供的一些可选配置,实现了自定义表单登录。但是在我们的日常需求中,仅仅是表单登录时满足不了的。所以这一章,我给大家带来 SpringSecurity 下自定义登录方式的示例。
首先我们选定我们的自定义登录方式,这里我们选择手机短信登录。显而易见,SpringSecurity 并没有给我们提供手机短信登录的简单配置集成方式,所以需要我们自己来进行实现。
我们先来分析一波,手机短信登录我们可以分为两个部分:
- 手机验证码校验
- 手机验证码校验应该是一个复用模块,因为不光登录可能会用到,注册、绑定等很多场景也都可能用到,并且这一块和 SpringSecurity 关系不大,我们放到后面,将其专门开发成一个 Lib。
- 手机号登录
- 通过了手机验证码校验,其实就是一个手机号登录了,按用户的手机号去数据库查询。所以我们现在主要完成第二块,手机号登录。
要自定义手机号登录,我们这里必须分析一下 SpringSecurity 的认证流程,具体源码在后面的章节我会带着大家去详细看一下,这里我们先来找一下 SpringSecurity 的认证流程,我们前面的章节已经可以使用表单登录了,那么我们就以表单登录的方式来跟踪一下原发,分析出认证流程,我们会以一下我们之前做了那些事:
- 我们指明了登录方式为 formLogin
- 我们通过设置配置,自定义认证路径
- 我们自定义了 UserDetailService 从数据库中查询用户信息
- 我们自定义了认证成功或失败处理器
然后我们来猜测一下可能的认证流程
-
用户发起认证请求,服务端从请求中取出参数
-
去数据库按参数进行查询,然后进行校验
-
最后做认证结果处理。
我们从 IDEA 点击查看 formLogin 方法
HttpSecurity 类
public FormLoginConfigurer<HttpSecurity> formLogin() throws Exception {
    // 发现这里 new 了一个 FormLoginConfigurer
    return (FormLoginConfigurer)this.getOrApply(new FormLoginConfigurer());
}
继续点击 FormLoginConfigurer 类进行查看,发现在 FormLoginConfigurer 的构造函数中创建了一个 UsernamePasswordAuthenticationFilter,并且设置了表单登录的参数名。
FormLoginConfigurer 类
public FormLoginConfigurer() {
    super(new UsernamePasswordAuthenticationFilter(), (String)null);
    this.usernameParameter("username");
    this.passwordParameter("password");
}
我们继续进入 UsernamePasswordAuthenticationFilter,我们发现这是一个过滤器,其次在它的构造函数里面指定了 /login 和 Post。(结合之前我们配置时说的,默认登录地址是 login + post),我们猜测这里是设置了拦截的 Url 和 Method,那么这个 Filter 应该就是认证的入口
UsernamePasswordAuthenticationFilter 类
public UsernamePasswordAuthenticationFilter() {
    super(new AntPathRequestMatcher("/login", "POST"));
}
我们继续看 Filter 的 处理方法,可以出在这个方法里面,从请求中取出了表单参数,并且将参数封装到了 UsernamePasswordAuthenticationToken 中,最后使用getAuthenticationManager().authenticate(authRequest); 进行认证,getAuthenticationManager 获取到的是一个 AuthenticationManager 对象,实际上是使用 AuthenticationManager 的 authenticate 方法进行认证。
UsernamePasswordAuthenticationFilter 类
public Authentication attemptAuthentication(HttpServletRequest request, HttpServletResponse response) throws AuthenticationException {
    if (this.postOnly && !request.getMethod().equals("POST")) {
        throw new AuthenticationServiceException("Authentication method not supported: " + request.getMethod());
    } else {
        String username = this.obtainUsername(request);
        String password = this.obtainPassword(request);
        if (username == null) {
            username = "";
        }

        if (password == null) {
            password = "";
        }

        username = username.trim();
        UsernamePasswordAuthenticationToken authRequest = new UsernamePasswordAuthenticationToken(username, password);
        this.setDetails(request, authRequest);
        return this.getAuthenticationManager().authenticate(authRequest);
    }
}
我们继续进入 authenticate 方法,发现其是一个接口方法,有很多实现类。没办法,我们只好将应用启动,进行 debug 断点跟踪。
public interface AuthenticationManager {
    Authentication authenticate(Authentication var1) throws AuthenticationException;
}
经过断点跟踪,我们发现实际上调用的是 ProviderManager 的 authenticate 方法,我们发现在该方法中,获取所有的 Providers,然后遍历,找出与封装的 Token 匹配的 Provider,调用其 authenticate 方法。
ProviderManager 类
public Authentication authenticate(Authentication authentication)
			throws AuthenticationException {
    	// 获取之前封装的 Token 类型
		Class<? extends Authentication> toTest = authentication.getClass();
		AuthenticationException lastException = null;
		Authentication result = null;
		boolean debug = logger.isDebugEnabled();

    	// 获取所有 providers,遍历之
		for (AuthenticationProvider provider : getProviders()) {
			// 判断 Provider 是否支持封装的 Token
            if (!provider.supports(toTest)) {
				continue;
			}

			if (debug) {
				logger.debug("Authentication attempt using "
						+ provider.getClass().getName());
			}

			try {
                // 调用 Provider 的认证方法
				result = provider.authenticate(authentication);

				if (result != null) {
					copyDetails(authentication, result);
					break;
				}
			}
			catch (AccountStatusException e) {
				prepareException(e, authentication);
				// SEC-546: Avoid polling additional providers if auth failure is due to
				// invalid account status
				throw e;
			}
			catch (InternalAuthenticationServiceException e) {
				prepareException(e, authentication);
				throw e;
			}
			catch (AuthenticationException e) {
				lastException = e;
			}
		}

		if (result == null && parent != null) {
			// Allow the parent to try.
			try {
                // 认证没有获取到结果,使用 parent 进行认证
				result = parent.authenticate(authentication);
			}
			catch (ProviderNotFoundException e) {
				// ignore as we will throw below if no other exception occurred prior to
				// calling parent and the parent
				// may throw ProviderNotFound even though a provider in the child already
				// handled the request
			}
			catch (AuthenticationException e) {
				lastException = e;
			}
		}

		if (result != null) {
            // 认证完毕后,调用 Token 的方法擦除掉敏感信息(eg: password...)
			if (eraseCredentialsAfterAuthentication
					&& (result instanceof CredentialsContainer)) {
				// Authentication is complete. Remove credentials and other secret data
				// from authentication
				((CredentialsContainer) result).eraseCredentials();
			}
			// 认证通过,发布认证成功消息
			eventPublisher.publishAuthenticationSuccess(result);
			return result;
		}

		// Parent was null, or didn't authenticate (or throw an exception).

		if (lastException == null) {
			lastException = new ProviderNotFoundException(messages.getMessage(
					"ProviderManager.providerNotFound",
					new Object[] { toTest.getName() },
					"No AuthenticationProvider found for {0}"));
		}

		prepareException(lastException, authentication);

		throw lastException;
	}
我们继续追踪 Provider 的 authenticate 方法,进入AbstractUserDetailsAuthenticationProvider 的 authenticate 方法,我们重点关注一下 retrieveUser 方法。
AbstractUserDetailsAuthenticationProvider 类
public Authentication authenticate(Authentication authentication)
      throws AuthenticationException {
   Assert.isInstanceOf(UsernamePasswordAuthenticationToken.class, authentication,
         messages.getMessage(
               "AbstractUserDetailsAuthenticationProvider.onlySupports",
               "Only UsernamePasswordAuthenticationToken is supported"));

   // Determine username
   String username = (authentication.getPrincipal() == null) ? "NONE_PROVIDED"
         : authentication.getName();

   boolean cacheWasUsed = true;
   // 从缓存中尝试获取用户信息
   UserDetails user = this.userCache.getUserFromCache(username);

   if (user == null) {
      cacheWasUsed = false;

      try {
         // 缓存没获取到,使用封装的 Token 尝试获取用户信息
         user = retrieveUser(username,
               (UsernamePasswordAuthenticationToken) authentication);
      }
      catch (UsernameNotFoundException notFound) {
         logger.debug("User '" + username + "' not found");

         if (hideUserNotFoundExceptions) {
            throw new BadCredentialsException(messages.getMessage(
                  "AbstractUserDetailsAuthenticationProvider.badCredentials",
                  "Bad credentials"));
         }
         else {
            throw notFound;
         }
      }

      Assert.notNull(user,
            "retrieveUser returned null - a violation of the interface contract");
   }

   try {
      // UserDetail 支持设置账户冻结、启用等四个状态,这里是对账户状态进行校验
      preAuthenticationChecks.check(user);
      // 进行密码校验,之前如果使用了 passwordEncoder 对密码进行加密,那么从数据库中取出来的应该是加
      //密过的密码,这里会对参数中的明文密码与数据库密码进行校验
      additionalAuthenticationChecks(user,
            (UsernamePasswordAuthenticationToken) authentication);
   }
   catch (AuthenticationException exception) {
      if (cacheWasUsed) {
         // There was a problem, so try again after checking
         // we're using latest data (i.e. not from the cache)
         cacheWasUsed = false;
         user = retrieveUser(username,
               (UsernamePasswordAuthenticationToken) authentication);
         preAuthenticationChecks.check(user);
         additionalAuthenticationChecks(user,
               (UsernamePasswordAuthenticationToken) authentication);
      }
      else {
         throw exception;
      }
   }

   postAuthenticationChecks.check(user);

   if (!cacheWasUsed) {
      this.userCache.putUserInCache(user);
   }

   Object principalToReturn = user;

   if (forcePrincipalAsString) {
      principalToReturn = user.getUsername();
   }
   // 将获取到的用户信息封装成一个 Authentication 返回
   return createSuccessAuthentication(principalToReturn, authentication, user);
}
我们发现 retrieveUser 方法是一个抽象方法,具体实现应该在子类中,继续追踪,发现实现在 DaoAuthenticationProvider 中,在 retrieveUser 方法中调用 UserDetailService 的 loadUserByUsername 方法,到了这里,大概的流程我们基本上就知道了。PS: UserDetailService 在系统中有多个实现,这里会使用哪个要看实际情况与设置,这个后面有机会说一下。
AbstractUserDetailAuthenticationProvider 类
protected abstract UserDetails retrieveUser(String username,
      UsernamePasswordAuthenticationToken authentication)
      throws AuthenticationException;
DaoAuthenticationProcider 类
protected final UserDetails retrieveUser(String username,
      UsernamePasswordAuthenticationToken authentication)
      throws AuthenticationException {
   UserDetails loadedUser;

   try {
      // 调用 UserDetailService 的 loadUserByUsername 方法
      loadedUser = this.getUserDetailsService().loadUserByUsername(username);
   }
   catch (UsernameNotFoundException notFound) {
      if (authentication.getCredentials() != null) {
         String presentedPassword = authentication.getCredentials().toString();
         passwordEncoder.isPasswordValid(userNotFoundEncodedPassword,
               presentedPassword, null);
      }
      throw notFound;
   }
   catch (Exception repositoryProblem) {
      throw new InternalAuthenticationServiceException(
            repositoryProblem.getMessage(), repositoryProblem);
   }

   if (loadedUser == null) {
      throw new InternalAuthenticationServiceException(
            "UserDetailsService returned null, which is an interface contract violation");
   }
   return loadedUser;
}
我们来总结一下整个认证流程,通过过滤器获取到请求参数,封装 Token,调用 ProviderManager 的 authenticate 方法,该方法实际上调用的 ProviderManager 管理的 Provider (认证逻辑的实现类) 的 authenticate 方法,最后调用 UserDetailService 去获取用户的信息。
- 首先通过 Filter 拦截用户请求,获取到参数
- 将参数封装成 Token
- 调用 AuthenticationManager 的 authenticated 方法。这里 AuthenticationManager 是接口,实际上调用的是 ProviderManager 的 authenticated 方法。从名字我们可以猜测出 ProviderManager 管理了很多 Provider
- 在 ProviderManager 的 authenticated 方法中,获取所有 Provider,遍历,按 Token 匹配,调用匹配到的 Provider 的 authentication 方法(这里表单登录实际上调用的是 DaoAuthenticationProvider 的方法)
- 最终调用的是 UserDetailService 的 loadUserByUsername 方法
- 查询出用户信息后,进行校验
- 校验通过后,发布认证成功信息。如果认证失败,会抛出异常,最终也会发布认证失败信息。
所以我们要自定义手机号登陆,需要做一下操作:
- 自定义一个 Filter 用来拦截手机号登陆
- 自定义一个 Token
- 自定义一个 Provider
- 自定义一个 UserDetailService 的实现
- 最终把上面这些自定义的类作为配置,加入到 SpringSecurity 的校验流程中去
OK,我们一步一步来:
自定义 SmsCodeAuthenticationToken
继承 AbstractAuthenticationToken 类,父类里面主要三个属性
- 权限集合 (Collection
- 客户端信息(Object detail)
- 是否通过认证(authenticated)
自己实现的 Token 在此基础上按照认证方式进行扩展,比如如果是表单登录,需要添加用户名、密码等。我们这里是短信验证码认证,只需要手机号即可。
- Token 主要在认证流程中装载数据。
- 下面单参数的构造方法,传递一个 mobile,是认证前用来存储认证参数的,此时默认将 authenticated 置为 false
- 双参数的构造方法,是用来状态获取到的用户信息,此时默认将 authenticate 置为 true,但是并不代表当前认证已经通过了。因为可能后面还有密码校验(表单登录时)、账号状态校验等。
/**
 * @author: hblolj
 * @Date: 2019/3/15 10:58
 * @Description: 认证前用来装载认证参数,认证通过后用来装载用户信息,因为短信验证码登录没有密码,将 credentials 移除了
 * @Version:
 **/
public class SmsCodeAuthenticationToken extends AbstractAuthenticationToken{

    private final Object principal;

    public SmsCodeAuthenticationToken(Object mobile) {
        super((Collection)null);
        this.principal = mobile;
        this.setAuthenticated(false);
    }

    public SmsCodeAuthenticationToken(Object principal, Collection<? extends GrantedAuthority> authorities) {
        super(authorities);
        this.principal = principal;
        super.setAuthenticated(true);
    }

    public void setAuthenticated(boolean isAuthenticated) throws IllegalArgumentException {
        if (isAuthenticated) {
            throw new IllegalArgumentException("Cannot set this token to trusted - use constructor which takes a GrantedAuthority list instead");
        } else {
            super.setAuthenticated(false);
        }
    }

    public void eraseCredentials() {
        super.eraseCredentials();
    }

    @Override
    public Object getCredentials() {
        return null;
    }

    public Object getPrincipal() {
        return this.principal;
    }
}
自定义 SmsCodeAuthenticationFilter
主要参考 UsernamePasswordAuthenticationFilter 来实现自定义 Filter。在 Filter 中主要要做的事情有以下几点:
-
指定 Filter 拦截的 Url 和 HttpMethod
-
完成拦截的逻辑代码
-
从请求中获取参数(手机号)
-
将参数封装成自定义的 Token,同时设置一下 Detail(主要是发起请求的客户端信息)
-
调用
AuthenticationManager的authenticated方法进行认证
-
/**
 * @author: hblolj
 * @Date: 2019/3/15 10:58
 * @Description:
 * @Version:
 **/
public class SmsCodeAuthenticationFilter extends AbstractAuthenticationProcessingFilter {

    // TODO: 2019/3/15 该参数可以抽取成配置,最后通过配置文件进行修改,这样作为共用组件只需要实现一个 default,具体值可以有调用者指定
    private String mobileParameter = "mobile";

    private boolean postOnly = true;

    /**
     * 通过构造函数指定该 Filter 要拦截的 url 和 httpMethod
     */
    protected SmsCodeAuthenticationFilter() {
        // TODO: 2019/3/15 pattern 可以抽取成配置,最后通过配置文件进行修改,这样作为共用组件只需要实现一个 default,具体值可以有调用者指定
        super(new AntPathRequestMatcher("/authentication/mobile", "POST"));
    }

    @Override
    public Authentication attemptAuthentication(HttpServletRequest request, HttpServletResponse response) throws AuthenticationException, IOException, ServletException {

        // 当设置该 filter 只拦截 post 请求时,符合 pattern 的非 post 请求会触发异常
        if (this.postOnly && !request.getMethod().equals("POST")) {
            throw new AuthenticationServiceException("Authentication method not supported: " + request.getMethod());
        } else {

            // 1. 从请求中获取参数 mobile + smsCode
            String mobile = obtainMobile(request);
            if (mobile == null){
                mobile = "";
            }

            mobile = mobile.trim();

            // 2. 封装成 Token 调用 AuthenticationManager 的 authenticated 方法,该方法中根据 Token 的类型去调用对应 Provider 的 authenticated
            SmsCodeAuthenticationToken token = new SmsCodeAuthenticationToken(mobile);
            this.setDetails(request, token);

            // 3. 返回 authenticated 方法的返回值
            return this.getAuthenticationManager().authenticate(token);
        }
    }

    protected String obtainMobile(HttpServletRequest request) {
        return request.getParameter(mobileParameter);
    }

    protected void setDetails(HttpServletRequest request, SmsCodeAuthenticationToken authRequest) {
        authRequest.setDetails(this.authenticationDetailsSource.buildDetails(request));
    }

    public String getMobileParameter() {
        return mobileParameter;
    }

    public void setMobileParameter(String mobileParameter) {
        Assert.hasText(mobileParameter, "mobileParameter parameter must not be empty or null");
        this.mobileParameter = mobileParameter;
    }

    public void setPostOnly(boolean postOnly) {
        this.postOnly = postOnly;
    }
}
自定义 SmsCodeAuthenticationProvider
SmsCodeAuthenticationProvider 实现 AuthenticationProvider 接口,其中有两个方法:
- authenticate: 主要是认证逻辑实现
- 在 authenticate 方法中主要的逻辑
- 从 token 取出参数,调用 UserDetailService 进行查询用户信息。UserDetailService 需要我们根据不同的业务实现不同的实现类,去数据库做不同的查询操作。
- 使用查询出的用户信息构造新的 SmsCodeAuthenticationToken
- 如果是表单登录,还要使用 PasswordEncoder 进行密码校验
- 如果系统有设置账号冻结相关设置,这里可以进行校验(按取出的用户信息)
- 最后返回 token。(如果返回的 result 不为 null,最后回去做密码擦除等操作,然后调用登录成功处理。)
- 在 authenticate 方法中主要的逻辑
- supports: 对 authenticate 的 参数进行校验,与 Provider 对应的 Token 进行比较,看是否是其子类或子接口。
PS: 这里注明一下,短信验证码校验应该在 SmsCodeAuthenticationFilter 之前就被校验了
/**
 * @author: hblolj
 * @Date: 2019/3/15 10:58
 * @Description: 短信验证码认证的真正校验逻辑,实际上是按手机号查询用户,短信验证码过滤器在这之前
 * @Version:
 **/
public class SmsCodeAuthenticationProvider implements AuthenticationProvider{

    private UserDetailsService userDetailsService;

    @Override
    public Authentication authenticate(Authentication authentication) throws AuthenticationException {

        SmsCodeAuthenticationToken token = (SmsCodeAuthenticationToken) authentication;

        // 对用户进行认证
        UserDetails userDetails = userDetailsService.loadUserByUsername((String) token.getPrincipal());
        if (userDetails == null){
            throw new InternalAuthenticationServiceException("未找到对应的用户信息!");
        }

        // 构造新的 Token,采用该构造函数时,会默认将 authenticated 参数置为 true
        SmsCodeAuthenticationToken authenticationToken = new SmsCodeAuthenticationToken(userDetails, userDetails.getAuthorities());
        authenticationToken.setDetails(token.getDetails());

        // TODO: 2019/3/15 如果认证方式与密码相关,这里可以对密码进行校验 @PasswordEncoder

        // TODO: 2019/3/15 可以校验账号状态: 启用、冻结等等
//        userDetails.isAccountNonExpired(); 账号是否过期
//        userDetails.isAccountNonLocked(); 账号有无冻结
//        userDetails.isCredentialsNonExpired(); 账号密码是否过期
//        userDetails.isEnabled(); 账号是否启用

        return authenticationToken;
    }

    @Override
    public boolean supports(Class<?> aClass) {
        // aClass 是 authenticate 方法参数的类型
        // 此处判断 aClass 是否是该 Provider 对应的 Token 的子类或者子接口,只有通过了,才会调用 authenticate 方法去认证
        return SmsCodeAuthenticationToken.class.isAssignableFrom(aClass);
    }

    public void setUserDetailsService(UserDetailsService userDetailsService) {
        this.userDetailsService = userDetailsService;
    }
}
自定义 UserDetailService
重写 loadUserByUsername 方法,按手机号查询。在实际开发中,这里可以提供一个默认缺省实现,真正的实现交给业务开发人员去实现。
/**
 * @author: hblolj
 * @Date: 2019/3/15 14:08
 * @Description:
 * @Version:
 **/
@Component("mobileUserDetailService")
public class MobileUserDetailService implements UserDetailsService{

    @Override
    public UserDetails loadUserByUsername(String mobile) throws UsernameNotFoundException {
        // TODO: 2019/3/15 按手机号查询用户信息
        return new User("4000368163", "123", true, true, true,
                true, AuthorityUtils.commaSeparatedStringToAuthorityList("admin"));
    }
}
自定义 SmsCodeAuthenticationSecurityConfig
经过上面的几步准备,现在万事俱备,只欠东风。我们只需要将 Filter 和 Provider 添加到 SpringSecurity 的认证链路当中(就可以召唤神龙了)即可。
- 继承
SecurityConfigurerAdapter类,重写该类中的configure(HttpSecurity)方法。(后面源码分析时,会分析这个类是怎样作用于配置的) - 在
configure方法中,首先初始化自定义的 Filter 和 Provider,最后使用 HttpSecurity 进行设置添加
/**
 * @author: hblolj
 * @Date: 2019/3/15 10:59
 * @Description:
 * @Version:
 **/
@Component
public class SmsCodeAuthenticationConfig extends SecurityConfigurerAdapter<DefaultSecurityFilterChain, HttpSecurity>{

    @Autowired
    private AuthenticationSuccessHandler successHandler;

    @Autowired
    private AuthenticationFailureHandler failureHandler;

    @Autowired
    private UserDetailsService mobileUserDetailService;

    @Override
    public void configure(HttpSecurity builder) throws Exception {

        // 1. 初始化 SmsCodeAuthenticationFilter
        SmsCodeAuthenticationFilter filter = new SmsCodeAuthenticationFilter();
        filter.setAuthenticationManager(builder.getSharedObject(AuthenticationManager.class));
        filter.setAuthenticationSuccessHandler(successHandler);
        filter.setAuthenticationFailureHandler(failureHandler);

        // 2. 初始化 SmsCodeAuthenticationProvider
        SmsCodeAuthenticationProvider provider = new SmsCodeAuthenticationProvider();
        provider.setUserDetailsService(mobileUserDetailService);

        // 3. 将设置完毕的 Filter 与 Provider 添加到配置中,将自定义的 Filter 加到 UsernamePasswordAuthenticationFilter 之前
        builder.authenticationProvider(provider).addFilterBefore(filter, UsernamePasswordAuthenticationFilter.class);
    }
}
最后,将自定义的 config 添加到配置中,主要使用 apply 方法将我们自定义的 config 加入到 SpringSecurity 中,同时设置手机登录地址访问不需要认证,不然就没法使用了。
@Autowired
private SmsCodeAuthenticationConfig smsCodeAuthenticationConfig;

 @Override
protected void configure(HttpSecurity http) throws Exception {

    http.apply(smsCodeAuthenticationConfig) // 加载短信验证
        .and()
        .formLogin() // 指定登录认证方式为表单登录
      //.loginPage("http://www.baidu.com") //指定自定义登录页面地址,一般前后端分离,这里就用不到了
        .loginProcessingUrl("/authentication/form") // 自定义表单登录的 action 地址,默认是 /login
        .successHandler(authenticationSuccessHandler)
        .failureHandler(authenticationFailureHandler)
        .and()
        .authorizeRequests()
        // 设置手机登录地址不需要校验
        .antMatchers("/authentication/mobile").permitAll()
        .antMatchers(
        securityProperties.getBrowser().getSignUpUrl()).permitAll() // 允许登录页面不需要认证就可以访问,不然会死循环导致重定向次数过多
        .anyRequest() // 对所有的请求
        .authenticated() // 都进行认证
        .and()
        .csrf()
        .disable();
}
然后启动服务,因为是 post 请求,我们打开 postman 进行模拟,这里我对DefaultAuthenticationSuccessHandler 做了一下处理,使其返回 principal.toString()
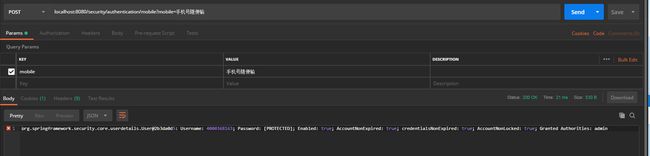
如图所示,证明我们配置的手机号认证流程已经生效了。
同理,除了手机号的自定义登录,我们还可以自定义其他的登录方式,比如微信公众号开发中,我们需要使用用户的 OpenId 来登录,就可以按这个模式来处理(最终更新完后,我会将代码实现上传到 Github 上,到时候会包含这个 weixin openId 登录,这里大家感兴趣的话,可以自己先实现以下)。
不过 QQ 登录和 WeiXin 的快捷登录又不一样,属于第三方登录,要使用 SpringSocial + OAuth2 来开发。这个我会放到后面几章去讲解。
下一章的话,会带大家处理一下在 SpringSecurity 下的 Session 管理与登出。To Be Continue!