VideoView播放视频初体验
转载请标明出处:http://blog.csdn.net/EdisonChang/article/details/52087248
这几个月一直在忙项目上的事情,所以已经有一段时间不写博客,抽时间整理下最近的收藏夹,感觉还是有一些新的知识点可以分享的。
先从最近的说起,近期项目上需要支持视频播放功能,虽然第三方的播放器在播放体验上会比原生的好太多,而且基本上也不需要额外的处理。刚开始也考虑过要接入公司的播放器sdk,当然github上也有很多开源库都是不错的,但是唯一的弊病就是sdk太大了,所以就没有考虑这一些第三方库,而直接用了系统的videoView 原生视频播放组件,过程中遇到的一些问题在这里做一下简单的记录。
博主在这个过程中也参照了很多资料,有些文章知识点总结的还是比较到位的,先推荐几篇相关的文章,
1、[Android基础] VideoView
2、Android三种播放视频的方式
3、Android播放器框架分析之AwesomePlayer
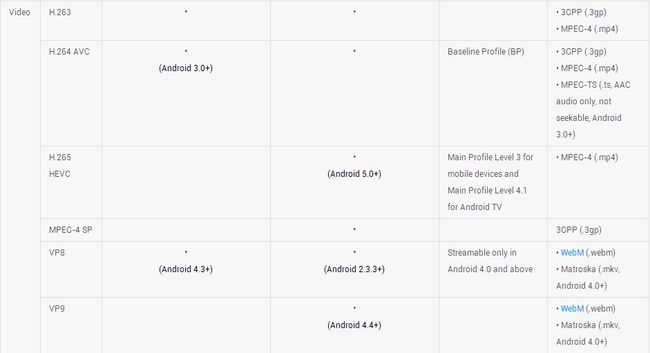
(1)android支持的视频编码格式
(2)如何使用VideoView
        videoView = (VideoView) root.findViewById(R.id.videoView);
        //设置播放完成以后监听
        videoView.setOnCompletionListener(mOnCompletionListener);
        //设置发生错误监听,如果不设置videoview会向用户提示发生错误
        videoView.setOnErrorListener(mOnErrorListener);
        //设置在视频文件在加载完毕以后的回调函数
        videoView.setOnPreparedListener(mOnPreparedListener);
        Uri uri = Uri.parse(mUrl);
        videoView.setVideoURI(uri);
一般情况下我们需要自己能够自定义视频控制器,
<RelativeLayout xmlns:android="http://schemas.android.com/apk/res/android"
                android:layout_width="match_parent"
                android:layout_height="match_parent"
>
    <VideoView
            android:id="@+id/videoView"
            android:layout_width="match_parent"
            android:layout_height="match_parent"/>
    <ProgressBar
            android:id="@+id/progressBar"
            android:layout_width="wrap_content"
            android:layout_height="wrap_content"
            android:layout_centerInParent="true"/>
    <xxx.xxx.MediaController
            android:id="@+id/media_controller"
            android:layout_width="match_parent"
            android:layout_height="match_parent">

    xxx.xxx.MediaController>
RelativeLayout>
MediaController 就是一个简单的layout,可以包括seekbar 、暂停控制等,代码配置如下:
        mediaController = (MediaController) root.findViewById(R.id.media_controller);
        mediaController.setVideoView(videoView);
VideoView提供诸多方法供开发者调用,开发简单的播放器通常了解以下api 够用了,
public void start()
//开始播放。

public void pause()
//暂停播放。

public void resume()
//恢复播放,从头开始播放

public long getDuration()
//获取视频播放时长。

public long getCurrentPosition()
//获取当前播放位置。

public void seekTo(long msec)
//设置播放位置,可以和seekbar联合起来使用
(3)全屏播放 - 横竖屏切换
activity 在Androidmanifest.xml 中依然定义竖屏, 可以在mediaController中定义一个方法控制全屏的切换,
<activity
  android:name="com.example.test.VideoActivity"
  android:configChanges="keyboard|orientation|screenSize"
  android:screenOrientation="portrait"
  android:theme="@style/Theme.AppCompat.Light.NoActionBar"/>
这里需要注意的是,需要在 VidioView 外层套一个容器,如布局中RelativeLayout ,此处定义为root,直接上代码,
 public void switchSize(Activity activity, View root) {
        if (!fullscreen) {
            activity.setRequestedOrientation(orientation);
            WindowManager.LayoutParams attrs = activity.getWindow().getAttributes();
            attrs.flags |= WindowManager.LayoutParams.FLAG_FULLSCREEN;
            activity.getWindow().setAttributes(attrs);
            activity.getWindow().addFlags(WindowManager.LayoutParams.FLAG_LAYOUT_NO_LIMITS);

            RelativeLayout.LayoutParams rootParams = new RelativeLayout.LayoutParams(RelativeLayout.LayoutParams.MATCH_PARENT, RelativeLayout.LayoutParams.MATCH_PARENT);
            root.setLayoutParams(rootParams);

            RelativeLayout.LayoutParams layoutParams = new RelativeLayout.LayoutParams(RelativeLayout.LayoutParams.MATCH_PARENT, RelativeLayout.LayoutParams.MATCH_PARENT);
            layoutParams.addRule(RelativeLayout.CENTER_IN_PARENT);

            videoView.setLayoutParams(layoutParams);
            videoView.getHolder().setSizeFromLayout();
            mediaController.setIconResource(R.drawable.icon_video_cancel_full);

            fullscreen = true;
        } else {
            activity.setRequestedOrientation(ActivityInfo.SCREEN_ORIENTATION_PORTRAIT);

            WindowManager.LayoutParams attrs = activity.getWindow().getAttributes();
            attrs.flags &= (~WindowManager.LayoutParams.FLAG_FULLSCREEN);
            activity.getWindow().setAttributes(attrs);
            activity.getWindow().clearFlags(WindowManager.LayoutParams.FLAG_LAYOUT_NO_LIMITS);

            RelativeLayout.LayoutParams rootParams = (RelativeLayout.LayoutParams) root.getLayoutParams();
            rootParams.height = DensityUtils.dp2px(activity, 200);
            root.setLayoutParams(rootParams);

            RelativeLayout.LayoutParams layoutParams = new RelativeLayout.LayoutParams(RelativeLayout.LayoutParams.MATCH_PARENT, RelativeLayout.LayoutParams.MATCH_PARENT);
            layoutParams.addRule(RelativeLayout.CENTER_IN_PARENT);
            videoView.setLayoutParams(layoutParams);
            videoView.getHolder().setSizeFromLayout();

            mediaController.setIconResource(R.drawable.icon_video_full);
            fullscreen = false;
        }
    }
细心的朋友会发现,在切换全屏的时候并不是直接将视频转为横屏,而是通过activity.setRequestedOrientation(orientation)来控制。这其实是一个细节问题,实际开发过程中,每个视频的尺寸是不一样的,考虑到视频源的尺寸问题,并不是每一个视频都是宽大于高,而且也不是所有的手机屏幕都是高大于宽的(如pad,模拟器等)。而orientation 可以在视频加载onPrepared 回调后进行设置。
  private void treatOrientation(MediaPlayer mp) {
        int width = mp.getVideoWidth();
        int height = mp.getVideoHeight();
        if (width != 0 && height != 0) {
            int screenWidth = DeviceUtils.getScreenWidth(ContextUtils.getApplicationContext());
            int screenHeight = DeviceUtils.getScreenHeight(ContextUtils.getApplicationContext());
            if (width > height) {
                if (screenHeight > screenWidth) {
                    this.orientation = ActivityInfo.SCREEN_ORIENTATION_LANDSCAPE;
                } else {
                    this.orientation = ActivityInfo.SCREEN_ORIENTATION_PORTRAIT;
                }
            } else {
                if (screenHeight > screenWidth) {
                    this.orientation = ActivityInfo.SCREEN_ORIENTATION_PORTRAIT;
                } else {
                    this.orientation = ActivityInfo.SCREEN_ORIENTATION_LANDSCAPE;
                }
            }
        }
    }
以上设置的切换效果,视频会按照原来的比例充满屏幕,视频不会得到拉伸,如果不考虑视频的拉伸直接充满屏幕,可以用下面的方式配置
  RelativeLayout.LayoutParams LayoutParams = new RelativeLayout.LayoutParams(RelativeLayout.LayoutParams.MATCH_PARENT, RelativeLayout.LayoutParams.MATCH_PARENT);
        LayoutParams.addRule(RelativeLayout.ALIGN_PARENT_BOTTOM);
        LayoutParams.addRule(RelativeLayout.ALIGN_PARENT_TOP);
        LayoutParams.addRule(RelativeLayout.ALIGN_PARENT_LEFT);
        LayoutParams.addRule(RelativeLayout.ALIGN_PARENT_RIGHT);
        videoView.setLayoutParams(LayoutParams);
或者继承VideoView后重写onMeasure方法
@Override
protected void onMeasure(int widthMeasureSpec, int heightMeasureSpec) {
  int width = getDefaultSize(mVideoWidth, widthMeasureSpec);
  int height = getDefaultSize(mVideoHeight, heightMeasureSpec);
  ......
  setMeasuredDimension(width, height);
}
(4)暂停/恢复 页面时,视频重新加载
 public void onPause() {
        videoPos = mediaController.getPosition();
        videoView.stopPlayback();
    }

    public void onResume() {
        videoView.resume();
        mediaController.seekToPosition(videoPos);
    }
一般情况下在视频播放时,页面 onPause() 再onResume, videoView 会重新开始播放。
比较取巧的处理方案是在 onPause() 的时候记录当前播放进度位置,在 onResume() 的时候拖动到该进度位置,但是这种情况下依然会有黑屏或者透明的现象,关于黑屏或者透明的原因博文后面会有介绍。
但是VideoView自身的加载机制就是这样的,每次都会重新加载。如果播放的是本地视频,那么这个问题容易解决:在按下home或者关机键后保存当前播放的帧到本地变量中,然后重新可见的时候通过调用seekTo方法跳到之前保存的帧,同时调用pause()方法暂停播放,就可以达到效果。但是如果播放的是网络视频的话,就需要在视频缓冲准备的时候设置一个缓冲背景(视频正在缓冲中。。。),等加载完毕后再执行刚才的流程。
此外这里还有一个细节要注意,在activity onPause 时调用的是mVideoView.stopPlayback()方法,而不是pause ,这个细节非常重要,通过源码来看下这两个方法的异同点。
public void stopPlayback() {
        if (mMediaPlayer != null) {
            mMediaPlayer.stop();
            mMediaPlayer.release();
            mMediaPlayer = null;
            mCurrentState = STATE_IDLE;
            mTargetState  = STATE_IDLE;
        }
    }
    public void pause() {
        if (isInPlaybackState()) {
            if (mMediaPlayer.isPlaying()) {
                mMediaPlayer.pause();
                mCurrentState = STATE_PAUSED;
            }
        }
        mTargetState = STATE_PAUSED;
    }
调用stopPlayback后系统会将mMediaPlayer 释放,这样可以解决视频缓冲时activity退到后台导致的内存问题。 另外一点在activity onResume 的时候,为什么需要调用videoView.resume(),而不是videoview 的start() 方法呢?
这个问题就比较好理解了,应用按home键后,activity会运行在后台,等系统低内存的时候会有概率将activity回收,当activity恢复到前台后需要重新再次调用mediaPlayer.prepareAsync 才能再次正常加载视频, 所以如果直接调用start 方法再很多情况下是播不了视频的。当然为了确保恢复到前台后的进度和之前一样,我们在onResume 后还有一个seekto的操作 。
在拖动视频播放进度条,手动seekTo后经常会碰到进度跳动的情况,这也是视频播放器普遍存在的问题,主要还是和视频格式和分片的位置有关系,暂时也没有好的解决方法。感兴趣的朋友,可以参考 关于Android VideoView seekTo不准确的解决方案。
(5)透明或者黑屏问题
VideoView 继承于SurfaceView,关于SurfaceView出现黑屏或者透明的问题,[Android基础] VideoView 这篇文章也提到了。
The surface is Z ordered so that it is behind the window holding its SurfaceView; the SurfaceView punches a hole in its window to allow its surface to be displayed. The view hierarchy will take care of correctly compositing with the Surface any siblings of the SurfaceView that would normally appear on top of it. This can be used to place overlays such as buttons on top of the Surface, though note however that it can have an impact on performance since a full alpha-blended composite will be performed each time the Surface changes.
这是SurfaceView类的说明,解释了出现透明的原因,也提供了解决问题的思路,最简单的解决方法就是将SurfaceView挪到上层。
videoView.setZOrderOnTop(true);冰川孤辰 在文章中也提到了这种方法的缺点并给出了另外一种解决方案,
不过挪动之后就可以设置VideoView的背景,此时才不会遮盖实际的视频绘图了,xml中指定吧,这里省略,不过如果VideoView区域还有其他控件的话,会被遮盖,所以最后我就没设定zorderOnTop了,而是直接在xml中指定VideoView的背景色,然后在onPrepare回调的时候,去掉背景即可(按需延时,或者在有播放进度,要更新进度条的时候进行去掉背景操作都ok,不然可能会有一瞬间的透明):
但是解决的并不彻底,实际上onPrepared只是告诉我们视频已经准备好了,确没有真正开始播放,所以在onPrepare回调时把视频的背景设为透明,在一些视频缓冲慢的场景下依然会出现透明或者黑屏。
解决的方法可以在onPrepared回调后,加一个setOnInfoListener的监听等到视频真正开始播放后再去掉VideoView 的背景。
@Override
  public void onPrepared(MediaPlayer mp) {
    mp.setOnInfoListener(new MediaPlayer.OnInfoListener() {
      @Override
      public boolean onInfo(MediaPlayer mp, int what, int extra) {

        if (what == MediaPlayer.MEDIA_INFO_VIDEO_RENDERING_START) {
          // video started
           videoView.setBackgroundColor(Color.TRANSPARENT);
          return true;
        }
        return false;
      }
    });
还有很多地方没有讲到,如果大家有兴趣可以留言,有问题的地方也欢迎留言指正,多谢!