Gatling是一款基于Scala 开发的高性能服务器性能测试工具,它主要用于对服务器进行负载等测试;想使用Gatling进行压测的原因之一是想体验一下Scala编程的感觉,玩一下;第二,工作上也确实有这样的需求;
压测工作简单来说就是利用压测应用,来测试一下服务器的响应性能参数;然后把这些工作全部自动化,集成到jenkins中来运行。
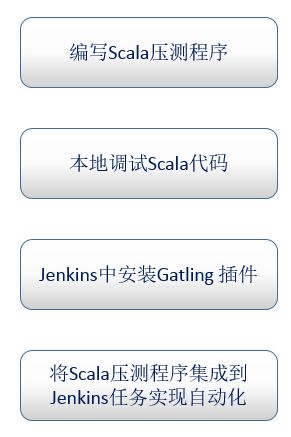
整个工作的子任务分解可以由下图来表示:
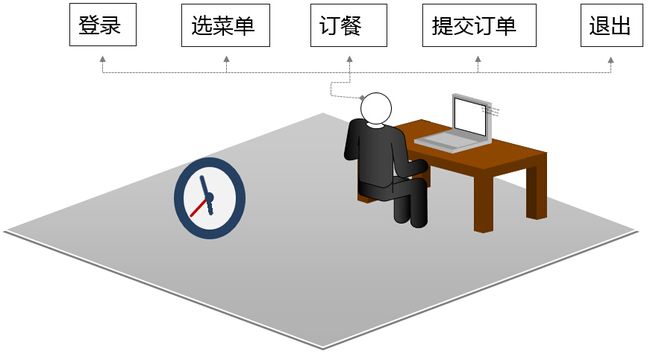
压测使用的是一个常见的web应用,该web应用的具体使用的业务场景如下:
针对该应用的压测Scala源代码如下:
文件名:performance.scala
package performance

import scala.concurrent.duration._

import io.gatling.core.Predef._
import io.gatling.http.Predef._
import io.gatling.jdbc.Predef._

class Performance extends Simulation {

  //用户名、餐馆ID 存储文件
  val user = csv("/root/.jenkins/workspace/testGatling/src/test/scala/data/user.csv").random
  val res = csv("/root/.jenkins/workspace/testGatling/src/test/scala/data/restaurant.csv").random
  val ip = csv("/root/.jenkins/workspace/testGatling/src/test/scala/data/ip.csv").random

  val httpProtocol = http
    .baseURL("http://${ip}:8180")

  val headers_0 = Map("Accept" -> "text/html,application/xhtml+xml,application/xml;q=0.9,*/*;q=0.8")

  val scn = scenario("Emenu")
    //打开订餐首页
    .exec(http("index")
    .get("/E_Menu/userlogin/login.jsp")
    .headers(headers_0))

    //登录
    .pause(1 second,20 second)
    .feed(user)
    .feed(res)
    .exec(http("login")
    .post("/E_Menu/userlogin/login")
    .headers(headers_0)
    .formParam("username", "${username}")
    .formParam("password", "${password}")
    )

    //选择餐馆
    .pause(1 second,20 second)
    .exec(http("menu")
    .get("/E_Menu/menu.action?res_num=${rest_id}")
    .headers(headers_0)
    )
    //点菜
    .pause(1 second,20 second)
    .exec(addCookie(Cookie("username", "${username}")))
    .exec(addCookie(Cookie("res_num", "${rest_id}")))
    .exec(addCookie(Cookie("food_num0", "105")))
    .exec(addCookie(Cookie("food_num1", "104")))
    .exec(addCookie(Cookie("food_num2", "104")))
    .exec(addCookie(Cookie("food_num3", "106")))
    .exec(addCookie(Cookie("total", "52")))
    .exec(http("list") //点完菜,开始订
    .get("/E_Menu/list.action")
    .headers(headers_0)
    )
    //下单
    .pause(1 second,20 second)
    .exec(http("order")
    .get("/E_Menu/order.action?people=5&time=2025-08-31")
    .headers(headers_0)
    )

    //    //回首页
    .pause(1 second,20 second)
    .exec(http("restaurant")
    .get("/E_Menu/restaurant.action")
    .headers(headers_0)
    )

    //用户信息
    .pause(1 second,20 second)
    .exec(http("userinfo")
    .get("/E_Menu/userinfo?username=${username}")
    .headers(headers_0)
    )

    //我的订单
    .pause(1 second,20 second)
    .exec(http("userorder")
    .get("/E_Menu/userorder.action?username=${username}")
    .headers(headers_0)
    )

    //退出
    .pause(1 second,20 second)
    .exec(http("exit")
    .get("/E_Menu/userlogin/login.jsp")
    .headers(headers_0))

  setUp(scn.inject(atOnceUsers(100))).protocols(httpProtocol)
}
写完scala代码,并且保证它在本地可以调试通过,下一步就是需要将代码集成进jenkins;
先确保jenkins Gatling Plugin在jenkins上被安装;
之后,写入用来执行的shell调控代码:
#################### 环境准备 ####################
pwd
export IP="xx.xx.xx.xx"
export user="root"
export pwd="xxxxxxxxxx"
export tomcat_path="/root/apache-tomcat-7.0.56/bin"
export killtomcat="/root/killtomcat.sh"
#################### 定义函数 ####################
kill_tomcat7(){
expect -c "
spawn ssh $user@$IP sh $killtomcat;
expect {
yes/no { send yes\r;exp_continue }
*password: { send $pwd\r }
};
expect eof;
"
}
start_tomcat(){
expect -c "
spawn ssh $user@$IP sh $tomcat_path/$1;
expect {
yes/no { send yes\r;exp_continue }
*password: { send $pwd\r }
};
expect eof;
"
}
#################### tomcat压测 ####################
停止tomcat
kill_tomcat7
启动tomcat
start_tomcat startup_non.sh
mvn gatling:execute -Dgatling.simulationClass=performance.Performance
#################### 完毕 ####################
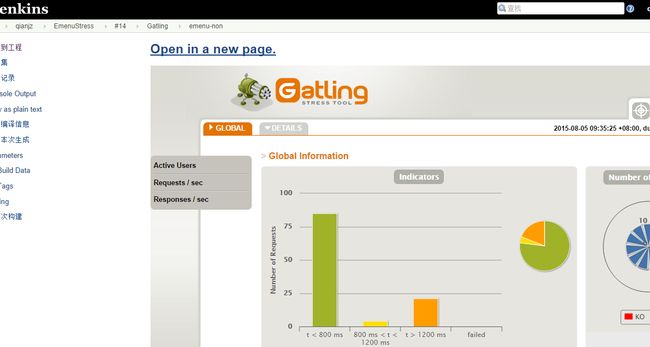
参考截图如下:
在完成调试改bug工作之后,可以尝试运行一下,得到压测结果 Gatling report ,然后可以进行相关的数据分析,这里不再赘述。
Jenkins 集成 Gatling Report参考截图如下:
11 个赞 关注 收藏
所以具体实现过程我这里不多写了,我重点写下对生成的HTML测试报告进行优化。
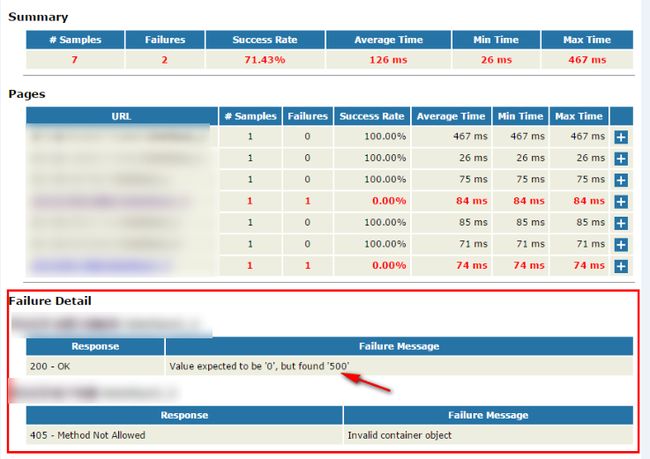
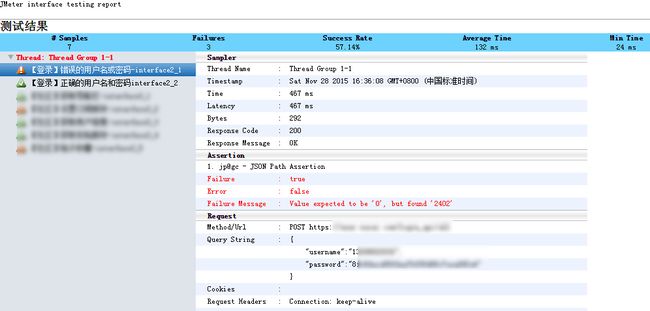
如果按JMeter默认设置,生成报告如下:
从上图可以看出,结果信息比较简单,对于运行成功的case,还可以将就用着。但对于跑失败的case,就只有一行assert错误信息。(信息量太少了,比较难找到失败原因)
优化大致过程
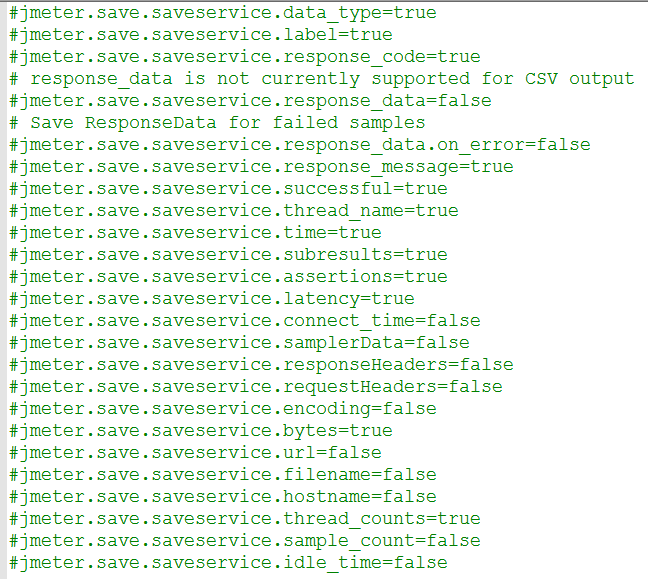
1、修改jmeter.properties文件,打开一些输出内容开关(下图根据需要选择相关项,具体就不用多说了吧)
2、制定一份自己的输出模板。(不用默认的jmeter_home/extras/jmeter-results-detail-report.xsl模板,也可以网上自己找份。)
3、最后执行,生成对应的HTML报告(一般我们都在linux环境 下运行,语句大致如下,其中my_project_template.xsl就上第2步说的定制模板,这个是网上找的一份。)
xsltproc $jmeter_home/extras/my_project_template.xsl $my_project_workspace/result/jtl/$test_name/${test_name}.jtl > $my_project_workspace/result/html/$test_name/${test_name}.html
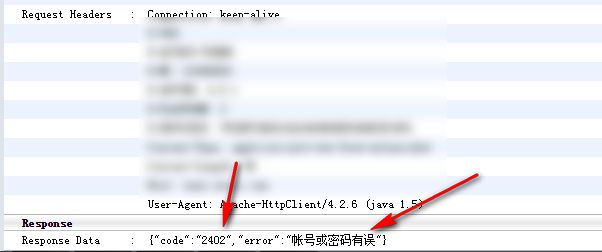
最后报告如下:
优化后的HTML报告,多了接口地址、接口参数、Headers信息(包括cookie、session),而且有返回结果。失败原因一目了然[图片上传失败...(image-9cb8f5-1527240193077)]
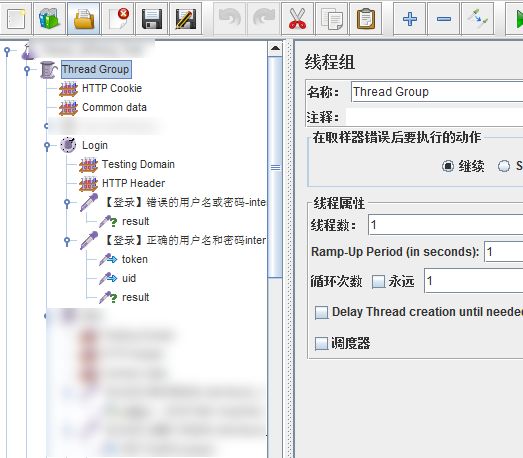
最后附上我的jmeter文件样本:
什么是mock server
mock:英文可以翻译为模仿的,mock server是我们用来解除依赖(耦合),假装实现的技术,比如说,前端需要使用某些api进行调试,但是服务端并没有开发完成这些api,那么前端的工作就被服务端阻塞了,那么就可以使用mock server假装实现这些api,能够返回特定的数据,帮助前端进行页面渲染,当然我们为了方便可以需要与服务端进行约定,约定接口的内容是什么。
restful接口规范
转接阮一峰老师的博客—RESTful API 设计指南:http://www.ruanyifeng.com/blog/2014/05/restful_api.html
Moco-约定uri(一)
moco工具是在github开源的一个项目,可以使用moco工具搭一个简单的mock server方便我们进行调试,github地址:https://github.com/dreamhead/moco,下载下来的是一个jar包,目前的版本是0.11.1,首先我们要编写一个config文件,把我们需要“模拟”的请求和响应写入这个配置文件,配置文件是json格式的,接下来我们写一个比较简单的请求,访问 localhost:12306/hello 接口,返回一个纯文本“moco”,moco工具约定了12306端口,不必纠结,就跟tomcat约定8080端口类似,config.json文件如下,而且json文件要与moco的jar包放在同一个文件夹下。比如博主的目录结构:
G:\学习资料\mock\moco-runner-0.11.1-standalone.jar
G:\学习资料\mock\config.json
[
    {
        "request":
        {
            "uri":"/hello"
        },
        "response":
        {
            "text":"moco"
        }
    }
]
配置文件比较简单,我们请求接口,返回一个纯文本,启动指令:
>java -jar moco-runner-0.11.1-standalone.jar http -p 12306 -c config.json
这里的http就是http协议, -p 12306 绑定端口号12306, -c config.json读config文件
看到以上的表现,就说明moco已经顺利启动了,我们访问localhost:12306/hello 看到结果如下就说明mock server顺利返回了我们约定的数据”moco”
Moco-约定uri(二)
修改config文件如下,注意这里moco工具能实时监测到json配置文件的变化,并自行重启server
[
    {
        "request":
        {
            "uri":"/"
        },
        "response":
        {
            "text":"welcome to Moco"
        }
    },
    {
        "request":
        {
            "uri":"/hello"
        },
        "response":
        {
            "text":"moco"
        }
    }
]
接下来分别访问localhost:12306和12306:12306/hello,结果如下:
Moco-约定get请求
[
    {
        "request":
        {
            "method":"get",
            "uri":"/get"
        },
        "response":
        {
            "text":"moco get"
        }
    }
]
Moco-约定post请求
[
    {
        "request":
        {
            "method":"post",
            "uri":"/post"
        },
        "response":
        {
            "text":"moco post"
        }
    }
]
Moco-约定请求参数
[
    {
        "request":
        {
            "method":"get",
            "uri":"/get",
            "queries":
            {
                "id":"12306",
                "name":"moco"
            }
        },
        "response":
        {
            "text":"moco queries"
        }
    }
]
Moco-约定请求body必须为json格式
[
    {
        "request":
        {
            "method":"post",
            "uri":"/post",
            "text":
            {
                "json":"{\"id\":\"12306\",\"name\":\"moco\"}"
            }
        },
        "response":
        {
            "status":"200"
        }
    }
]
Moco-约定请求头部
[
    {
        "request":
        {
            "method":"post",
            "uri":"/post",
            "headers":
            {
                "content-type":"application/json",
                "Connection":"keep-alive",
                "Content-Encoding":"gzip"
            }
        },
        "response":
        {
            "status":"200"
        }
    }
]
Moco-约定返回内容
前面已经看到了response的集中返回内容如text,和status,下面展示一下返回文件和设置文件格式等
[
    {
        "request":
        {
            "method":"post",
            "uri":"/post",
        },
        "response":
        {
            "file":"data.js",
            "charset":"GBK",
            "version":"HTTP/1.0"
        }
    }
]
Moco-约定返回状态码
见上述的几个json,里面已经包含了返回状态码的使用方式
Moco-在单元测试中的使用(以Python为例)
[
    {
        "request":
        {
            "method":"get",
            "uri":"/api/hello"
        },
        "response":
        {
            "text":"hello Savitar!",
            "status":200
        }
    }
]
这里模拟一个get请求,返回纯文本“hello Savitar!”和状态码200,先在浏览器访问localhost:12306/api/hello 结果如下图:
说明接口返回没问题,接下来使用Python requests+unittest写一个简单的接口测试用例
#coding=utf-8
'''
@author=Savitar
'''
import unittest
import requests

class MocoTestApi(unittest.TestCase):
    def setUp(self):
        self.url = "http://localhost:12306"
    def test_moco_test_api(self):
        api = "/api/hello"
        url = self.url+api
        r = requests.get(url)
        self.assertEqual(r.status_code,200)
        self.assertEqual(r.text,"hello Savitar!")
    def tearDown(self):
        pass

if __name__ == '__main__':
    unittest.main()
