在之前的文章中,其实已经对镜像做出了说明,镜像其实就是容器中的文件系统,也可以说是一个极度精简的Linux程序运行环境。而在上一篇文章的末尾,运行第一个docker(hello-world)的输出也给出了容器运行的相关步骤说明,其中就包含镜像的获取,Docker守护进程从Docker Hub上拉取一个名为hello-world的镜像到本地,然后Docker守护进程创建一个新的容器,从而输出信息到终端。
Docker镜像仓库:
镜像存储中的核心概念仓库(Repository)是镜像存储的位置。Docker注册服务器(Registry)是仓库存储的位置。每个仓库包含不同的镜像。
比如一个镜像名称 ubuntu:14.04,冒号前面的ubuntu是仓库名,后面的14.04是TAG,不同的TAG可以对应相同的镜像,TAG通常设置为镜像的版本号。
Docker Hub 是Docker官方提供公共仓库,提供大量的常用镜像,由于国内网络原因经常连接Docker Hub会比较慢,所以我们也可以选择一些国内提供类似Docker Hub镜像服务站点。比如网易云、阿里云以及DaoCloud等,我们可以使用它们所提供的加速服务来更加快捷的从Docker Hub上拉取镜像。这里为了后面介绍镜像的管理更加方便,我们先进行Docker镜像站点的配置。
修改Docker镜像站点:
[root@centos7 docker]# cat /etc/docker/daemon.json
{}
[root@centos7 docker]# echo > /etc/docker/daemon.json
[root@centos7 docker]# cat >> /etc/docker/daemon.json << EOF
> {
>     "registry-mirrors": ["https://registry.docker-cn.com"]
> }
> EOF
[root@centos7 docker]# cat /etc/docker/daemon.json
{
    "registry-mirrors": ["https://registry.docker-cn.com"]
}
[root@centos7 docker]# systemctl restart docker
查找镜像:
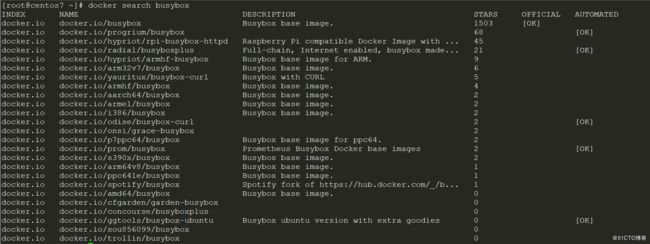
docker search [image_name][:tag]
上面的实例是在Docker Hub上查找所有名称带有busybox的镜像,命令执行后的输出包含如下几列:
索引(INDEX)
仓库名:镜像所在的仓库名称
镜像描述:对镜像的描述
星级(STARS):用户评价,反映出一个镜像的受欢迎程度
是否官方(OFFICIAL):是否是官方推出并维护的镜像(比如Ubuntu,CentOS等在Docker Hub上都有官方团队管理维护的镜像)
自动构建(AUTOMATED):标识这个镜像是由Docker Hub的自动构建(Automated Build)流程创建的
该命令一共包含如下参数:
-f, --filter filter :根据提供的条件检索输出结果
--limit int :限定输出结果的最大值
--no-index :不截断输出结果
--no-trunc :不截断输出结果
[root@centos7 ~]# docker search --filter=is-official=true busybox
INDEX       NAME                DESCRIPTION           STARS     OFFICIAL   AUTOMATED
docker.io   docker.io/busybox   Busybox base image.   1503      [OK]
[root@centos7 ~]# docker search -f "is-official=true" busybox
INDEX       NAME                DESCRIPTION           STARS     OFFICIAL   AUTOMATED
docker.io   docker.io/busybox   Busybox base image.   1503      [OK]
[root@centos7 ~]# docker search -f "stars=10" busybox
INDEX       NAME                                  DESCRIPTION                                     STARS     OFFICIAL   AUTOMATED
docker.io   docker.io/busybox                     Busybox base image.                             1503      [OK]
docker.io   docker.io/progrium/busybox                                                            68                   [OK]
docker.io   docker.io/hypriot/rpi-busybox-httpd   Raspberry Pi compatible Docker Image with ...   45
docker.io   docker.io/radial/busyboxplus          Full-chain, Internet enabled, busybox made...   21                   [OK]
# 注意:这里的stars=10检索的结果并没有星级等于10的,因为stars=10是filter的参数格式要求,这里的检索条件等同于检索星级最低为10且名称包含busybox的镜像。
[root@centos7 ~]# docker search --no-trunc -f "is-official=true" -f "stars=10" busybox
INDEX       NAME                DESCRIPTION           STARS     OFFICIAL   AUTOMATED
docker.io   docker.io/busybox   Busybox base image.   1503      [OK]
[root@centos7 ~]# docker search --no-trunc --limit 25 -f "is-automated=true" -f "stars=2"  busybox
INDEX       NAME                           DESCRIPTION                                                                               STARS     OFFICIAL   AUTOMATED
docker.io   docker.io/progrium/busybox                                                                                               68                   [OK]
docker.io   docker.io/radial/busyboxplus   Full-chain, Internet enabled, busybox made from scratch. Comes in git and cURL flavors.   21                   [OK]
docker.io   docker.io/odise/busybox-curl                                                                                             2                    [OK]
docker.io   docker.io/prom/busybox         Prometheus Busybox Docker base images                                                     2                    [OK]
# 可以同时指定多个参数
拉取镜像:
docker pull [image_name][:tag]
[root@centos7 ~]# docker pull busybox
Using default tag: latest
Trying to pull repository docker.io/library/busybox ...
latest: Pulling from docker.io/library/busybox
57c14dd66db0: Pull complete
Digest: sha256:7964ad52e396a6e045c39b5a44438424ac52e12e4d5a25d94895f2058cb863a0
Status: Downloaded newer image for docker.io/busybox:latest
[root@centos7 ~]# docker pull busybox:1.30
Trying to pull repository docker.io/library/busybox ...
1.30: Pulling from docker.io/library/busybox
Digest: sha256:7964ad52e396a6e045c39b5a44438424ac52e12e4d5a25d94895f2058cb863a0
Status: Downloaded newer image for docker.io/busybox:1.30
该命令还有一个-a选项,用来从仓库中下载所有的标记的镜像,一般不常用,不过多介绍。
列出镜像:
docker images [OPTIONS] [REPOSITORY]
-a, --all=false :显示所有镜像,默认不显示中间层镜像
-f, --filter=[]:根据过滤条件显示镜像
--no-trunc=false:指定不使用截断的形式显示信息
-q, --quiet=false:只显示镜像的IMAGE ID
结果信息:
REPOSITORY: 镜像的仓库名
TAG: 镜像的标签名
IMAGE ID: 镜像的唯一ID
CREATED: 镜像建立的时间
VIRTUAL SIZE: 镜像的大小
示例:
1)列出所有镜像,-a参数是默认值,加不加结果都一样
[root@centos7 ~]# docker images
REPOSITORY              TAG                 IMAGE ID            CREATED             SIZE
docker.io/hello-world   latest              fce289e99eb9        5 weeks ago         1.84 kB
docker.io/busybox       1.30                3a093384ac30        5 weeks ago         1.2 MB
docker.io/busybox       latest              3a093384ac30        5 weeks ago         1.2 MB
[root@centos7 ~]# docker images -a
REPOSITORY              TAG                 IMAGE ID            CREATED             SIZE
docker.io/hello-world   latest              fce289e99eb9        5 weeks ago         1.84 kB
docker.io/busybox       1.30                3a093384ac30        5 weeks ago         1.2 MB
docker.io/busybox       latest              3a093384ac30        5 weeks ago         1.2 MB
2)列出包含指定名称的镜像
[root@centos7 ~]# docker images busybox
REPOSITORY          TAG                 IMAGE ID            CREATED             SIZE
docker.io/busybox   1.30                3a093384ac30        5 weeks ago         1.2 MB
docker.io/busybox   latest              3a093384ac30        5 weeks ago         1.2 MB
3)列出包含指定名称和对应标签的镜像
[root@centos7 ~]# docker images busybox:1.30
REPOSITORY          TAG                 IMAGE ID            CREATED             SIZE
docker.io/busybox   1.30                3a093384ac30        5 weeks ago         1.2 MB
4)列出没有打标签的镜像(因为本地没有未打标签的镜像,输出为空)
[root@centos7 ~]# docker images -f 'dangling=true'
REPOSITORY          TAG                 IMAGE ID            CREATED             SIZE
5)列出所有打标签的镜像,且不截断输出结果
[root@centos7 ~]# docker images -f 'dangling=false' --no-trunc
REPOSITORY              TAG                 IMAGE ID                                                                  CREATED             SIZE
docker.io/hello-world   latest              sha256:fce289e99eb9bca977dae136fbe2a82b6b7d4c372474c9235adc1741675f587e   5 weeks ago         1.84 kB
docker.io/busybox       1.30                sha256:3a093384ac306cbac30b67f1585e12b30ab1a899374dabc3170b9bca246f1444   5 weeks ago         1.2 MB
docker.io/busybox       latest              sha256:3a093384ac306cbac30b67f1585e12b30ab1a899374dabc3170b9bca246f1444   5 weeks ago         1.2 MB
6)列出创建时间比hello-world镜像早的镜像
[root@centos7 ~]# docker images -f 'before=hello-world'
REPOSITORY          TAG                 IMAGE ID            CREATED             SIZE
docker.io/busybox   1.30                3a093384ac30        5 weeks ago         1.2 MB
docker.io/busybox   latest              3a093384ac30        5 weeks ago         1.2 MB
7)列出创建时间比busybox:1.30镜像晚的镜像
[root@centos7 ~]# docker images -f 'since=busybox:1.30'
REPOSITORY              TAG                 IMAGE ID            CREATED             SIZE
docker.io/hello-world   latest              fce289e99eb9        5 weeks ago         1.84 kB
8)列出关联匹配指定模式的镜像
[root@centos7 ~]# docker images -f 'reference=hello*'
REPOSITORY              TAG                 IMAGE ID            CREATED             SIZE
docker.io/hello-world   latest              fce289e99eb9        5 weeks ago         1.84 kB
9)列出本地所有镜像的ID(批量删除镜像时会用到)
[root@centos7 ~]# docker images -a -q
fce289e99eb9
3a093384ac30
3a093384ac30
查看镜像的详细信息:
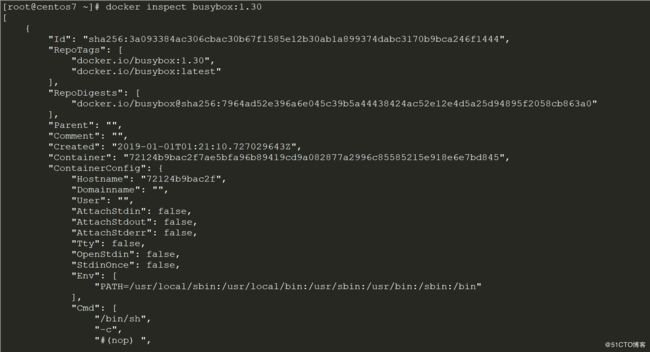
docker inspect [OPTION] CONTAINER|IMAGE [CONTAINER|IMAGE...]
-f, --format="": 以指定格式显示镜像的详细信息
-s, --size:如果使用该镜像创建了容器则显示总的文件大小
--type: 对于特定属性使用JSON格式返回结果
1)查看busybox:1.30镜像的容器配置中的Hostname
[root@centos7 ~]# docker inspect --format='{{.ContainerConfig.Hostname}}' $(docker images -q busybox:1.30)
72124b9bac2f
2)查看busybox:1.30镜像的架构
[root@centos7 ~]# docker inspect --format='{{.Architecture}}' $(docker images -q busybox:1.30)
amd64
3)查看busybox:1.30镜像的系统类型
[root@centos7 ~]# docker inspect --format='{{.Os}}' $(docker images -q busybox:1.30)
linux
4)查看busybox:1.30镜像的系统环境变量
[root@centos7 ~]# docker inspect --format='{{.Config.Env}}' $(docker images -q busybox:1.30)
[PATH=/usr/local/sbin:/usr/local/bin:/usr/sbin:/usr/bin:/sbin:/bin]
5)查看busybox:1.30镜像的Config字段配置,并以JSON格式返回输出结果
[root@centos7 ~]# docker inspect --format='{{json .Config}}' $(docker images -q busybox:1.30)
{"Hostname":"","Domainname":"","User":"","AttachStdin":false,"AttachStdout":false,"AttachStderr":false,"Tty":false,"OpenStdin":false,"StdinOnce":false,"Env":["PATH=/usr/local/sbin:/usr/local/bin:/usr/sbin:/usr/bin:/sbin:/bin"],"Cmd":["sh"],"ArgsEscaped":true,"Image":"sha256:a6633a61b3209de4088bd822bc5b3fa470f57c7f3df4fa0544cb20907915a65a","Volumes":null,"WorkingDir":"","Entrypoint":null,"OnBuild":null,"Labels":null}
6)使用busybox镜像启动一个容器,并使用--size参数获取其大小
[root@centos7 ~]# docker run -itd --name busybox01 busybox
[root@centos7 ~]# docker inspect --size busybox01   # 这里要使用容器的名称或ID
......
        "SizeRw": 3,
        "SizeRootFs": 1199420,
......
# 输出过多,已省略
查看镜像的构建历史:
docker history [OPTIONS] IMAGE
[root@centos7 docker]# docker history busybox IMAGE CREATED CREATED BY SIZE COMMENT 3a093384ac30 5 weeks ago /bin/sh -c #(nop) CMD ["sh"] 0 B5 weeks ago /bin/sh -c #(nop) ADD file:7ba585d92672740... 1.2 MB
构建镜像:
构建镜像常用的方法:
1)docker commit 基于容器构建镜像
2)docker build 使用dockerfile构建镜像
3)其他方法,包含docker import, docker load等
1、基于容器创建镜像
步骤1:登录Docker Hub (这里暂时没有私有仓库,以Docker Hub为例)
步骤2:拉取一个镜像
[root@centos7 ~]# docker pull centos:6
Trying to pull repository docker.io/library/centos ...
6: Pulling from docker.io/library/centos
9bfcefca2b8d: Pull complete
Digest: sha256:935c45b2e2c4f01aa5a6ff8625632390c7685835a8dfcfdd50790aabc9c24d11
Status: Downloaded newer image for docker.io/centos:6
步骤3:使用拉取的镜像创建容器
[root@centos7 ~]# docker run -itd --name mycentos01 centos:6
8c671b1133638f18e996a02bcbac7d24ed014b9cacd9a827106ef7abb8fb7221
步骤4:对容器做出修改
[root@centos7 ~]# docker exec -it mycentos01 /bin/bash
[root@8c671b113363 /]# yum -y install nginx
步骤5:提交修改
[root@centos7 ~]# docker commit mycentos01 jerry12356/testcentos6
sha256:0aada46be3cfed2d55c84f86a6c73b570d8ae31d495e8e84526b95cfccfad691
步骤6:验证
[root@centos7 ~]# docker images jerry12356/testcentos6
REPOSITORY               TAG                 IMAGE ID            CREATED             SIZE
jerry12356/testcentos6   latest              0aada46be3cf        31 seconds ago      253 MB
2、使用Dockerfile进行构建
步骤1:创建Dockerfile
[root@centos7 ~]# mkdir testimage
[root@centos7 ~]# vi testimage/Dockerfile
[root@centos7 ~]# cat testimage/Dockerfile
from centos:6
ENV HOSTNAME=mycentos02
步骤2:使用Dockerfile构建镜像
[root@centos7 ~]# cd testimage/
[root@centos7 testimage]# docker build -t testimage .
Sending build context to Docker daemon 2.048 kB
Step 1/2 : FROM centos:6
 ---> 0cbf37812bff
Step 2/2 : ENV HOSTNAME mycentos02
 ---> Running in 9bc163c742e6
 ---> cebe8edc579a
Removing intermediate container 9bc163c742e6
Successfully built cebe8edc579a
步骤3:验证
[root@centos7 testimage]# docker images testimage
REPOSITORY          TAG                 IMAGE ID            CREATED             SIZE
testimage           latest              cebe8edc579a        10 seconds ago      194 MB
3、其他方法构建镜像(因不作为常用的构建方式,故不在此举例,后面会有对应的介绍)
提交镜像:
docker commit [OPTION] CONTAINER [REPOSITORY[:TAG]]
-a, --author="": 指定作者
-m, --message="": 指定镜像构建的信息
-p, --pause=true: 可以在不暂停容器的情况下构建镜像
注:上面构建镜像中已有示例,故不多做赘述
给镜像打标签:
docker tag SOURCE_IMAGE[:TAG] TARGET_IMAGE[:TAG]
[root@centos7 docker]# docker images
REPOSITORY          TAG                 IMAGE ID            CREATED             SIZE
docker.io/busybox   latest              3a093384ac30        5 weeks ago         1.2 MB
docker.io/centos    latest              1e1148e4cc2c        2 months ago        202 MB
[root@centos7 docker]# docker tag busybox:latest mybusybox:1.30
[root@centos7 docker]# docker images
REPOSITORY          TAG                 IMAGE ID            CREATED             SIZE
docker.io/busybox   latest              3a093384ac30        5 weeks ago         1.2 MB
mybusybox           1.30                3a093384ac30        5 weeks ago         1.2 MB
docker.io/centos    latest              1e1148e4cc2c        2 months ago        202 MB
推送镜像:
docker push IMAGE[:TAG]
注:上面构建镜像中已有示例,需先登录Docker Hub或私有仓库
删除镜像:
docker rmi [OPTIONS] IMAGE [IMAGES...]
-f, --force=false: 强制删除镜像
--no-prune=false:删除镜像的同时保留该镜像的父镜像
示例:
1)删除指定镜像
[root@centos7 testimage]# docker images
REPOSITORY               TAG                 IMAGE ID            CREATED             SIZE
testimage                latest              cebe8edc579a        10 minutes ago      194 MB
jerry12356/testcentos6   latest              0aada46be3cf        22 minutes ago      253 MB
docker.io/hello-world    latest              fce289e99eb9        5 weeks ago         1.84 kB
docker.io/busybox        1.30                3a093384ac30        5 weeks ago         1.2 MB
docker.io/busybox        latest              3a093384ac30        5 weeks ago         1.2 MB
docker.io/centos         6                   0cbf37812bff        4 months ago        194 MB
[root@centos7 testimage]# docker rmi jerry12356/testcentos6
Untagged: jerry12356/testcentos6:latest
Deleted: sha256:0aada46be3cfed2d55c84f86a6c73b570d8ae31d495e8e84526b95cfccfad691
Deleted: sha256:2d3e8446066084493a55b97a2e8256553373eca56af7926eff05003e0d4bf14f
[root@centos7 testimage]# docker images
REPOSITORY              TAG                 IMAGE ID            CREATED             SIZE
testimage               latest              cebe8edc579a        10 minutes ago      194 MB
docker.io/hello-world   latest              fce289e99eb9        5 weeks ago         1.84 kB
docker.io/busybox       1.30                3a093384ac30        5 weeks ago         1.2 MB
docker.io/busybox       latest              3a093384ac30        5 weeks ago         1.2 MB
docker.io/centos        6                   0cbf37812bff        4 months ago        194 MB
2)强制删除指定镜像
[root@centos7 testimage]# docker ps -l
CONTAINER ID        IMAGE               COMMAND             CREATED             STATUS              PORTS               NAMES
8c671b113363        centos:6            "/bin/bash"         26 minutes ago      Up 26 minutes                           mycentos01
[root@centos7 testimage]# docker rmi centos:6
Error response from daemon: conflict: unable to remove repository reference "centos:6" (must force) - container 8c671b113363 is using its referenced image 0cbf37812bff
[root@centos7 testimage]# docker rmi -f centos:6
Untagged: centos:6
Untagged: docker.io/centos@sha256:935c45b2e2c4f01aa5a6ff8625632390c7685835a8dfcfdd50790aabc9c24d11
[root@centos7 testimage]# docker images
REPOSITORY              TAG                 IMAGE ID            CREATED             SIZE
testimage               latest              cebe8edc579a        13 minutes ago      194 MB
docker.io/hello-world   latest              fce289e99eb9        5 weeks ago         1.84 kB
docker.io/busybox       1.30                3a093384ac30        5 weeks ago         1.2 MB
docker.io/busybox       latest              3a093384ac30        5 weeks ago         1.2 MB
3)删除所有镜像
[root@centos7 testimage]# docker images
REPOSITORY              TAG                 IMAGE ID            CREATED             SIZE
testimage               latest              cebe8edc579a        13 minutes ago      194 MB
docker.io/hello-world   latest              fce289e99eb9        5 weeks ago         1.84 kB
docker.io/busybox       1.30                3a093384ac30        5 weeks ago         1.2 MB
docker.io/busybox       latest              3a093384ac30        5 weeks ago         1.2 MB
[root@centos7 testimage]# docker rmi $(docker images -q)
[root@centos7 testimage]# docker images
REPOSITORY          TAG                 IMAGE ID            CREATED             SIZE
补充:
以上就是Docker镜像管理用到的命令及示例,在Docker 1.12版本之前这些都是通用的。然而,因为这些命令都没有组织性和一致性,部分常用命令大家都很熟悉,但是部分命令却很少用到,这样就造成新手无法快速记住这些命令,也无法形成系统的认识,所以在Docker 1.13中,Docker将命令按照逻辑分组到管理命令中(1.12版本的命令仍可以使用,但不确定会否在后续的版本中移除)。也就是根据操作对象进行命令的分组,分别有如下管理命令集:
docker container:管理容器的顶级命令
docker image:管理镜像的顶级命令
docker network:管理Docker网络的顶级命令
docker node :管理Swarm nodes的顶级命令
docker plugin :管理Docker plugins的顶级命令
docker secret :管理Docker secrets的顶级命令
docker service:管理services的顶级命令
docker stack :管理Docker stacks的顶级命令
docker swarm :管理Swarm的顶级命令
docker system:管理 Docker的顶级命令
docker volume :管理Docker volumes的顶级命令
本篇的主题是镜像管理,所以这里就只介绍一些在Docker 1.13中镜像管理的命令:
docker image COMMAND
包含如下COMMAND:
    build         使用Dockerfile构建镜像,相当于docker build
    history      显示镜像的构建历史,相当于docker history
    import      从一个tar包中导入内容来创建一个文件系统镜像
    inspect     显示一个或多个镜像的详细信息,相当于docker inspect
    load          从一个tar包或者标准输入加载一个镜像
    ls              列出镜像列表,相当于docker images
    prune       移除未使用的镜像
    pull           从一个Registry拉取一个镜像或者仓库,相当于docker pull
    push         推送一个镜像或者仓库到Registry上,相当于docker push
    rm             移除一个或者多个镜像,相当于docker rmi
    save          把一个或多个镜像保存为一个tar包(默认流式输出到标准输出中)
    tag            根据源镜像创建一个带标签的目标镜像(给镜像打一个新的标签),相当于docker tag
因为上面已经演示了Docker 1.12之前的镜像管理命令,且很多命令跟Docker 1.13版本是相同的,所以这里仅仅对几个1.12版本中没有的命令做一个演示示例,其他不再赘述。
保存镜像到文件:
[root@centos7 docker]# docker image save -o busybox.tar busybox
[root@centos7 docker]# ls -l busybox.tar
-rw------- 1 root root 1424896 Feb  9 19:59 busybox.tar
从文件读取镜像:
[root@centos7 docker]# docker rmi busybox
Untagged: busybox:latest
Untagged: docker.io/busybox@sha256:7964ad52e396a6e045c39b5a44438424ac52e12e4d5a25d94895f2058cb863a0
[root@centos7 docker]# docker images
REPOSITORY          TAG                 IMAGE ID            CREATED             SIZE
mybusybox           1.30                3a093384ac30        5 weeks ago         1.2 MB
docker.io/centos    latest              1e1148e4cc2c        2 months ago        202 MB
[root@centos7 docker]# docker image load -i busybox.tar
Loaded image: docker.io/busybox:latest
[root@centos7 docker]# docker images
REPOSITORY          TAG                 IMAGE ID            CREATED             SIZE
mybusybox           1.30                3a093384ac30        5 weeks ago         1.2 MB
docker.io/busybox   latest              3a093384ac30        5 weeks ago         1.2 MB
docker.io/centos    latest              1e1148e4cc2c        2 months ago        202 MB
导入镜像:
[root@centos7 docker]# docker rmi busybox Untagged: busybox:latest [root@centos7 docker]# docker images REPOSITORY TAG IMAGE ID CREATED SIZE mybusybox 1.30 3a093384ac30 5 weeks ago 1.2 MB docker.io/centos latest 1e1148e4cc2c 2 months ago 202 MB [root@centos7 docker]# docker image import busybox.tar sha256:a452c2617c27c3c4d3a9459820a3f8e19c42ab0599300835cdd91de5113387d2 [root@centos7 docker]# docker images REPOSITORY TAG IMAGE ID CREATED SIZEa452c2617c27 3 seconds ago 1.42 MB mybusybox 1.30 3a093384ac30 5 weeks ago 1.2 MB docker.io/centos latest 1e1148e4cc2c 2 months ago 202 MB
注意:docker image save一般和docker image load一起使用,可以将镜像保存并导入,且不改变镜像的信息(比如Registry, Tag,ID等),但如果使用docker image import导入,相当于从本地文件进行导入,会丢失上上述信息,且Image ID也发生改变。
移除未使用的镜像:
[root@centos7 docker]# docker image prune -a -f
Deleted Images:
untagged: docker.io/busybox:latest
untagged: docker.io/busybox@sha256:7964ad52e396a6e045c39b5a44438424ac52e12e4d5a25d94895f2058cb863a0
deleted: sha256:3a093384ac306cbac30b67f1585e12b30ab1a899374dabc3170b9bca246f1444
deleted: sha256:683f499823be212bf04cb9540407d8353803c25d0d9eb5f2fdb62786d8b95ead
untagged: docker.io/centos:latest
untagged: docker.io/centos@sha256:184e5f35598e333bfa7de10d8fb1cebb5ee4df5bc0f970bf2b1e7c7345136426
deleted: sha256:1e1148e4cc2c148c6890a18e3b2d2dde41a6745ceb4e5fe94a923d811bf82ddb
deleted: sha256:071d8bd765171080d01682844524be57ac9883e53079b6ac66707e192ea25956
deleted: sha256:e9230e266e0c80a1eca715c72410fa002bfe4a55b242a3cca727da231221c770
deleted: sha256:5317dd421848a115203f1f0cf24467857b40e55dfe8cdf7cc76d4f731a0e12ab
Total reclaimed space: 204.4 MB
[root@centos7 docker]# docker images
REPOSITORY          TAG                 IMAGE ID            CREATED             SIZE
当镜像未被用作运行任何一个容器时,指定该命令会移除该镜像;而只要镜像被用来运行一个或多个容器,则执行该命令不会对该镜像造成影响。


