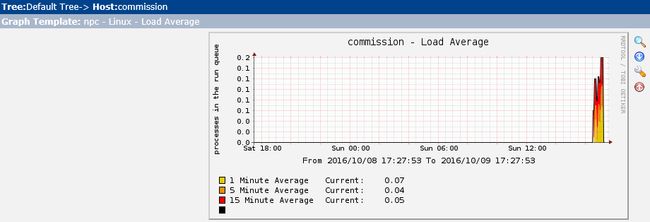
由于公司系统监控和网络流量监控分别由不同的软件监控且由几台服务器完成,近期想整合到一起,并改为开源免费的Nagios和Cacti完成。以下为部署日志:
一、安装RHEL7.2
最小化安装,配置IP,时间同步,本地yum源,安装vim(个人习惯)、bash-completion(命令补齐)
# hostnamectl set-hostname nagios_cacti
# yum install vim
# yum install bash-completion
# yum install chrony
# systemctl enable chronyd
# systemctl start chronyd
# vim /etc/chrony.conf
server 10.100.2.5 iburst //增加一行时间源
# yum install ntpdate
# ntpdate 10.100.2.5 //手动同步时间
配置CentOS 163 yum源
# yum install wget
# wget http://mirrors.163.com/centos/7.2.1511/os/x86_64/Packages/yum-3.4.3-132.el7.centos.0.1.noarch.rpm
# wget http://mirrors.163.com/centos/7.2.1511/os/x86_64/Packages/yum-metadata-parser-1.1.4-10.el7.x86_64.rpm
# wget http://mirrors.163.com/centos/7.2.1511/os/x86_64/Packages/yum-plugin-fastestmirror-1.1.31-34.el7.noarch.rpm
# wget http://mirrors.163.com/.help/CentOS7-Base-163.repo
# rpm -qa|grep yum //检查redhat是否安装了yum,及有哪些Yum包
# rpm -qa|grep yum|xargs rpm -e --nodeps //删除redhat自带的yum包
# rpm -ivh yum-3.4.3-132.el7.centos.0.1.noarch.rpm yum-metadata-parser-1.1.4-10.el7.x86_64.rpm yum-plugin-fastestmirror-1.1.31-34.el7.noarch.rpm
# mv CentOS7-Base-163.repo /etc/yum.repos.d/
# vim /etc/yum.repos.d/CentOS7-Base-163.repo //通过":1,$s/$releasever/7/gc"和":1,$s/$basearch/x86_64/gc"查找和替换文件内容
# yum clean all //清除yum缓存
# yum makecache //重建缓存,以提高搜索软件包速度
# yum update //更新系统(省略)
二、安装Nagios
1、下载软件包并安装Nagios
Nagios-4.2.1:
http://nchc.dl.sourceforge.net/project/nagios/nagios-4.x/nagios-4.2.1/nagios-4.2.1.tar.gz
Nagios-plugins-2.1.3:
https://nagios-plugins.org/download/nagios-plugins-2.1.3.tar.gz
NRPE-3.0.1:
https://codeload.github.com/NagiosEnterprises/nrpe/tar.gz/3.0.1
官方安装文档:Nagios QuickstartInstallation Guides
https://assets.nagios.com/downloads/nagioscore/docs/nagioscore/4/en/quickstart.html
# yum install httpd php gcc glibc glibc-common gd gd-devel
# yum install unzip //编译所需,否则会报错。
# useradd -M -s /sbin/nologin nagios
# usermod -aG nagios apache
# tar zxvf nagios-4.2.1.tar.gz
# cd nagios-4.2.1/
# make all
# make install
# make install-init
# make install-config
# make install-commandmode
# make install-webconf
# vim /usr/local/nagios/etc/objects/contacts.cfg
email [email protected] //修改nagios警告信息的邮件地址
# htpasswd -c /usr/local/nagios/etc/htpasswd.users nagios //配置登录账号和密码
2、安装nagios-plugins插件
# tar zxvfnagios-plugins-2.1.3.tar.gz
# cd nagios-plugins-2.1.3/
# ./configure --with-nagios-user=nagios --with-nagios-group=nagios
# make
# make install
# chown -R nagios.nagios/usr/local/nagios/
# systemctl enable httpd
# systemctl start httpd
# systemctl enable nagios
# systemctl start nagios
# /etc/init.d/nagios checkconfig //检查nagios配置文件是否有错误,或使用以下命令检查:
# /usr/local/nagios/bin/nagios -v /usr/local/nagios/etc/nagios.cfg
# firewall-cmd --zone=public --add-service=http –permanent
# firewall-cmd –reload
# systemctl restart firewalld
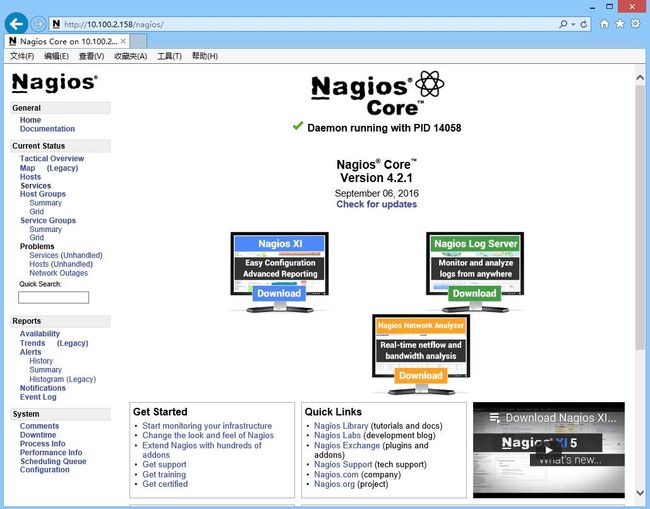
使用http://10.100.2.158/nagios登录控制台,输入配置的账号密码即可登录。
注:如果web管理员不是使用默认的nagiosadmin,需要修改cgi.cfg
# vim /usr/local/nagios/etc/cgi.cfg
//把所有的nagiosadmin改为自定义的用户名,否则查看Services时会提示权限不够。
默认HTTP会有告警信息,解决办法:在/var/www/html目录新建一个空白index.html文件即可。
# touch /var/www/html/index.html
重启nagios和httpd服务,等待几分钟即恢复正常。
3、安装NRPE插件
# tar zxvf nrpe-3.0.1.tar.gz
# cd nrpe-3.0.1/
# yum install openssl-devel //解决checking for SSL headers... configure: error: Cannotfind ssl headers错误问题
# ./configure --with-nrpe-user=nagios --with-nrpe-group=nagios --with-nagios-user=nagios --with-nagios-group=nagios --enable-command-args --enable-ssl
# make all //编译和安装nrpe
# make install-plugin
# make install-daemon
# make install-config //注:nrpe3.0以下请使用# make install-daemon-config
# /usr/local/nagios/bin/nrpe -c /usr/local/nagios/etc/nrpe.cfg –d //启动nrpe服务
# yum install net-tools
# netstat –tnpl //可以看到5666端口已处于监听状态,说明nrpe服务已启动
# echo “/usr/local/nagios/bin/nrpe-c /usr/local/nagios/etc/nrpe.cfg –d” >> /etc/rc.local
# chmod +x /etc/rc.d/rc.local //设置开机自启动,手动重启方法如下:
# pkill nrpe && /usr/local/nagios/bin/nrpe -c /usr/local/nagios/etc/nrpe.cfg –d
# vim /usr/local/nagios/etc/objects/commands.cfg //末尾增加以下内容
define command{
command_name check_nrpe
command_line $USER1$/check_nrpe -H $HOSTADDRESS$ -c $ARG1$
}
//允许check_nrpe命令定义nagios服务,-c后面带的$ARG1$参数是传给nrpe daemon执行的检测命令,它必须是nrpe.cfg中所定义的命令。
//自定义的Servers下的cfg配置文件中使用check_nrpe的时候要用”!”带上这个参数。
//可通过# /usr/local/nagios/libexec/check_nrpe –h查看插件的命令参数。
# mkdir /usr/local/nagios/etc/servers //创建servers监控配置文件集中存储目录
# vim /usr/local/nagios/etc/nagios.cfg //修改配置文件
cfg_dir=/usr/local/nagios/etc/servers //启用此规则,即默认读取处理此目录下的配置文件
修改发送者邮箱:
1>、修改nagios.cfg管理邮箱
# vim /usr/local/nagios/etc/nagios.cfg
将admin_email地址改为需要的邮箱:[email protected]
2>、修改commands.cfg邮件发送选项
# vim /usr/local/nagios/etc/objects/commands.cfg
在以下两个关于email定义中,在command_line的命令行末尾增加-- -f$ADMINEMAIL$选项,注意-f和$ADMINEMAIL$之间没有空格,也可以直接使用[email protected]而不用去修改nagios.cfg文件。
或者:在/bin/mail和-s之间增加-r $ADMINEMAIL$选项,也可以直接增加-r sender@address选项而不用修改nagios.cfg配置文件中的admin_email地址。
注:不同环境适用方法可能略有不同,配置选项就这几个,可以多测试一下。
# 'notify-host-by-email' command definition
define command{
command_name notify-host-by-email
command_line /usr/bin/printf "%b" "***** Nagios *****\n\nNotification Type: $NOTIFICATIONTYPE$\nHost: $HOSTNAME$\nState: $HOSTSTATE$\nAddress: $HOSTADDRESS$\nInfo: $HOSTOUTPUT$\n\nDate/Time: $LONGDATETIME$\n" | /bin/mail -s "** $NOTIFICATIONTYPE$ Host Alert: $HOSTNAME$ is $HOSTSTATE$ **" $CONTACTEMAIL$ -- -f$ADMINEMAIL$
}
# 'notify-service-by-email' command definition
define command{
command_name notify-service-by-email
command_line /usr/bin/printf "%b" "***** Nagios *****\n\nNotification Type: $NOTIFICATIONTYPE$\n\nService: $SERVICEDESC$\nHost: $HOSTALIAS$\nAddress: $HOSTADDRESS$\nState: $SERVICESTATE$\n\nDate/Time: $LONGDATETIME$\n\nAdditional Info:\n\n$SERVICEOUTPUT$\n" | /bin/mail -s "** $NOTIFICATIONTYPE$ Service Alert: $HOSTALIAS$/$SERVICEDESC$ is $SERVICESTATE$ **" $CONTACTEMAIL$ -- -f$ADMINEMAIL$
}
3>、重启nagios服务
4、添加客户端(Client被监控端)
1>、客户端安装NRPE和插件nagios-plugins
下载所需软件包
nagios-plugins-2.1.3.tar.gz
nrpe-3.0.1.tar.gz
新建用户
# useradd –M –s /sbin/nologinnagios
先安装nagios-plugins(NRPE依赖于nagios-plugins)
# tar zxvf nagios-plugins-2.1.3.tar.gz
# cd nagios-plugins-2.1.3
# ./configure--with-nagios-user=nagios --with-nagios-group=nagios
# make all
# make install
再安装NRPE
# yum install openssl-devel
# tar zxvf nrpe-3.0.1.tar.gz
# cd nrpe-3.0.1
# ./configure --with-nrpe-user=nagios --with-nrpe-group=nagios --with-nagios-user=nagios --with-nagios-group=nagios --enable-command-args --enable-ssl
# make all
# make install-plugin
# make install-daemon
# make install-config
# ls /usr/local/nagios/libexec/ //查看安装成功的NRPE插件,有check_nrpe说明安装成功
# vim /usr/local/nagios/etc/nrpe.cfg //配置nrpe
allowed_hosts=127.0.0.1,10.100.2.158 //添加服务端IP
dont_blame_nrpe=1 //把0改为1,允许命令参数
#/usr/local/nagios/bin/nrpe -c /usr/local/nagios/etc/nrpe.cfg –d //启动nrpe服务
为了便于NRPE服务的启动,可以定义一个/etc/init.d/nrpe脚本
# vim /etc/init.d/nrpe //输入以下内容:
#!/bin/bash
# chkconfig: 2345 88 12
# description: NRPE DAEMON
NRPE=/usr/local/nagios/bin/nrpe
NRPECONF=/usr/local/nagios/etc/nrpe.cfg
case "$1" in
start)
echo -n "Starting NRPE daemon..."
$NRPE -c $NRPECONF -d
echo " done."
;;
stop)
echo -n "Stopping NRPE daemon..."
pkill -u nagios nrpe
echo " done."
;;
restart)
$0 stop
sleep 2
$0 start
;;
*)
echo "Usage: $0start|stop|restart"
;;
esac
exit 0
# chmod a+x /etc/init.d/nrpe //赋予脚本执行权限,即可以通过systemctl或service执行启动,停止了。
# service nrpe start //启动nrpe
#echo “/usr/local/nagios/bin/nrpe -c /usr/local/nagios/etc/nrpe.cfg -d” >> /etc/rc.local
或# chkconfig nrpe on //设置为开机自启动
# netstat –tnlp //查看5666端口是否成功启动
测试监控主机和被监控设备之间的连通性(Server上):
#/usr/local/nagios/libexec/check_nrpe -H 10.100.2.200
NRPE v3.0.1 //通信成功
2>、Server监控端创建Client被监控端配置文件
# vim /usr/local/nagios/etc/servers/test.cfg //监控主机上新建Client端配置文件
define host{
use linux-server
host_name commission
alias commission
address 10.100.2.200
max_check_attempts 5
check_period 24x7
notification_interval 30
notification_period 24x7
}
define service{
use generic-service
host_name commission
service_description PING
check_command check_ping!100.0,20%!500.0,60%
}
define service{
use generic-service
host_name commission
service_description SSH
check_command check_ssh
notifications_enabled 0 ;disable notification
}
define service{
use generic-service
host_name commission
service_description CPU
check_command check_nrpe!check_cpu
notifications_enabled 1
}
define service{
use generic-service
host_name commission
service_description Physical Memory
check_command check_nrpe!check_mem
notifications_enabled 1
}
//可以以templates.cfg模板进行修改
关于check_cpu和check_mem自定义插件的使用方法(插件见附件):
2.1从官网下载需要的插件,注意修改+x执行权限和属性
2.2修改Client端配置:修改nrpe.cfg,增加以下内容
command[check_mem]=/usr/local/nagios/libexec/check_mem -w 10 -c 5
command[check_cpu]=/usr/local/nagios/libexec/check_cpu -w 80 -c 90
2.3重启nrpe服务
# pkill nrpe&&/usr/local/nagios/bin/nrpe -c /usr/local/nagios/etc/nrpe.cfg -d
2.4修改Server端配置:修改test.cfg,在define service中定义check_command
check_command check_nrpe!check_mem
check_command check_nrpe!check_cpu
3>、利用NSClicent++监控远程Windows系统
下载插件包NSCP-0.4.4.19-x64.msi
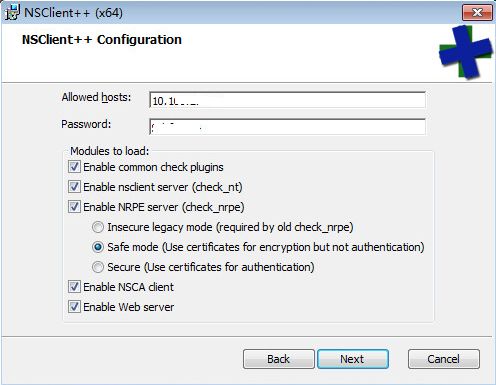
在Windows客户端安装插件包:
查看服务是否启动,勾选登录中的“允许服务与桌面交互”
安装完成查看启动的端口,5666是nrpe,12489是NSClient++
在监控主机的commands.cfg配置文件中修改以下部分,添加-s 密码:
# vim /usr/local/nagios/etc/objects/commands.cfg
# 'check_nt' command definition
define command{
command_name check_nt
command_line $USER1$/check_nt -H $HOSTADDRESS$ -p 12489 -s 123456 -v $ARG1$ $ARG2$
}
添加监控客户端:
# vim /usr/local/nagios/etc/nagios.cfg
cfg_file=/usr/local/nagios/etc/objects/windows.cfg //启用windows监控,如果有添加启用cfg_dir=/usr/local/nagios/etc/servers目录则需要注释掉windows.cfg,否则会有冲突
以windows.cfg为模板,添加新的windows服务器
# cp /usr/local/nagios/etc/objects/windows.cfg /usr/local/nagios/etc/servers/wintest.cfg
//修改配置中的host_name,IP地址等。
# /usr/local/nagios/libexec/check_nt -H 10.100.2.189 -p 12489 -s 123456 -v UPTIME
//测试客户端连通性(注意有特殊符号需要单引号),以下信息表示连接正常。
System Uptime - 20 day(s) 4 hour(s)11 minute(s) |uptime=29051
# /usr/local/nagios/bin/nagios -v /usr/local/nagios/etc/nagios.cfg //测试配置
# systemctl restart nagios //重启nagios服务
默认check_nt!MEMUSE!-w 80 –c 90监控的是物理内存和虚拟内存的总和,单独监控物理内存方法:
1) 修改Client的nsclient.ini文件三个选项:
[/settings/NRPE/server]下的insecure = true、verify mode = none、allow arguments = true
修改完成后,通过# /usr/local/nagios/libexec/check_nrpe -H 10.100.2.189测试连通性,
I (0.4.4.19 2015-12-08) seem to bedoing fine...表示连接正常,如果提示
CHECK_NRPE: Error - Couldnot complete SSL handshake.则表示未修改正确。
查看监控显示结果:
# /usr/local/nagios/libexec/check_nrpe -H 10.100.2.189 -p 5666 -c CheckMEM -a MaxWarn=80% MaxCrit=90% type=physicalShowAll
2) 修改Server的commands.cfg文件,定义物理内存监控服务
define command{
command_name check_winmem
command_line $USER1$/check_nrpe -H $HOSTADDRESS$ -p 5666-c CheckMEM -a MaxWarn=$ARG1$% MaxCrit=$ARG2$% ShowAll=long type=physical
}
3) 修改Server的客户端配置文件xenapp.cfg,定义监控内容
define service{
use generic-service
host_name xenapp
service_description PhysicalMemory
check_command check_winmem!80!90
}
4) 检测配置文件是否有错误:# /usr/local/nagios/bin/nagios -v /usr/local/nagios/etc/nagios.cfg
5) 重启nagios服务:# systemctl restart nagios
三、安装Cacti
1、下载软件包并安装
Cacti-0.8.8h:
http://www.cacti.net/downloads/cacti-0.8.8h.tar.gz
Cacti-spine-0.8.8h:
http://www.cacti.net/downloads/spine/cacti-spine-0.8.8h.tar.gz
官方安装手册:
http://docs.cacti.net/manual:088:1_installation.1_install_unix
配置安装环境:
#yum install httpd php php-mysql php-snmp php-xml mariadb mariadb-server
2、安装RRDtool工具
# yum install rrdtool
# rrdtool -h
3、安装SNMP服务
# yum install net-snmp net-snmp-utils
# systemctl enable snmpd
# systemctl start snmpd
4、安装cacti-spine(高效采集器)
# yum install net-snmp-devel mariadb-devel openssl-devel
# yum install autoconf automake binutils dos2unix gcc cpplibtool glibc-devel glibc-headers kernel-headers
# yum install wget patch
# tar zxvf cacti-spine-0.8.8h.tar.gz
# cd cacti-spine-0.8.8h/
# aclocal
# libtoolize –force
# autoheader
# autoconf
# automake
# ./configure
# make
# make install
# cp /usr/local/spine/bin/spine /usr/bin/spine
# cp /usr/local/spine/etc/spine.conf.dist /etc/spine.conf
# chown nagios.nagios /etc/spine.conf
# vim /etc/spine.conf
DB_Host localhost
DB_Database cacti
DB_User cactiuser
DB_Pass 123456
DB_Port 3306
# /usr/bin/spine //执行检查是否有错,安装完cacti后再执行
5、创建cacti数据库
启动数据库:
# systemctl enable mariadb
# systemctl start mariadb
# mysqladmin -uroot password 'rootpasswd' //Mariadb默认密码为空,先设置密码
# mysql -uroot -p //使用root权限账号登录
create database cacti; //创建数据库
grant all on cacti.* to cactiuser@'localhost' identified by '123456'; //授于本地登录权限
6、安装cacti程序
# tar zxvf cacti-0.8.8h.tar.gz
# mv cacti-0.8.8h /var/www/html/cacti
# mysql -u cactiuser -p cacti //导入数据库
# chmod -R 777 /var/www/html/cacti/rra //授于rra和log文件夹777权限
# chmod -R 777 /var/www/html/cacti/log
# /usr/bin/spine //显示以下内容表示连接正常
SPINE:Using spine config file [/etc/spine.conf]
SPINE:Version 0.8.8h starting
SPINE:Time: 0.0455 s, Threads: 5, Hosts: 2
7、修改cacti全局配置文件
# vim /var/www/html/cacti/include/config.php
修改默认数据库名及连接数据库的用户名和密码
$database_default= "cacti";
$database_username= "cactiuser";
$database_password= "123456";
修改cacti系统时区,否则php会有告警日志信息
# vim /var/www/html/cacti/include/global.php //增加一行
date_default_timezone_set('Asia/Shanghai');
8、添加RRDtool抓图任务计划
# crontab -e
输入以下任务计划:
*/5 * * ** /usr/bin/php /var/www/html/cacti/poller.php >> /tmp/cacti_rrdtool.log2>&1
9、配置SELinux
测试php模块是否正常,http://10.100.2.158/phpinfo.php
#vim phpinfo.php //在html首页目录下
//测试完成后删除文件
-------------------------------------------------------------------------------------------
测试Mysql数据库的连接是否正常,http://10.100.2.158/mysqltest.php
#vim mysqltest.php //html首页目录下,名称随意起
If($link) echo “connect success!”;
else echo “connect fail!”;?>
测试数据库连接性前,需要修改sebool值:在SELinux启用情况下,php连接mysql测试会失败
#getsebool -a |grep httpd_can_network_connect //查看httpd进程连接模式,默认为off
#setsebool -P httpd_can_network_connect=1 //启用连接后即可测试正常
------------------------------------------------------------------------------------------
配置SELinux上下文,否则访问cacti时会提示禁止访问:
# yum install policycoreutils-python //安装semanage工具,默认未安装
# ls -Zd cacti/ //查看当前cacti目录的上下文,为admin_home_t
# semanage fcontext -a -t httpd_sys_content_t '/var/www/html/cacti(/.*)?' //定义cacti目录的上下文规则
# restorecon -RFvv cacti/ //更改cacti目录的上下文
修改完成后重启httpd
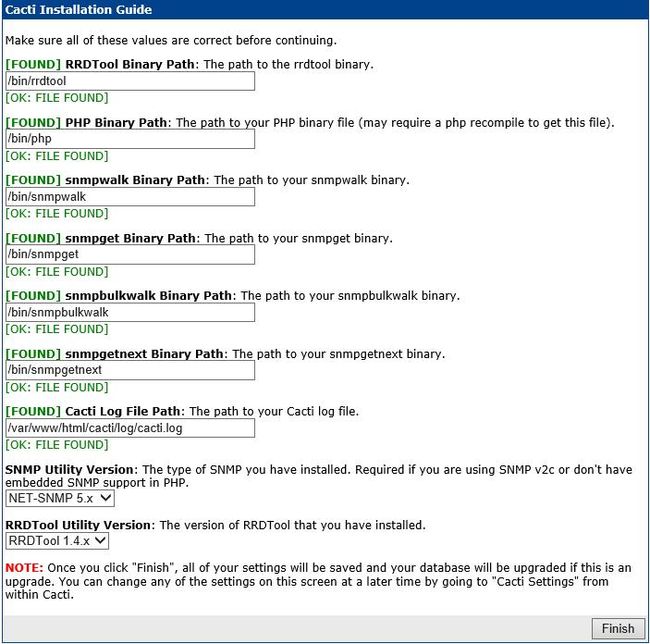
10、配置Cacti控制台
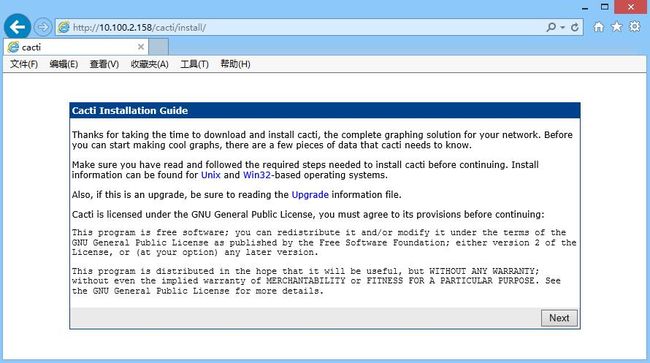
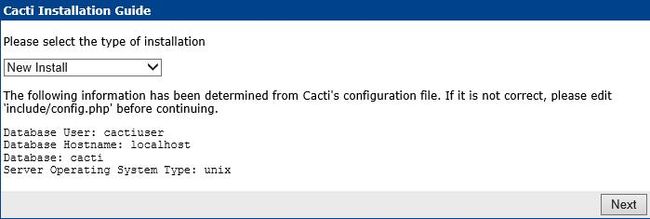
打开浏览器,输入http://10.100.2.158/cacti回车后显示如下界面:
默认账号和密码均为admin,第一次登录后强制修改密码。
在Cacti的web配置界面选择Settings,修改以下内容
settings->paths->Spine Poller File Path[/usr/local/spine/bin/spine]
settings->poller->Poller Type [spine]
settings->poller->Maximum Threads perProcess [5]
save完成
11、修改网络流量监控平均间隔取样时间
默认,cacti以5分钟的平均间隔来取样,为了更准确查看流量可以自定义修改间隔:
1>、修改poller
进入cacti,点击settings,选择Poller项目,修改Poller Interval和Cron Interval设置为Every Minute(还可以改为10s\15s\20s\30s)
2>、修改crontab
# crontab -e
*/1 * * * * /usr/bin/php /var/www/html/cacti/poller.php>> /tmp/cacti_rrdtool.log 2>&1
3>、修改Data Templates
在Data Templates页面,打开Interface – Traffic项目,在Associated RRA’s列表按住Ctrl键同时点击Hourly(1 Minute Average)即选择1分钟间隔。把Step的300改为60,Save。
4>、Rebuild rrd cache(在修改Poller Interval时已有提醒,如下)
# cd /var/www/html/cacti/cli/
# php -q rebuild_poller_cache.php -d
除使用命令行外还可以Utilities->System Utilities->Rebuild Poller Cache
此时查看Data Sources已经变成1 Minute
在graphs页面已经可以看到Hourly(1 Minute Average)的图表了,但仍然以5分钟为间隔。
5>、删除所有rra文件,重新生成,即变为1分钟的间隔了
# rm -f /var/www/html/cacti/rra/*.rrd
12、添加多CPU合一模板
1>、下载模板文件
http://forums.cacti.net/download/file.php?id=30985&sid=d0a7b07ada17e17f159f8a29451adf68
2>、解压缩并修改模板文件:
# vimcacti_graph_template_host_mib_-_multi_cpu_utilization_on_2_processor_box.xml
//其中前2位数字00表示template的类型,后面4位数字0016表示CactiVersion,这4位需要和当前使用的cacti版本相匹配。接下来的32位数字为系统随机生成。
查看cacti version方法:
# less /var/www/html/cacti/include/global_arrays.php
查找以下代码,可以看到各版本对应的Cacti Version
$hash_version_codes= array(
"0.8.4" => "0000",
"0.8.5" => "0001",
"0.8.5a" =>"0002",
"0.8.6" => "0003",
"0.8.8" => "0024",
"0.8.8a" =>"0024",
"0.8.8b" =>"0024",
"0.8.8c" =>"0025",
"0.8.8d" =>"0025",
"0.8.8e" =>"0025",
"0.8.8f" =>"0025",
"0.8.8g" =>"0025",
"0.8.8h" => "0025",
);
使用:1,$s/00xx/0025/gc查找和替换版本号(有上百个,如不想确认可使用/g即可)。
3>、导入模板:
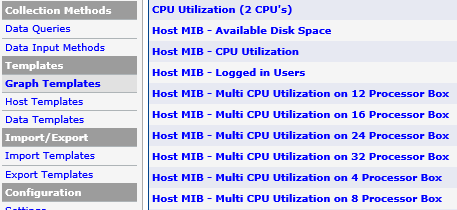
导入成功后在Graph Templates可以查看到导入的模板:
4>、添加Associated Data Queries,如下(在添加设备的时候一起添加就可以了)
5>、新建CPU监控图
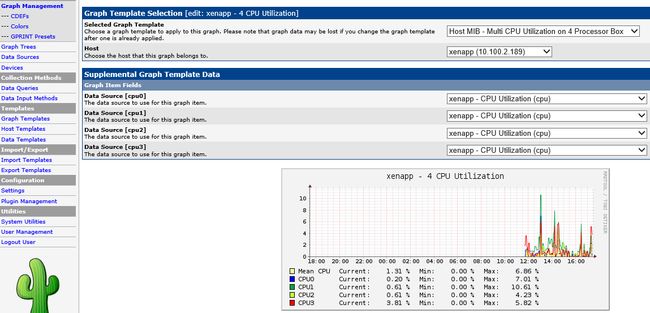
在Graph Management点击ADD,选择相应的模板、主机及各CPU对应的Data Source:
6>、删除原建立的CPU的各core监控图(如有生成)
注意:不要把原rrd数据也删除了,只删除图像即可。
参考:http://www.cnyunwei.com/thread-1326-1-1.html
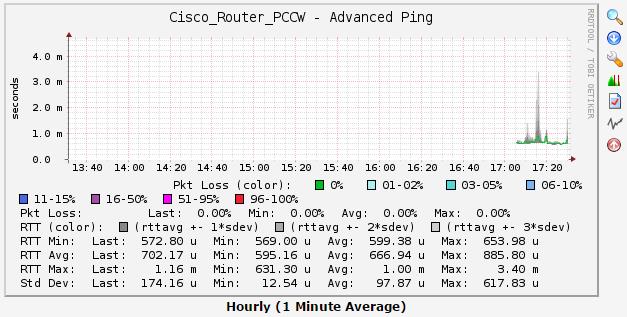
13、添加Advanced Ping模板
1>、下载模板文件
http://docs.cacti.net/usertemplate:graph:advanced_ping_alt
2>、解压缩并修改模板,将0019改为0025(参考CPU多合一模板)
在Import Templates页面导入修改后的xml文件
上传解压后的scripts文件夹内的ss_fping.php文件到cacti安装目录的scripts内。
3>、在New Graphs页面,选择需要创建ping监控图的Host,然后选择“PING-AdvancedPing ALT”模板,点击创建即可。
14、添加被监控设备
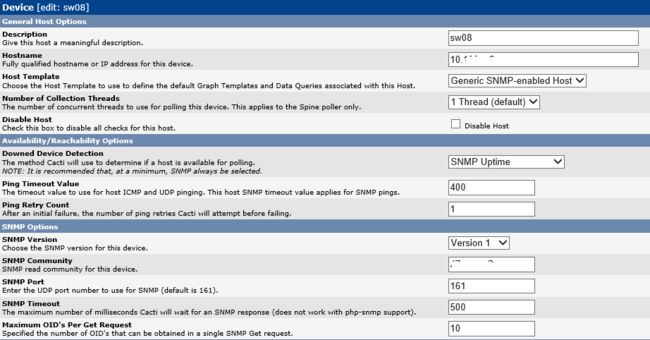
登录cacti点击Devices,然后点击Add添加设备:
然后选择“Create Graphs for this Host”,再选择需要监控的网络接口,点击Create
(在创建前可以根据需要选择Select a graph type:In/Out Bits或In/Out Bytes)
添加设备到graphs树,以便在graphs查看流量图:
点击Graph Trees,使用默认Tree或点击Add增加新的组
在Default Tree中点击Add,增加新的设备进组,如下图:
点击Save保存即可。
查看监控流量图:
点击左上角的graphs,选择分组,点击目标设备即可看到建立的网络接口流量图:
在添加Windows客户端时,个别主机遇到一个很奇怪的问题:能获取网卡数据但获取不到硬盘、内存和CPU的数据。如下图:
SNMP - Get Mounted Partitions和SNMP - Get Processor Information获取不到数据,显示Success [0 Items, 0 Rows]。通过Debugging(Verbose Query)得到以下信息:
|
关闭防火墙也没用,但在另一个监控软件(IPMoniter)里又可以正常获取数据。显然SNMP没有问题,那问题可能出在检查脚本执行上。通过Google搜索证实了这个问题,如下:http://forums.cacti.net/viewtopic.php?t=31918
解决办法:修改xml脚本文件或Windows客户端的SNMP Community即可,原因是特殊字符导致的community识别错误。
修改snmp community:避免使用$、&、<>等特殊符号即可,但~!@,./等符号都可以使用。
修改xml脚本文件:
# cd /var/www/html/cacti/resource/script_server
# vim host_cpu.xml //在|host_snmp_version|和前面添加一个单引号
修改host_disk.xml文件相同,修改后再刷新就可以获取得数据了。
四、Nagios和Cacti整合
1、安装Ndoutils
Ndoutils是Nagios的一个插件,可以用来把nagios获取的数据导入mysql数据库中,也可以实现与cacti的插件NPC的集成。.
注:Nagios4.2.1至少需要Ndoutils2.1.0及以上版本,否则不兼容
下载Ndoutils
http://nchc.dl.sourceforge.net/project/nagios/ndoutils-2.x/ndoutils-2.1.1/ndoutils-2.1.1.tar.gz
安装Ndoutils:
# tar zxvf ndoutils-2.1.1.tar.gz
# cd ndoutils-2.1.1/
# ./configure --prefix=/usr/local/nagios/ --enable-mysql --with-ndo2db-user=nagios --with-ndo2db-group=nagios
# make all
# make install
准备配置文件:
# cd db
# ./installdb -ucactiuser -p123456 -h localhost -d cacti
//导入mysql.sql,可省略,cacti的npc插件会自动生成相关数据库表。
# cd ..
# cp src/{ndomod-4x.o,ndo2db-4x,log2ndo,file2sock} /usr/local/nagios/bin/
//nagios是4.x的版本就使用-4x,如果是3.x版本则复制对应的-3x。
# cp config/ndo2db.cfg-sample /usr/local/nagios/etc/ndo2db.cfg
# cp config/ndomod.cfg-sample /usr/local/nagios/etc/ndomod.cfg
# cd /usr/local/nagios/etc
# chown nagios.nagiosndo2db.cfg ndomod.cfg
# chmod 664 ndo2db.cfgndomod.cfg
# cd /usr/local/nagios/bin/
# mv ndo2db-4x ndo2db
# mv ndomod-4x.o ndomod.o
# chown nagios.nagios *
修改配置文件:
# vim /usr/local/nagios/etc/ndo2db.cfg
socket_type=tcp
tcp_port=5668
db_servertype=mysql
db_host=localhost
db_port=3306
db_name=cacti
db_prefix=npc_
db_user=cactiuser
db_pass=123456 //密码不能加引号
debug_level=1
# vim /usr/local/nagios/etc/ndomod.cfg
output_type=tcpsocket
output=127.0.0.1
# vim/usr/local/nagios/etc/nagios.cfg
在末尾添加以下内容:
broker_module=/usr/local/nagios/bin/ndomod.o config_file=/usr/local/nagios/etc/ndomod.cfg
// broker_module和config_file放在一行,中间空格隔开。
修改以下选项:
event_broker_options=-1 //默认选项,无需修改。为nagios开启event broker
process_performance_data=1
启动守护进程和nagios:
# /usr/local/nagios/bin/ndo2db -c /usr/local/nagios/etc/ndo2db.cfg
# netstat –tnlp //可以查看5668端口处于监听状态
tcp 0 0 0.0.0.0:5668 0.0.0.0:* LISTEN 30411/ndo2db
# tail -20 /var/log/messages //查看是否有报错
新建启动脚本和服务,以便开机自动启动:
# vim /etc/rc.d/init.d/ndo2db //新建脚本,如下:
#!/bin/bash
#Start ndo2db service
/usr/local/nagios/bin/ndo2db -c /usr/local/nagios/etc/ndo2db.cfg
# chmod +x /etc/rc.d/init.d/ndo2db
# ln -s /etc/rc.d/init.d/ndo2db /etc/rc.d/rc2.d/S98ndo2db
# ln -s /etc/rc.d/init.d/ndo2db /etc/rc.d/rc3.d/S98ndo2db
# ln -s /etc/rc.d/init.d/ndo2db /etc/rc.d/rc5.d/S98ndo2db
//设置235运行级别自动运行(启动顺序98,nagios为99)
如果日志/var/log/messages有以下信息
错误:Sep 23 13:38:10nagios_cacti nagios: ndomod: Still unable to connect to data sink. 0 items lost, 368 queued items to flush.
原因:Ndoutils需要先启动才能再启动Nagios,否则会报错。
解决办法:
# systemctl stop nagios
# pkill ndo2db
#/usr/local/nagios/bin/ndo2db -c /usr/local/nagios/etc/ndo2db.cfg
# systemctl start nagios
2、安装Npc插件
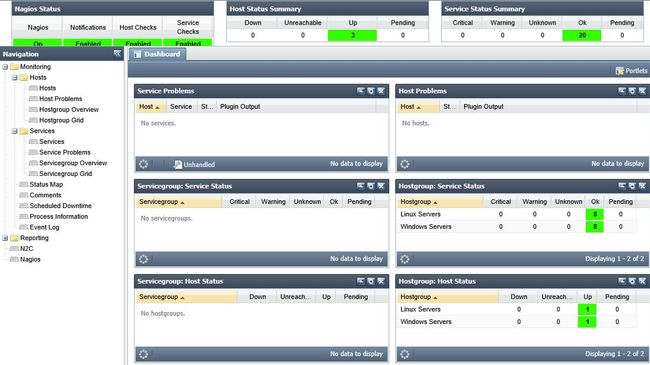
全称Nagios Plugin for Cacti,将nagios的数据通过ndo2db导入到mysql数据库(前面设置的npc_开头的表),然后cacti读取数据库信息将nagios的结果通过NPC展示出来。
下载插件:NPC
http://jaist.dl.sourceforge.net/project/gibtmirdas/npc-2.0.4.tar.gz
# tar zxvf npc-2.0.4.tar.gz
# mv npc /var/www/html/cacti/plugins/
# chown -R nagios.nagios /var/www/html/cacti/plugins/
# cd /var/www/html/cacti/plugins/
配置SELinux上下文,否则在插件管理页面会显示no plugins found:
# ls -Zd npc/ //查看当前npc上下文,为admin_home_t
# semanage fcontext -a -t httpd_sys_content_t '/var/www/html/cacti/plugins/npc(/.*)?' //定义npc上下文规则
# restorecon -RFvv npc/ //更改npc的上下文
登录cacti控制台,打开Plugin Management页面,找到Npc插件,点击install Plugin->enable Plugin,此时graphs旁边就有了npc选项了
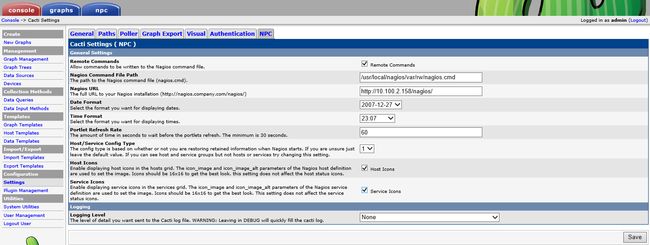
修改npc配置:Configuration->Settings->NPC,如下图:
勾选Remote Commands,输入Nagios Command File Path[/usr/local/nagios/var/rw/nagios.cmd],Nagios URL[http://10.100.2.158/nagios/],勾选Host Icons、Service Icons,Save保存。
重启相关服务:
# systemctl stop nagios
# systemctl restartmariadb
# systemctl restart httpd
# /usr/local/nagios/bin/ndo2db -c /usr/local/nagios//etc/ndo2db.cfg
# systemctl start nagios
# tail -20/var/log/messages //此时查看日志会有错误信息
修改mysql数据库表:
# mysql -ucactiuser -p
use cacti;
Nagios4.0及以上版本sql脚本(蓝色字体为4.0以下脚本):
CREATE TABLE IF NOT EXISTS `npc_service_parentservices` (
`service_parentservice_id` int(11) NOT NULL auto_increment,
`instance_id` smallint(6) NOT NULL default '0',
`service_id` int(11) NOT NULL default '0',
`parent_service_object_id` int(11) NOT NULL default '0',
PRIMARY KEY (`service_parentservice_id`),
UNIQUE KEY `instance_id` (`service_id`,`parent_service_object_id`)
) ENGINE=MyISAM COMMENT='Parent services';
ALTER TABLE `npc_hostchecks` ADD COLUMN `long_output` varchar(8192) NOT NULL default '' AFTER `output`;
ALTER TABLE `npc_hoststatus` ADD COLUMN `long_output` varchar(8192) NOT NULL default '' AFTER `output`;
ALTER TABLE `npc_servicechecks` ADD COLUMN `long_output` varchar(8192) NOT NULL default '' AFTER `output`;
ALTER TABLE `npc_servicestatus` ADD COLUMN `long_output` varchar(8192) NOT NULL default '' AFTER `output`;
ALTER TABLE `npc_statehistory` ADD COLUMN `long_output` varchar(8192) NOT NULL default '' AFTER `output`;
ALTER TABLE `npc_eventhandlers` ADD COLUMN `long_output` varchar(8192) NOT NULL default '' AFTER `output`;
ALTER TABLE `npc_systemcommands` ADD COLUMN `long_output` varchar(8192) NOT NULL default '' AFTER `output`;
ALTER TABLE `npc_notifications` ADD COLUMN `long_output` varchar(8192) NOT NULL default '' AFTER `output`;
ALTER TABLE `npc_services` ADD COLUMN `importance` varchar(8192) NOT NULL default '' AFTER `icon_p_w_picpath_alt`;
ALTER TABLE `npc_hosts` ADD COLUMN `importance` varchar(8192) NOT NULL default '' AFTER `z_3d`;
ALTER TABLE `npc_contacts` ADD COLUMN `minimum_importance` varchar(8192) NOT NULL default '' AFTER `notify_host_downtime`;
3、安装Settings、Thold、Monitor、realtime等插件
下载地址:http://docs.cacti.net/plugins
解压缩后,移动到plugins目录,例如:
# tar zxvf settings-v0.71-1.tgz
# mv settings /var/www/html/cacti/plugins/ //其他插件类似
# chown -R nagios.nagios /var/www/html/cacti/plugins
# restorecon -RFvv /var/www/html/cacti/plugins
打开Plugin Management页面,选择相关插件Install Plugint->Enable Plugin
插件配置和使用:
1、 使用monitor插件
a. 打开“Console → Settings → Misc”,可以调整Monitor的各项配置。
例如:勾选“Show Icon Legend”可以在监控页面显示图例,“View”可以选用Tiles类型,以显示设备状态表格。
b. 为cacti添加新设备时,勾选上“Monitor Host”项。对已添加的设备可以通过“Management → Devices”进去修改。
c. 单击Web页面上方的“monitor”标签链接,可以进入查看各设备/主机的状态图示。
2、 使用realtime插件
安装完realtime,在每一个监控图边上,都会有一个小图标,此时点击这个小图标,不会出来实时的数据,会报“The Image Cache Directorydirectory does not exist. Please first create it and set permissions and thenattempt to open another realtime graph”。
提示出没有Cache目录以及权限等的错误,需要进一步配置后才能取到数据。
a. 设置Cache目录及权限
# cd /var/www/html/cacti/
# mkdir cache
# chown –R nagios.nagios cache
# chmod –R 777 cache
# semanage fcontext -a -t httpd_cache_t '/var/www/html/cacti/cache(/.*)?'
# restorecon -RFvv cache/
b. 登录cacti网页
打开“Console →Settings → Misc”,设置“Cache Diredtiory”为“/var/www/html/cacti/cache”,保存后会出现 [OK: DIRFOUND]
此时再点击上图的小图标就会出来数据了,如果启用SELinux,注意修改设置否则提示无写入权限。
3、 使用thold插件
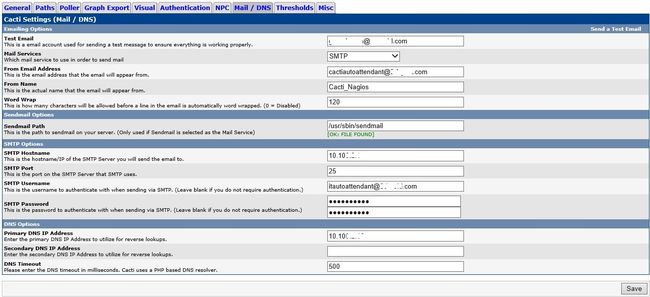
使用thold之前先要配置email参数
a. 配置email参数
# yum install mailx,sendmail
# systemctl mask postfix
# systemctl enable sendmail
# systemctl start sendmail
注:外部邮箱需要先在邮箱设置里启用POP3/SMTP服务,如使用163邮箱,密码为邮件授权码。
b. 设置thold模板
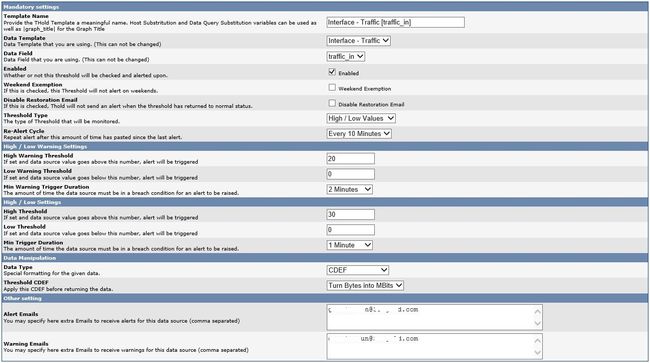
在Console->Templates->Threshold Templates页面点击ADD添加阀值模板:
如下,选择数据模板类型,数据来源,点击Create创建
WAN流量监控,使用自定义的CDEF计算,超过20M将告警,30M严重警告。
在创建好的模板里面,设置各项值:
注释:Data Type 选择的是“CDEF”说明按自定义的值计算;
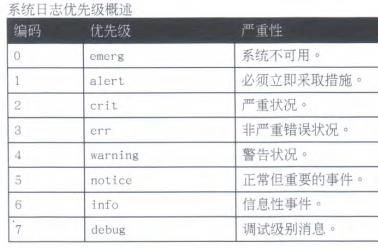
High Threshold里的30,是指流量使用超过30M发送报警,High Threshold实为High Alert Threshold,严重级别如下图;
Min Trigger Duration设置为1分钟,是指持续1分钟后触发,如果设置为Never则表示符合条件即触发告警,无需告警持续产生;
Re-Alert Cycle设置为10分钟,是指如果阈值没有恢复,一直处于30M以上,则每10分钟触发一次;
Alert EMail、Warning Email里填写邮件接收的Email地址,多个地址以逗号分隔。点击【Save】保存。
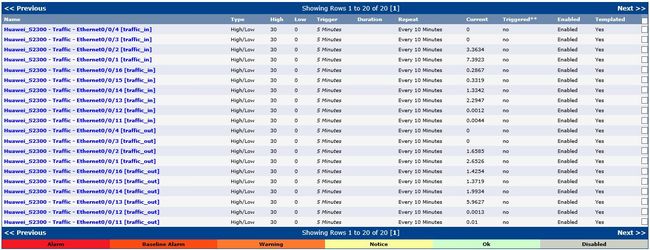
在Console->Management->Thresholds里可选择具体的告警项,取消“Template Propagation Enabled”前面的勾,不使用模板,自定义告警值。
注:创建CDEF方法:
为便于直观查看数据,避免换算来换算去的麻烦,可以自己定义CDEF很好的显示流量。
创建CDEF,Console->Graph Management->CDEF->Add
Name: Turn Bytes into MBits
Item Item Value
Item #1 Special Data Source: CURRENT_DATA_SOURCE
Item #2 Custom String: 8
Item #3 Operator: *
Item #4 Custom String: 1024
Item #5 Operator: /
Item #6 Custom String: 1024
Item #7 Operator: /
即:cdef=CURRENT_DATA_SOURCE,8,*,1024,/,1024,/
意义:数据源 * 8 / 1024 / 1024 (Mbits)
创建内存和硬盘监控模板:同上
注:这里有一个问题,如果模板里选择的是百分比,采用模板创建后不管阀值是多少,都是会认为超过阀值而报警。在Thresholds里取消“Template Propagation Enabled”重新保存即可。
在创建好的模板里面,设置各项值:
注释:Data Type 选择的是“Percentage”说明阀值按百分比算,
High Warning Threshold里的80,是指分区使用超过80%发送报警;
Min Trigger Duration设置为5分钟,是指持续5分钟后触发;
Re-Alert Cycle设置为10分钟,是指如果阈值没有恢复,一直处于80%以上,则每10分钟触发一次;
Alert EMail、Warning Email里填写邮件接收的Email地址,多个地址以逗号分隔。点击【Save】保存。
c. 创建通知列表(可省略)
在Console->Management->Notification Lists页面,点击右上角Add,输入列表名称、描述内容、邮箱地址,点击Save保存即可。
d. 创建告警模板
在Console->Create->New Graphs页面,选择Host和Graph Types,然后点击Auto-create thresholds,将自动生成告警模板。
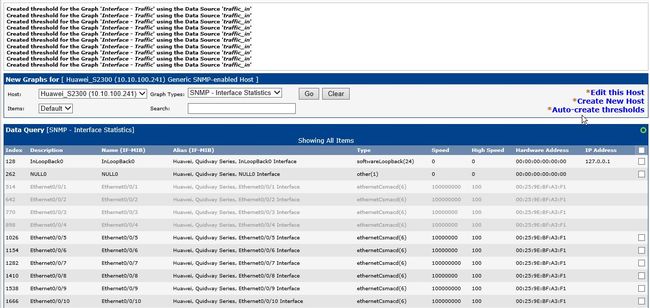 在Console->Management->Thresholds页面,可以看到刚才创建的告警项。
e. 告警的项
在Console->Management->Data Sources页面选择想创建告警项的监控名,点击Template Name编辑保存即可,类似上面操作。
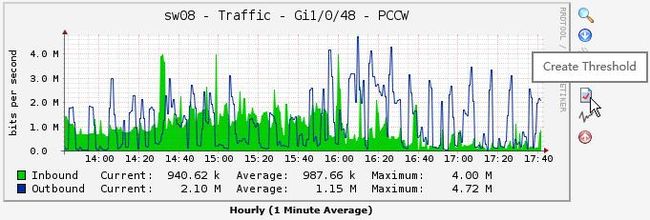
或者在Graphs监控图里点击右边有红色勾的图标,创建告警。如下图:
即不创建模板,也可自定义创建告警的项。
4、绘制Nagios监控图
基本流程:定义数据输入方法-定义数据模版-定义绘图模版
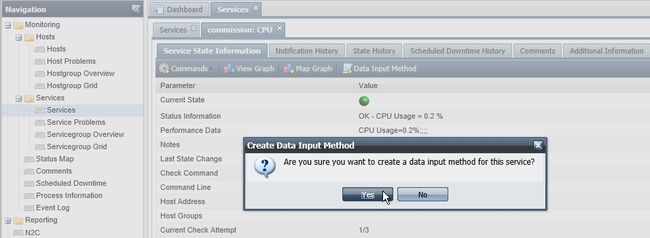
打开需要绘图服务的详细信息:
点击“Data Input Method”,选择Yes往cacti里引入一条数据输入脚本
此时在Cacti主控制台的Data Input Methods页面就有了一条新的记录
下面Output Fields栏显示的是这个输入方法定义的输出字段名,下面要定义的数据模版就要引用这些字段(没有这些字段可以参考Unix – Get Load Average新增)
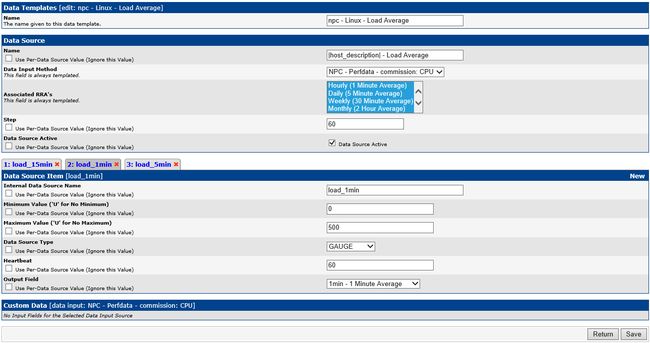
在Console控制台的Data Templates页面,新建一个数据模板(可以通过已有模板复制),如下:
输入新建模板的名称,Data Input Method改为上面新增的NPC - Perfdata - commission: CPU,勾选上Hourly(1 Minute Average),Step值改为60。另外注意检查Output Field的值和Data Source Item名称是否相对应。如下图:
在Console的Graph Templates页面,新建一个绘图模板,方法同上,可以选择一条类似的模板复制生成,然后再修改。
中间Graph Item Inputs有三个数据源,这是绘图的三个输入数据项名称。每个数据项又是引用的上面Graph Item中的某项。如下图:
分别打开Item # 1至# 6,修改Data Source为上面新建的相对应时间的数据源,如下:
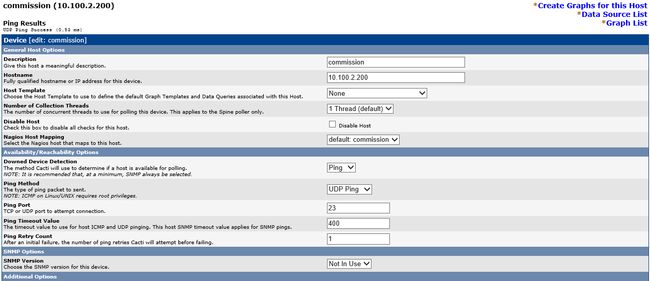
新增设备:同Cacti添加设备操作,在Devices页面,点击ADD添加
再在Graph Trees添加主机
然后在graphs控制台就可以看到新增加的绘制的图像了
把绘图添加到Graph Trees几分钟后就可以看到图表了,如果没有,检查下rra目录权限是否正确。或者直接用npc的那个脚本看能不能获取数据,在Data Input Methods里点开自己定义的数据输入方法,可以查到npc里自己这个服务的编号。然后用php -q 路径/perfdata.php --type=service --id=服务编号,看能不能获取到数据。如下:
整合完成后在NPC里查看监控图时显示不了,查看图片的URL地址发现路径不对,如下:http://10.100.2.158/graph_p_w_picpath.php?action=view&local_graph_id=17&rra_id=1
正确路径为:/cacti/graph_p_w_picpath.php
解决办法:修改/var/www/html/cacti/plugins/npc/目录下的以下js文件
js/src/monitoring/services/serviceDetail.js
js/src/monitoring/services/services.js
js/src/monitoring/hosts/hosts.js
js/src/monitoring/hosts/hostDetail.js
js/src/npc.js
js/npc-all-min.js
把/graph_p_w_picpath.php?这一串修改为:/cacti/graph_p_w_picpath.php?即添加/cacti/目录即可
可使用以下查找替换命令:
:1,$s/\/graph_p_w_picpath.php?/\/cacti\/graph_p_w_picpath.php?/gc
修改完成后清空浏览器缓存,再重新打开就可以看到图像了。
参考:http://linuxsogood.org/1003.html
