内容转载自我自己的博客 代码已上传Github仓库 https://github.com/zfb132/wechatPlatform
@TOC
准备工作
首先,申请一个属于自己的微信公众号(必须保证全局管理员是自己的微信账户,否则会很麻烦),还要拥有自己的服务器(Ubuntu 系统)来部署代码,且服务器已经成功安装了网络相关的两个常用软件 uwsgi 和 nginx ,前者一般用于进程控制,后者用于反向代理。
服务器端部署流程
第一步,在 Ubuntu 系统安装 venv :
sudo apt-get install python3-venv
第二步,创建 Python3 的虚拟环境:
python3 -m venv myvenv
注意:source myvenv/bin/activate表示激活虚拟环境,deactivate退出虚拟环境
第三步,在虚拟环境中升级pip:
pip install --upgrade pip
然后安装requirements.txt文件内的模块:
pip install -r requirements.txt
第四步:主代码的编写,主要有两种方法:
一种方法,直接下载我已经写好的代码运行即可:
git clone [email protected]:zfb132/wechatPlatform.git
另一种方法,自己逐个创建代码,创建所有代码后的目录文件结构如下:
wechatPlatform/
wechatPlatform/app/
wechatPlatform/app/__init__.py
wechatPlatform/app/config.py
wechatPlatform/app/controller/
wechatPlatform/app/controller/main.py
wechatPlatform/log.py
wechatPlatform/requirements.txt
wechatPlatform/runserver.py
各文件内容附在文章的最后。其中,要把config.example.py文件重命名为config.py,然后把里面的token改成自己的
第五步,编辑nginx.conf文件:
sudo vi /etc/nginx/nginx.conf
在合适位置添加以下内容:
    server{
        listen 80;
        server_name xxxx.whuzfb.cn;
        access_log /home/ubuntu/wechatPlatform/log/access.log;
        error_log /home/ubuntu/wechatPlatform/log/error.log;
        location /{
            include uwsgi_params;
            uwsgi_pass 127.0.0.1:8111;
            proxy_pass http://127.0.0.1:8111/;
        }
    }
然后再重启 nginx 服务:
service nginx restart
最后启动本代码在后台运行:
uwsgi uwsgi_wechat.ini -d ./server.log
至此,服务器端的代码已经全部编写并部署完成
注意:在启动uwsgi后会生成四个进程监听8111端口,如果想要杀死他们,先查看占用8111端口的所有进程的ID(不能直接关闭uwsgi,这可能会影响到其他项目),终端输入lsof -i:8111命令即可查看,然后使用kill -9 id依次杀死各个进程;这种方法比较麻烦,另一种快速的方法是:
kill -9 $(lsof -t -i:8111)
此命令可一步到位杀死所有占用8111端口的进程
微信平台网页端配置
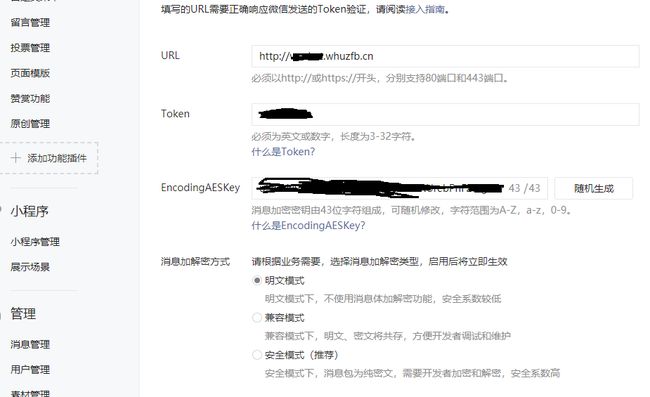
浏览器打开微信公众平台登录自己的管理员账户,点击开发栏目,选择基本配置,根据网页提示填写这三个内容(一般选择明文模式):  需要注意的是,一定要先在服务器端把代码运行起来,这样才能成功保存网页端的配置
附录
log.py文件内容:
#!/usr/bin/env python
# -*- coding: utf-8 -*-
import os
import logging
from logging.handlers import RotatingFileHandler

LOG_FORMAT = "%(asctime)s [%(funcName)s: %(filename)s,%(lineno)d] - %(levelname)s : %(message)s"
DATE_FORMAT = "%m/%d/%Y %H:%M:%S"
LOG_PATH = "./log/"

# 初始化日志文件配置
def initLog(fileName,logger):
    # 创建日志文件夹
    if not os.path.exists(LOG_PATH):
        os.mkdir(LOG_PATH)
    myapp = logging.getLogger(logger)
    myapp.setLevel(logging.DEBUG)
    # 切割日志文件
    handler = RotatingFileHandler(LOG_PATH+fileName, maxBytes=128*1024,backupCount=60)
    handler.setFormatter(logging.Formatter(LOG_FORMAT,DATE_FORMAT))
    myapp.addHandler(handler)
    return myapp
runserver.py文件内容:
#!/usr/bin/env python
# -*- coding: utf-8 -*-
from app import app
from log import initLog
logging = initLog('wechat.log','runserver')
if __name__ == '__main__':
    app.run(debug=True,port=8111)
application = app
config.py文件内容:
#!/usr/bin/env python
# -*- coding: utf-8 -*-
DEFAULTMESSAGE = "你好,消息已收到"
token = "mytoken"
__init__.py文件内容:
#!/usr/bin/env python
# -*- coding: utf-8 -*-
from flask import Flask
import logging
import os

app = Flask(__name__)
app.secret_key = "thisissecretkey"

from app.controller.main import *
main.py文件内容:
#!/usr/bin/env python
# -*- coding: utf-8 -*-
from app import app
from flask import request
import app.config as config
import logging

from wechatpy.utils import check_signature
from wechatpy.exceptions import InvalidSignatureException
from wechatpy import parse_message
from wechatpy.replies import TextReply
from wechatpy.replies import ImageReply

logging = logging.getLogger('runserver.main')

def handlemsg(data):
    msg = parse_message(data)
    print(msg)
    logging.debug('handle msg:'.format(msg))
    xml = txtreply(msg,msg.content)
    return xml

# 微信消息接口
@app.route('/',methods=["POST","GET"])
def main():
    logging.debug('进入主页面')
    try:
        signature = request.args.get("signature", "")
        timestamp = request.args.get("timestamp", "")
        nonce = request.args.get("nonce", "")
        echostr = request.args.get("echostr", "")
        # echostr是微信用来验证服务器的参数,需原样返回
        if echostr:
            try:
                logging.debug('正在验证服务器签名')
                check_signature(config.token, signature, timestamp, nonce)
                logging.debug('验证签名成功')
                return echostr
            except InvalidSignatureException as e:
                logging.error('检查签名出错: '.format(e))
                return 'Check Error'
        # 也可以通过POST与GET来区别
        # 不是在进行服务器验证,而是正常提交用户数据
        logging.debug('开始处理用户消息')
        xml = handlemsg(request.data)
        return xml
    # 处理异常情况或忽略
    except Exception as e:
        logging.error('获取参数失败: '.format(e))

def imgreply(msg,id):
    reply = ImageReply(message=msg)
    reply.media_id = id
    xml = reply.render()
    return xml

def txtreply(msg,txt):
    reply = TextReply(content=txt, message=msg)
    xml = reply.render()
    return xml
uwsgi_wechat.ini文件内容:
[uwsgi]
# http协议对客户端开发的端口号
http = 0.0.0.0:8111
# 应用目录,即python代码所在目录
pythonpath = ./
# web 应用python主程序
wsgi-file = ./runserver.py
# 一般在主运行程序里指定 app = Flask(__name__)
callable = app
# 工作进程数
processes = 4
# 线程数
threads = 2
# 指定日志文件
demonize = ./server.log
# python 虚拟环境目录
home = ./myvenv
后记
虽然目前这个代码只是把用户发来的消息再原封不动的返回给用户,看起来好像折腾了半天并没有实现啥有趣的功能,但是它最少实现了解析用户发来的消息以及返回给用户文字消息的功能,这已经足够了。消息处理的逻辑可以自己继续慢慢完善,比如接入图灵机器人等有趣功能