概述: 简要描述 OCLint 的安装以及使用,最后给出一个自动评审的 shell 脚本;
参考资料:
OCLint
xcpretty
转载请表明: 文章出处:http://www.jianshu.com/p/aa4305aa5468
完整脚本下载:https://github.com/hehtao/OCLint
一.OCLint 是什么?
官方原话如下:
OCLint is a static code analysis tool for improving quality and reducing defects by inspecting C, C++ and Objective-C code and looking for potential problems like:
Possible bugs - empty if/else/try/catch/finally statements
Unused code - unused local variables and parameters
Complicated code - high cyclomatic complexity, NPath complexity and high NCSS
Redundant code - redundant if statement and useless parentheses
Code smells - long method and long parameter list
Bad practices - inverted logic and parameter reassignment
...
Static code analysis is a critical technique to detect defects that aren't visible to compilers. OCLint automates this inspection process with advanced features:
Relying on the abstract syntax tree of the source code for better accuracy and efficiency; False positives are mostly reduced to avoid useful results sinking in them.
Dynamically loading rules into system, even in the runtime.
Flexible and extensible configurations ensure users in customizing the behaviors of the tool.
Command line invocation facilitates continuous integration and continuous inspection of the code while being developed, so that technical debts can be fixed early on to reduce the maintenance cost.
简单描述就是:
OCLint是一个静态代码分析工具,提高质量和减少缺陷通过检查C 、C++ 和Objective-C 代码和寻找潜在的问题,如:
- 可能的缺陷 - 空的if / else / try / catch / finally语句
- 未使用的代码 - 未使用的局部变量和参数
- 复杂的代码 - 很高的圈复杂度,NPath复杂性和太高的NCSS
- 代码异味 - 长方法和参数列表
- 长方法和参数列表不好的实践——倒逻辑和参数重新分配
…....
二.OCLint 安装:
1. 安装OCLint:
brew tap oclint/formulae
brew install oclint
2. 安装xcpretty:
gem install xcpretty
3. 更新:
brew update
brew upgrade oclint
三.使用:
先来看一串终端命令(稍后一句一句解释):
cd yourProjectPath   //你的工程所在目录
xcodebuild clean       // 相当于 bulid clean
xcodebuild | xcpretty -r json-compilation-database // 生成json 格式的编译文件,保存在工程目录下的 build/reports文件,文件名称为compilation_db.json
cp build/reports/compilation_db.json compile_commands.json // 将compilation_db.json 文件拷贝至当前目录并rename为compile_commands.json
oclint-json-compilation-database -e Pods -- -rc=LONG_LINE=200 -rc=NCSS_METHOD=100 -o=report.html //忽略 Pods 文件,-rc 执行规则每行最大字节长度为200字符, 忽略注释后括号后的有效代码行数40行;
oclint-json-compilation-database 相关规则:
# --命名
# 变量名字最长字节
#-rc=LONG_VARIABLE_NAME=20 /
# 变量名字最短字节
#-disable-rule ShortVariableName /
# --size
# 圈复杂度
#-re=CYCLOMATIC_COMPLEXITY=10 /
# 每个类最行数
#-rc=LONG_CLASS=700 /
# 每行字节数量
#-rc=LONG_LINE=200 /
# 每个方法行数
#-rc=LONG_METHOD=80 /
# 忽略注释后括号后的有效代码行数
#-rc=NCSS_METHOD=40 /
# 嵌套深度
#-rc=NESTED_BLOCK_DEPTH=5 /
# 字段数量
#-rc=TOO_MANY_FIELDS=20 /
# 方法数量
#-rc=TOO_MANY_METHODS=30 /
# 方法参数
#-rc=TOO_MANY_PARAMETERS=6
正常情况下,执行完上述命令此时在你的工程目录里已经生成了一个 report.html,长得下面这个样子:
 report.html
是不是懵逼了? 这是什么鬼东西? 怎么可以这么丑?确定不是乱码么?很负责的说这就是分析的结果呀!!! 接下来我们把它变好看些:
修改上面最后一条指令如下:
oclint-json-compilation-database -e Pods -- -report-type html -rc=LONG_LINE=200 -rc=NCSS_METHOD=100 -o=report.html //-report-type html 表示分析后输出的文件类型为HTML,查看其他支持的文件类型
再来看一下新生成的 report.html 文件:
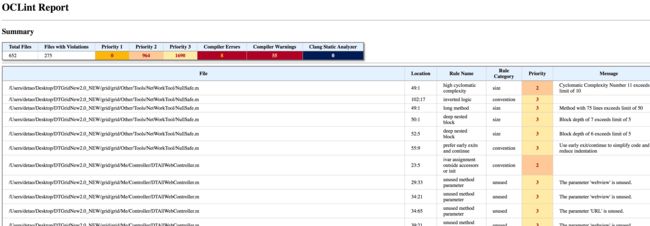 report.html
是不是清爽了很多? 也许你又说了,可是我还是看不懂啊!!!!!莫慌,且看我来解释:
OCLint的分析结果:
优先级的级别是从Priority 1, Priority 2, Priority 3 依次降低的
Total Files 总文件数
Files with Violations 违规文件数
Compiler Warnings 表示项目中的警告⚠️
Compiler Errors 表示编译错误
Location 表示警告的位置
Rule Name  规则名称
Localtion  问题所在位置
一起读一条:
描述信息如下:
- Priority: 3;
- Files:文件位置 xxxxx/Controller/DTAllWebController.m
- Localtion: 代码不符规则的位置: 29:33 第29行第33个字符开始的位置;
- Rule Name: unused method parameter;
- Message: 这些自己看吧;
到此,基本的使用已经讲完了,规则可以也已根据需求自定义;
但是,注意这个但是来了,每次写终端写一堆东西,好麻烦呀,咱们来写个脚本吧;
GOGOGO....
四.OCLint 脚本:
那么问题来了,脚本怎么写?没写过啊,我也不知道啊!!!!Google吧;
来一个简单地 shell "hello world" 脚本各位欣赏一下:
echo 'hello world'
是不是简单至极??意不意外,惊不惊喜 .....
大概描述一下shell 编辑过程:
- 打开终端输入 vim 点击 "i" 进入 insert模式,注意左下角;
- 输入 echo 'hello world',按 esc 进入命令行模式;
- 输入 :wq test.sh 文件保存为 test.sh 并退出 vim 模式;
- chmod +x test.sh 命令,更改test.sh 权限;
- ./test.sh 执行,输出 hello world;
下面来写OCLint 的脚本,仿造上面的流程:
将 echo 'hello world' 替换为:
xcodebuild clean
xcodebuild | xcpretty -r json-compilation-database
cp build/reports/compilation_db.json compile_commands.json
oclint-json-compilation-database -e Pods --  -report-type html -rc=LONG_LINE=200 -rc=NCSS_METHOD=100 -o=report.html
最终保存为: 你喜欢的名字.sh 例如:oclint.sh
脚本使用:
cd 至工程所在目录.执行 ./oclint.sh ,终端开始刷屏 .......

五. xcodebuild 命令报错解决方案:
如果你风骚的装了多个xcode(我是789全都有 ...) ,执行xcodebuild可能会遇到如下错误:
CoreSimulator detected Xcode.app relocation or
CoreSimulatorService version change.  Framework path
(/Library/Developer/PrivateFrameworks/CoreSimulator.framework
) and version (494.4) does not match existing job path
(/Applications/Xcode.app/Contents/Developer/Library/PrivateFra
meworks/CoreSimulator.framework/Versions/A/XPCServices/com
.apple.CoreSimulator.CoreSimulatorService.xpc) and version
(375.21).  Attempting to remove the stale service in order to add
the expected version.
解决方案如下:
终端执行如下命令:
launchctl remove com.apple.CoreSimulator.CoreSimulatorService || true
六. 完整的shell脚本:
if which oclint 2>/dev/null; then
echo 'oclint exist'
else
brew tap oclint/formulae
brew install oclint
fi
if which xcpretty 2>/dev/null; then
echo 'xcpretty exist'
else
gem install xcpretty
fi
xcodebuild clean
xcodebuild -workspace=grid  -scheme=grid | xcpretty -r json-compilation-database
cp build/reports/compilation_db.json compile_commands.json
oclint-json-compilation-database -e Pods -- \
-report-type html \
-rc=LONG_VARIABLE_NAME=20 \
-rc=ShortVariableName=4 \
-rc=LONG_CLASS=700 \
-rc=LONG_METHOD=80 \
-rc=LONG_LINE=200 \
-rc=NCSS_METHOD=120 \
-rc=NESTED_BLOCK_DEPTH=5 \
-rc=TOO_MANY_FIELDS=20 \
-rc=TOO_MANY_METHODS=30 \
-rc=TOO_MANY_PARAMETERS=6 \
-o=report.html
open ./report.html
简单解释一下上面的 if which oclint 2>/dev/null
shell 的 if 语句一般格式:
if ....; then
....
elif ....; then
....
else
....
fi
which 命令: 判断某个指令是否纯在,纯在则默认将结果打印在控制台;
" >/dev/null "将之前的结果重定向到/dev/null,不在控制台打印;