最近打算给xmake写一些IDE和编辑器的集成插件,发现vscode的编辑器插件比较容易上手的,就先研究了下vscode的插件开发流程,并且完成了xmake-vscode插件的开发。
我们先来看几张最后的效果图:
语法高亮和自动补全
状态栏
要实现上面的效果,其实并不复杂,首先我们先来简单介绍下,vscode的插件开发的基本流程:
安装插件开发环境
安装cnpm
由于国内环境比较复杂,直接用npm安装也许很慢或者访问不稳定,因此这里先安装了cnpm去默认使用淘宝的镜像源。
$ npm install -g cnpm --registry=https://registry.npm.taobao.org
创建空工程
通过cnpm去安装yo工具,用来创建一个vscode插件的空工程
$ cnpm install -g yo generator-code
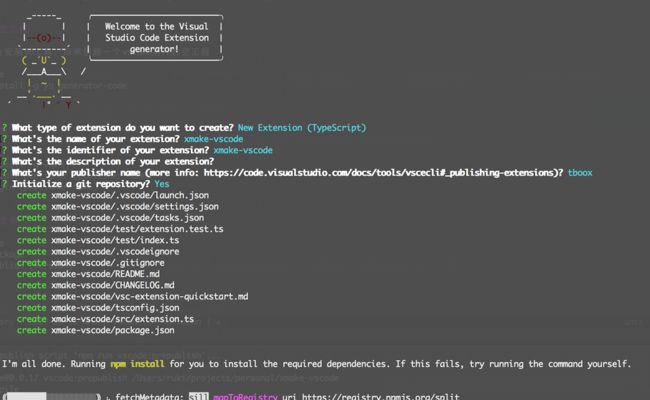
$ yo code
大体的源码结构如下:
选择创建项目后有四个输入和一个选择:
- 输入你扩展的名称 xmake-vscode
- 输入一个标志(项目创建的文件名称用这个)xmake-vscode
- 输入对这个扩展的描述
- 输入以后要发布用到的一名称(和以后再发布时候有一个名字是对应上的)tboox
- 是问你要不要创建一个git仓库用于版本管理
创建完成后的空工程,我们可以用vscode直接打开,然后进行调试加载运行下:
加载起来后,敲F1打开命令窗口,运行默认的hello world测试命令:
到此,一个简答的demo插件就搞定了,接下来我们简单介绍下如何发布这个插件到vscode的market上去。
创建发布者
首先我们需要在marketplace.visualstudio.com上注册一个账号,创建一个发布者,这里我取名为tboox
然后,我们需要在自己的账号里面,添加一个Personal Access Token(地址:https://[your name].visualstudio.com/_details/security/tokens,注意Token只显示一次,最好自己保存一份)
接着,我们安装下vsce这个工具,用于vscode的插件工程打包编译和发布。
$ cnpm install -g vsce
安装好vsce后,我们先创建一个发布者,这里为tboox,输入刚刚market账号里面提供的token进行绑定。
$ vsce create-publisher (publisher name)
构建发布
最后,只需要通过下面命令进行打包或者发布就行了,如果仅仅打个本地包,拖入vscode加载测试,可以运行:
$ vsce package
这将会生成一个类似xmake-vscode-0.0.1.vslx的插件包文件,用vscode可直接加载运行。
如果,我们已经开发完了插件,想要发布到market市场,可以执行:
$ vsce publish [version]
这个时候,我们就可以在xmake-vscode on marketplace上看到你的插件了,用户也可以直接通过vscode进行搜索和安装使用。
插件开发详解
插件的加载机制
插件通过工程根目录extension.json中配置的activationEvents进行触发,例如:
{
    "activationEvents": [
        "workspaceContains:xmake.lua",
        "onCommand:xmake.sayHello"
    ]
}
当vscode打开带有xmake.lua的目录或者执行xmake.XXX相关命令的时候,都会触发加载xmake-vscode插件,然后调用src/extension.ts中的activate入口函数,进行插件的加载和初始化。
export function activate(context: vscode.ExtensionContext) {

    let disposable = vscode.commands.registerCommand('xmake.sayHello', () => {
        vscode.window.showInformationMessage('Hello XMake!');
    });

    context.subscriptions.push(disposable);
}
上述代码,在加载插件的时候,注册sayHello命令,去显示Hello XMake!提示信息。
创建自定义输出
vscode通过创建OutputChannel来输出自己的日志信息,代码如下:
import * as vscode from 'vscode';

let log = vscode.window.createOutputChannel("xmake/log");
log.show();
log.appendLine("hello xmake!");
在创建的时候可以指定一个label名,用于区分不同的输出通道,最后显示的结果如下:
需要注意的是,必须执行log.show(),输出才会被显示出来,并且输出行为是带缓存刷新的,并不会实时输出,也不支持色彩高亮输出。
创建和控制终端
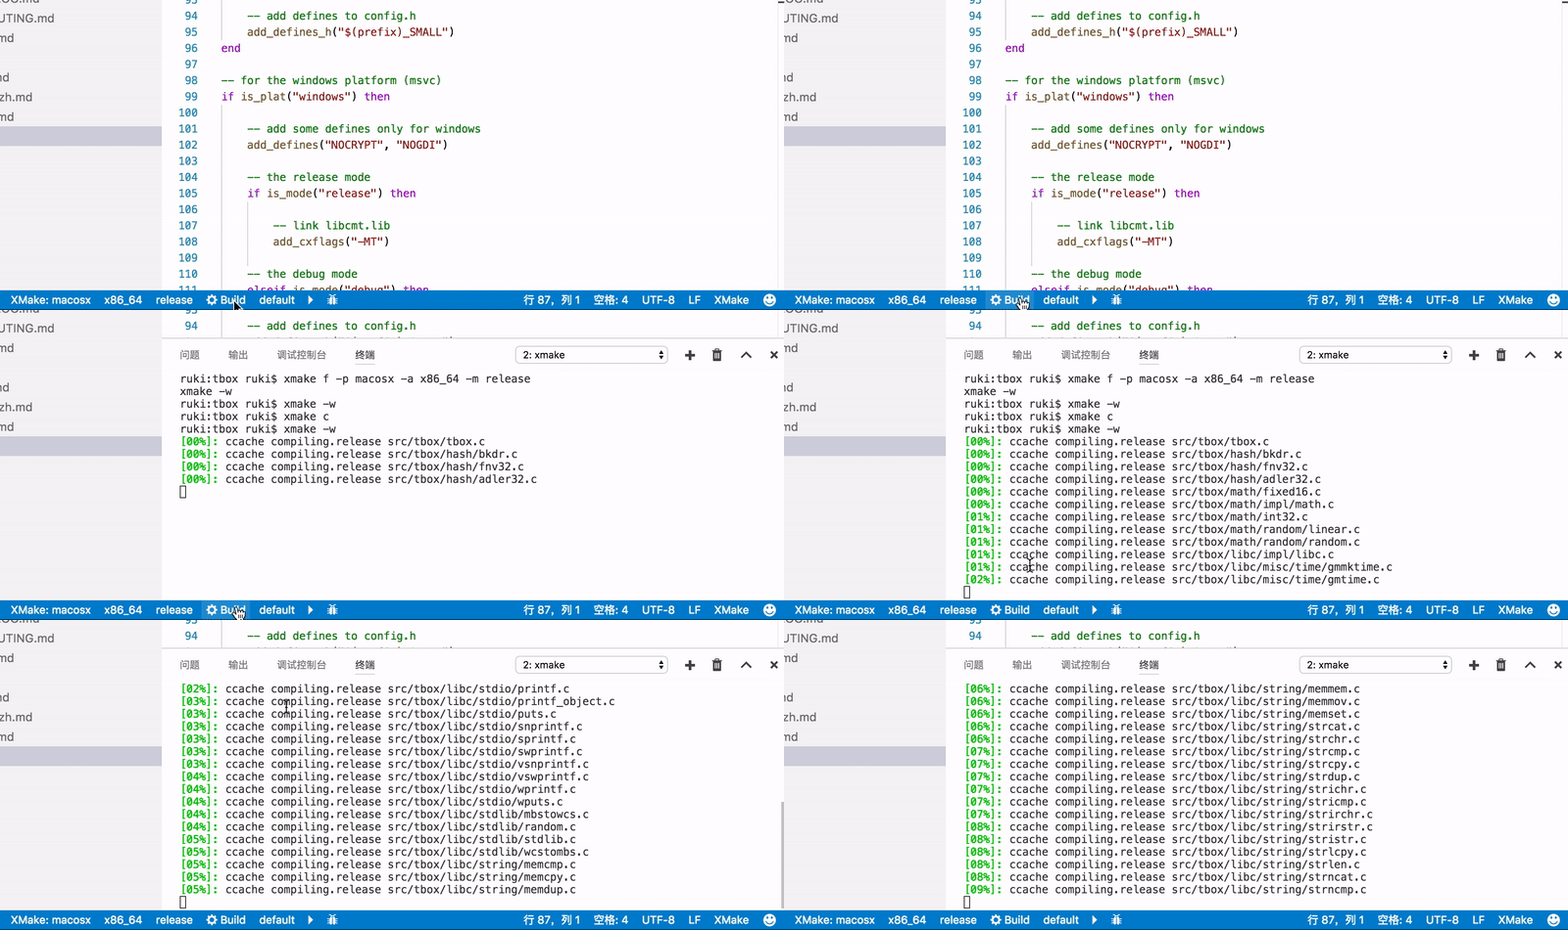
之前,xmake-vscode就是采用channel的方式来输出xmake的构建信息,效果不是很理想,因此后来改用了终端直接执行的方式,可以看下下面的效果图:
那如何控制终端,执行自己的命令呢,其实也非常简单:
let terminal = vscode.window.createTerminal({name: "xmake"});
terminal.show(true);
terminal.sendText("xmake");
上面的代码,通过创建一个label名为xmake的独立终端,然后发送执行命令:xmake,去让终端执行xmake进行项目的构建,当然如果要显示出来,还是要先调用下terminal.show(true)。
添加和读取全局配置
xmake-vscode里面增加了一些全局vscode配置项,用于控制xmake-vscode插件的行为,配置清单是在package.json文件中进行描述的,例如:
{
    "configuration": {
        "type": "object",
        "title": "XMake configuration",
        "properties": {
            "xmake.logLevel": {
                "type": "string",
                "default": "normal",
                "description": "The Log Level: normal/verbose/minimal",
                "enum": [
                    "verbose",
                    "normal",
                    "minimal"
                ]
            },
            "xmake.buildDirectory": {
                "type": "string",
                "default": "${workspaceRoot}/build",
                "description": "The Build Output Directory"
            },
            "xmake.androidNDKDirectory": {
                "type": "string",
                "default": "",
                "description": "The Android NDK Directory"
            }
        }
    }
}
上述配置,增加了三个配置项,都在xmake.域下面,可在vscode配置中直接搜索xmake相关字样就能方便找到。
读取配置也很方便,只要获取xmake相关域配置,进行读取就行了:
const config = vscode.workspace.getConfiguration('xmake');
config.get("buildDirectory");
创建状态栏
状态栏上的按钮是可以响应之前创建的那些命令的,例如:xmake.sayHello等,下面我们在状态栏上创建一个debug按钮,用来调试运行xmake构建的程序:
let debugButton = vscode.window.createStatusBarItem(vscode.StatusBarAlignment.Left, 4.5);

debugButton.command = 'xmake.onDebug';
debugButton.text = `$(bug)`;
debugButton.tooltip = "Debug the given target";
debugButton.show();
createStatusBarItem中第二个参数4.5用于控制按钮在状态栏上的布局顺序,创建好后,再设置下一些基础属性就行了,这里按钮的文本直接通过$(bug)设置了一个图标来显示,更加的直观。
更多vscode内置支持的图标,可以自己从octicons上面去找。
点击这个按钮,将会触发xmake.onDebug命令,然后在终端上执行xmake run -d命令,去运行调试程序。
添加选项输入列表
在xmake-vscode的状态栏上,我们还增加了几个快速配置的状态按钮,用于快速切换不同的平台、架构、编译模式,例如:
这个时候,需要有个选项选择列表的支持,在点击按钮后,列出可以选择的几个选项,然后选择切换,那如何创建这个选项列表呢,直接上代码:
// 初始化选项列表清单
let items: vscode.QuickPickItem[] = [];
items.push({label: "linux", description: "The Linux Platform"});
items.push({label: "macosx", description: "The MacOS Platform"});
items.push({label: "windows", description: "The Windows Platform"});
items.push({label: "android", description: "The Android Platform"});
items.push({label: "iphoneos", description: "The iPhoneOS Platform"});
items.push({label: "watchos", description: "The WatchOS Platform"});
items.push({label: "mingw", description: "The MingW Platform"});
items.push({label: "cross", description: "The Cross Platform"});

// 显示选项列表,提示用户选择
const chosen: vscode.QuickPickItem|undefined = await vscode.window.showQuickPick(items);
if (chosen) {

    // 获取选择后的结果,然后更新状态栏按钮文本
    platButton.text = chosen.label;
}
自定义语法高亮
语法高亮完全可以通过配置文件来搞定,不用写代码,当然也可以在代码中动态配置,这样稍微繁琐些。
xmake-vscode里面需要处理工程xmake.lua描述文件的语法高亮,因此这边在package.json里面先定义了一个叫xmake的语言类型,如果编辑器打开xmake.lua文件,就会对其进行语法高亮处理。
{
    "contributes": {
        "languages": [
            {
                "id": "xmake",
                "filenames": [
                    "xmake.lua"
                ],
                "aliases": [
                    "XMake"
                ],
                "configuration": "./languages/xmake-configuration.json"
            }
        ],
        "grammars": [
            {
                "language": "xmake",
                "scopeName": "source.xmake",
                "path": "./languages/xmake-grammars.json"
            }
        ]
    }
}
跟语法高亮相关的描述,都放置在/languages/xmake-grammars.json中,用json来描述,我们也可以用xml的格式来描述,但是这样可读性不是很好。
xmake-grammars.json中的描述规则,我们摘录自lua的grammars文件,因为xmake.lua本身就是基于lua语法的,例如,我们匹配'xxx'单引号字符串的规则,进行字符串的高亮输出。
{
    "begin": "'",
    "beginCaptures": {
        "0": {
            "name": "punctuation.definition.string.begin.xmake"
        }
    },
    "end": "'",
    "endCaptures": {
        "0": {
            "name": "punctuation.definition.string.end.xmake"
        }
    },
    "name": "string.quoted.single.xmake",
    "patterns": [
        {
            "include": "#escaped_char"
        }
    ]
}
自动补全的实现
代码的自动提示和补全比较麻烦下,需要写个自定义的class,通过languages进行注册:
vscode.languages.registerCompletionItemProvider("xmake", new Completion());
这里我们定义了一个Completion类,注册到xmake语言上去,xmake语言定义,就是刚才讲的在package.json中的配置。
然后我们实现下这个Completion类:
export class Completion implements vscode.CompletionItemProvider {

    // 匹配当前输入,提供需要补全的候选文本列表
    public provideCompletionItems(document: vscode.TextDocument, position: vscode.Position, token: vscode.CancellationToken): Thenable {

        // 获取当前输入的单词文本
        let wordAtPosition = document.getWordRangeAtPosition(position);
        var currentWord = '';
        if (wordAtPosition && wordAtPosition.start.character < position.character) {
            var word = document.getText(wordAtPosition);
            currentWord = word.substr(0, position.character - wordAtPosition.start.character);
        }

        // 猜测匹配结果,返回候选列表
        return new Promise(function (resolve, reject) {
            Promise.all([
                getLuaKeywordsSuggestions(currentWord),
                getXMakeCommandsSuggestions(currentWord)
            ]).then(function (results) {
                var suggestions = Array.prototype.concat.apply([], results);
                resolve(suggestions);
            }).catch(err => { reject(err); });
        });
    }

    // 这里可以对刚刚返回的候选文本列表在做二次处理,例如:增加详细的文档描述信息
    public resolveCompletionItem(item: vscode.CompletionItem, token: vscode.CancellationToken): Thenable {

        // 对每个候选文本增加文档描述
        return new Promise(function (resolve, reject) {
            item.documentation = "xxxxxxxxxxx";
            resolve(item);
         });
    }
}
这部分代码比较多,就不完全贴出来了,完整实现,可参考:completion.ts
结语
本文讲述的一些vscode插件代码都来自xmake-vscode,有兴趣的同学可以直接参考源码,写个自己的插件。
原文出处:http://tboox.org/cn/2017/10/11/xmake-vscode/


