前言
这个系列是java spring mvc 源码阅读与分析的一个系列
阅读源码分支为
spring初始化流程
spring的初始化流程大概可以分为几个阶段
- web容器启动
- spring bean容器初始化 (通过
ContextLoaderListener启动,是根上下文) - DispatcherServlet初始化(初始化另一个上下文,这个上下文是根上下文的一个子上下文)
但是这几个阶段也不是固定的
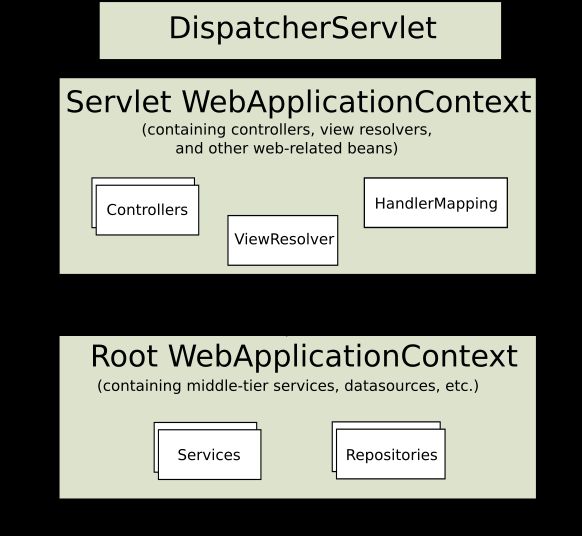
首先要科普的一点spring webmvc容器是分层的,有一个根容器,每一个DispatcherServlet拥有一个子容器
ContextLoaderListener这一步不是必选的,使用父子容器的设计也是方便除了webmvc使用其他使用spring容器的地方。只使用自容器也是可以的。
文档中介绍ContextLoaderListener:
Non-Spring MVC implementations are preferable for some projects. Many teams expect to leverage their existing investment in skills and tools, for example with JSF. If you do not want to use Spring’s Web MVC, but intend to leverage other solutions that Spring offers, you can integrate the web MVC framework of your choice with Spring easily. Simply start up a Spring root application context through its ContextLoaderListener, and access it through its ServletContext attribute (or Spring’s respective helper method) from within any action object. No "plug-ins" are involved, so no dedicated integration is necessary. From the web layer’s point of view, you simply use Spring as a library, with the root application context instance as the entry point. Your registered beans and Spring’s services can be at your fingertips even without Spring’s Web MVC. Spring does not compete with other web frameworks in this scenario. It simply addresses the many areas that the pure web MVC frameworks do not, from bean configuration to data access and transaction handling. So you can enrich your application with a Spring middle tier and/or data access tier, even if you just want to use, for example, the transaction abstraction with JDBC or Hibernate.
翻译过来大致是说
对于某些项目,非Spring MVC实现更为可取。许多团队希望利用他们现有的技能和工具投资,例如使用JSF。如果您不想使用Spring的Web MVC,但打算利用Spring提供的其他解决方案,您可以轻松地将您选择的Web MVC框架与Spring集成。通过其ContextLoaderListener简单地启动一个Spring根应用程序上下文,并通过任何动作对象中的ServletContext属性(或Spring的各自的帮助方法)访问它。没有涉及“插件”,因此不需要专门的集成。从Web层的角度来看,您只需使用Spring作为库,将根应用程序上下文实例作为入口点。即使没有Spring的Web MVC,您的注册bean和Spring的服务也可以在您的指尖。在这种情况下,Spring不会与其他Web框架竞争。它简单地解决了纯Web MVC框架从bean配置到数据访问和事务处理的许多方面。所以您可以使用Spring中间层和/或数据访问层来丰富您的应用程序,即使您只想使用JDBC或Hibernate的事务抽象。
一些重要的类与方法
org.springframework.web.context.support.XmlWebApplicationContext
这个类作文默认的webmvc 上下文类,其继承结构如下

比较复杂,根据这个实现接口的图,可以看出来这个类可以加载资源文件(实现
ResourceLoader接口)、区分上下级的bean容器(实现
BeanFactory接口和
HierarchicalBeanFactory接口),可以发布和接收消息(实现
ApplicationEventPublisher和
MessageSource接口)
这样就明白这个类的大致作用了
根容器初始化
web.xml中配置listener启动
一般在web.xml中我们需要配置
        contextConfigLocation

            classpath*:applicationContext-waimai-*.xml,
            classpath:webmvc-config.xml,


        org.springframework.web.context.ContextLoaderListener
注册了一个ContextLoaderListener listener,这个
在web环境启动的生命周期中,会向 ContextLoaderListener 这个listener会接收到一条消息,接收到消息后调用 ContextLoader#initWebApplicationContext 方法。ContextLoaderListener的继承关系如下

具体执行的是定义在父类ContextLoader中的方法
initWebApplicationContext
1、调用 initWebApplicationContext
initWebApplicationContext这个方法的核心代码如下
//如果context是空则创建一个context
if (this.context == null) {
                this.context = createWebApplicationContext(servletContext);
            }
            if (this.context instanceof ConfigurableWebApplicationContext) {
                ConfigurableWebApplicationContext cwac = (ConfigurableWebApplicationContext) this.context;
                if (!cwac.isActive()) {
                    // The context has not yet been refreshed -> provide services such as
                    // setting the parent context, setting the application context id, etc
                    if (cwac.getParent() == null) {
                        // The context instance was injected without an explicit parent ->
                        // determine parent for root web application context, if any.
                        ApplicationContext parent = loadParentContext(servletContext);
                        cwac.setParent(parent);
                    }
                    configureAndRefreshWebApplicationContext(cwac, servletContext);
                }
            }
        //设置根容器
            servletContext.setAttribute(WebApplicationContext.ROOT_WEB_APPLICATION_CONTEXT_ATTRIBUTE, this.context);

            ClassLoader ccl = Thread.currentThread().getContextClassLoader();
            if (ccl == ContextLoader.class.getClassLoader()) {
                currentContext = this.context;
            }
            else if (ccl != null) {
                currentContextPerThread.put(ccl, this.context);
            }
上面这段代码中可以看到两个比较关键的地方,一个是,调用createWebApplicationContext创建context。另外一个是context创建完成,需要调用configureAndRefreshWebApplicationContext来设置和刷新各种配置项
1.1 调用 createWebApplicationContext
createWebApplicationContext用来生成一个具体的context,代码如下
    protected WebApplicationContext createWebApplicationContext(ServletContext sc) {
          //决定类,如果不通过参数指定默认值则使用定义在org/springframework/web/context/ContextLoader.properties里默认值,这个
        Class contextClass = determineContextClass(sc);
        if (!ConfigurableWebApplicationContext.class.isAssignableFrom(contextClass)) {
            throw new ApplicationContextException("Custom context class [" + contextClass.getName() +
                    "] is not of type [" + ConfigurableWebApplicationContext.class.getName() + "]");
        }
        return (ConfigurableWebApplicationContext) BeanUtils.instantiateClass(contextClass);
    }
1.2 调用 configureAndRefreshWebApplicationContext
    protected void configureAndRefreshWebApplicationContext(ConfigurableWebApplicationContext wac, ServletContext sc) {
        if (ObjectUtils.identityToString(wac).equals(wac.getId())) {
            // The application context id is still set to its original default value
            // -> assign a more useful id based on available information
            String idParam = sc.getInitParameter(CONTEXT_ID_PARAM);
            if (idParam != null) {
                wac.setId(idParam);
            }
            else {
                // Generate default id...
                wac.setId(ConfigurableWebApplicationContext.APPLICATION_CONTEXT_ID_PREFIX +
                        ObjectUtils.getDisplayString(sc.getContextPath()));
            }
        }

        wac.setServletContext(sc);
        //CONFIG_LOCATION_PARAM 的默认值是 contextConfigLocation 也就是我们在web.xml中配置的xml位置
        String configLocationParam = sc.getInitParameter(CONFIG_LOCATION_PARAM);
        if (configLocationParam != null) {
            wac.setConfigLocation(configLocationParam);
        }

        // use in any post-processing or initialization that occurs below prior to #refresh  根据环境获取数据配置
        ConfigurableEnvironment env = wac.getEnvironment();
        if (env instanceof ConfigurableWebEnvironment) {
            ((ConfigurableWebEnvironment) env).initPropertySources(sc, null);
        }

        customizeContext(sc, wac);
        wac.refresh();
    }
这个方法中依次做了这么几件事
- 为bean容器(也就是XmlWebApplicationContext)设置id
- 从web.xml中读取
contextConfigLocation配置,并放到容器中 - 读取环境配置文件并初始化
- 通过调用
customizeContext定制bean容器其他初始化,方式是通过读取globalInitializerClasses和contextInitializerClasses参数配置的类,实例化这些类(这些类需要实现ApplicationContextInitializer接口)调用initialize方法 - 调用bean容器的
refresh方法。
在spring中,ApplicationContext接口明确说明,所有的上下文对象都应该是只读的(为了线程安全理所当然),但是这样的类可以被刷新,可以看到``的继承关系图中的祖先类中存在AbstractRefreshableApplicationContext,用于刷新整个上下文
2. 调用refresh
刷新上下文对象,这个方法定义在 AbstractApplicationContext中,代码如下
    @Override
    public void refresh() throws BeansException, IllegalStateException {
        synchronized (this.startupShutdownMonitor) {
            // Prepare this context for refreshing.
            prepareRefresh();

            // Tell the subclass to refresh the internal bean factory.
            ConfigurableListableBeanFactory beanFactory = obtainFreshBeanFactory();

            // Prepare the bean factory for use in this context.
            prepareBeanFactory(beanFactory);

            try {
                // Allows post-processing of the bean factory in context subclasses.
                postProcessBeanFactory(beanFactory);

                // Invoke factory processors registered as beans in the context.
                invokeBeanFactoryPostProcessors(beanFactory);

                // Register bean processors that intercept bean creation.
                registerBeanPostProcessors(beanFactory);

                // Initialize message source for this context.
                initMessageSource();

                // Initialize event multicaster for this context.
                initApplicationEventMulticaster();

                // Initialize other special beans in specific context subclasses.
                onRefresh();

                // Check for listener beans and register them.
                registerListeners();

                // Instantiate all remaining (non-lazy-init) singletons.
                finishBeanFactoryInitialization(beanFactory);

                // Last step: publish corresponding event.
                finishRefresh();
            }

            catch (BeansException ex) {
                if (logger.isWarnEnabled()) {
                    logger.warn("Exception encountered during context initialization - " +
                            "cancelling refresh attempt: " + ex);
                }

                // Destroy already created singletons to avoid dangling resources.
                destroyBeans();

                // Reset 'active' flag.
                cancelRefresh(ex);

                // Propagate exception to caller.
                throw ex;
            }

            finally {
                // Reset common introspection caches in Spring's core, since we
                // might not ever need metadata for singleton beans anymore...
                resetCommonCaches();
            }
        }
    }
为了线程安全,这个方法是同步执行的,并且是按次序分别调用几个函数,这里简洁的代码设计很漂亮,值得学习。
我们可以看到依次执行了这几个方法
- prepareRefresh();
- ConfigurableListableBeanFactory beanFactory = obtainFreshBeanFactory();
- prepareBeanFactory(beanFactory);
- postProcessBeanFactory(beanFactory);
- invokeBeanFactoryPostProcessors(beanFactory);
- registerBeanPostProcessors(beanFactory);
- initMessageSource();
- initApplicationEventMulticaster();
- onRefresh();
- registerListeners();
- finishBeanFactoryInitialization(beanFactory);
- finishRefresh();
下面我们具体分析下执行过程
2.1 prepareRefresh()
第一步,执行prepareRefresh();,这一步主要配置开始时间、active flag 还有其他初始化配置文件
    protected void prepareRefresh() {
        this.startupDate = System.currentTimeMillis();
        this.closed.set(false);
        this.active.set(true);

        if (logger.isInfoEnabled()) {
            logger.info("Refreshing " + this);
        }

        // Initialize any placeholder property sources in the context environment
        initPropertySources();

        // Validate that all properties marked as required are resolvable
        // see ConfigurablePropertyResolver#setRequiredProperties
        getEnvironment().validateRequiredProperties();

        // Allow for the collection of early ApplicationEvents,
        // to be published once the multicaster is available...
        this.earlyApplicationEvents = new LinkedHashSet<>();
    }
2.2 执行ConfigurableListableBeanFactory beanFactory = obtainFreshBeanFactory();
获取
obtainFreshBeanFactory 这个方法如下
    protected ConfigurableListableBeanFactory obtainFreshBeanFactory() {
        //通知子类刷新bean Factory
        refreshBeanFactory();
        ConfigurableListableBeanFactory beanFactory = getBeanFactory();
        if (logger.isDebugEnabled()) {
            logger.debug("Bean factory for " + getDisplayName() + ": " + beanFactory);
        }
        return beanFactory;
    }
看下子类AbstractRefreshableApplicationContext 如何执行刷refreshBeanFactory(),代码如下
    @Override
    protected final void refreshBeanFactory() throws BeansException {
        if (hasBeanFactory()) {
            destroyBeans();
            closeBeanFactory();
        }
        try {
            //创建一个默认beanFactory  DefaultListableBeanFactory
            DefaultListableBeanFactory beanFactory = createBeanFactory();
            //设置序列化id
            beanFactory.setSerializationId(getId());
            //初始化BeanFactory
            customizeBeanFactory(beanFactory);
            //重要 载入bean定义
            loadBeanDefinitions(beanFactory);
            synchronized (this.beanFactoryMonitor) {
                this.beanFactory = beanFactory;
            }
        }
        catch (IOException ex) {
            throw new ApplicationContextException("I/O error parsing bean definition source for " + getDisplayName(), ex);
        }
    }
上述代码中最重要的是loadBeanDefinitions方法,XmlWebApplicationContext实现的loadBeanDefinitions方法如下
载入bean定义
    @Override
    protected void loadBeanDefinitions(DefaultListableBeanFactory beanFactory) throws BeansException, IOException {
        // Create a new XmlBeanDefinitionReader for the given BeanFactory.
        XmlBeanDefinitionReader beanDefinitionReader = new XmlBeanDefinitionReader(beanFactory);

        // Configure the bean definition reader with this context's
        // resource loading environment.
        beanDefinitionReader.setEnvironment(getEnvironment());
        beanDefinitionReader.setResourceLoader(this);
        beanDefinitionReader.setEntityResolver(new ResourceEntityResolver(this));

        // Allow a subclass to provide custom initialization of the reader,
        // then proceed with actually loading the bean definitions.
        initBeanDefinitionReader(beanDefinitionReader);
        loadBeanDefinitions(beanDefinitionReader);
    }
其中loadBeanDefinitions是核心方法,里面包含了读取xml文件,从xml读取配置,生成bean并且注入。这里比较复杂,之后专门来分析一下吧 [todo]
这一步完成后,bean已经完成刷新,成功从xml文件中取出内容加入容器中。
完成这一步之后,父容器初始化完成,如果配置了DispatchServlet相关配置的开始进行子容器的初始化。