本篇文章中的代码只是部分片段,完整代码存放于github上https://github.com/Q-Zhan/simple-vue。
进入正文~实现数据绑定主要是要实现两个方面的功能:数据变化导致视图变化,视图变化导致数据变化。后者比较容易实现,就是监听视图的事件,然后在回调函数中改变数据。所以重点是数据变化时如何改变视图。
这里的思路是通过object.defineProperty()来对数据的属性设置一个set函数,设置后当数据改变时set函数就会被调用,我们就可以里面进行视图更新操作。
具体实现过程
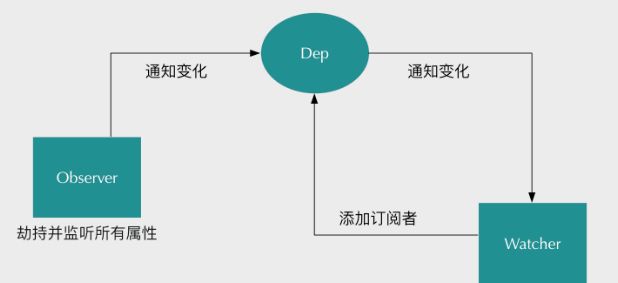
如上图所示,我们需要一个监听器Observer来给所有的属性设置set函数。如果属性发生了变化,就要通知所有的订阅者Watcher。而这些Watcher统一存放在消息订阅器Dep中,这样比较方便统一管理。Watcher接受到来自Dep的通知后就执行相应的操作去更新视图。
Observer
监听器的核心代码如下:
function observe(data) {
  if (!data || typeof data !== 'object') {
    return;
  }
  Object.keys(data).forEach(function(key) {  // 遍历属性,递归设置set函数
    defineReactive(data, key, data[key]);
  });
}
function defineReactive(data, key, val) {
  observe(val)
  var dep = new Dep()
  Object.defineProperty(data, key, {
    enumerable: true,
    configurable: true,
    get: function() {
      if (Dep.target) {
        dep.addSub(Dep.target)  // 添加watcher
      }
      return val
    },
    set: function(newVal) {
      if (val === newVal) {
        return;
      }
      val = newVal;
      dep.notify()  // 通知dep
    }
  })
}
通过调用observe()函数来递归地给data对象设置set和get函数,在data的属性被get时添加watcher,被set时通知dep,dep的notify会接着通知所有的watcher去执行更新操作。
Dep
消息订阅器的核心代码如下:
function Dep() {
  this.subs = []  // 订阅者数组
}
Dep.prototype = {
  addSub: function(sub) {
    this.subs.push(sub)
  },
  notify: function() {
    this.subs.forEach(function(sub) {
      sub.update()
    })
  }
}
Dep.target = null
消息订阅器比较简单,就是维护一个subs数组。当监听新属性时把它push进subs数组中,然后dep被通知时触发notify函数,从而触发subs数组中每个watcher的update操作。
Watcher
function Watcher(vm, exp, cb) {
  this.cb = cb
  this.vm = vm
  this.exp = exp
  this.value = this.get()
}

Watcher.prototype = {
  update: function() {
    this.run()
  },
  run: function() {
    var value = this.vm.data[this.exp]
    var oldVal = this.value
    if (value !== oldVal) {
      this.value = value
      this.cb.call(this.vm, value, oldVal)  // 执行更新时的回调函数
    }
  },
  get: function() {
    Dep.target = this
    var value = this.vm.data[this.exp]  // 读取data的属性,从而执行属性的get函数
    Dep.target = null
    return value
  }
}
Watcher的主要功能是去触发属性的get函数,从而添加watcher到Dep的subs数组中。另外就是在update()中更新属性的值并触发更新回调函数。
使用Watcher的方法如下:
var el = document.getElementById('XXX')
observe(data)
new Watcher(vm, exp, function(value) {  // vm表示某个实例,exp表示属性名
  el.innerHTML = value
})
为了使用时的整洁,我们需要把代码稍微包装下。
SimpleVue
function SimpleVue (data, el, exp) {
  var self = this
  this.data = data
  Object.keys(data).forEach(function(key) {
    self.proxyKeys(key)
  })
  observe(data)
  el.innerHTML = this.data[exp]
  new Watcher(this, exp, function(value) {
    el.innerHTML = value
  })
  return this
}

SimpleVue.prototype = {
  proxyKeys: function(key) {
    var self = this
    Object.defineProperty(this, key, {
      enumerable: false,
      configurable: true,
      get: function() {
        return self.data[key]
      },
      set: function(newVal) {
        self.data[key] = newVal
      }
    })
  }
}
使用如下:
// html
{{name}}  //这个{{name}}暂时没用

// js
var el = document.querySelector('#name')
var selfVue = new SimpleVue({ name: 'hello'}, el, 'name')
setTimeout(function() {
  selfVue.name = '123'
}, 2000)
需要注意的是SimpleVue原型的proxyKeys是为了将selfVue.data.name这种操作代理为selfVue.name。这下我们就可以直接通过selfVue.name = "XXX"来改变数据了,并且视图也会相应变化。
Compile
上面的例子都是写死一个属性去替换,而真正的使用时我们需要去解析dom节点,对类如{{}}的进行替换并绑定watcher。这个解析过程通过Compile来实现。
nodeToFragement: function(el) {
    var fragment = document.createDocumentFragment()
    var child = el.firstChild
    // 将dom节点移到fragment
    while(child) {
      fragment.appendChild(child)
      child = el.firstChild
    }
    return fragment
  },
  compileElement: function(el) {
    var childNodes = el.childNodes
    var self = this;
    [].slice.call(childNodes).forEach(function(node) {
      var reg = /\{\{(.*)\}\}/
      var text = node.textContent
      if (self.isTextNode(node) && reg.test(text)) {
        self.compileText(node, reg.exec(text)[1])
      }
      if (node.childNodes && node.childNodes.length) {
        self.compileElement(node)  // 递归遍历子节点
      }
    });
  },
  compileText: function(node, exp) {
    var self = this
    var initText = this.vm[exp]
    this.updateText(node, initText)
    new Watcher(this.vm, exp, function(value) {
      self.updateText(node, value)
    })
  },
compile主要做三件事情。一是将dom节点移入DocumentFragment中去,因为DocumentFragment中操作dom节点不会引起浏览器的重绘,性能会比直接操作dom节点好很多。二是递归调用compileElement函数来遍历所有子节点,如果子节点包含{{}}形式的则调用compileText。三是compileText函数创建新的watcher。
当然加入compile后SimpleVue也要有相应的变化:
function SimpleVue (options) {
  var self = this
  this.vm = this
  this.data = options.data
  Object.keys(this.data).forEach(function(key) {
    self.proxyKeys(key)
  })
  observe(this.data)
  new Compile(options.el, this.vm)
  return this
}
[参考资料]:https://www.cnblogs.com/libin-1/p/6893712.html

