写在前面
2011年在写了个物理引擎,期间重新啃起了物理课本,一晃就是5年,
当年自己写的物理引擎的代码又阅读一遍,受益匪浅,加上最近制作坦克争霸使用Box2d的思考,对物理引擎管线又有了新的认识和体会。
人除了造人,还可以是造世界,这两种时候人能够扮演上帝的角色。有人会说:“几个小球撞来撞球算哪门子世界?”引用《黑客帝国》里
男主角的话:“哪一个才是真实的世界?”在小球的眼里,它的世界就是真实的世界,只是小球无意识,意识形态的程序设计太复杂,
如果有一天意识形态能用程序表达并通过图灵测试,那么:"哪一个才是真实的世界?同样都是原子构成的世界,哪一个才是真实的世界?"。
不废话,现在就开始吧...
准备工作
运行环境
准备好一款浏览器,而且必须是现代浏览器(如Google Chrome最新版),因为物理引擎虽然支持老的浏览器,但是为了看到这个物理世界发生的一切,会在canvas里渲染刚体。
顶级NameSpace
为了纪念牛顿,使用Newton作为顶级命名空间。
var Newton = {};Class.js
代码的分类抽象完全基于Class,使用的class.js如下所示:
var Class = function () { };
Class.extend = function (prop) {
    var _super = this.prototype;
    var prototype = Object.create(this.prototype);
    for (var name in prop) {
        prototype[name] = name == "ctor" ?
            (function (name, fn) {
                return function () {
                    var tmp = this._super;
                    this._super = _super[name];
                    var ret = fn.apply(this, arguments);
                    this._super = tmp;
                    return ret;
                };
            })(name, prop[name]) :
            prop[name];
    }

    function Class() {
        this.ctor.apply(this, arguments);
    }

    Class.prototype = prototype;
    Class.prototype._super = Object.create(this.prototype);
    Class.prototype.constructor = Class;
    Class.extend = arguments.callee;

    return Class;
};
向ES6靠齐的class.js,暴露prototype给语言使用者总是不友好的,大概的使用方式如下:
- 通过Class.extend定义类
- 通过XXX.extend实现继承
- ctor方法里通过this._super访问父类ctor
- 其余方法通过this.xxx访问父类方法
- 如果本身已经包含xxx方法,通过this._super.xxx访问父类方法
以前写过一篇文章介绍。
Vector2
Vector2,一般用来表示向量,有的时候也用来当作点来进行计算。
Newton.Vector2 = Class.extend({
    ctor: function (x, y) {
        this.x = x;
        this.y = y;
    },
    clone:function() {
        return new Newton.Vector2(this.x, this.y);
    },
    length: function () {
        return Math.sqrt(this.x * this.x + this.y * this.y);
    },
    normalize: function () {
        var inv = 1 / this.length();
        this.x *= inv;
        this.y *= inv;
        return this;
    },
    add: function (v) {
        this.x += v.x;
        this.y += v.y;
        return this;
    },
    multiply: function (f) {
        this.x*=f;
        this.y*=f;
        return this;
    },
    dot: function (v) {
        return this.x * v.x + this.y * v.y;
    },
    angle: function (v) {
        return Math.acos(this.dot(v) / (this.length() * v.length())) * 180 / Math.PI;
    },
    distanceSquare: function (x, y) {
        return this.x * x + this.y * y;
    }
});
其中
- clone复制向量/点
- length求向量长度
- normalize转单位向量
- add向量叠加
- multiply向量翻倍
- dot内积
- angle方法用来求两个向量的夹角
- distanceSquare 距离的平方
除了clone方法,其余方法都不会创建新的Vector2,这里不能为了使用的代码可以连缀而创建大量的Vector2。
知识准备
[角]速度等于加速度在时间上的累加
v = a*t
[角]位移等于速度在时间上的累加
s = v*t
加速度等于过物体重心的力除以质量(最常见的物体受地球的吸引力,即重力。把物体看成质点,而且过重心先不用考虑角速度)
F = ma
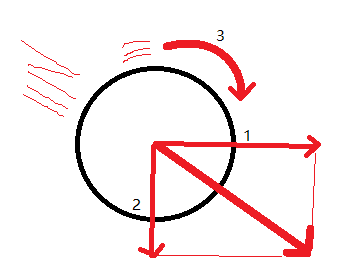
运动的独立性
一个物体同时参与几种运动,各分运动都可看成独立进行的,互不影响,物体的合运动则视为几个相互独立分运动叠加的结果
如下图的运动小球:
可拆分成如下三种运动分量:
牛顿的世界
世界里需要模拟时间流逝,去累加速度、位移。
时间是连续的还是非连续的?到底有没有最小时间片?最小时间片是多少?现代物理依然无法给出定论。
但是在物理引擎里,时间是非连续的。
Newton.World = Class.extend({
    ctor: function () {
        this.bodies = [];
        this.bodiesLen = 0;
        this.timeStep = 1/60;
    }
});
如上面代码所示,bodies为世界里的所有物体,bodiesLen为物体的数量。timeStep为最小时间片段。
时间流逝
Newton.World = Class.extend({
    ...
    ...
    start: function () {
        Newton.Ticker(function () {
            this.tick();
            this.start();
        }.bind(this));
    },
    tick:function(){
        var  k = 0;
        for (; k < this.bodiesLen ; k++) {
            var body = this.bodies[k];
            body.tick(this.timeStep);
        }
    },
    add: function (body) {
        this.bodies.push(body);
        this.bodiesLen = this.bodies.length;
    }
    ...
    ...
世界可以通过add方法向世界增加物体,上面的tick处理世界上发生的所有事件,目前仅仅是调用了物体自身的tick。
ticker代码如下:
(function () {
    var lastTime = 0;
    var Ticker = function (callback, element) {
        var currTime = new Date().getTime();
        var timeToCall = Math.max(0, 16 - (currTime - lastTime));
        var id = window.setTimeout(function () {
                callback(currTime + timeToCall);
            },
            timeToCall);
        lastTime = currTime + timeToCall;
        return id;
    };

    Newton.Ticker = Ticker;
}());
这里不使用requestAnimationFrame的,用的智能setTimeout。因为tick里面以后会包含很多逻辑,如重力处理、AABB优化、碰撞检测、碰撞处理、重叠处理、休眠处理,
requestAnimationFrame里的函数是在repaint之前调用,和复杂且耗时的程序逻辑混在一起会导致帧率下降,起反作用。
第一个物体
小球,是这个世界第一个物体。它除了不分男女,与生俱来许多属性(运动和碰撞相关的属性)。
Newton.Circle = Class.extend({
    ctor: function (option) {
        this.bodyType = Newton.BODYTYPEDYNAMIC;
        this.r = option.r;
        this.position = new Newton.Vector2(0, 0);
        this.mass = 1;
        this.linearVelocity = new Newton.Vector2(0, 0);
        this.rotation = 0;
        this.angularVelocity = 0;

        for(var key in option){
            if (option.hasOwnProperty(key) && this.hasOwnProperty(key)) {
                this[key]=option[key];
            }
        }

        //过重心的力
        this.force=Newton.World.Gravity.clone().multiply(this.mass);

        if (this.bodyType === Newton.BODYTYPESTATIC) {
            this.invMass=0;
        }else{
            this.invMass=1/this.mass;
        }
    },
    integrateVelocity: function (dt) {
        this.linearVelocity.x += this.force.x*this.invMass * dt;
        this.linearVelocity.y += this.force.y*this.invMass * dt;
    },
    integratePosition: function (dt) {
        this.position.x += this.linearVelocity.x * dt;
        this.position.y += this.linearVelocity.y * dt;
    },
    integrateRotation: function (dt) {
        if (this.rotation >= 360) this.rotation %= 360;
        this.rotation += this.angularVelocity * 180 * dt / Math.PI;
    },
    tick: function (dt) {
        this.integrateVelocity(dt);
        this.integratePosition(dt);
        this.integrateRotation(dt);
    }
})- integrateVelocity对应 v=at
- integratePosition对应 s=mv
- integrateRotation对应 s=mv
- this.force.y*this.invMass对应 a=f/m
上面的构造函数里,会把传入的参数覆盖默认的参数配置,并且提前计算好重力的倒数,因为重力的倒数会被经常用到。
好了。到目前为止已经完成了一款简陋的物理引擎,包含了物理引擎管线的:重力处理。下面要通过canvas把物理引擎的运作过程可视化。
渲染准备
Newton.Render = Class.extend({
    ctor: function (selector) {
        this.canvas = document.querySelector(selector);
        this.ctx = this.canvas.getContext("2d");
    },
    clear: function () {
        this.ctx.clearRect(0, 0, this.canvas.width, this.canvas.height);
    },
    circle: function (x, y, r, rotation) {
        this.ctx.save();
        this.ctx.beginPath();
        this.ctx.setTransform(1 * Math.cos(rotation), Math.sin(rotation), -1*Math.sin(rotation), Math.cos(rotation), x, y);
        this.ctx.arc(0, 0, r, 0, 2 * Math.PI, false);
        this.ctx.lineTo(0, 0)
        this.ctx.arc(0, 0, 3, 0, 2 * Math.PI, false);
        this.ctx.stroke();
        this.ctx.restore();
    }
});
上面使用setTransform设置变换矩阵,能完成rotate(), scale(), translate(), or transform() 所能完成的工作。
使用下面代码测试绘制:
var rd = new Newton.Render("#ourCanvas");
rd.circle(100, 100, 80, 10 * Math.PI / 180);
可以看到下面的效果:
这里为了能看出旋转的角度,从圆的重心向右边r的位置画了一条线段。因为后续文章当中,也会出现矩形的刚体,同样,我们可以封装一个绘制矩形的
方法:
    rect: function (x, y, w, h, rotation) {
        this.ctx.save();
        this.ctx.beginPath();
        this.ctx.setTransform(1 * Math.cos(rotation), Math.sin(rotation), -1 * Math.sin(rotation), Math.cos(rotation), x, y);
        this.ctx.strokeRect(-w / 2, -h / 2, w, h);
        this.ctx.beginPath();
        this.ctx.moveTo(w / 2, 0);
        this.ctx.lineTo(0, 0);
        this.ctx.arc(0, 0, 3, 0, 2 * Math.PI, false);
        this.ctx.closePath();
        this.ctx.stroke();
        this.ctx.restore();
    }
让物理引擎跑起来
var world = new Newton.World();
var c1 = new Newton.Circle({
    r: 20,
    position: new Newton.Vector2(100, 20),
    linearVelocity: new Newton.Vector2(350, 100),
    angularVelocity:Math.PI/10
});
world.add(c1);

var render = new Newton.Render("#ourCanvas");
world.onTick(function () {
    render.clear();
    render.circle(c1.position.x, c1.position.y, c1.r, c1.rotation);
})

world.start();
上面Circle的参数里面:
- r代表球的半径
- position是球的位置
- linearVelocity球的线速度
- angularVelocity球的角速度
按照上面一步一步,你将看到一个小球从(100,20 )的位置加速旋转掉飞下。
第一次重构
因为Newton.Circle 的大部分属性和方法,在其他的刚体中也适用,只有半径这个东西是Circle特有的,
所以将Newton.Circle改名为Newton.Body,并移除属性r,然后Newton.Circle 的代码就变成了:
Newton.Circle = Newton.Body.extend({
    ctor: function (option) {
        this._super(option);
        this.r = option.r;
    }
});
加四面墙
var world = new Newton.World();
var minV =10;
var c1 = new Newton.Circle({
    r: 20,
    position: new Newton.Vector2(100, 20),
    linearVelocity: new Newton.Vector2(350, 100),
    angularVelocity:Math.PI/10
});
world.add(c1);

var render = new Newton.Render("#ourCanvas");
world.onTick(function () {
    render.clear();
    render.circle(c1.position.x, c1.position.y, c1.r, c1.rotation);

    if (c1.position.y - c1.r < 0) {
        c1.linearVelocity.y *= -0.95;
        c1.angularVelocity *= 0.9;
        c1.position.y = c1.r;
    }
    if (c1.position.y + c1.r > 400 ) {
        c1.linearVelocity.y *= -0.95;
        c1.angularVelocity *= 0.9;
        c1.position.y  = 400-c1.r;
    }

    if (c1.position.x + c1.r > 400) {
        c1.linearVelocity.x *= -0.95;
        c1.angularVelocity *= 0.9;
        c1.position.x = 400 - c1.r;
    }
    if (c1.position.x - c1.r < 0) {
        c1.linearVelocity.x *= -0.95;
        c1.angularVelocity *= 0.9;
        c1.position.x = c1.r;
    }

    if (Math.round( c1.position.y+c1.r)===400&& Math.abs(c1.linearVelocity.y) < minV){
        c1.linearVelocity.y = 0;
        c1.linearVelocity.x *= 0.95;
    }
    if (Math.abs(c1.linearVelocity.x) < minV) {
        c1.linearVelocity.x = 0;
    }

})

world.start();
现在你可以看到一个小球在画布里,撞来撞去最后静止。
world.onTick里面加了一大堆逻辑,用来处理小球与400*400的Canvas的碰撞,以及角速度和角速度的衰减,位置的矫正(重叠处理),到最后
的静止。因为世界只有圆一种刚体,所有只能先这样实现。但是上面的onTick里新加的代码,其实可以窥见物理引擎管线中的必备流程:
- 碰撞检测
- 碰撞反应
- 重叠处理
- 休眠处理
- ...
与鼠标互动
...
...
...
function createBall(p){
    var c1 = new Newton.Circle({
        r: 20,
        position: new Newton.Vector2(p.x, p.y),
        linearVelocity: new Newton.Vector2(350, 100),
        angularVelocity:Math.PI/10
    });
    world.add(c1);
}

function getMousePos( evt) {
    var rect = evt.srcElement.getBoundingClientRect();
    return {
        x: evt.clientX - rect.left,
        y: evt.clientY - rect.top
    };
}

var canvas=document.querySelector("#ourCanvas");
canvas.addEventListener("click",function(evt){
    createBall(getMousePos(evt));
},false);

var render = new Newton.Render("#ourCanvas");
world.onTick(function () {
    render.clear();
    for(var i=0;i
效果如下:
因为所有的刚体都会被push进world.bodies,所有在onTick中需要遍历所有的小球进行绘制和与墙面的碰撞检测。
最后
本篇幅主要做了大量的准备工作包含class.js、ticker.js、vector2.js、render.js,真正的物理引擎的部分只占了小部分,后续的文章的占比会恰好相反。
虽然社区里有许多成熟的物理引擎,但自己实现一款物理引擎有非常多的好处:
- 避开Box2d沉重的计算开销
- 自由定制和扩展自己物理引擎
- 知道每行代码的意义使用起来更放心
未完待续..
下篇预告:《零基础制作物理引擎--创造力量 》


