Lesson1
1、首先确保安装了Node.js和npm依赖包管理工具
2、在git上克隆官方示例程序
git clone https://github.com/reactjs/react-router-tutorial
cd react-router-tutorial
cd lessons/01-setting-up
npm install
npm start
运行完成后打开:http://localhost:8080
就可以在浏览器看见: "Hello React Router"
打开modules/App.js,更改里面内容,可以看到浏览器上的内容随时变化!
Lesson2 : rendering a router
1、打开index.js
首先import Router、Route和hashHistory,然后render Reouter替换原来的App组件。这是由于:React Router 是一个组件。Router 本身是一个容器,真正的路由都要由Route去定义。
// ...
import { Router, Route, hashHistory } from 'react-router'
render((
), document.getElementById('app'))
上面访问的路由为“/”,组件是App。路由的切换由URL得hash变化决定,即URL的#部分发生变化。
2、添加Scene
.modules/About.js
.modules/Repos.js
// modules/About.js
import React from 'react'export
default React.createClass({ render() { return About }})
// modules/Repos.js
import React from 'react'export
default React.createClass({ render() { return Repos }})
把场景添加到路由里面
// insert into index.js
import About from './modules/About'
import Repos from './modules/Repos'
render((
{/* add the routes here */}
), document.getElementById('app'))
现在访问: http://localhost:8080/#/about 和 http://localhost:8080/#/repos
Lesson3 Navigating with Link
Link类似于之前用过的标签
// modules/App.js
import React from 'react'import { Link } from 'react-router'
export default React.createClass({
render() {
return (
React Router Tutorial
About
Repos
) }})
React Router Tutorial
访问:http://localhost:8080
lesson4 嵌套的路由
这个功能可以做出类似Nav的功能,Route里面可以嵌套多个Route
// index.js// ...
render((
{/* make them children of App */}
), document.getElementById('app'))
在App里面
// modules/App.js// ...
render() {
return (
React Router Tutorial
About
Repos
{/* add this */}
{this.props.children}
React Router Tutorial
{/* add this */}
{this.props.children}
) }
则UI结构如下:
Lesson 5 Active Links
通过行内样式表改变Link的样式:
// modules/App.js
也可以添加className在css文件中设置样式
// modules/App.js
创建css文件,并在index.html中引入
// index.html
我们不用为每个Link都添加activeClassName,这里我们使用一个spread operator
创建modules/NavLink.js
// modules/NavLink.js
import React from 'react'
import { Link } from 'react-router'
export default React.createClass({
render() {
return
}
})
在modules/App.js中这样写:
// modules/App.js
import NavLink from './NavLink'
Lesson 6 URL Params
1、添加一个带参数的路由
建立一个文件:modules/Repo.js
// modules/Repo.js
import React from 'react'
export default React.createClass({
render() {
return (
{this.props.params.repoName}
{this.props.params.repoName}
)
}})
2、在index.js里面添加新路由
// import Repo
import Repo from './modules/Repo'
render((
{/* add the new route */}
), document.getElementById('app'))
3、在Repo.js里面添加跳转的Link
// Repos.js
import { Link } from 'react-router'
export default React.createClass({
render() {
return (
Repos
{/* add some links */}
React Router
React
)
Repos
{/* add some links */}
}})
附:path属性可以匹配通配符
:paramName 匹配URL的一个部分,知道遇到下一个/、?、#为止。路径参数可以通过this.props.params.paramName获取
// 匹配 /hello/michael
// 匹配 /hello/ryan
()表示URL的这个部分是可选的
// /hello
// /hello/micale
// /hello/ryan
匹配任意字符直到下一个字符为止,非贪婪模式
// /files/hello.jpg
// /files/hello.html
// /files/
// /files/a
// /files/a/b
**匹配任意字符,直到遇到下一个/、?、#为止,贪婪模式
// /files/hello.jpg
// /files/path/to/file.jpg
路由匹配规则是从上到下执行,一旦发现匹配,就不再匹配其余的规则了。
Lesson 7 更多的嵌套
1、将Repo的路由放进Repos的路由
//index.js
//Repos.js
Repos
React Router
React
{/* will render Repo.js when at /repos/:userName/:repoName */} #{this.props.children}
Repos
{/* will render Repo.js when at /repos/:userName/:repoName */} #{this.props.children}
2、添加NavLink
// modules/Repos.js
import NavLink from './NavLink'
Lesson 8 Index Routes
当我们访问/在app里出现了一个空白,我们想让他渲染一个Home的component
IndexRoute显示指定Home是根路由的子组件,即指定默认情况下加载的子组件。IndexRoute组件没有路径参数path
//modules/Home.js
import React from 'react'
export default React.createClass({
render() {
return Home
}
})
在App里如果没有任何场景被渲染的时候,就渲染Home
// modules/App.js
import Home from './Home'
{/* ... */}
{this.props.children ||
{/* ... */}
{this.props.children ||
添加IndexRoute
// index.js
import { Router, Route, hashHistory, IndexRoute } from 'react-router'
import Home from './modules/Home'
render((
{/* add it here, as a child of / */}
), document.getElementById('app'))
IndexRoute没有path ,
Lesson 9 Index Links
添加可以返回Home的方法,IndexLink
//App.js
import { IndexLink } from 'react-router'
使用onlyActiveOnIndex Property
或
Lesson 10 Clean URLs with Browser History
配置浏览器历史
//index.js
// bring in browserHistory instead of hashHistory
import { Router, Route, browserHistory, IndexRoute } from 'react-router'
render((
{/* ... */}
), document.getElementById('app'))
点击链接,然后刷新,会得到
Cannot GET /repos
这是因为服务器端配置的原因,目前的服务器不知道如何处理URL
在package.json中添加:
"start": "webpack-dev-server --inline --content-base . --history-api-fallback"
同时要将我们的文件引用,相对路径为绝对路径
//index.html
重启服务器:npm start
Lesson 11 Production-ish Server
Webpack dev server 不是生产模式的服务器,下面配置生产模式下的服务器
安装依赖模块:
npm install express if-env compression --save
更新package.json
"scripts": {
"start": "if-env NODE_ENV=production && npm run start:prod || npm run start:dev",
"start:dev": "webpack-dev-server --inline --content-base . --history-api-fallback",
"start:prod": "webpack && node server.js"
},
此时的脚本说明,如果运行npm start 启动服务器,如果在生产环境下执行start:prod,如果不是,执行start:dev
在根目录下创建server.js
//server.js
var express = require('express')
var path = require('path')
var compression = require('compression')
var app = express()
// serve our static stuff like index.css
app.use(express.static(__dirname))
// send all requests to index.html so browserHistory in React Router works
app.get('*', function (req, res) {
res.sendFile(path.join(__dirname, 'index.html'))
})
var PORT = process.env.PORT || 8080
app.listen(PORT, function() {
console.log('Production Express server running at localhost:' + PORT)
})
现在运行:NODE_ENV=production npm start
现在就有了生产环境下的app
此时运行:http://localhost:8080/package.json就可以获得json文件的内容,让我们重新更新文件的路径来解决这个问题
创建一个public的文件夹,并且把index.html 和 index.css文件放进去
1、更新server.js指向正确的路径:
// server.js
app.use(express.static(path.join(__dirname, 'public')))
app.get('*', function (req, res) {
res.sendFile(path.join(__dirname, 'public', 'index.html'))
})
2、更新webpack编译时的输出路径
// webpack.config.js
output: {
path: 'public',
}
3、在服务器启动脚本中,添加该路径
"start:dev": "webpack-dev-server --inline --content-base public --history-api-fallback",
4、添加一些代码
// webpack.config.js
var webpack = require('webpack')
module.exports = {
//...
plugins: process.env.NODE_ENV === 'production' ? [ new #webpack.optimize.DedupePlugin(), new #webpack.optimize.OccurrenceOrderPlugin(), new #webpack.optimize.UglifyJsPlugin() ] : [],
//...
}
在express中添加conpression
// server.js
var compression = require('compression')
var app = express()
// must be first!
app.use(compression())
现在我们可以在生产模式下启动服务器了
NODE_ENV=production npm start
Lesson 12 Navigating Programatically
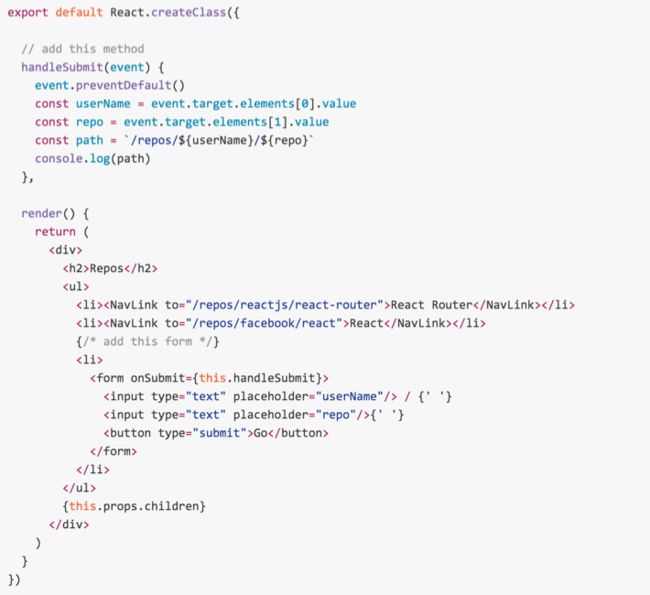
之前使用的都是Link进行路由的跳转,而实际使用更多的使用表单提交,按钮点击来进行路由的切换
在Repos创建一个表单提交
// modules/Repos.js
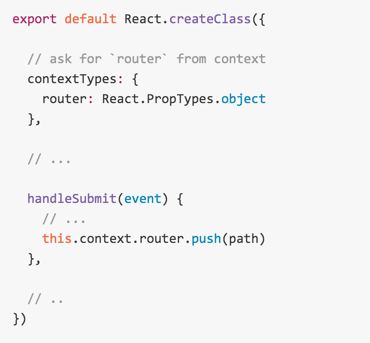
那么可以使用以下方式保存路由
Lesson 13 服务器端渲染
Lesson 14 结束语
附:组件介绍
1、Redirect组件:
{/* 从 /inbox/messages/:id 跳转到 /messages/:id */}
<Redirect from="messages/:id" to="/messages/:id" />
访问/inbox/message/5,会自动跳到/messages/5
2、IndexRedirect 组件
访问根路由的时候,将用户重定向到某个子组件。
3、Link 组件取代标签,
4、IndexLink 如果连接到根路由不要使用Link要使用IndexLink(使用路由的精确匹配)
5、history属性
Router的history属性监听浏览器地址的变化,并将URL解析为一个地址对象,供React Router 匹配
6、表单处理:Link组件用于正常的用户点击跳转,但有时候还需要表单跳转、点击按钮跳转。
有两种方案:1、使用browserHistory.push
2、使用context对象
7、路由的钩子
每个路由都有Enter和Leave的钩子,当用户进入或者离开该路由时触发

