前言
在上一篇文章中,我们学习了三方刷新库MJRefresh(巧用MJRefresh),同时我们也说了MJRefresh是基于UIScrollView的,在这篇文章中,我们将着重讲述一下UIScrollView的属性和方法的使用。
创建
UIScrollView继承自UIView和NSCoding协议, 因此它的创建相当简单
let testScrollView = UIScrollView(frame: CGRect(x: 0, y: 0, width: 200, height: 200))
// 设置背景颜色
testScrollView.backgroundColor = UIColor.black
// 设置代理
testScrollView.delegate = self
view.addSubview(testScrollView)
属性
-
contentOffset偏移量,默认是CGPointZero,一般用在UIScrollView的代理方法里,用来做拖拽距离判断操作
例如:
func scrollViewDidScroll(_ scrollView: UIScrollView) {

    // 向下拉动偏移量大于等于20
    if scrollView.contentOffset.y  >= -20 {
        print("now is \(scrollView.contentOffset.y)")
    }
}
-
contentSize滑动区域大小, 默认是CGSizeZero, width代表x方向滑动区域大小,height代表竖向滑动区域大小,一般为必选
例如:
testScrollView.contentSize = CGSize(width: 200 , height: 200 * 2)
-
contentInset边缘插入内容以外的可滑动区域,默认是UIEdgeInsetsZero,top、bottom、left、right分别代表顶部和底部可滑动区域
例如:
testScrollView.contentInset = UIEdgeInsets(top: 10, left: 10, bottom: 10, right: 10)
-
isDirectionalLockEnabled默认为FALSE, 如果设置为TRUE,那么在推拖拽UIScrollView的时候,会锁住水平或竖直方向的滑动
例如:
testScrollView.isDirectionalLockEnabled = true
这个属性需要解释一下,这样说吧,当你的手准备滑动的时候,手按住UIScrollView不放,如果一开始滑动的方向是x方向,那么你就无法在y方向上移动(此时手还没有放开);如果一开始滑动的方向是y方向,那么你就无法在x方向上滑动(此时手还没有放开);如果一开始滑动的方向是倾斜方向(x、y均同时移动),那么你可以在任何方向随意滑动(此时手还没有放开)!
-
bounces弹性效果,默认是TRUE, 如果设置成false,则当你滑动到边缘时将不具有弹性效果
例如:
testScrollView.bounces = false
-
alwaysBounceVertical竖直方向总是可以弹性滑动,默认是NO, 当设置为TRUE(前提是属性bounces必须为TRUE)的时候,即使contentSize设置的width和height都比UIScrollView的width和height小,在垂直方向上都可以有滑动效果,甚至即使我们不设置contentSize都可以产生滑动效果; 反之,如果设置alwaysBounceVertical为FALSE, 那么当contentSize设置的width和height都比UIScrollView的width和height小的时候,即使bounces设置为TRUE,那么不可能产生弹性效果
例如:
在垂直方向有弹性效果
let testScrollView = UIScrollView(frame: CGRect(x: 0, y: 0, width: 100, height: 100))
testScrollView.backgroundColor = UIColor.black
testScrollView.delegate = self
testScrollView.bounces = true
testScrollView.alwaysBounceVertical = true
view.addSubview(testScrollView)

let testImageView = UIImageView(frame: CGRect(x: 0, y: 0, width: 100, height: 100))
testImageView.backgroundColor = UIColor.green
testScrollView.addSubview(testImageView)
在垂直方向没有弹性效果
let testScrollView = UIScrollView(frame: CGRect(x: 0, y: 0, width: 100, height: 100))
testScrollView.backgroundColor = UIColor.black
testScrollView.delegate = self

// 因为contentSize为0,而且没有设置testScrollView.alwaysBounceVertical = true,所以即便testScrollView.bounces = true也没有弹性效果
testScrollView.bounces = true

view.addSubview(testScrollView)

let testImageView = UIImageView(frame: CGRect(x: 0, y: 0, width: 100, height: 100))
testImageView.backgroundColor = UIColor.green
testScrollView.addSubview(testImageView)
alwaysBounceHorizontal用法完全同alwaysBounceVerticalisPagingEnabled是否可分页,默认是FALSE, 如果设置成TRUE, 则可分页
例如:
let testScrollView = UIScrollView(frame: CGRect(x: 50, y: 64, width: UIScreen.main.bounds.width - 100, height: 200))
testScrollView.backgroundColor = UIColor.black
testScrollView.contentSize = CGSize(width: UIScreen.main.bounds.width - 100 , height: 200 * 2)
testScrollView.delegate = self
testScrollView.isPagingEnabled = true

view.addSubview(testScrollView)

let testImageView = UIImageView(frame: CGRect(x: 0, y: 0, width: UIScreen.main.bounds.width - 100, height: 200))
testImageView.backgroundColor = UIColor.green
testScrollView.addSubview(testImageView)

let testView = UIImageView(frame: CGRect(x: 0, y: 200, width: UIScreen.main.bounds.width - 100, height: 200))
testView.backgroundColor = UIColor.red
testScrollView.addSubview(testView)
演示效果
isScrollEnabled是否可滑动,默认是TRUE, 如果默认为FLASE, 则无法滑动showsHorizontalScrollIndicator是否显示水平方向滑动条,默认是TRUE, 如果设置为FALSE,当滑动的时候则不会显示水平滑动条showsVerticalScrollIndicator是否显示垂直方向上滑动条,默认是TRUE, 如果设置为FALSE,当滑动的时候则不会显示垂直方向上的滑动条scrollIndicatorInsets滑动条的边缘插入,即是距离上、左、下、右的距离
例如:
// 当向下滑动时,滑动条距离顶部的距离总是20
testScrollView.scrollIndicatorInsets = UIEdgeInsets(top: 20, left: 0, bottom: 0, right: 0)
-
indicatorStyle设置滑动条颜色, 默认是灰白色
indicatorStyle是个枚举类型:
public enum UIScrollViewIndicatorStyle : Int {

    case `default`  // 灰白色,搭配任意背景色

    case black      // 黑色,搭配白色背景最佳

    case white      // 白色,搭配黑色背景最佳
}
-
decelerationRate减速率,CGFloat类型,当你滑动松开手指后的减速速率, 但是尽管decelerationRate是一个CGFloat类型,但是目前系统只支持以下两种速率设置选择
1 UIScrollViewDecelerationRateNormal 值是 0.998
2 UIScrollViewDecelerationRateFast 值是 0.99
例如设置
// 快速减速
testScrollView.decelerationRate = UIScrollViewDecelerationRateFast
-
indexDisplayMode索引展示模式,是一个枚举值,有两种选择
public enum UIScrollViewIndexDisplayMode : Int {

    case automatic    // 根据需要自动显示或隐藏

    case alwaysHidden // 总是隐藏
}
事实上,这个属性我并没有试出任何的作用,我也不知道作用是什么?如果你知道,请告诉我!此外,我现在使用的环境是Xcode 8.3, 而这个属性似乎是在8.3以后才能用?看下面官方截图
我也尝试在网上搜索,包括Stack Overflow, 但是并没有搜索到有影响力的答案!Sorry for that
isTrackingget属性,returns YES if user has touched. may not yet have started draggingisDraggingget属性,returns YES if user has started scrolling. this may require some time and or distance to move to initiate draggingisDeceleratingget属性,returns YES if user isn't dragging (touch up) but scroll view is still moving-
delaysContentTouches延迟内容触摸不子类化UIScrollView:(延迟UIScrollView上面的子控件响应,优先响应UIScrollView事件),默认是true, 作用就是可以延迟触发滑动视图上的子类控件(比如UIButton)的响应事件,优先响应UIScrollView的事件; 如果设置成false,不延迟内容触摸,作用就是优先触发滑动视图上的子类控件。另外,APPLE文档说明:
if NO, we immediately call -touchesShouldBegin:withEvent:inContentView:. this has no effect on presses, 意思就是说该属性设置成false,则会触发UIScrollView中的touchesShouldBegin(_ touches: Set方法(在方法中会说到它的用法),设置为true不会触发该方法!, with event: UIEvent?, in view: UIView) -> Bool 不子类化UIScrollView
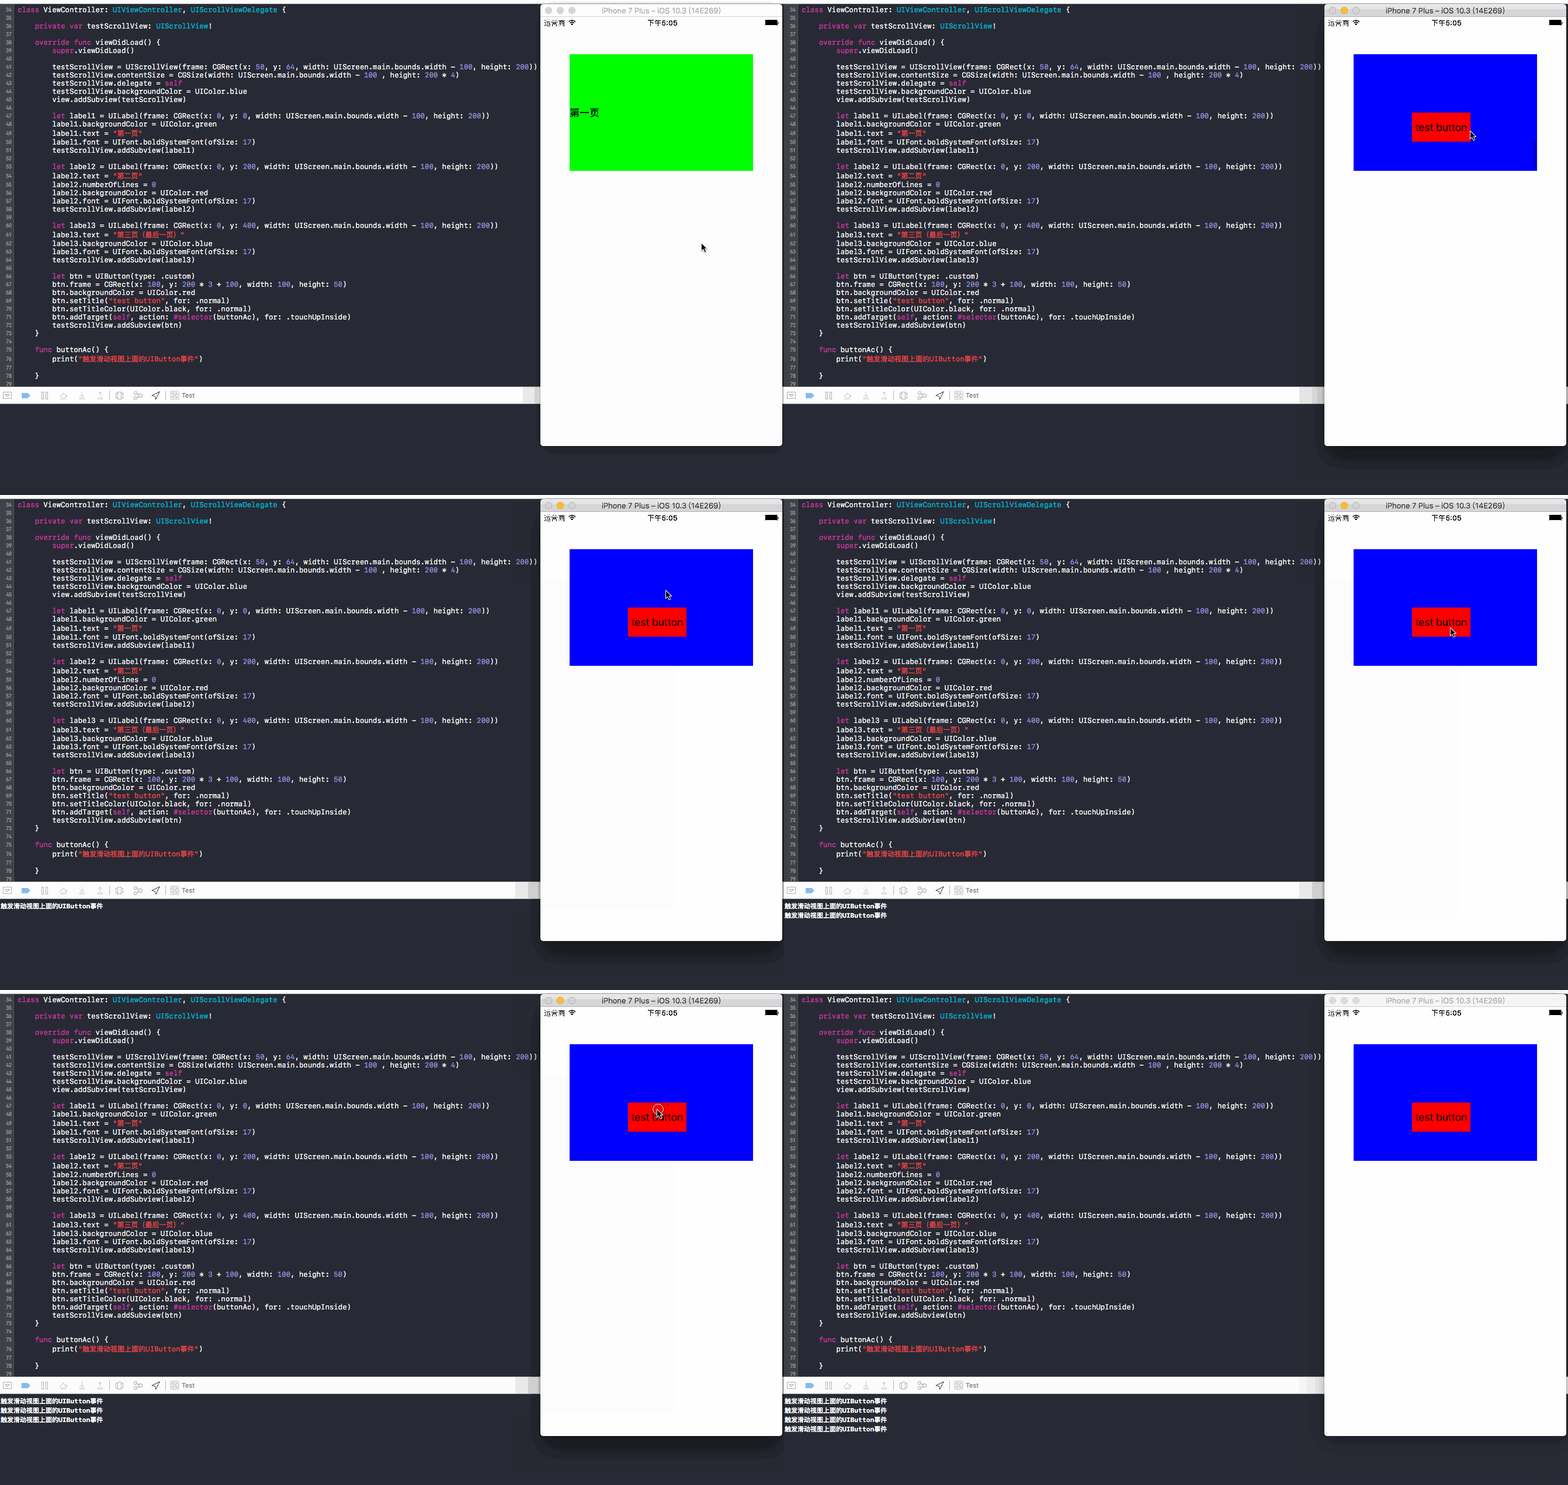
01 不子类化UIScrollView,默认设置(true):操作方法,点击button并快速向上滑动
结果:控制台没有输出任何日志,也就是没有响应button事件,并且可以看到button向上滑动,实质上是触发了UIScrollView的滑动事件!
02 不子类化UIScrollView,默认设置(true):操作方法,长按button向上滑动
结果:控制台输出“触发滑动视图上面的UIButton事件”, 响应了button事件,可以看到button没有向上滑动,也就是没有触发UIScrollView的滑动事件!
03 不子类化UIScrollView,设置false: 操作方法,点击button并快速向上滑动或者长按上滑
结果:当点击button并且同时快速上滑时或者长按上滑时,响应了button的事件,控制台输出“触发滑动视图上面的UIButton事件”, 没有看到button向上滑动,说明没有触发UIScrollView的滑动事件!
不子类化UIScrollView属性小结(个人认为): 一般情况下,我们使用该属性的默认值即可,因为如果不延迟内容触摸,优先响应UIScrollView上面的子控件,这样很容易造成误操作,比如上面的例子,一般用户的行为操作是希望向上滑动,但是只是不小心一开始触摸到的是一个button,却执行了button事件跳转到另一个页面或者toast提示或者其他操作,这显然不是用户所期望的,因为用户希望能够向上滑动,查看更多的状态等等!!!
不子类化UIScrollView注意点: 在上面的01和02操作中,为什么在都是设置为true的情况下,点击button快速上滑是响应UIScrollView事件,但是长按button上滑却是响应button事件呢?这就牵扯到UIScrollView的内部原理了,在UIScrollView中,在有一个计时器用来判断用户当前操作在UIScrollView上面的子视图的响应事件时长(这里以button为例,设UIScrollView内部默认时长为x),当用户操作时长小于x时(比如点击按钮立即上滑),UIScrollView内部机制会将触发事件传递给UIScrollView处理,则响应UIScrollView事件; 当用户操作时长大于x(比如长按按钮上滑),UIScrollView内部机制就会将触发事件返回交由它的子视图button来处理,也即是认为用户是想要操作button而并非UIScrollView!
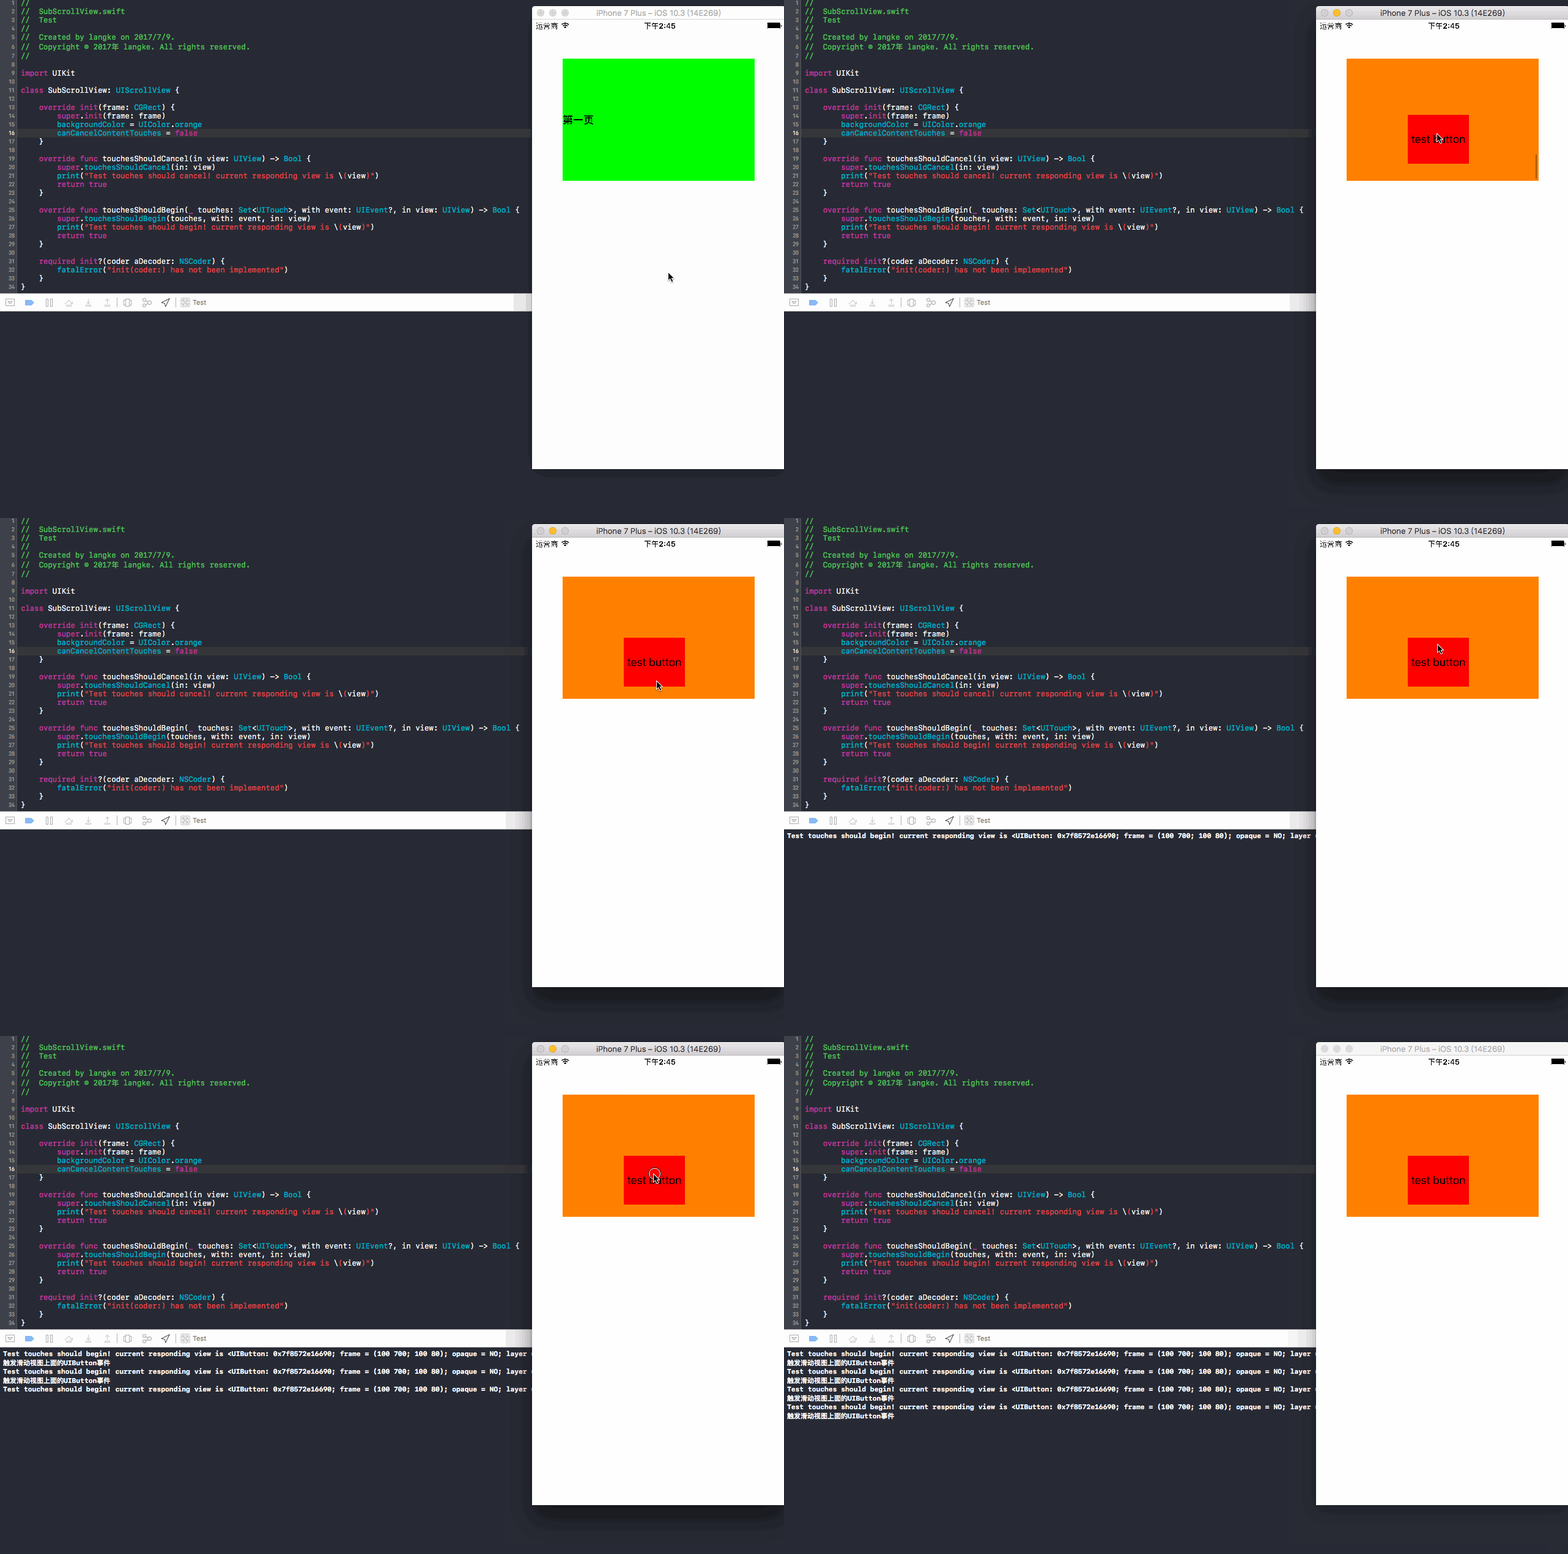
04 子类化UIScrollView,默认设置为true:操作方法,点击按钮立即上滑
代码:
class ViewController: UIViewController, UIScrollViewDelegate {

    private var testScrollView: SubScrollView!

    override func viewDidLoad() {
        super.viewDidLoad()

        // 使用的是子类化UIScrollView
        testScrollView = SubScrollView(frame: CGRect(x: 50, y: 64, width: UIScreen.main.bounds.width - 100, height: 200))
        testScrollView.contentSize = CGSize(width: UIScreen.main.bounds.width - 100 , height: 200 * 4)
        testScrollView.delegate = self
        view.addSubview(testScrollView)

        let label1 = UILabel(frame: CGRect(x: 0, y: 0, width: UIScreen.main.bounds.width - 100, height: 200))
        label1.backgroundColor = UIColor.green
        label1.text = "第一页"
        label1.font = UIFont.boldSystemFont(ofSize: 17)
        testScrollView.addSubview(label1)

        let label2 = UILabel(frame: CGRect(x: 0, y: 200, width: UIScreen.main.bounds.width - 100, height: 200))
        label2.text = "第二页"
        label2.numberOfLines = 0
        label2.backgroundColor = UIColor.red
        label2.font = UIFont.boldSystemFont(ofSize: 17)
        testScrollView.addSubview(label2)

        let label3 = UILabel(frame: CGRect(x: 0, y: 400, width: UIScreen.main.bounds.width - 100, height: 200))
        label3.text = "第三页(最后一页)"
        label3.backgroundColor = UIColor.blue
        label3.font = UIFont.boldSystemFont(ofSize: 17)
        testScrollView.addSubview(label3)

        let btn = UIButton(type: .custom)
        btn.frame = CGRect(x: 100, y: 200 * 3 + 100, width: 100, height: 50)
        btn.backgroundColor = UIColor.red
        btn.setTitle("test button", for: .normal)
        btn.setTitleColor(UIColor.black, for: .normal)
        btn.addTarget(self, action: #selector(buttonAc), for: .touchUpInside)
        testScrollView.addSubview(btn)
    }

    func buttonAc() {
        print("触发滑动视图上面的UIButton事件")
    }
}
子类化UIScrollView代码:
class SubScrollView: UIScrollView {

    override init(frame: CGRect) {
        super.init(frame: frame)
        backgroundColor = UIColor.blue
        // 默认为true
//        delaysContentTouches = false
    }

    override func touchesShouldCancel(in view: UIView) -> Bool {
        super.touchesShouldCancel(in: view)
        print("Test touches should cancel! current responding view is \(view)")
        return true
    }

    override func touchesShouldBegin(_ touches: Set, with event: UIEvent?, in view: UIView) -> Bool {
        super.touchesShouldBegin(touches, with: event, in: view)
        print("Test touches should begin! current responding view is \(view)")
        return true
    }

    required init?(coder aDecoder: NSCoder) {
        fatalError("init(coder:) has not been implemented")
    }
}
好,看一下演示效果:
结果:点击按钮立即上滑,在默认设置(true)下,控制台没有输出button事件的打印值,按钮上移,所以是优先触发UIScrollView响应事件!另外,没有触发
touchesShouldBegin方法,原因是delaysContentTouches没有设置成false,所以不会触发!
05 子类化UIScrollView,默认设置为true:操作方法,长按button上滑
演示效果:
结果:长按button上滑,没有触发button方法中的事件,button上移,控制台打印
touchesShouldBegin和touchesShouldCancel日志,说明响应的还是UIScrollView事件!这里又是怎么回事呢?还是之前提到的这是由于UIScrollView的内部机制,在04中,因为触发button的时间极其短,小于延迟内容触摸的时间x,所以UIScroll直接接收了事件的响应,没有将事件返回给它的子视图button!!而长按button的时候,触发button的时间已经达到内容触摸的时间x(大于x),所以UIScrollView内部判断了用户应该是要响应button事件,所以将事件返回给button,那么问题来了,既然事件已经返回给button了,但是为什么没有打印button方法中的 “触发滑动视图上面的UIButton事件” 呢?更重要的是,为何button上移了,说明响应了UIScrollView事件呢?这又和所复写的touchesShouldCancel相关了,因为该方法返回的bool值是true,所以相当于你(UIScrollView)把事件返回给我(button)后,后面又touchesShouldCancel返回true来取消我的响应,真实让我(button)空欢喜一场了!
好,既然你UIScrollView想要我button响应事件,那你后面就不要反悔来取消我的事件啊,那么你就该在touchesShouldCancel中返回false来跟我说:我不取消你的任务了,你做吧!!!于是我们在touchesShouldCancel中将返回值设置成false看看会怎么样,其他不变,然后:
override func touchesShouldCancel(in view: UIView) -> Bool {
    super.touchesShouldCancel(in: view)
    print("Test touches should cancel! current responding view is \(view)")
    return false
}
演示效果:
结果:button没有上移,button方法中的事件被响应,执行了
touchesShouldBegin(响应UIScrollView上面的子视图button)和touchesShouldCancel(返回false告诉button,把事件交给button处理)
06 子类化UIScrollView,默认设置为false:操作方法,点击button立即上滑、点击button长按上滑:
import UIKit

class SubScrollView: UIScrollView {

    override init(frame: CGRect) {
        super.init(frame: frame)
        backgroundColor = UIColor.blue
        // 设置为false
        delaysContentTouches = false
    }

    override func touchesShouldCancel(in view: UIView) -> Bool {
        super.touchesShouldCancel(in: view)
        print("Test touches should cancel! current responding view is \(view)")
        // 这里返回true,UIScrollView取消子视图的响应
        return true
    }

    override func touchesShouldBegin(_ touches: Set, with event: UIEvent?, in view: UIView) -> Bool {
        super.touchesShouldBegin(touches, with: event, in: view)
        print("Test touches should begin! current responding view is \(view)")
        return true
    }

    required init?(coder aDecoder: NSCoder) {
        fatalError("init(coder:) has not been implemented")
    }
}
演示效果:
同样地,从上面我们可以看到,当
delaysContentTouches = false时,也就是不延迟内容触摸(优先响应button),但实际情况是,我们看到button上移,button方法中的事件没有被响应,touchesShouldBegin和touchesShouldCancel方法被调用,也就是最终响应了UIScrollView事件!!这又是什么样的奇怪现象呢?事实上,尽管你设置了``delaysContentTouches = false, 但是最终决定权还是在UIScrollView的手里,它有一个致命武器就是touchesShouldCancel`返回true来取消你的响应,UIScrollView在告诉你:小子(button),本跟我耍花样,你完全在我的掌握之中,我想让你干你就干,不想让你干你就给我走人!
于是,我们除了设置``delaysContentTouches = false`外,还要:
override func touchesShouldCancel(in view: UIView) -> Bool {
    super.touchesShouldCancel(in: view)
    print("Test touches should cancel! current responding view is \(view)")
    return false
}
现在来看一下效果:
结果:我们看到,当我们直接点击button,和长按button立即上滑时,button不上移,button事件被响应,说明最终并未响应UIScrollView中的时间!但是,我们发现一个奇怪的现象,就是当我点击button立即上滑(演示中的第5、6、7下操作)时,button没有上移,但是button中的方法也没有被调用,说明什么?说明似乎既没有响应button事件,也没有响应UIScrollView中的事件?这个现象就十分奇怪了,事实上,button事件依然被响应,只不过我们别忘记了一点,点击button的模式,现在是
.touchUpInside,如果改成touchUpOutside就会响应了,最好的验证方式是将这里得button换成一个UIView,然后给UIView添加一个向上轻扫的手势UISwipeGestureRecognizer,然后就可以验证接收的事件的确是当前UIScrollView的子视图而并非UIScrollView了。
-
canCancelContentTouches可以取消内容触摸, 默认是true,可以优先响应UIScrollView(直接点击button除外除外);设置成false,则不取消内容触摸,也即是优先响应响应子视图,但是在延迟内容触摸的时间x内除外!
设置成true(默认):
结果:除了立即点击一下button会调用button的方法外,快速点击button上滑,button上移,没有走
touchesShouldBegin和touchesShouldCancel方法,触发的时间小于延迟触摸内容时间x,所以直接响应UIScrollView滑动;当按下button停留一下上滑时,button依旧上移,但是走了touchesShouldBegin和touchesShouldCancel方法,触发的时间大于延迟触摸内容时间x,本应该调用button中的方法,但是由于UIScrollView让touchesShouldCancel返回true取消了button的调用,所以还是走UIScrollView的响应!
设置成false:
结果:我们发现,在将
canCancelContentTouches设置成false后,则永远不会调用touchesShouldCancel方法, 当快速点击button上滑或者长按住button直接立即上滑时,button上移,响应了UIScrollView事件,没有走touchesShouldBegin和touchesShouldCancel方法, 触摸时间小于延迟内容触摸时间x,所以响应UIScrollView; 当点击button停顿一下后(不松手)继续上滑时,button没有上移,触摸时间大于延迟内容触摸时间x,button事件被响应,走了touchesShouldBegin方法,响应了button点击事件;
minimumZoomScale滑动视图的最小缩放倍数,默认是1.0maximumZoomScale滑动视图的最大缩放倍数,默认是1.0(要使得缩放有效果,maximumZoomScale必须要大于minimumZoomScale)
例如:
class ViewController: UIViewController, UIScrollViewDelegate {

    private var testScrollView: UIScrollView!
    private var testImgView: UIImageView!

    override func viewDidLoad() {
        super.viewDidLoad()

        testScrollView = UIScrollView(frame: CGRect(x: 50, y: 264, width: UIScreen.main.bounds.width - 100, height: 200))
        testScrollView.contentSize = CGSize(width: UIScreen.main.bounds.width - 100 , height: 200)
        testScrollView.delegate = self
        testScrollView.backgroundColor = UIColor.orange
        testScrollView.minimumZoomScale = 0.5
        testScrollView.maximumZoomScale = 2
        view.addSubview(testScrollView)

        testImgView = UIImageView(frame: testScrollView.bounds)
        testImgView.image = #imageLiteral(resourceName: "testimage2.jpg")
        testScrollView.addSubview(testImgView)

    }

    func viewForZooming(in scrollView: UIScrollView) -> UIView? {
        return testImgView
    }

    func scrollViewDidEndZooming(_ scrollView: UIScrollView, with view: UIView?, atScale scale: CGFloat) {

        let offSetX = scrollView.bounds.width > scrollView.contentSize.width ? (scrollView.bounds.width - scrollView.contentSize.width) * 0.5 : 0.0
        let offSetY = scrollView.bounds.height > scrollView.contentSize.height ? (scrollView.bounds.height - scrollView.contentSize.height) * 0.5 : 0.0
        testImgView.center = CGPoint(x: scrollView.contentSize.width * 0.5 + offSetX, y: scrollView.contentSize.height * 0.5 + offSetY)
    }
}
演示效果:
注意:需要实现缩放效果,代理必须要实现
func viewForZooming(in scrollView: UIScrollView) -> UIView?方法,否则无法实现缩放功能,必要时要达到缩放后的一些效果操作还要实现代理的func scrollViewDidEndZooming(_ scrollView: UIScrollView, with view: UIView?, atScale scale: CGFloat)方法!
-
zoomScale当前的缩放比例, 默认是1.0
例如
func tap() {

    // 双击当前图片,使其缩放成原来的0.8倍
    testScrollView.zoomScale = 0.8

    // 使图片居中
    let offSetX = testScrollView.bounds.width > testScrollView.contentSize.width ? (testScrollView.bounds.width - testScrollView.contentSize.width) * 0.5 : 0.0
    let offSetY = testScrollView.bounds.height > testScrollView.contentSize.height ? (testScrollView.bounds.height - testScrollView.contentSize.height) * 0.5 : 0.0
    testImgView.center = CGPoint(x: testScrollView.contentSize.width * 0.5 + offSetX, y: testScrollView.contentSize.height * 0.5 + offSetY)
}
bouncesZoom弹性缩放,默认是true, 设置成false的话,当缩放到最大或最小值的时候不会有弹性效果isZooming正在缩放,get属性,正在进行缩放的时候是true, 松开就是falseisZoomBouncingget属性,当没有设置bouncesZoom的时候,如果正在缩放过程中则为false,如果缩放到最小值或者最大值时松开手指则为true; 当设置bouncesZoom = false的时候,如果正在缩放过程中zoomScale > 1时则为false,并且缩放到最大值时松开手指也是false。scrollsToTop滑动到顶部,默认是true,当点击状态栏的时候,如果当前UIScrollView不是处在顶部位置,那么可以直接回到顶部;如果已经在顶部,则没有作用;另外必须注意如果要这个属性起作用,它的delegate方法func scrollViewShouldScrollToTop(_ scrollView: UIScrollView) -> Bool不能返回false,否则没用。panGestureRecognizer平移手势,get属性,可以通过设置平移手势的属性来改变平移方式,比如设置触摸手指的最少个数minimumNumberOfTouchespinchGestureRecognizer捏合手势,也就是缩放手势,get属性,设置同平移手势一样,当缩放禁用时返回nil。keyboardDismissMode键盘消失模式, 默认是none,是个枚举值
public enum UIScrollViewKeyboardDismissMode : Int {

    case none             //  无

    case onDrag       //  拖拽,只要滑动UIScrollView,键盘消失

    case interactive  //  交互式,拖住UIScrollView一直下滑,当接触到键盘时,键盘就跟着同步下滑
}
演示一下interactive:
testScrollView.keyboardDismissMode = .interactive
-
refreshControl自带的刷新控件(iOS 10.0以后才有的,很少用到)
testScrollView.refreshControl = UIRefreshControl()
演示效果
当然,这个属性还可以在菊花下方添加一个title,但是具有一定的透明度,不是那么好用,尝试过很多方法难以改变,字体和颜色是可以设置的,希望后期Apple可以优化,以至于好用!
方法
-
setContentOffset(_ contentOffset: CGPoint, animated: Bool)设置或者指定偏移量(动画)
如果我们需要在某一处触发某个事件就滑动到指定的位置,就可以使用这个方法,十分有用,看下面的例子
override func touchesEnded(_ touches: Set, with event: UIEvent?) {

    // testScrollView的frame的height为200, 现在可以使用这个方法滑到最后一页
    testScrollView.setContentOffset(CGPoint(x: 0, y: 200 * 2), animated: true)
}
演示效
-
scrollRectToVisible(_ rect: CGRect, animated: Bool)滑动到指定的可见区域(带动画),意思就是滑动到CGRect所组成的矩形区域,使其可见!
解释一下,这个方法中的
CGRect中的width和height必须要设置才能起作用,而且必须大于0!!!否则设置无效! 另外,如果当前区域已经可见,那这个方法什么都不做,什么意思呢?比如现在我所在区域坐标为 (x: 0, y: 0, width: 200, height:200),testScrollView.scrollRectToVisible(CGRect(x: 0, y: 20, width: 100, height: 150), animated: true), 那么这个方法就不会起作用,因为20(y坐标) + 150(height) = 170 < 200,当前区域已经包含了scrollRectToVisible所要滑动可见的区域 !
-
flashScrollIndicators()滑动条闪烁
......................................
// 当页面加载成功出现时,滑动条会自动显示出来,停留一下又自动隐藏
// 不设置的话,页面出现时也不会显示滑动条,只有在滑动过程中会显示滑动条
testScrollView.flashScrollIndicators()
view.addSubview(testScrollView)
touchesShouldBegin(_ touches: Set触摸事件开始, 这个前面讲, with event: UIEvent?, in view: UIView) -> Bool delaysContentTouches和canCancelContentTouches属性的时候也讲得差不多了,方法的意思是开始响应UIScrollView的子视图(比如button)的事件。此外,这个方法必须要子类化UIScrollView即复写父类才可以起到作用,用来控制UIScrollView的子视图的触摸事件的传递, 在触摸事件传递到UIScrollView的子视图之前就会被调用,如果返回false则触摸事件一定不会传递给子视图,但是直接点击除外,因为直接点击子视图,子视图立马响应自己的方法!touchesShouldCancel(in view: UIView) -> Bool触摸事件取消,返回true直接取消UIScrollView的子视图的响应,直接由UIScrollView响应;返回false则会响应UIScrollView的子视图事件;func setZoomScale(_ scale: CGFloat, animated: Bool)当前的缩放比例(可带动画)
例如
func doubleTap() {
    testScrollView.setZoomScale(0.5, animated: true)
}
-
func zoom(to rect: CGRect, animated: Bool)缩放指定的区域
例如:
testScrollView = UIScrollView(frame: CGRect(x: 50, y: 264, width: 300, height: 100))
testScrollView.contentSize = CGSize(width:300 , height: 100)
testScrollView.backgroundColor = UIColor.orange
testScrollView.minimumZoomScale = 0.1
testScrollView.maximumZoomScale = 4
testScrollView.delegate = self
view.addSubview(testScrollView)

func doubleTap() {
    testScrollView.zoom(to: CGRect(x: 0, y: 0, width: 100, height: 50), animated: false)
    print("current zoomScale is \(testScrollView.zoomScale)")
}

func scrollViewDidScroll(_ scrollView: UIScrollView) {
    print("contentoffset x is \(scrollView.contentOffset.x)")
    print("contentoffset y is \(scrollView.contentOffset.y)")
    print("contentSize: \(scrollView.contentSize)")
}
这个方法使用要注意几点:
1、func zoom(to rect: CGRect, animated: Bool)方法中的CGRect中的x、y不能设置成负数,设置负数的话,默认x、y为0;
2、 zoomScale = min(UIScrollView.width / zoom.width, UIScrollView.height / zoom.height)
3、
contentSize.height = zoomScale * UIScrollView.height
contentSize.width = zoomScale * UIScrollView.width
4、 下面只是相对值,大多数情况下精确,少数情况下有少许误差!
zoom.y * zoomScale >= (UIScrollView.height / zoomScale - zoom.height)
zoom.x * zoomScale >= (UIScrollView.width / zoomScale - zoom.width)

contentOffSet.y = zoom.y * zoomScale - (UIScrollView.height / zoomScale - zoom.height)
contentOffSet.x = zoom.x * zoomScale - (UIScrollView.width / zoomScale - zoom.width)
到这里看得好累有没有??其实我也写得很累,继续搬砖
看一下UIScrollView的UIScrollViewDelegate方法
func scrollViewDidScroll(_ scrollView: UIScrollView)已经滑动,常用来处理一些偏移量,判断拖拽状态等func scrollViewDidZoom(_ scrollView: UIScrollView)已经缩放,处理一些缩放操作func scrollViewWillBeginDragging(_ scrollView: UIScrollView)即将开始拖拽(或许要拖拽移动一小段距离才会调用),只要一开始拖拽就会调用func scrollViewWillEndDragging(_ scrollView: UIScrollView, withVelocity velocity: CGPoint, targetContentOffset: UnsafeMutablePointer即将松开手指结束拖拽) func scrollViewDidEndDragging(_ scrollView: UIScrollView, willDecelerate decelerate: Bool)已经松开手指,结束拖拽状态func scrollViewWillBeginDecelerating(_ scrollView: UIScrollView)即将开始减速func scrollViewDidEndDecelerating(_ scrollView: UIScrollView)已经结束减速, 当UIScrollView停止时就调用func scrollViewDidEndScrollingAnimation(_ scrollView: UIScrollView)已经结束滑动动画,这个方法起作用的前提是设置了上面提到的两种方法中的任意一种,否则不会起作用!
1 func setContentOffset(_ contentOffset: CGPoint, animated: Bool)

2 func scrollRectToVisible(_ rect: CGRect, animated: Bool)
func viewForZooming(in scrollView: UIScrollView) -> UIView?返回一个需要缩放的视图,需要做缩放的时候必须调用此方法,之前已经讲过,不再赘述!func scrollViewWillBeginZooming(_ scrollView: UIScrollView, with view: UIView?)即将开始缩放,在滑动视图开始缩放它的内容视图前调用func scrollViewDidEndZooming(_ scrollView: UIScrollView, with view: UIView?, atScale scale: CGFloat)已经结束缩放状态,结束缩放手势时调用,在最小和最大值之前进行缩放func scrollViewShouldScrollToTop(_ scrollView: UIScrollView) -> Bool滑到顶部,这个方法和属性scrollsToTop用法一致,本质一致,返回true则是可以滑动顶部,false反之!func scrollViewDidScrollToTop(_ scrollView: UIScrollView)已经滑到顶部,当滑动到顶部的动画完成的时候调用
小结
到此,UIScrollView基本差不多,我们详细讲解了它的一些基本属性和用法,甚至包括一些具体的区别和细节,但是还有一些更深入的底层原理到底怎么样实现的呢?包括它的滑动手势控制,定时器设置,偏移量等还有很多工作需要做,怎么做,还有待研究,有时间会继续深入更新...
欢迎加入 iOS(swift)开发互助群:QQ群号:558179558, 相互讨论和学习!


