Python开发简单爬虫(Python2.X版本,Eclipse工具)
一、爬虫介绍
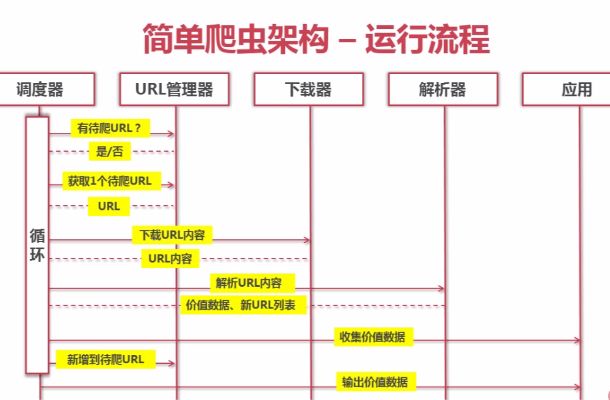
- 爬虫调度端:启动、停止爬虫,监视爬虫运行情况
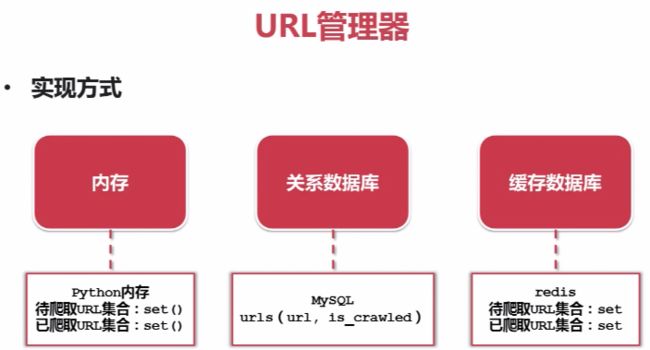
- URL管理器:管理将要爬取的URL和已经爬取的URL
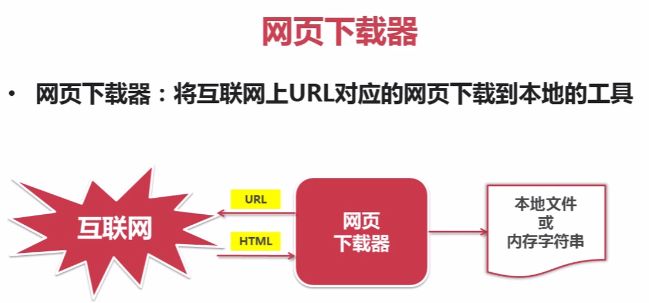
- 网页下载器:下载URL指定的网页,存储成字符串
- 网页解析器:提取有价值的数据,提取关联URL补充URL管理器
二、URL管理器
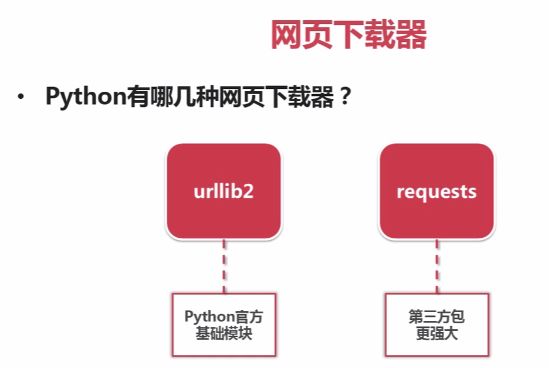
三、网页下载器
(1)方法一
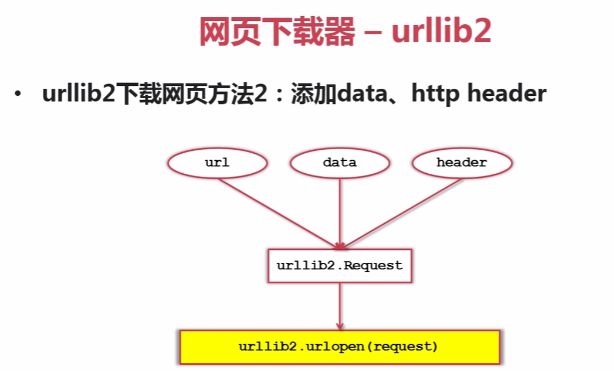
(2)方法二
- header:http头信息
- data:用户输入信息
(3)方法三
- HTTPCookieProcessor:需登录的网页
- ProxyHandler:需代理访问的网页
- HTTPSHandler:加密访问的网页
- HTTPRedirectHandler:URL自动跳转的网页
# coding:utf8   #出现编码错误时添加

import urllib2
import cookielib
url = "http://www.baidu.com"

print '第一种方法'
response1 = urllib2.urlopen(url)
print response1.getcode()
print len(response1.read())

print '第二种方法'
request = urllib2.Request(url)
request.add_header('user_agent', 'Mozilla/5.0')
response2 = urllib2.urlopen(request)
print response2.getcode()
print len(response2.read())

print '第三种方法'
cj = cookielib.CookieJar()
opener = urllib2.build_opener(urllib2.HTTPCookieProcessor(cj))
urllib2.install_opener(opener)
response3 = urllib2.urlopen(request)
print response3.getcode()
print cj
print response3.read()
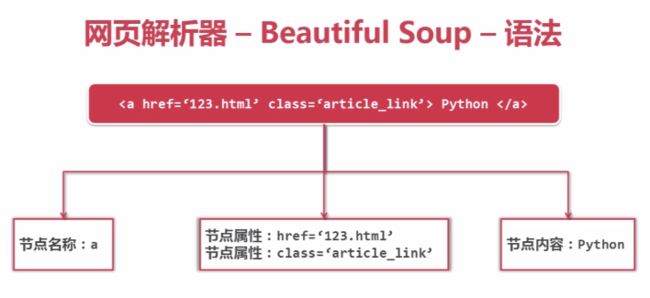
四、网页解析器
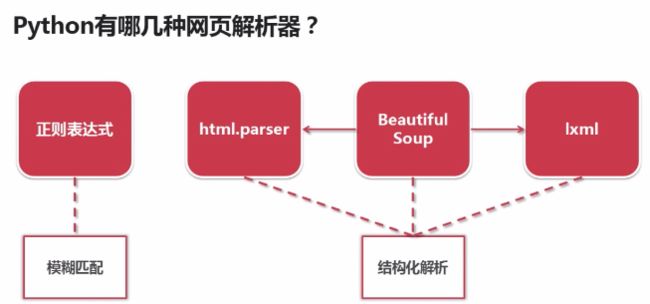
Python 自带:
html.parser
第三方:BeautifulSoup,lxml
安装beautifulsoup4
1.命令提示符中进入安装Python的文件夹中~\Python27\Scripts
2.输入pip install beautifulsoup4
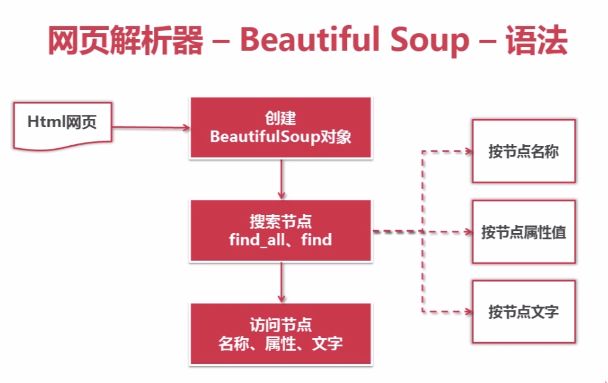
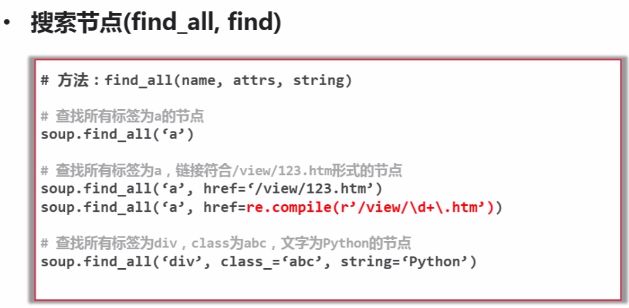
calss为Python的关键词,所以用class_表示。
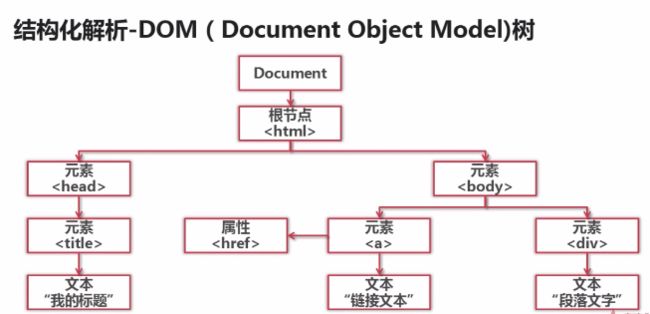
以字典形式可访问节点所有属性
参考:Python爬虫利器二之Beautiful Soup的用法
# coding:utf8

import re
from bs4 import BeautifulSoup

html_doc = """
The Dormouse's story

The Dormouse's story

Once upon a time there were three little sisters; and their names were
Elsie,
Lacie and
Tillie;
and they lived at the bottom of a well.

...
"""
soup = BeautifulSoup(html_doc,'html.parser',from_encoding='utf-8')

print '获取所有的链接'
links = soup.find_all('a')
for link in links:
    print link.name, link['href'], link.get_text()

print '获取Lacie的 链接'
link_node = soup.find('a',href = 'http://example.com/lacie')
print link_node.name, link_node['href'], link_node.get_text()

print '正则匹配'
link_node = soup.find('a',href = re.compile(r'ill'))
print link_node.name, link_node['href'], link_node.get_text()

print '获取p段落文字'
p_node = soup.find('a',class_ = "title")
print p_node.name, p_node.get_text()

结果:
获取所有的链接
a http://example.com/elsie Elsie
a http://example.com/lacie Lacie
a http://example.com/tillie Tillie
获取Lacie的 链接
a http://example.com/lacie Lacie
正则匹配
a http://example.com/tillie Tillie
获取p段落文字
p The Dormouse's story
Eclipse:
ctrl+shift+M或Ctrl+Shift+o或Ctrl+1可以自动导入相应的包或创建相应的类或方法。
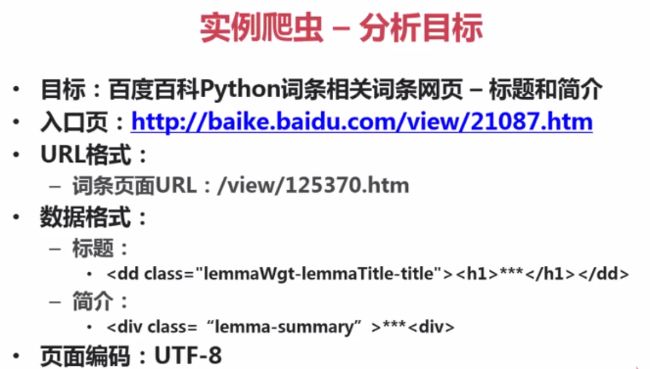
五、实例
观察目标,定制策略,策略要根据目标的变化实时更新。
精通Python网络爬虫(Python3.X版本,PyCharm工具)
一、爬虫类型
- 通用网络爬虫:全网爬虫。由初始URL集合、URL队列、页面爬行模块、页面分析模块、页面数据库、链接过滤模块等构成。
- 聚焦网络爬虫:主题爬虫。由初始URL集合、URL队列、页面爬行模块、页面分析模块、页面数据库、链接过滤模块,内容评价模块、链接评价模块等构成。
- 增量网络爬虫:增量式更新,尽可能爬取新页面(更新改变的部分)。
- 深层网络爬虫:隐藏在表单后,需要提交一定关键词才能获取的页面。URL列表、LVS列表(LVS指标签/数值集合,即填充表单的数据源)、爬行控制器、解析器、LVS控制器、表单分析器、表单处理器、响应分析器等构成。
二、核心技术
PyCharm常用快捷键:
Alt+Enter:快速导入包
Ctrl+z:撤销,Ctrl+Shift+z:反撤销
(1)Urllib库
1)Python2.X与Python3.X区别
| Python2.X | Python3.X |
|---|---|
import urllib2 |
import urllib.requset, urllib.error |
import urllib |
import urllib.requset, urllib.error, urllib.parse |
urllib2.urlopen |
urllib.request.urlopen |
urllib.urlencode |
urllib.parse.urlencode |
urllib.quote |
urllib.request.quote |
urllib.CookieJar |
http.CookieJar |
urllib.Request |
urllib.request.Request |
2)快速爬取网页
import urllib.request

# 爬取百度网页内容
file = urllib.request.urlopen("http://www.baidu.com", timeout=30) # timeout超时设置,单位:秒
data = file.read()            #读取文件全部内容,字符串类型
dataline = file.readline()    #读取文件一行内容
datalines = file.readlines()  #读取文件全部内容,列表类型

# 以html格式存储到本地
fhandle = open("/.../1.html","wb")
fhandle.write(data)
fhandle.close()

# 快捷存储到本地
filename = urllib.request.urlretrieve("http://www.baidu.com",filename="/.../1.html")
urllib.request.urlcleanup() #清除缓存

# 其他常用方法
file.getcode() #响应状态码,200为链接成功
file.geturl() #爬取的源网页

# URL编码(当URL中存在汉字等不符合标准的字符时需要编码后爬取)
urllib.request.quote("http://www.baidu.com")  # http%3A//www.baidu.com
# URL解码
urllib.request.unquote("http%3A//www.baidu.com") # http://www.baidu.com
注意:URL中存在汉字如
https://www.baidu.com/s?wd=电影,爬取该URL时实际传入URL应该是"https://www.baidu.com/s?wd=" + urllib.request.quote("电影"),而不应该是urllib.request.quote("https://www.baidu.com/s?wd=电影")
3)浏览器模拟(应对403禁止访问)
import urllib.request

url = "http://baidu.com"
# 方法一
headers = ("User-Agent",
           "Mozilla/5.0 (Windows NT 6.1; WOW64) AppleWebKit/537.36 \
           (KHTML, like Gecko) Chrome/49.0.2623.221 Safari/537.36 SE 2.X MetaSr 1.0")
opener = urllib.request.build_opener()
opener.addheaders = [headers]
data = opener.open(url).read()

# 方法二
req = urllib.request.Request(url)
req.add_header("User-Agent", "Mozilla/5.0 (Windows NT 6.1; WOW64) AppleWebKit/537.36 \
           (KHTML, like Gecko) Chrome/49.0.2623.221 Safari/537.36 SE 2.X MetaSr 1.0")
data = urllib.request.urlopen(req).read()
4)POST请求
import urllib.request
import urllib.parse

url = "http://www.iqianyue.com/mypost"   # 测试网站
# 将数据使用urlencode编码处理后,使用encode()设置为utf-8编码
postdata = urllib.parse.urlencode({"name": "abc", "pass": "111"}).encode("utf-8")
req = urllib.request.Request(url, postdata)
req.add_header("User-Agent", "Mozilla/5.0 (Windows NT 6.1; WOW64) AppleWebKit/537.36 \
           (KHTML, like Gecko) Chrome/49.0.2623.221 Safari/537.36 SE 2.X MetaSr 1.0")
data = urllib.request.urlopen(req).read()
注意:
postdata = urllib.parse.urlencode({"name": "abc", "pass": "111"}).encode("utf-8"),必须encode("utf-8")编码后才可使用,实际结果为b'name=abc&pass=111',未编码结果为name=abc&pass=111
5)代理服务器设置(应对IP被屏蔽、403)
def use_proxy(proxy_add, url):
    import urllib.request
    proxy = urllib.request.ProxyHandler({'http': proxy_add})
    opener = urllib.request.build_opener(proxy, urllib.request.HTTPHandler)
    # 创建全局默认opener对象,这样使用urlopen()也会使用该对象
    urllib.request.install_opener(opener)
    # 解码类型与网页编码格式一致
    data = urllib.request.urlopen(url).read().decode("gb2312")
    return data

# 代理IP可用百度搜索
data = use_proxy("116.199.115.79:80", "http://www.baidu.com")
print(data)
注意:
encode():编码,decode():解码
- 例如(Python3.X):
u = '中文'
str = u.encode('utf-8') # 结果:b'\xe4\xb8\xad\xe6\x96\x87',为字节类型
u1 = str.decode('utf-8') # 结果:中文- 过程:
str(unicode) --[encode('utf-8')]--> bytes --[decode('utf-8')]--> str(unicode)
6)DebugLog调试日志
import urllib.request

httphd = urllib.request.HTTPHandler(debuglevel=1)
httpshd = urllib.request.HTTPSHandler(debuglevel=1)

opener = urllib.request.build_opener(httphd, httpshd)
urllib.request.install_opener(opener)
data = urllib.request.urlopen("http://www.baidu.com")
运行结果:
send: b'GET / HTTP/1.1\r\nAccept-Encoding: identity\r\nHost: www.baidu.com\r\nUser-Agent: Python-urllib/3.6\r\nConnection: close\r\n\r\n'
reply: 'HTTP/1.1 200 OK\r\n'
header: Date header: Content-Type header: Transfer-Encoding header: Connection header: Vary header: Set-Cookie header: Set-Cookie header: Set-Cookie header: Set-Cookie header: Set-Cookie header: Set-Cookie header: P3P header: Cache-Control header: Cxy_all header: Expires header: X-Powered-By header: Server header: X-UA-Compatible header: BDPAGETYPE header: BDQID header: BDUSERID
7)异常处理
URLError:1)连接不上服务器。2)远程URL不存在。3)无网络。4)HTTPError:
200:OK
301:Moved Permanently——重定向到新的URL
302:Found——重定向到临时的URL
304:Not Modified——请求资源未更新
400:Bad Request——非法请求
401:Unauthorized——请求未经授权
403:Forbidden——禁止访问
404:Not Found——未找到对应页面
500:Internal Server Error——服务器内部错误
501:Not Implemented——服务器不支持实现请求所需要的功能
import urllib.error
import urllib.request

try:
    urllib.request.urlopen("http://www.baidu.com")
except urllib.error.URLError as e:
    if hasattr(e, "code"):
        print(e.code)
    if hasattr(e, "reason"):
        print(e.reason)
(2)正则表达式
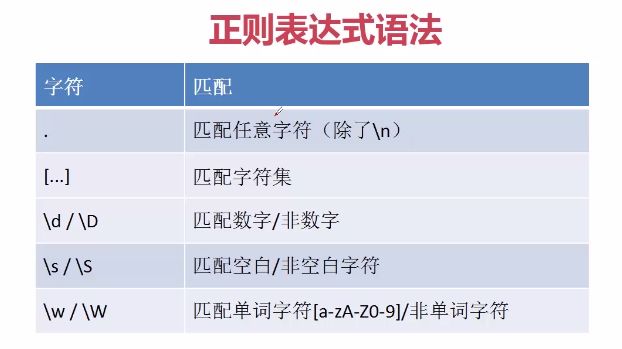
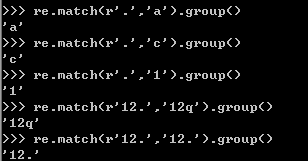
1)基本语法(适用其他)
-
1.单个字符匹配
[...]匹配字符集内的任意字符
\w包括[a-zA-Z0-9]即匹配所以大小写字符及数字,以及下划线
-
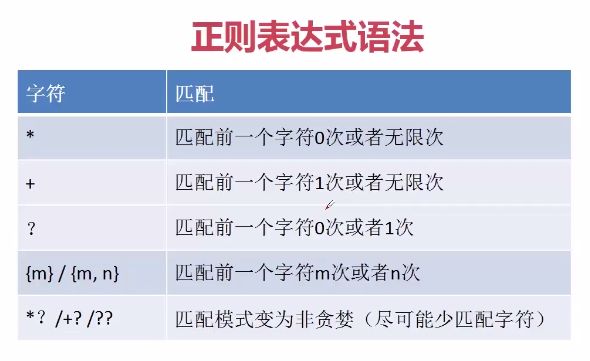
2.多个字符匹配
因为
*匹配前个字符0到无限次,所以*?匹配前个字符0次,既不匹配前个字符。
因为+匹配前个字符1到无限次,所以+?匹配前个字符1次。
因为?匹配前个字符0或1次,所以??匹配前个字符0次,既不匹配前个字符。
-
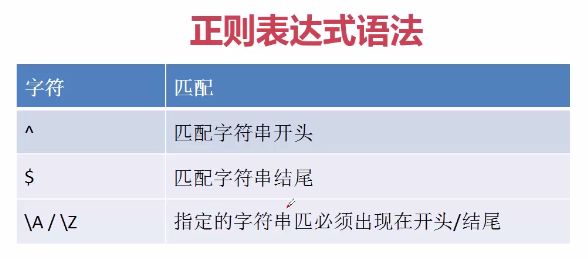
3.边界匹配
-
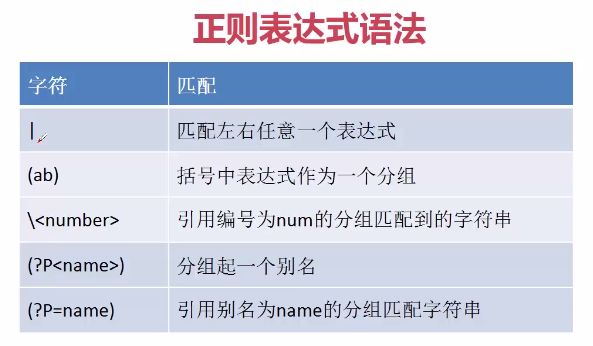
4.分组匹配
\引用编号为num的分组匹配的字符串:
代码1:
re.match(r'<(book>)(python)pythonpython').group()
结果:python python
代码2:re.match(r'<(book>)(python)pythonpython').groups()
结果:('book>','python')
解释:
.groups()方法返回分组匹配的字符串集合,指总体匹配模式中()内的分组匹配模式匹配的结果集。代码1中'<(book>)(python)为总体匹配模式,其中有(book>)和(python)两个分组匹配模式,代码2结果就为这两个分组匹配模式匹配的结果集,\就是通过num来引用该结果集中的字符串,\1为book>,\2为python。
用
(?P和) (?P=name)替代,代码1还可以写为:
re.match(r'<(?Pbook>)(?P python)pythonpython').group()
- 5.模式修改
| 符号 | 含义 |
|---|---|
I |
匹配时忽略大小写 |
M |
多行匹配 |
L |
做本地化识别匹配 |
U |
根据Unicode字符及解析字符 |
S |
让.匹配包括换行符,使.可以匹配任意字符 |
2)re模块
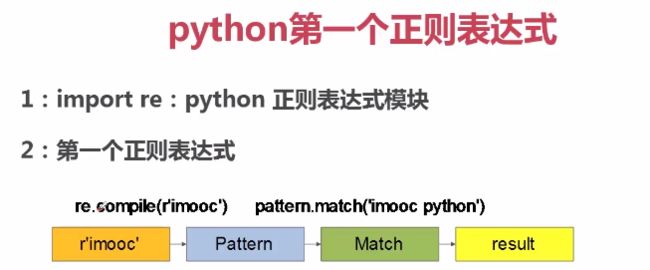
import re
str = ‘imooc python’

pa = re.compile(r'imooc') #匹配‘imooc’字符串
ma = pa.match(str)
# 等价于
ma = re.match(r'imooc', str)

ma.string   #被匹配字符串
ma.re       #匹配模式(pa值)
ma.group()  #匹配结果
ma.span()   #匹配位置

pa = re.compile(r'imooc', re.I) #匹配‘imooc’字符串,不管大小写

# 上述最终可写为
ma = re.match(r'imooc', 'imooc python', re.I)
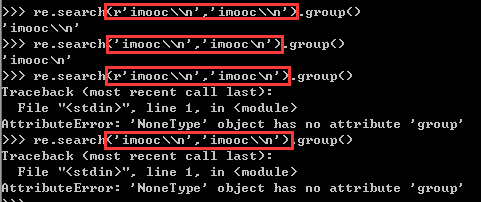
样式字符串前r的用法:
(1)带上r,样式字符串为原字符串,后面的样式字符串是什么匹配什么,里面即使有转义字符串也按普通字符串匹配。
(2)不带r,样式字符串无转义字符串不影响,有转义字符串需考虑转义字符串进行匹配。
例子中r'imooc\\n'相当于imooc\\n,'imooc\\n'相当于imooc\n,因为'\\'为转义字符串时相当于'\'
march从头开始匹配,找出字符串开头符合匹配样式的部分,开头无符合返回NoneType
seach从头开始匹配,找出字符串内第一个符合匹配样式的部分并返回,字符串内无符合返回NoneType
sub()参数中repl可以是用来替代的字符串,也可以是一个函数且该函数需返回一个用来替换的字符串。count为替换次数,默认为0,为都替换。
re.sub(r'\d+','100','imooc videnum=99')
re.sub(r'\d+',lambda x: str(int(x.group())+1),'imooc videnum=99')
结果:'imooc videnum=100'
lambda x: str(int(x.group())+1)为匿名函数,其中冒号前的x为函数参数,默认传入匹配的结果对象,需要用.group()方法获取结果字符串。冒号后算式的结果为返回值。也可以写成:
def add(x):
    val = x.group()
    num = int(val)+1
    return str(num)

re.sub(r'\d+',add,'imooc videnum=99')
(3)Cookie用法(应对模拟登陆)
import urllib.request
import urllib.parse
import http.cookiejar

# 创建CookieJar对象
cjar = http.cookiejar.CookieJar()
# 使用HTTPCookieProcessor创建cookie处理器,并以其为参数创建opener对象
opener = urllib.request.build_opener(urllib.request.HTTPCookieProcessor(cjar))
# 将opener安装为全局
urllib.request.install_opener(opener)

# 网站登录页
url1 = 'http://xxx.com/index.php/login/login_new/'
# 登陆所需要POST的数据
postdata = urllib.parse.urlencode({
            'username': 'xxx',
            'password': 'xxx'
            }).encode("utf-8")
req = urllib.request.Request(url1, postdata)
# 网站登陆后才能访问的网页
url2 = 'http://xxx.com/index.php/myclass'

# 登陆网站
file1 = urllib.request.urlopen(req)
# 爬取目标网页信息
file2 = urllib.request.urlopen(url2).read()
(4)多线程与队列
# 多线程基础
import threading

class A(threading.Thread):
    def __init__(self):
        # 初始化该线程
        threading.Thread.__init__(self)

    def run(self):
        # 该线程要执行的内容
        for i in range(10):
            print("线程A运行")

class B(threading.Thread):
    def __init__(self):
        threading.Thread.__init__(self)

    def run(self):
        for i in range(10):
            print("线程B运行")

t1 = A()
t1.start()

t2 = B()
t2.start()
# 队列基础(先进先出)
import queue
# 创建队列对象
a = queue.Queue()
# 数据传入队列
a.put("hello")
a.put("php")
a.put("python")
a.put("bye")
# 结束数据传入
a.task_done()

for i in range(4):
    # 取出数据
    print(a.get())
(5)浏览器伪装
Headers信息:
Accept:text/html,application/xhtml+xml,application/xml;q=0.9,image/webp,*/*;q=0.8
-
Accept:浏览器支持内容类型,支持优先顺序从左往右依次排序 -
text/html:HTML文档 -
application/xhtml+xml:XHTML文档 -
application/xml:XML文档
Accept-Encoding:gzip, deflate, sdch(设置该字段,从服务器返回的是对应形式的压缩代码(浏览器会自动解压缩),因此可能出现乱码)
-
Accept-Encoding:浏览器支持的压缩编码方式 -
deflate:一种无损数据压缩的算法
Accept-Language:zh-CN,zh;q=0.8
-
Accept-Language:支持的语言类型 -
zh-CN:zh中文,CN简体 -
en-US:英语(美国)
Connection:keep-alive
-
Connection:客户端与服务端连接类型 -
keep-alive:持久性连接 -
close:连接断开
Referer:http://123.sogou.com/(某些反爬虫网址可能检验该字段,一般可以设置为要爬取网页的域名地址或对应网址的主页地址)
-
Referer:来源网址
·
.addheaders方法传入格式为:[('Connection','keep-alive'),("User-Agent", "Mozilla/5.0 (Windows NT 6.1; WOW64) AppleWebKit/537.36 (KHTML, like Gecko) Chrome/49.0.2623.221 Safari/537.36 SE 2.X MetaSr 1.0"),...]
三、Scrapy框架
(1)常见爬虫框架
- Scrapy框架:
https://scrapy.org/ - Crawley框架
- Portia框架:有网页版
- newspaper框架
- python-goose框架
(2)安装Scrapy
Python2.X和Python3.X同时安装,命令提示符:
py -2:启动Python2.X
py -3:启动Python3.X
py -2 -m pip install ...:使用Python2.X pip安装
py -3 -m pip install ...:使用Python3.X pip安装安装超时:
手动指定源,在pip后面跟-i,命令如下:
pip install packagename -i http://pypi.douban.com/simple --trusted-host pypi.douban.com
pipy国内镜像目前有:
豆瓣 http://pypi.douban.com/simple/
阿里云 http://mirrors.aliyun.com/pypi/simple/
中国科技大学 https://pypi.mirrors.ustc.edu.cn/simple/
清华大学 https://pypi.tuna.tsinghua.edu.cn/simple/
华中理工大学 http://pypi.hustunique.com/
山东理工大学 http://pypi.sdutlinux.org/出现如下错误:
error:Microsoft Visual C++ 14.0 is required. Get it with "Microsoft Visual C++ Build Tools": http://landinghub.visualstudio.com/visual-cpp-build-tools
解决方案:
在http://www.lfd.uci.edu/~gohlke/pythonlibs/#twisted下载twisted对应版本的whl文件,cp后面是python版本,amd64代表64位,以Python位数为准
运行命令:
pip install C:\xxx\Twisted-17.5.0-cp36-cp36m-win_amd64.whl安装成功后运行出现
No module named 'win32api'错误:
在https://sourceforge.net/projects/pywin32/files%2Fpywin32/下载安装对应pywin32即可
(3)Scrapy应用(命令提示符输入)
1)创建项目
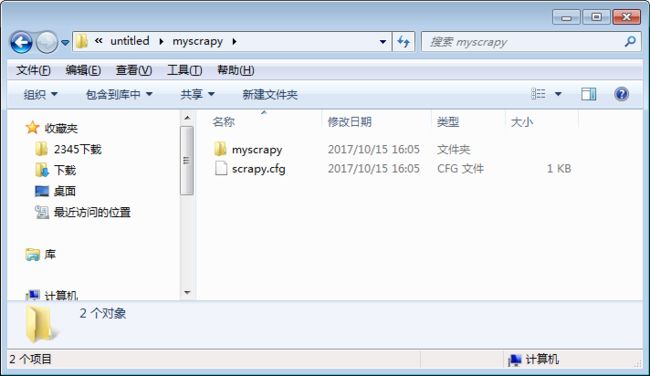
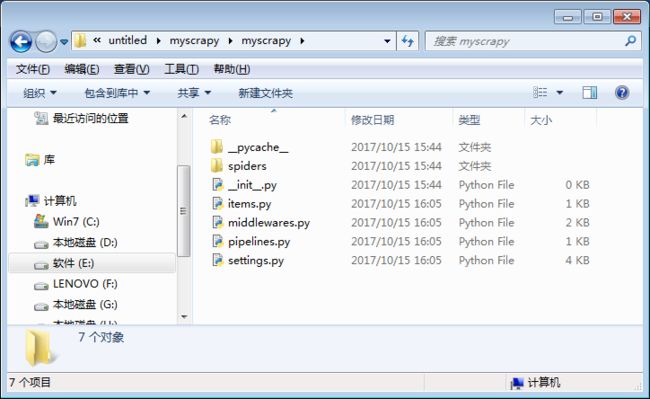
scrapy startproject myscrapy:创建名为myscrapy的爬虫项目,自动生成如下目录
目录结构:
-
myscrapy/scrapy.cfg:爬虫项目配置文件 -
myscrapy/myscrapy/items.py:数据容器文件,定义获取的数据 -
myscrapy/myscrapy/pipelines.py:管道文件,对items定义的数据进行加工处理 -
myscrapy/myscrapy/settings.py:设置文件 -
myscrapy/myscrapy/spiders:放置爬虫文件 -
myscrapy/myscrapy/middleware.py:下载中间件文件
参数控制:
-
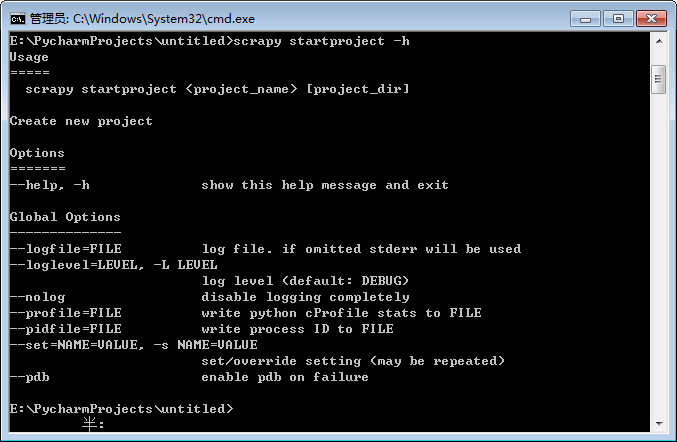
scrapy startproject --logfile="../logf.log" myscrapy
在创建myscrapy爬虫项目同时在指定地址创建名为logf的日志文件 -
scrapy startproject --loglevel=DEBUG myscrapy
创建项目同时指定日志信息的等级为DEBUG模式(默认),等级表如下:
| 等级名 | 含义 |
|---|---|
CRITICAL |
发生最严重的错误 |
ERROR |
发生必须立即处理的错误 |
WARNING |
出现警告信息,存在潜在错误 |
INFO |
输出提示信息 |
DEBUG |
输出调试信息,常用于开发阶段 |
-
scrapy startproject --nolog myscrapy
创建项目同时指定不输出日志
2)常用工具命令
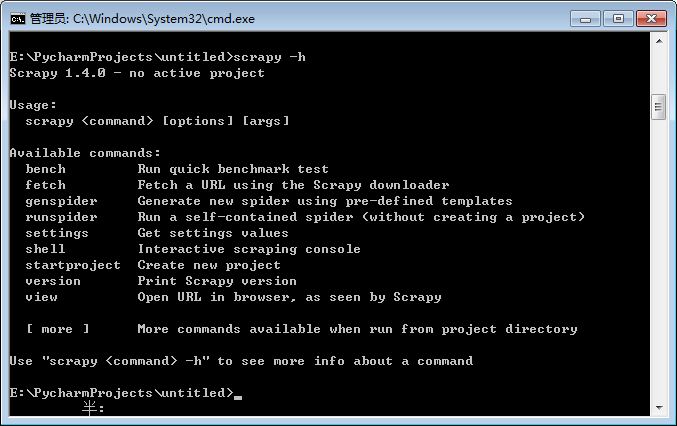
全局命令:(项目文件夹外scrapy -h)
-
scrapy fetch http://www.baidu.com:显示爬取网站的过程 -
scrapy fetch --headers --nolog http://www.baidu.com:显示头信息不显示日志信息 -
scrapy runspider 爬虫文件.py -o xxx/xxx.xxx:运行指定爬虫文件并将爬取结果存储在指定文件内 -
scrapy setting --get BOT_NAME:项目内执行为项目名,项目外执行为scrapybot -
scrapy shell http://www.baidu.com --nolog:爬取百度首页创建一个交互终端环境并设置为不输出日志信息。
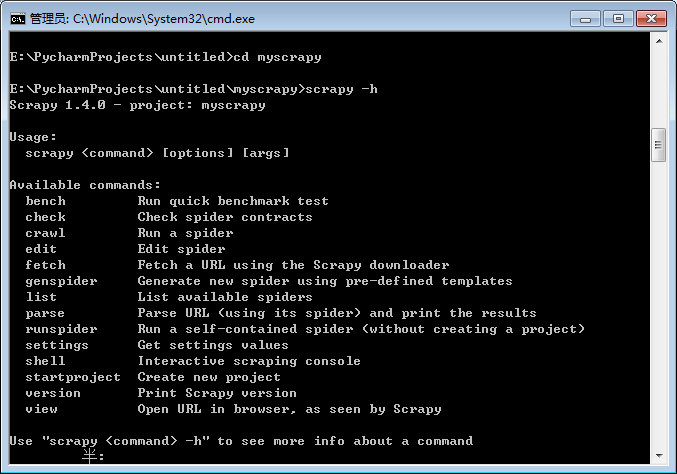
项目命令:(项目文件夹内scrapy -h)
-
scrapy bench:测试本地硬件性能 -
scrapy genspider -l:查看可使用的爬虫模板
-
scrapy genspider -d 模板名:查看爬虫模板内容 -
scrapy genspider -t 模板名 爬虫名 要爬取的网站域名:快速创建一个爬虫文件 -
scrapy check 爬虫名:对爬虫文件进行合同测试 -
scrapy crawl 爬虫名:启动爬虫 -
scrapy list:显示可以使用的爬虫文件 -
scrapy edit 爬虫名:编辑爬虫文件(Windows下执行有问题) -
scrapy parse 网站URL:获取指定URL网站内容,并使用对应爬虫文件处理分析,可设置的常用参数如下:
| 参数 | 含义 |
|---|---|
--spider==SPIDER |
指定某个爬虫文件进行处理 |
-a NAME=VALUE |
设置爬虫文件参数 |
--pipelines |
通过pipelines处理items |
--nolinks |
不展示提取到的链接信息 |
--noitems |
不展示得到的items |
--nocolour |
输出结果颜色不高亮 |
--rules,-r |
使用CrawlSpider规则处理回调函数 |
--callback=CALLBACK,-c CALLBACK |
指定spider中用于处理返回的响应的回调函数 |
--depth=DEPTH,-d DEPTH |
设置爬取深度,默认为1 |
--verbose,-v |
显示每层的详细信息 |
3)Items编写
import scrapy
class MyscrapyItem(scrapy.Item):
    # define the fields for your item here like:
    name = scrapy.Field()
    ...
格式:数据名 = scrapy.Field()
实例化:item = MyscrapyItem(name = "xxx",...)
调用:item["name"]、item.keys()、 item.items()(可以看做字典使用)
4)Spider编写(BasicSpider)
# -*- coding: utf-8 -*-
import scrapy
class MyspiderSpider(scrapy.Spider):
    name = 'myspider' # 爬虫名
    allowed_domains = ['baidu.com']
    start_urls = ['http://baidu.com/']

    def parse(self, response):
        pass
-
allowed_domains:允许爬取的域名,当开启OffsiteMiddleware时,非允许的域名对应的网址会自动过滤,不再跟进。 -
start_urls:爬取的起始网址,如果没有指定爬取的URL网址,则从该属性中定义的网址开始进行爬取,可指定多个起始网址,网址间用逗号隔开。 -
parse方法:如果没有特别指定回调函数,该方法是处理Scrapy爬虫爬行到的网页响应(response)的默认方法,通过该方法,可以对响应进行处理并返回处理后的数据,同时该方法也负责链接的跟进。
| 其他方法 | 含义 |
|---|---|
start_requests() |
该方法默认读取start_urls属性中定义的网址(也可自定义),为每个网址生成一个Request请求对象,并返回可迭代对象 |
make_requests_from_url(url) |
该方法会被start_requests() 调用,负责实现生成Request请求对象 |
close(reason) |
关闭Spider时调用 |
log(message[,level, component]) |
实现在Spider中添加log |
__init__() |
负责爬虫初始化的构造函数 |
# -*- coding: utf-8 -*-
import scrapy
from myscrapy.items import MyscrapyItem

class MyspiderSpider(scrapy.Spider):
    name = 'myspider'
    allowed_domains = ['baidu.com']
    start_urls = ['http://baidu.com/']
    my_urls = ['http://baidu.com/', 'http://baidu.com/']

    # 重写该方法可读取自己定义的URLS,不重写时默认从start_urls中读取起始网址
    def start_requests(self):
        for url in self.my_urls:
            # 调用默认make_requests_from_url()生成具体请求并迭代返回
            yield self.make_requests_from_url(url)

    def parse(self, response):
        item = MyscrapyItem()
        item["name"] = response.xpath("/html/head/title/text()")
        print(item["name"])
5)XPath基础
-
/:选择某个标签,可多层标签查找 -
//:提取某个标签的所有信息 -
test():获取该标签的文本信息 -
//Z[@X="Y"]:获取所有属性X的值是Y的标签的内容
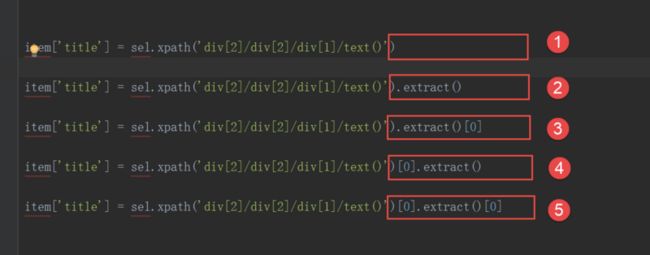
- 返回一个SelectorList 对象
- 返回一个list、里面是一些提取的内容
- 返回2中list的第一个元素(如果list为空抛出异常)
- 返回1中SelectorList里的第一个元素(如果list为空抛出异常),和3达成的效果一致
- 4返回的是一个str, 所以5会返回str的第一个字符
6)Spider类参数传递(通过-a选项实现参数的传递)
# -*- coding: utf-8 -*-
import scrapy
from myscrapy.items import MyscrapyItem

class MyspiderSpider(scrapy.Spider):
    name = 'myspider'
    allowed_domains = ['baidu.com']
    start_urls = ['http://baidu.com/']
    # 重写初始化方法,并设置参数myurl
    def __init__(self, myurl=None, *args, **kwargs):
        super(MyspiderSpider, self).__init__(*args, **kwargs)
        myurllist = myurl.split(",")
        # 输出要爬的网站
        for i in myurllist:
            print("爬取网站:%s" % i)
        # 重新定义start_urls属性
        self.start_urls = myurllist

    def parse(self, response):
        item = MyscrapyItem()
        item["name"] = response.xpath("/html/head/title/text()")
        print(item["name"])
命令行:scrapy crawl myspider -a myurl=http://www.sina.com.cn,http://www.baidu.com --nolog
7)XMLFeedSpider
# -*- coding: utf-8 -*-
from scrapy.spiders import XMLFeedSpider

class MyxmlSpider(XMLFeedSpider):
    name = 'myxml'
    allowed_domains = ['sina.com.cn']
    start_urls = ['http://sina.com.cn/feed.xml']
    iterator = 'iternodes'  # you can change this; see the docs
    itertag = 'item'  # change it accordingly

    def parse_node(self, response, selector):
        i = {}
        # i['url'] = selector.select('url').extract()
        # i['name'] = selector.select('name').extract()
        # i['description'] = selector.select('description').extract()
        return i
-
iterator:设置迭代器,默认iternodes(基于正则表达式的高性能迭代器),此外还有html、xml -
itertag:设置开始迭代的节点 -
parse_node(self, response, selector):在节点与所提供的标签名相符合的时候被调用,可进行信息的提取和处理操作
| 其他属性或方法 | 含义 |
|---|---|
namespaces |
以列表形式存在,主要定义在文档中会被爬虫处理的可用命名空间 |
adapt_response(response) |
主要在spider分析响应(Response)前被调用 |
process_results(response, results) |
主要在spider返回结果时被调用,对结果在返回前进行最后处理 |
8)CSVFeedSpider
CSV:一种简单、通用的文件格式,其存储的数据可以与表格数据相互转化。最原始的形式是纯文本形式,列之间通过,间隔,行之间通过换行间隔。
# -*- coding: utf-8 -*-
from scrapy.spiders import CSVFeedSpider

class MycsvSpider(CSVFeedSpider):
    name = 'mycsv'
    allowed_domains = ['iqianyue.com']
    start_urls = ['http://iqianyue.com/feed.csv']
    # headers = ['id', 'name', 'description', 'image_link']
    # delimiter = '\t'

    # Do any adaptations you need here
    #def adapt_response(self, response):
    #    return response

    def parse_row(self, response, row):
        i = {}
        #i['url'] = row['url']
        #i['name'] = row['name']
        #i['description'] = row['description']
        return i
-
headers:存放CSV文件包含的用于提取字段行信息的列表 -
delimiter:主要存放字段之间的间隔符,csv文件以,间隔 -
parse_row(self, response, row):用于接收Response对象,并进行相应处理
9)CrawlSpider(自动爬取)
class MycrawlSpider(CrawlSpider):
    name = 'mycrawl'
    allowed_domains = ['sohu.com']
    start_urls = ['http://sohu.com/']
    # 自动爬取规则
    rules = (
        Rule(LinkExtractor(allow=r'Items/'), callback='parse_item', follow=True),
    )

    def parse_item(self, response):
        i = {}
        #i['domain_id'] = response.xpath('//input[@id="sid"]/@value').extract()
        #i['name'] = response.xpath('//div[@id="name"]').extract()
        #i['description'] = response.xpath('//div[@id="description"]').extract()
        return i
-
rules:设置自动爬取规则,规则Rule的参数如下: -
LinkExtractor:链接提取器,用来提取页面中满足条件的链接,以供下次爬取使用,可设置的参数如下
| 参数名 | 含义 |
|---|---|
allow |
提取符合对应正则表达式的链接 |
deny |
不提取符合对应正则表达式的链接 |
restrict_xpaths |
使用XPath表达式与allow共同作用,提取出同时符合两者的链接 |
allow_domains |
允许提取的域名,该域名下的链接才可使用 |
deny_domains |
禁止提取的域名,限制不提取该域名下的链接 |
-
callback='parse_item':处理的回调方法 -
follow=True:是否跟进。CrawlSpider爬虫会根据链接提取器中设置的规则自动提取符合条件的网页链接,提取之后再自动的对这些链接进行爬取,形成循环,如果链接设置为跟进,则会一直循环下去,如果设置为不跟进,则第一次循环后就会断开。
10)避免爬虫被禁止(settings.py内设置)
- 禁止Cookie:(应对通过用户Cookie信息对用户识别和分析的网站)
# Disable cookies (enabled by default)
COOKIES_ENABLED = False
- 设置下载延时:(设置爬取的时间间隔,应对通过网页访问(爬取)频率进行分析的网站)
# Configure a delay for requests for the same website (default: 0)
# See http://scrapy.readthedocs.org/en/latest/topics/settings.html#download-delay
# See also autothrottle settings and docs
#DOWNLOAD_DELAY = 3
- IP池:(应对检验用户IP的网站)
在middlewares.py中或新创建一个Python文件中编写:
import random
from scrapy.contrib.downloadermiddleware.httpproxy import HttpProxyMiddleware

class IPPOOLS(HttpProxyMiddleware):
    myIPPOOL = ["183.151.144.46:8118",
                "110.73.49.52:8123",
                "123.55.2.126:808"]
    # process_request()方法,主要进行请求处理
    def process_request(self, request, spider):
        # 随机选择一个IP
        thisip = random.choice(self.myIPPOOL)
        # 将IP添加为具体代理,用该IP进行爬取
        request.meta["proxy"] = "http://" + thisip
        # 输出观察
        print('当前使用IP:%s' % request.meta["proxy"])
设置为默认下载中间件:
# Enable or disable downloader middlewares
# See http://scrapy.readthedocs.org/en/latest/topics/downloader-middleware.html
DOWNLOADER_MIDDLEWARES = {
    'scrapy.contrib.downloadermiddleware.httpproxy.HttpProxyMiddleware': 123,
    # 格式:'下载中间件所在目录.下载中间件文件名.下载中间件内部要使用的类':数字(有规定)
    'myscrapy.middlewares.IPPOOLS': 125
}
- 用户代理池
在middlewares.py中或新创建一个Python文件中编写:
import random
from scrapy.downloadermiddlewares.useragent import UserAgentMiddleware

class UAPOOLS(UserAgentMiddleware):
    myUApool = [
        "Mozilla/5.0 (Windows NT 6.1; WOW64) AppleWebKit/537.36 \
        (KHTML, like Gecko) Chrome/49.0.2623.221 Safari/537.36 SE 2.X MetaSr 1.0",
        "Mozilla/5.0 (Windows NT 6.1; WOW64) AppleWebKit/537.36 \
        (KHTML, like Gecko) Chrome/60.0.3112.113 Safari/537.36",
    ]

    def process_request(self, request, spider):
        thisUA = random.choice(self.myUApool)
        request.headers.setdefault('User-Agent', thisUA)
        print("当前使用UA: %s" % thisUA)
设置为默认下载中间件:
# Enable or disable downloader middlewares
# See http://scrapy.readthedocs.org/en/latest/topics/downloader-middleware.html
DOWNLOADER_MIDDLEWARES = {
    'myscrapy.middlewares.UAPOOLS': 1,
    'scrapy.contrib.downloadermiddleware.useragent.UserAgentMiddleware': 2,
}
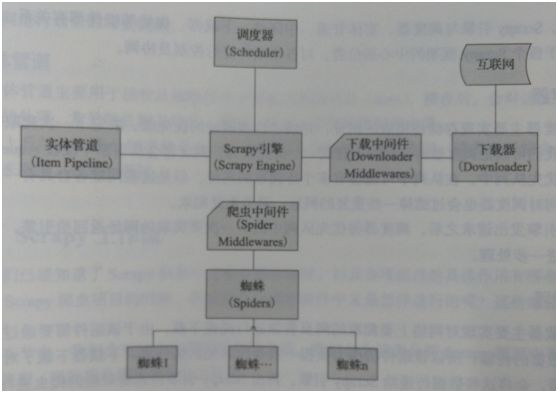
(4)Scrapy核心框架
- Scrapy引擎:框架核心,控制整个数据处理流程,以及触发一些事务处理。
- 调度器:存储待爬取的网址,并确定网址优先级,同时会过滤一些重复的网址。
- 下载器:对网页资源进行高速下载,然后将这些数据传递给Scrapy引擎,再由引擎传递给爬虫进行处理。
- 下载中间件:下载器与引擎间的特殊组件,处理其之间的通信。
- 爬虫:接收并分析处理引擎的Response响应,提取所需数据。
- 爬虫中间件:爬虫与引擎间的特殊组件,处理其之间的通信。
- 实体管道:接收爬虫组件中提取的数据,如:清洗、验证、存储至数据库等
(5)Scrapy输出与存储
1)中文存储
setting.py设置pipelines
# Configure item pipelines
# See http://scrapy.readthedocs.org/en/latest/topics/item-pipeline.html
ITEM_PIPELINES = {
    'myscrapy.pipelines.MyscrapyPipeline': 300,
}
import codecs
class MyscrapyPipeline(object):
    def __init__(self):
        # 以写入的方式创建或打开要存入数据的文件
        self.file = codecs.open('E:/xxx/mydata.txt',
                                'wb',
                                encoding="utf-8")
    # 主要处理方法,默认自动调用
    def process_item(self, item, spider):
        content = str(item) + '\n'
        self.file.write(content)
        return item
    # 关闭爬虫时调用
    def close_spider(self, spider):
        self.file.close()
注意:要想执行
process_item(),爬虫文件parse()方法中必须返回item:yield item
2)Json输出
import codecs
import json
class MyscrapyPipeline(object):
    def __init__(self):
        print("创建pip")
        # 以写入的方式创建或打开要存入数据的文件
        self.file = codecs.open('E:/PycharmProjects/untitled/myscrapy/data/mydata.txt',
                                'wb',
                                encoding="utf-8")

    def process_item(self, item, spider):
        js = json.dumps(dict(item), ensure_ascii=False)
        content = js + '\n'
        self.file.write(content)
        return item

    # 关闭爬虫时调用
    def close_spider(self, spider):
        self.file.close()
注意:
- 爬虫文件
parse()方法中,由response.xpath("xxx/text()")返回的SelectorList 对象不能转换为Json类型,需要response.xpath("xxx/text()").extract()转化为字符串列表类型才可转化为Json类型。json.dumps(dict(item), ensure_ascii=False):进行json.dumps()序列化时,中文信息默认使用ASCII编码,当设定不使用ASCII编码时,中文信息就可以正常显示
3)数据库操作
- 安装:
pip install pymysql3 - 导入:
import pymysql - 链接MySQL:
conn = pymysql.connect(host="主机名", user="账号", passwd="密码"[, db="数据库名"]) - SQL语句执行:
conn.query("SQL语句") - 查看表内容:
# cursor()创建游标
cs = conn.cursor()
# execute()执行对应select语句
cs.execute("select * from mytb")
# 遍历
for i in cs:
    print("当前是第"+str(cs.rownumber)+"行")
    print(i[x])
四、Scrapy文档实例
(1)循环爬取http://quotes.toscrape.com/网站
import scrapy
class MyxpathSpider(scrapy.Spider):
    name = 'myxpath'
    allowed_domains = ['toscrape.com']
    start_urls = ['http://quotes.toscrape.com/']

    def parse(self, response):
        for quote in response.css('div.quote'):
            yield {
                'text': quote.css('span.text::text').extract_first(),
                'author': quote.xpath('span/small/text()').extract_first(),
            }

        next_page = response.css('li.next a::attr("href")').extract_first()
        if next_page is not None:
            yield response.follow(next_page, self.parse)
循环爬取时,注意循环的下个网页需在
allowed_domains域名下,否则会被过滤,从而无法循环


