作者: 一字马胡
转载标志 【2017-11-26】
更新日志
| 日期 | 更新内容 | 备注 |
|---|---|---|
| 2017-11-26 | 新建文章 | Spring 5 WebFlux demo |
Reactor
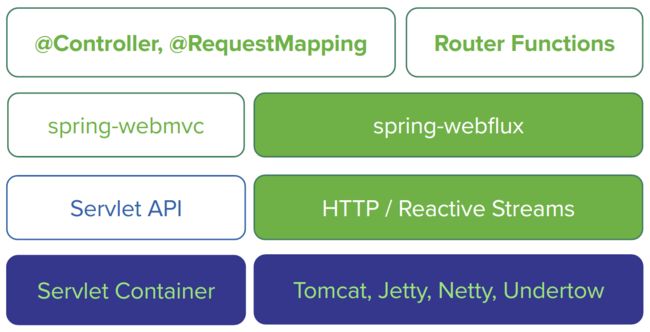
Spring 5的一大亮点是对响应式编程的支持,下面的图片展示了传统Spring Web MVC结构以及Spring 5中新增加的基于Reactive Streams的Spring WebFlux框架,可以使用webFlux模块来构建异步的、非堵塞的、事件驱动的服务,在伸缩性方面表现非常好。
从上面的结构图中可以看出,WebFlux模块从上到下依次是Router Functions,WebFlux,Reactive Streams三个新组件,WebFlux模块需要运行在实现了Servlet 3.1+规范的容器之上,Servlet 3.1规范中新增了对异步处理的支持,在新的Servlet规范中,Servlet线程不需要一直阻塞等待直到业务处理完成,也就是说,Servlet线程将不需要等待业务处理完成再进行结果输出,然后再结束Servlet线程,而是在接到新的请求之后,Servlet线程可以将这个请求委托给另外一个线程(业务线程)来完成,Servlet线程将委托完成之后变返回到容器中去接收新的请求,Servlet 3.1 规范特别适用于那种业务处理非常耗时的场景之下,可以减少服务器资源的占用,并且提高并发处理速度,而对于那些能快速响应的场景收益并不大。下面介绍上图中webFlux各个模块:
- Router Functions: 对标@Controller,@RequestMapping等标准的Spring MVC注解,提供一套函数式风格的API,用于创建Router,Handler和Filter。
- WebFlux: 核心组件,协调上下游各个组件提供响应式编程支持。
- Reactive Streams: 一种支持背压(Backpressure)的异步数据流处理标准,主流实现有RxJava和Reactor,Spring WebFlux默认集成的是Reactor。
上面提到WebFlux默认集成的Reactive Streams组件是Reactor,Reactor类似于RxJava 2.0,同属于第四代响应式框架,下面主要介绍一下Reactor中的两个关键概念,Flux以及Mono。
Flux
如果去查看源代码的话,可以发现,Flux和Mono都实现了Reactor的Publisher接口,从这里可以看出,Flux和Mono属于事件发布者,类似与生产者,对消费者提供订阅接口,当有事件发生的时候,Flux或者Mono会通过回调消费者的相应的方法来通知消费者相应的事件,这也就是所谓的相应式编程模型,生产者和消费者减耦,它们之间通过实现一个共同的方法组来实现相互联系(生产者通知事件是通过回调消费者的方法,而实现通知很多时候是通过代理)。
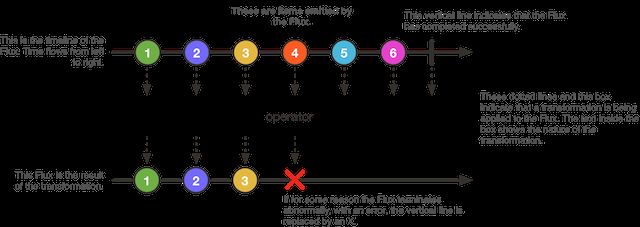
下面这张图是Flux的工作流程图:
可以从这张图中很明显的看出来Flux的工作模式,可以看出Flux可以emit很多item,并且这些item可以经过若干Operators然后才被subscrib,下面是使用Flux的一个小例子:
Flux.fromIterable(getSomeLongList())
    .mergeWith(Flux.interval(100))
    .doOnNext(serviceA::someObserver)
    .map(d -> d * 2)
    .take(3)
    .onErrorResumeWith(errorHandler::fallback)
    .doAfterTerminate(serviceM::incrementTerminate)
    .subscribe(System.out::println);
Mono
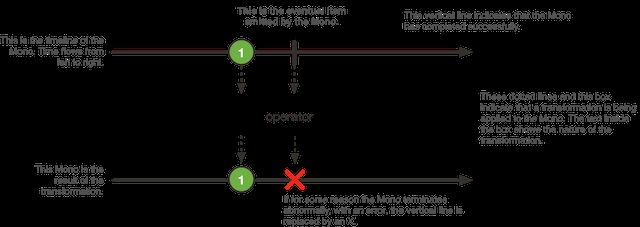
下面的图片展示了Mono的处理流程,可以很直观的看出来Mono和Flux的区别:
Mono只能emit最多只能emit一个item,下面是使用Mono的一个小例子:
Mono.fromCallable(System::currentTimeMillis)
    .flatMap(time -> Mono.first(serviceA.findRecent(time), serviceB.findRecent(time)))
    .timeout(Duration.ofSeconds(3), errorHandler::fallback)
    .doOnSuccess(r -> serviceM.incrementSuccess())
    .subscribe(System.out::println);
WebFlux实战
上文中简单介绍了Reactor的两个重要组件Flux和Mono,本文将介绍如何使用Spring 5的新组件WebFlux来进行应用开发,对于WebFlux底层的实现细节不在本文的分析范围之内,当然本文也不会分析总结Spring 5的新特性,这些内容将在其他的文章中进行分析总结,下面将完整的描述一个使用WebFlux的步骤。
首先需要新建一个Spring项目,然后添加Spring 5的依赖,下面是添加的maven依赖:
        5.0.0.RELEASE


            org.reactivestreams
            reactive-streams


            io.projectreactor
            reactor-core


            io.projectreactor.ipc
            reactor-netty


            org.apache.tomcat.embed
            tomcat-embed-core
            8.5.4


            org.springframework
            spring-context
            ${spring.version}


            org.springframework
            spring-webflux
            ${spring.version}


            com.fasterxml.jackson.core
            jackson-databind
            2.9.1


            org.apache.logging.log4j
            log4j-core
            2.9.1


            junit
            junit
            4.12
            test


            org.springframework
            spring-test
            ${spring.version}
            test
然后定义ViewModel类,下面是本文例子涉及的model类定义:
/**
 * Created by hujian06 on 2017/11/23.
 *
 * the result model
 */
public class ResultModel {

    private int id;
    private String content;

    public ResultModel() {

    }

    /**
     * read property from json string
     * @param id id
     * @param content data
     */
    public ResultModel(@JsonProperty("id") int id,
                       @JsonProperty("context") String content) {
        this.id = id;
        this.content = content;
    }
}

public class ResultViewModel {

    private int code;
    private String message;
    private ResultModel data;
}
上面的ResultViewModel类是最后将要返回的Vo类,包含了code、message以及data这三个标准返回内容,响应内容将以json格式返回。下面介绍Service的实现细节,可以从上面Vo类中的ResultModel中看出返回内容很简单,就是id和Content,下面首先mock几个数据:
    //*************mock data**************//
    private static List resultModelList = new ArrayList<>();

    static {
        ResultModel model = new ResultModel();
        model.setId(1);
        model.setContent("This is first model");
        resultModelList.add(model);

        model = new ResultModel();
        model.setId(2);
        model.setContent("This is second model");
        resultModelList.add(model);
    }
在本例中要实现的接口包括查询单个内容(根据id)、查询所有内容、插入数据。下面分别介绍每一个接口的山西爱你细节,首先是根据id查询单个内容的实现:
    /**
     * get the result by the pathVar {"id"}
     * @param serverRequest the request
     * @return the result model
     */
    public Mono extraResult(ServerRequest serverRequest) {
        int id = Integer.parseInt(serverRequest.pathVariable("id"));
        ResultModel model = null;
        ResultViewModel resultViewModel;

        for (ResultModel m : resultModelList) {
            if (m.getId() == id) {
                model = m;
                break;
            }
        }

        if (model != null) {
            resultViewModel = new ResultViewModel(200, "ok", model);
        } else {
            resultViewModel = ResultViewModel.EMPTY_RESULT;
        }

        //return the result.
        return Mono.just(resultViewModel);
    }
需要注意的是,和传统的MVC Controller不同,Reactive Controller操作的是非阻塞的ServerRequest和ServerResponse,而不再是Spring MVC里的HttpServletRequest和HttpServletResponse。上面的方法中最为关键的一点是最后的return语句,返回了一个Mono,并且这个Mono包含了查询的结果。下面是查询所有内容的方法细节:
    /**
     * return total result view
     * @param serverRequest the request
     * @return flux of total result model view
     */
    public Flux flowAllResult(ServerRequest serverRequest) {
        List result = new ArrayList<>();
        for (ResultModel model : resultModelList) {
            result.add(new ResultViewModel(200, "ok", model));
        }

        return Flux.fromIterable(result);
    }
这个方法的实现就非常简洁了,最后返回的内容是一个Flux,意味着这个方法会返回多个item,方法中使用了Flux的fromIterable静态方法来构造Flux,还有很多其他的静态方法来构造Flux,具体的内容可以参考源代码。最后是插入一条内容的方法实现:
    /**
     * the "write" api
     * @param serverRequest the request
     * @return the write object
     */
    public Mono putItem(ServerRequest serverRequest) {

        //get the object and put to list
        Mono model = serverRequest.bodyToMono(ResultModel.class);
        final ResultModel[] data = new ResultModel[1];

        model.doOnNext(new Consumer() {
            @Override
            public void accept(ResultModel model) {

                //check if we can put this data
                boolean check = true;
                for (ResultModel r : resultModelList) {
                    if (r.getId() == model.getId()) {
                        check= false;
                        break;
                    }
                }

                if (check) {
                    data[0] = model;
                    //put it!
                    resultModelList.add(model);
                } else {
                    data[0] = null; //error
                }
            }
        }).thenEmpty(Mono.empty());

        ResultViewModel resultViewModel;
        if (data[0] == null) { //error
            resultViewModel = new ResultViewModel(200, "ok", data[0]);
        } else { //success
            resultViewModel = ResultViewModel.EMPTY_RESULT;
        }

        //return the result
        return Mono.just(resultViewModel);
    }
这个方法看起来优点费解,首先通过ServerRequest的body构造除了一个Mono(通过bodyToMono方法),然后通过调用这个Mono的doOnNext方法来进行具体的插入逻辑处理。这个时候就需要看Reactor的另外一个重要的角色Subscriber了,也就是所谓的订阅者,或者消费者,下面是Subscriber提供的几个方法:
    /**
     * Invoked after calling {@link Publisher#subscribe(Subscriber)}.
     *
     * No data will start flowing until {@link Subscription#request(long)} is invoked.
     *
     * It is the responsibility of this {@link Subscriber} instance to call {@link Subscription#request(long)} whenever more data is wanted.
     *
     * The {@link Publisher} will send notifications only in response to {@link Subscription#request(long)}.
     *
     * @param s
     *            {@link Subscription} that allows requesting data via {@link Subscription#request(long)}
     */
    public void onSubscribe(Subscription s);

    /**
     * Data notification sent by the {@link Publisher} in response to requests to {@link Subscription#request(long)}.
     *
     * @param t the element signaled
     */
    public void onNext(T t);

    /**
     * Failed terminal state.
     *
     * No further events will be sent even if {@link Subscription#request(long)} is invoked again.
     *
     * @param t the throwable signaled
     */
    public void onError(Throwable t);

    /**
     * Successful terminal state.
     *
     * No further events will be sent even if {@link Subscription#request(long)} is invoked again.
     */
    public void onComplete();
结合所谓的响应式编程模型,publisher在做一件subscriber委托的事情的关键节点的时候需要通知subscribe,比如开始做、出错、完成。关于响应式编程模型的具体分析总结,等完成了RxJava 2.0的相关分析总结之后再来补充。到此为止本例的Service已经编写完成了,下面来编写handler,handler其实是对Service的一层包装,将返回类型包装成ServerResponse,因为是包装,所以只展示根据id查询内容的接口的包装细节:
    /**
     * get the result from service first, then trans the result to {@code ServerResponse}
     * @param serverRequest the req
     * @return the ServerResponse
     */
    public Mono extraResult(ServerRequest serverRequest) {
        //get the result from service
        //todo : do some check here.

        Mono resultViewModelMono = resultService.extraResult(serverRequest);

        Mono notFound = ServerResponse.notFound().build();

        //trans to ServerResponse and return.
        //todo : too many code

        return resultViewModelMono.flatMap(new Function>() {
            @Override
            public Mono apply(ResultViewModel resultViewModel) {
                return ServerResponse
                        .ok()
                        .contentType(APPLICATION_JSON)
                        .body(fromObject(resultViewModel));
            }
        }).switchIfEmpty(notFound);
    }
ServerResponse提供了丰富的静态方法来支持将Reactor类型的结果转换为ServerResponse,到目前为止,业务层面已经编写完成,现在可以开始来进行router的编程了,router就和他的意义一样就是用来路由的,将url路由给具体的handler来实现处理,WebFlux需要返回一个RouterFunction来进行设置路由信息,下面是本例子中使用到的RouterFunction细节:
    /**
     * build the router
     * @return the router
     */
    public RouterFunction buildResultRouter() {
        return RouterFunctions
                .route(RequestPredicates.GET("/s5/get/{id}")
                        .and(RequestPredicates
                                .accept(MediaType.APPLICATION_JSON_UTF8)), requestHandler::extraResult)
                .andRoute(RequestPredicates.GET("/s5/list")
                        .and(RequestPredicates
                                .accept(MediaType.APPLICATION_JSON_UTF8)), requestHandler::listResult)
                .andRoute(RequestPredicates.POST("/s5/put/")
                        .and(RequestPredicates
                                .accept(MediaType.APPLICATION_JSON_UTF8)), requestHandler::createView);
    }
可以发现,其实就是将一个url和一个handler的具体方法绑定在一起来实现将一个url路由给一个handler方法进行处理,RequestPredicates提供了大量有用的静态方法进行该部分的工作,具体的内容可以参考RequestPredicates的源码以及在项目中多实践积累。到目前为止,一个url请求可以路由到一个handler进行处理了,下面将使用Netty或者Tomcat来将这个例子运行起来,并且进行测试,文章开头提到,WebFlux需要运行在实现了Servlet 3.1规范的容器中,而包括Tomcat、Jetty、Netty等都有实现,但是推荐使用Netty来运行WebFlux应用,因为Netty是非阻塞异步的,和WebFlux搭配效果更佳。所以下面的代码展示了如何使用Netty来启动例子:
    public void nettyServer() {

        RouterFunction router = buildResultRouter();

        HttpHandler httpHandler = RouterFunctions.toHttpHandler(router);

        ReactorHttpHandlerAdapter httpHandlerAdapter = new ReactorHttpHandlerAdapter(httpHandler);

        //create the netty server
        HttpServer httpServer = HttpServer.create("localhost", 8600);

        //start the netty http server
        httpServer.newHandler(httpHandlerAdapter).block();

        //block
        try {
            System.in.read();
        } catch (IOException e) {
            e.printStackTrace();
        }
    }
如何想使用Tomcate来启动例子,则可以参考下面的例子:
    public void tomcatServer() {

        RouterFunction route = buildResultRouter();
        HttpHandler httpHandler = toHttpHandler(route);

        Tomcat tomcatServer = new Tomcat();
        tomcatServer.setHostname("localhost");
        tomcatServer.setPort(8600);
        Context rootContext = tomcatServer.addContext("", System.getProperty("java.io.tmpdir"));
        ServletHttpHandlerAdapter servlet = new ServletHttpHandlerAdapter(httpHandler);
        Tomcat.addServlet(rootContext, "httpHandlerServlet", servlet);
        rootContext.addServletMapping("/", "httpHandlerServlet");
        try {
            tomcatServer.start();
        } catch (LifecycleException e) {
            e.printStackTrace();
        }

        //block
        try {
            System.in.read();
        } catch (IOException e) {
            e.printStackTrace();
        }
    }
运行项目之后,就可以测试是否成功了,下面是一个测试:
curl http://127.0.0.1:8600/s5/get/1
{
  "code":200,
  "message":"ok",
  "data": {
       "id":1,
       "content":"This is first model"
       }
}

curl http://127.0.0.1:8600/s5/list
[
  {
    "code":200,
    "message":"ok",
    "data": {
         "id":1,
         "content":"This is first model"
         }
  },
  {
     "code":200,
     "message":"ok",
     "data": {
           "id":2,
           "content":"This is second model"
           }
  }
]


