先举个例子看看执行结果
class InBoundHandlerA extends ChannelInboundHandlerAdapter {

    @Override
    public void channelRead(ChannelHandlerContext ctx, Object msg) throws Exception {
        ByteBuf in = ((ByteBuf) msg);
        System.out.println("InBoundHandlerA channelRead " + in.toString(CharsetUtil.UTF_8));
        super.channelRead(ctx, msg);
    }
}

class InBoundHandlerC extends ChannelInboundHandlerAdapter {

    @Override
    public void channelActive(ChannelHandlerContext ctx) throws Exception {
        super.channelActive(ctx);
        // 打印 OutboundHandlerC -> OutboundHandlerB  ->  OutboundHandlerA 从尾部开始往前找 outbound
        ctx.channel().writeAndFlush("write in InBoundHandlerC");
        // 只打印 OutboundHandlerB  ->  OutboundHandlerA 从当前 handler 往前找 outbound
        // ctx.writeAndFlush("write in InBoundHandlerC");
    }

    @Override
    public void channelRead(ChannelHandlerContext ctx, Object msg) throws Exception {
        ByteBuf in = ((ByteBuf) msg);
        System.out.println("InBoundHandlerC channelRead " + in.toString(CharsetUtil.UTF_8));
        super.channelRead(ctx, msg);
    }
}

class OutboundHandlerA extends ChannelOutboundHandlerAdapter {
    @Override
    public void write(ChannelHandlerContext ctx, Object msg, ChannelPromise promise) throws Exception {
        System.out.println("OutboundHandlerA");
        super.write(ctx, msg, promise);
    }
}

public void start() {
    NioEventLoopGroup boss = new NioEventLoopGroup();
    NioEventLoopGroup worker = new NioEventLoopGroup();

    ServerBootstrap serverBootstrap = new ServerBootstrap();
    serverBootstrap.group(boss, worker)
            .channel(NioServerSocketChannel.class)
            .childHandler(new ChannelInitializer() {
                @Override
                protected void initChannel(NioSocketChannel ch) throws Exception {
                    ch.pipeline().addLast(new InBoundHandlerA());
                    ch.pipeline().addLast(new OutboundHandlerA());
                    ch.pipeline().addLast(new InBoundHandlerB());
                    ch.pipeline().addLast(new OutboundHandlerB());
                    ch.pipeline().addLast(new InBoundHandlerC());
                    ch.pipeline().addLast(new OutboundHandlerC());
                }
            });

    serverBootstrap.bind(PORT)
            .addListener(future -> {
                System.out.println("服务端启动成功 port " + PORT);
            });
}
起一个 server 加入 3 个 InBoundHandler 和 3个 OutBoundHandler 打印一些 log。在 InBoundHandlerC channelActive 的时候写一些数据。
如果用 ctx.channel().writeAndFlush 将依次打印 OutboundHandlerC -> OutboundHandlerB -> OutboundHandlerA。
如果用 ctx.writeAndFlush 只会打印 OutboundHandlerB -> OutboundHandlerA。
不用专门写客户端,可以用 sokit 等 TCP 工具来测试
结论:ctx.channel().writeAndFlush 将从 Pipeline 的尾部开始往前找 OutboundHandler 。 ctx.writeAndFlush 会从当前 handler 往前找 OutboundHandler。
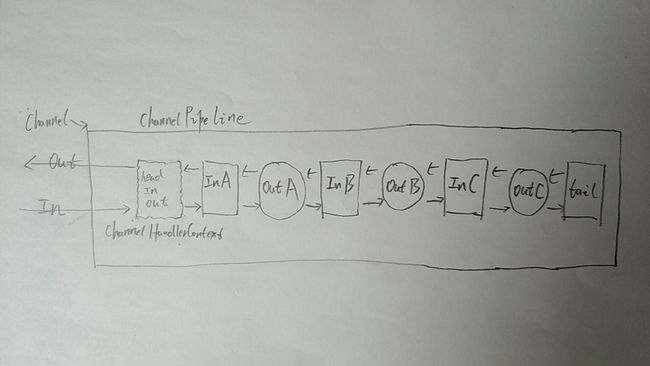
画了一个图
一个 Channel 底层对应一个 socket 连接。Channel 建立的时候会初始化一个 ChannelPipeline。 ChannelHandler 包裹在 ChannelHandlerContext 中,ChannelHandlerContext 以双向链表的的形式组织。
abstract class AbstractChannelHandlerContext extends DefaultAttributeMap
        implements ChannelHandlerContext, ResourceLeakHint {

    volatile AbstractChannelHandlerContext next;
    volatile AbstractChannelHandlerContext prev;

    private final boolean inbound;
    private final boolean outbound;
ChannelHandlerContext 包裹 ChannelHandler, 以双向链表组织,用 inbound 和 outbound 标志是 InBound 还是 OutBound。
public class DefaultChannelPipeline implements ChannelPipeline {
    final AbstractChannelHandlerContext head;
    final AbstractChannelHandlerContext tail;

    private final Channel channel;

    protected DefaultChannelPipeline(Channel channel) {
        tail = new TailContext(this);
        head = new HeadContext(this);

        head.next = tail;
        tail.prev = head;
    }
DefaultChannelPipeline 创建的时候会默认添加一个头结点和尾结点。tail 是一个 InBoundHandler ,head 既是 InBound 也是 OutBound。
@Override
public final ChannelPipeline addLast(EventExecutorGroup group, String name, ChannelHandler handler) {
    final AbstractChannelHandlerContext newCtx;
    synchronized (this) {
        checkMultiplicity(handler);

        newCtx = newContext(group, filterName(name, handler), handler);

        addLast0(newCtx);

        EventExecutor executor = newCtx.executor();
        if (!executor.inEventLoop()) {
            callHandlerAddedInEventLoop(newCtx, executor);
            return this;
        }
    }
    callHandlerAdded0(newCtx);
    return this;
}

private void addLast0(AbstractChannelHandlerContext newCtx) {
    AbstractChannelHandlerContext prev = tail.prev;
    newCtx.prev = prev;
    newCtx.next = tail;
    prev.next = newCtx;
    tail.prev = newCtx;
}
Handler 添加到 Pipeline 中的时候会组织起双向链表。
private static void checkMultiplicity(ChannelHandler handler) {
    if (handler instanceof ChannelHandlerAdapter) {
        ChannelHandlerAdapter h = (ChannelHandlerAdapter) handler;
        if (!h.isSharable() && h.added) {
            throw new ChannelPipelineException(
                    h.getClass().getName() +
                    " is not a @Sharable handler, so can't be added or removed multiple times.");
        }
        h.added = true;
    }
}
checkMultiplicity 检查一个 handler 的实例是不是被添加了多次。一个 handler 可以被添加到多个 Pipeline 中(对应多个Channel)。一个 Channel 只在一个特定的线程中执行(NioEventLoop),一个线程可以处理多个 Channel 。如果一个 handler 的实例被添加了多次必须标记为 @Sharable。如果一个 sharable 的 handler 被添加到多个 Pipleline 中要注意线程的安全性(一个 Channel 一个 Pipeline,多个 Channel 可能在同一个线程中执行,但大部分情况可能是在不同的线程中执行的)。
说了这么多还没到正题
ctx.channel().writeAndFlush其实调用的是 pipeline 的 writeAndFlush,里面又调用了 tail.writeAndFlush ,所以是从尾部往前找 Outbound。
@Override
public ChannelFuture writeAndFlush(Object msg) {
    return pipeline.writeAndFlush(msg);
}

@Override
public final ChannelFuture writeAndFlush(Object msg) {
    return tail.writeAndFlush(msg);
}

private void write(Object msg, boolean flush, ChannelPromise promise) {
    AbstractChannelHandlerContext next = findContextOutbound();
    final Object m = pipeline.touch(msg, next);
    EventExecutor executor = next.executor();
    if (executor.inEventLoop()) {
        if (flush) {
            next.invokeWriteAndFlush(m, promise);
        } else {
            next.invokeWrite(m, promise);
        }
    } else {

    }
}

private AbstractChannelHandlerContext findContextOutbound() {
    AbstractChannelHandlerContext ctx = this;
    do {
        ctx = ctx.prev;
    } while (!ctx.outbound);
    return ctx;
}
IDEA 中 cmd + alt + 鼠标左键可查看一个接口方法的实现类。
而 ctx.writeAndFlush 是从当前 handler 往前找 Outbound。
有时可灵活运用 ctx.writeAndFlush 来减少 handler 的传播路径。
为什么要这样设计两种情况???
